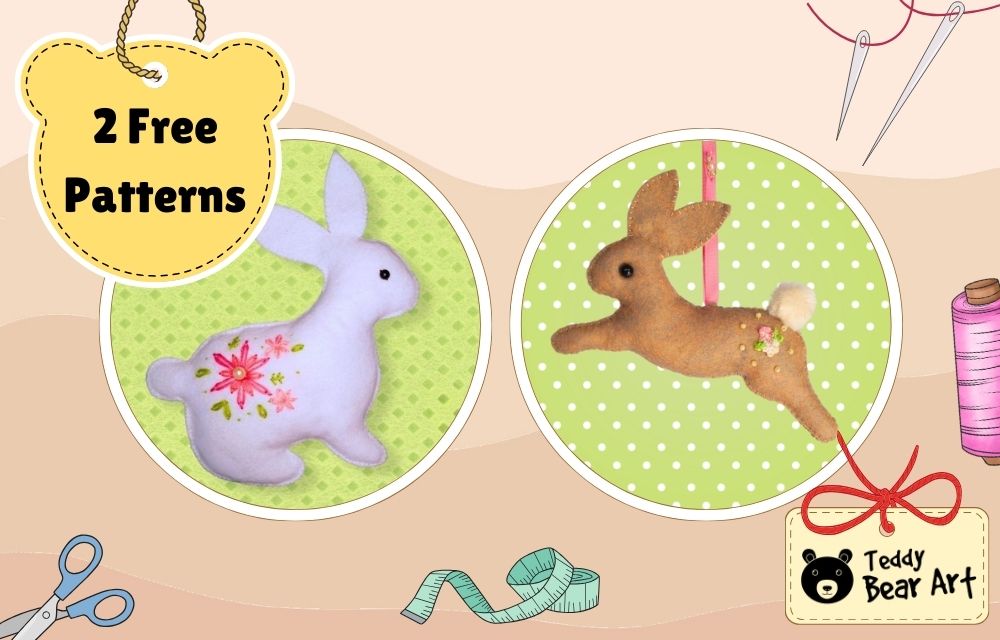
Easy felt rabbit sewing patterns are one of the most enjoyable ways to start sewing soft toys, especially if the goal is a quick project with a charming result. In this article, we share two easy felt rabbit sewing patterns that work well for both beginners and experienced makers. Felt is forgiving, simple to cut, and ideal for small handmade animals, which makes these bunny patterns perfect for relaxed creative time, gifts, or small craft projects.

These rabbit designs are intentionally uncomplicated. They do not require a sewing machine, complex shaping, or advanced techniques. With basic tools, a little felt, and some stuffing, it is possible to create sweet, handmade bunnies that look finished and professional while still being easy to sew.
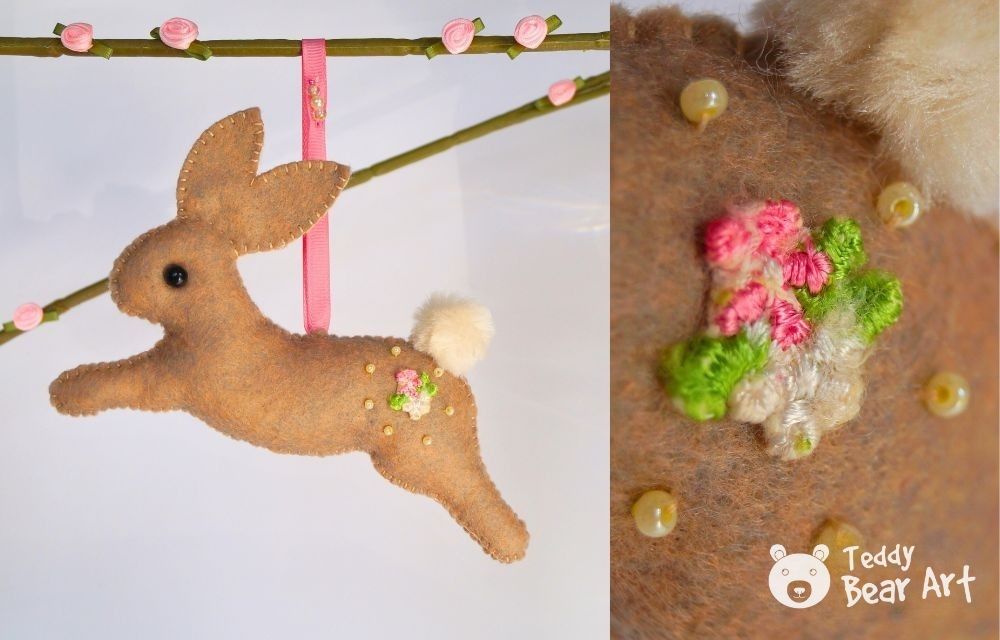
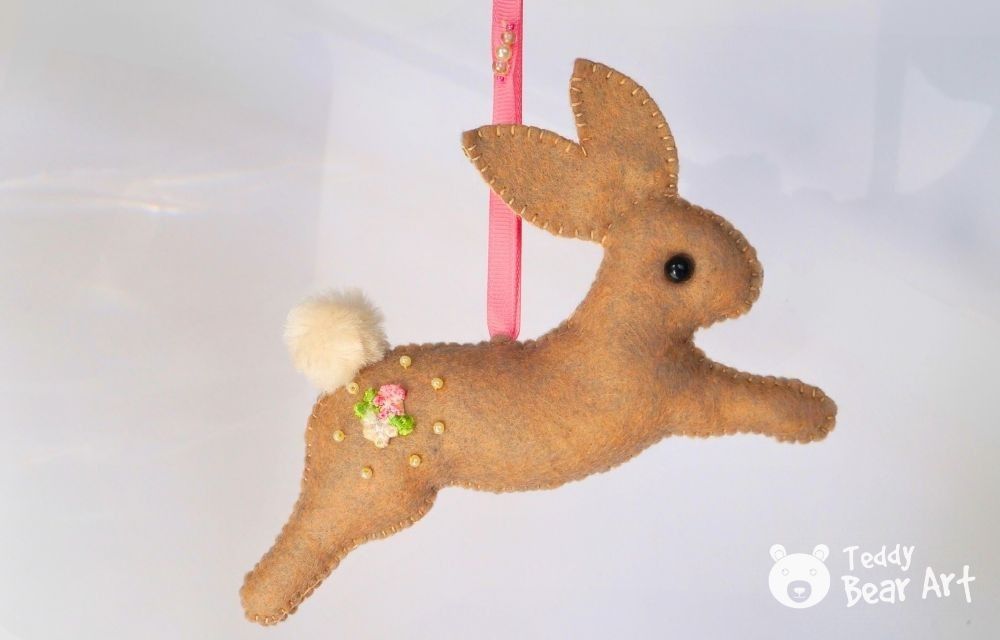
Running Rabbit
The soft texture of felt and the simple shape of a small handmade rabbit make this project easy and enjoyable. With clear pattern pieces and minimal stitching, the finished rabbit works beautifully as home décor, a small gift, an Easter detail, or a charming handmade toy.
Download the Pattern
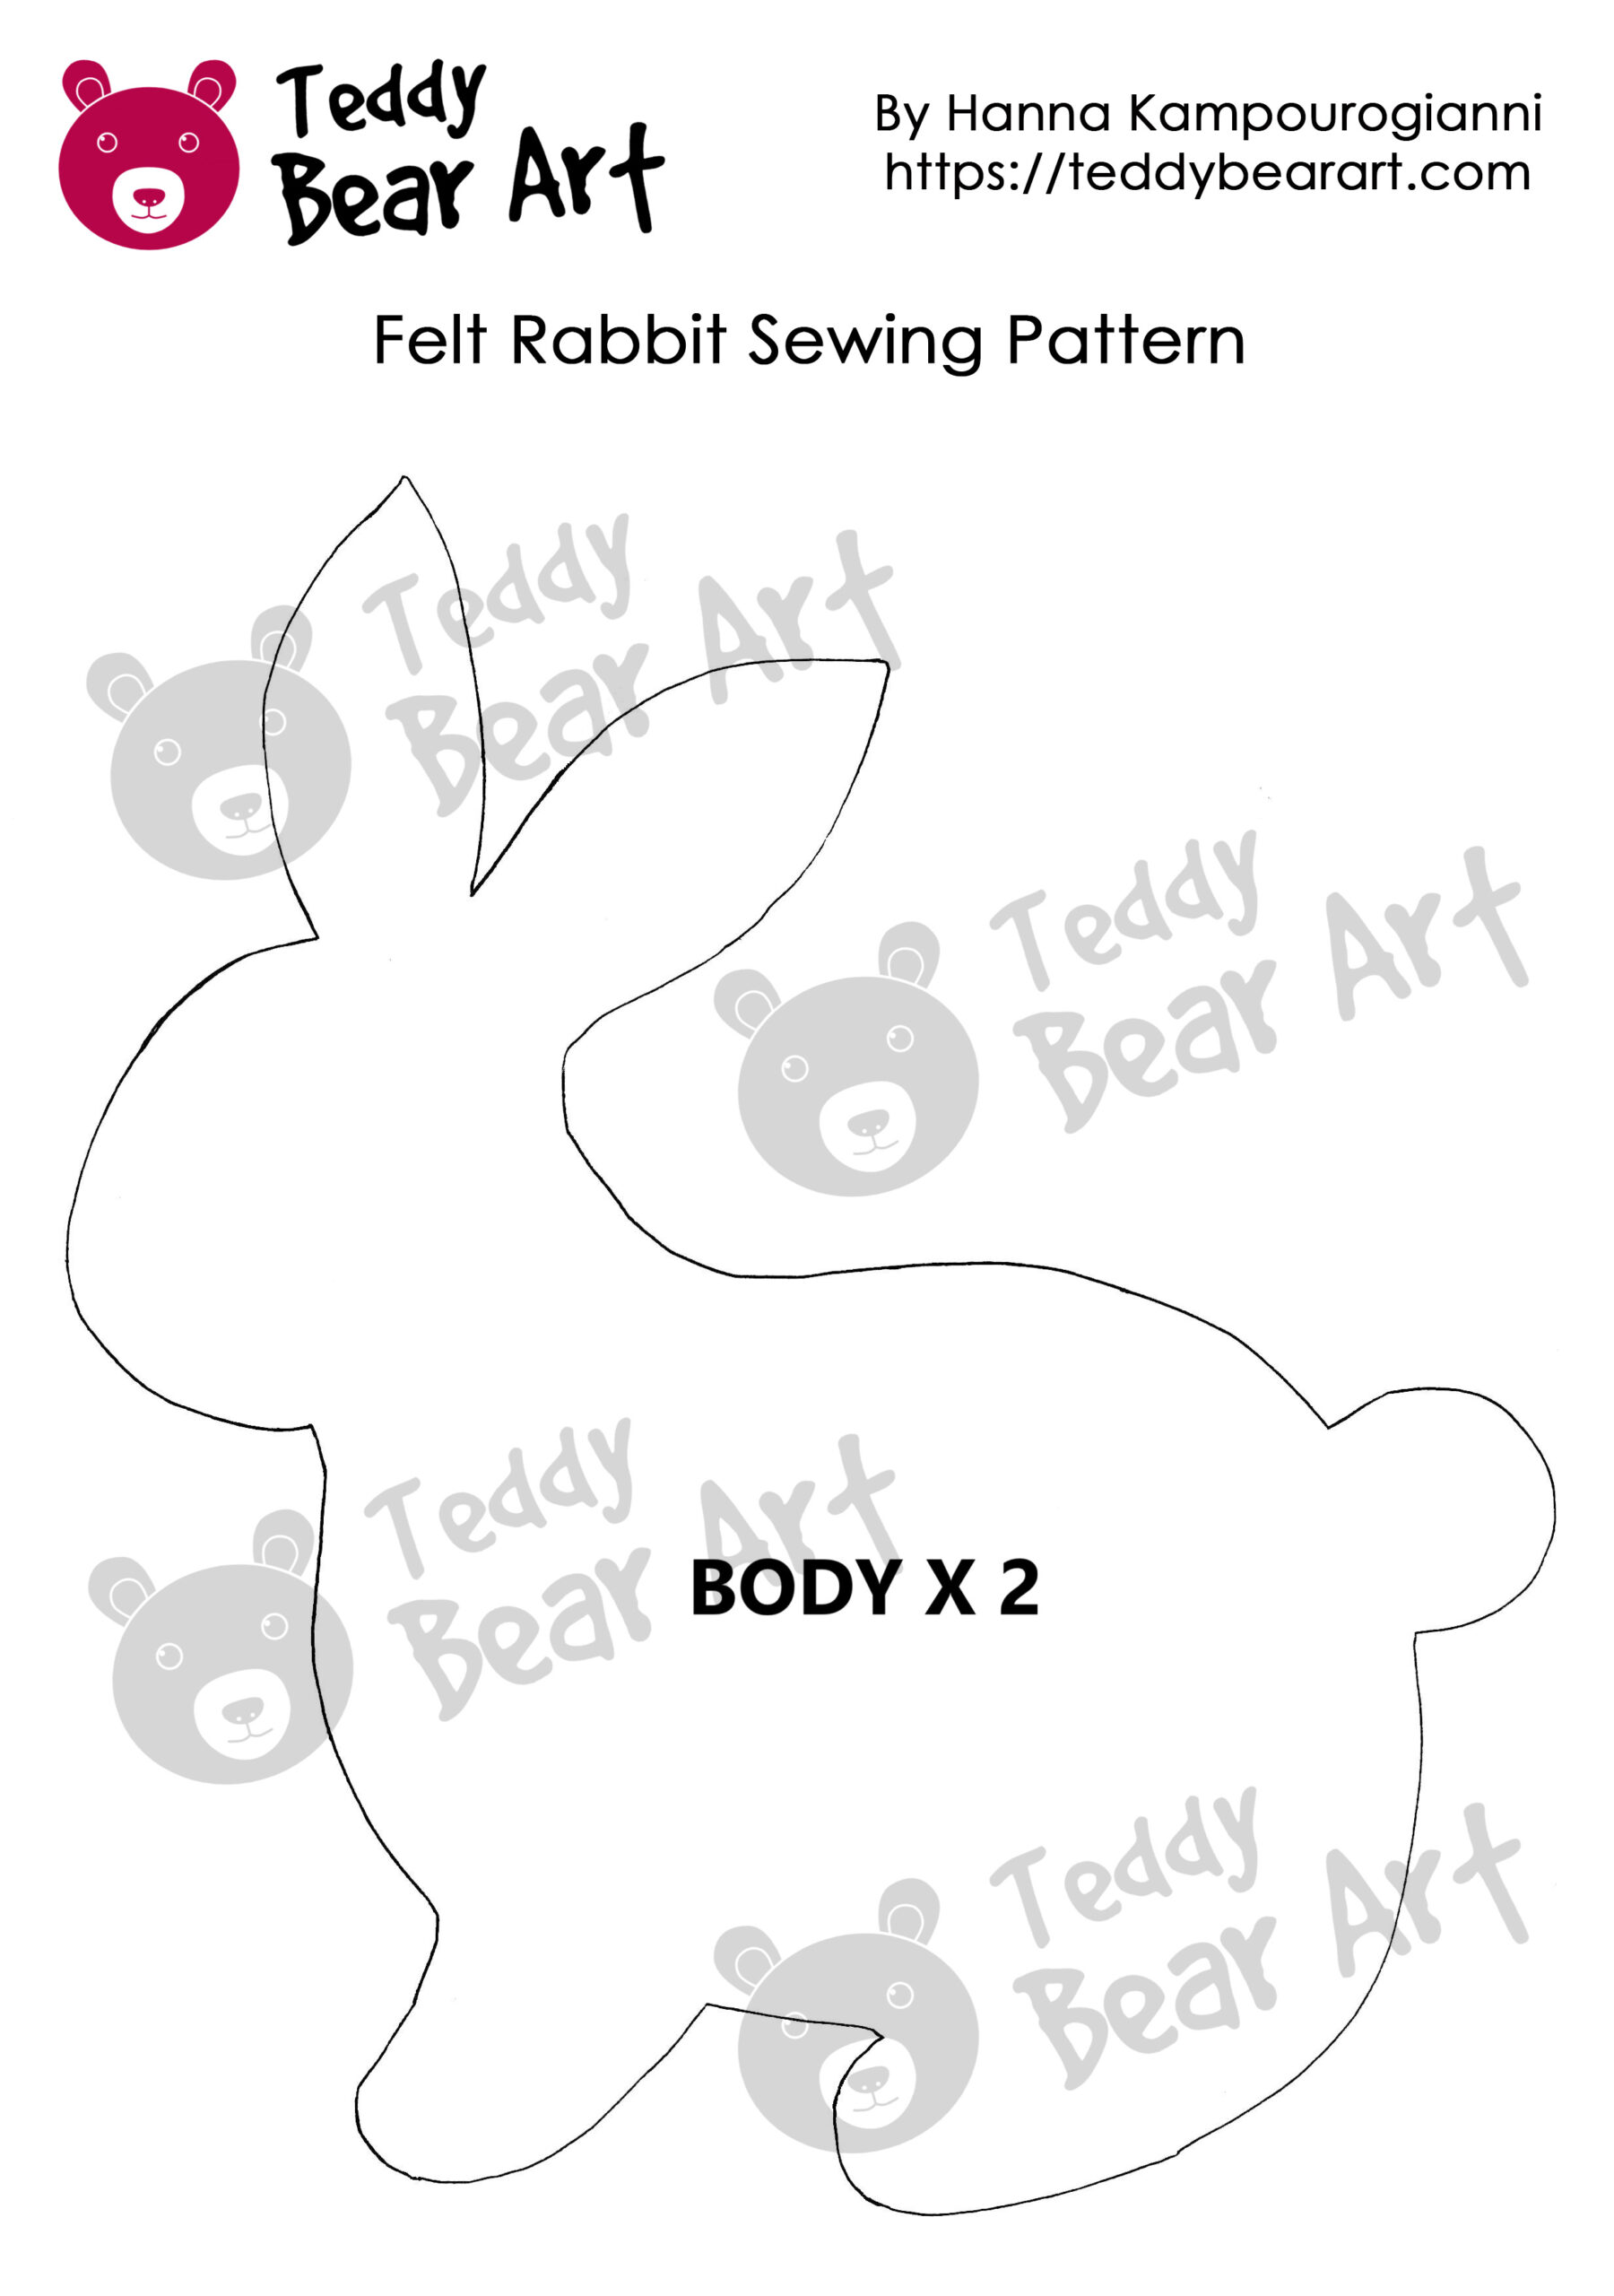
Notice that seam allowances are included.
To download the pattern, follow the instructions below:
From a phone or tablet: There should be a similar option for mobile devices with Android or iOS. Click on the image. Save it by holding your finger on the image and selecting the “Save Image” option. Then, go to your photo gallery and print it (an option available).
From a computer: Click on the photo of the pattern you see below. In the new tab that will open, you press the right mouse button and select the “Save image as …” option. Then, you choose where the image will be saved on your computer.

Materials You Will Need
- Felt sheets in your chosen colors
- Embroidery floss
- A small piece of plush or white yarn for the tail
- Hand sewing needle
- Small sharp scissors
- Polyester stuffing
- Beads
- Ribbon
Follow our detailed guide, completed with photos and tips to sew this beautiful rabbit.
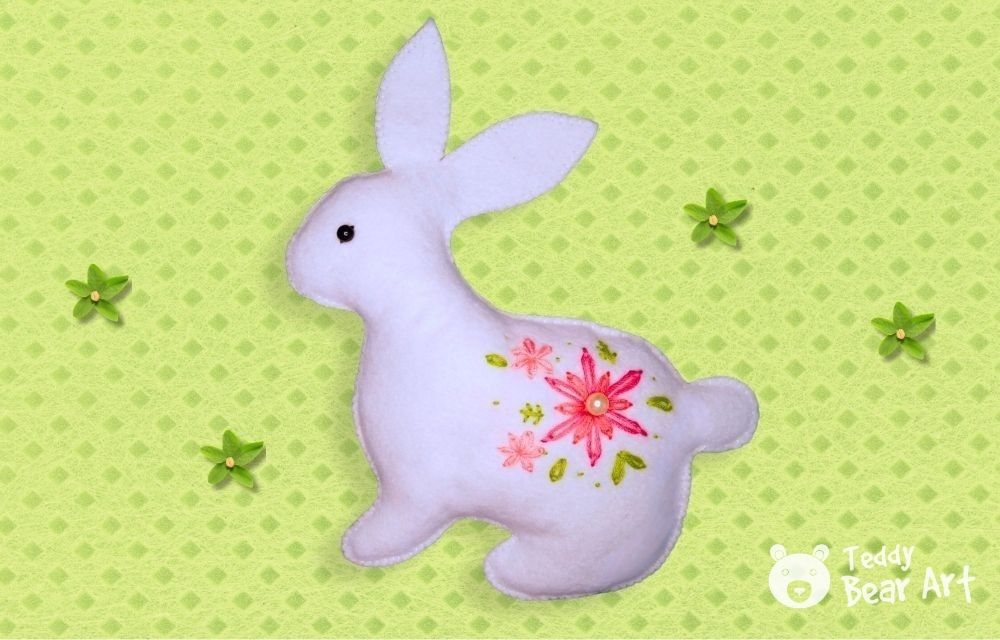
Sitting Rabbit
This felt rabbit sewing pattern is perfect for relaxed, creative time with soft materials and clean shapes. It works well for home decor, seasonal displays, and handmade gifts, while the clear pieces and simple lines make it beginner-friendly and fun to customize with different colors and textures.
Download the Pattern
Notice that seam allowances are included.
To download the pattern, follow the instructions below:
From a phone or tablet: There should be a similar option for mobile devices with Android or iOS. Click on the image. Save it by holding your finger on the image and selecting the “Save Image” option. Then, go to your photo gallery and print it (an option available).
From a computer: Click on the photo of the pattern you see below. In the new tab that will open, you press the right mouse button and select the “Save image as …” option. Then, you choose where the image will be saved on your computer.
Materials You Will Need
- Felt sheets in your chosen colors
- Embroidery floss
- Hand sewing needle
- Small sharp scissors
- Polyester stuffing
- Beads
Follow our detailed tutorial, completed with numerous photos, to embroider and sew this beautiful rabbit.
Frequently Asked Questions
Can I mix different types or colors of felt for a unique look?
Absolutely! Combining different textures or contrasting colors adds personality to your rabbit. Just make sure the felt pieces are compatible in thickness.
Can I personalize my felt rabbit with accessories?
Yes, adding tiny scarves, bows, or little felt clothes instantly makes your rabbit unique and playful. Small details let you customize each bunny for gifts or seasonal decor.
What stuffing works best for a soft but firm rabbit shape?
Polyester fiberfill is ideal because it’s lightweight and easy to shape. You can also add a little wool stuffing for a firmer feel, or mix both for a soft but well-supported toy.
Before You Go
Creating these felt rabbits is a simple, rewarding way to enjoy a little creative time while making something charming and personal. With just felt, thread, and stuffing, it’s possible to bring these easy patterns to life, whether for home décor, seasonal accents, or thoughtful handmade gifts.
Don’t be afraid to experiment with colors, textures, and small details to make each rabbit truly unique. Download your free patterns, start sewing, and let your creativity hop to life.
Get Free Patterns & Be the First to Know!
Want free teddy bear patterns, exclusive tutorials, and a chance to win craft supplies?
Sign up for our newsletter using the subscribe form in the middle of this article to receive new patterns, insider tips, and the latest news on teddy bear art. You’ll also automatically be entered into our annual giveaway for a chance to win teddy bear crafting materials.
Bonus entry: Save one of our pins on Pinterest to increase your chances of winning!
Let’s create, inspire, and craft beautiful teddy bears together!
Hey Hanna,
Adorable patterns are perfect for a quick win. What works best for me with felt bunnies is wool or wool-blend felt for cleaner edges, a tight blanket stitch around the curve. I embroider eyes and noses for kid-safe gifts, add a little lavender to the stuffing, and close with a ladder stitch so the seam disappears. Printing at 80–120% scales beautifully if you want pocket bunnies or a cuddle size without redrafting. Lovely share!
Marios
Hi Marios,
Thank you so much! Great tips, especially about felt choice and scaling the pattern. Really appreciate you sharing!
Hanna
I love these cute and simple bunny rabbit crafts! For someone who isn’t really “good” at crafts, your templates are so straightforward and the results are adorable. Thank you for sharing your talent — and inspiration — with us. I have a question — how do you set aside time for crafting like this? I have a hard time getting a quiet space for crafting. 🙂
Thank you so much, this really means a lot to me! I’m happy to hear the templates feel easy to use, that’s exactly what I aim for.
As for time and space, I now have my own studio, but it wasn’t always that way. I started with a simple box of supplies and crafted wherever I could, at the kitchen table, in the evenings, and during any quiet moments I could find. I didn’t wait for perfect conditions, just used small pockets of time.
Even 20-30 minutes can make a big difference if you’re consistent. Thank you again for your kind words and inspiration!