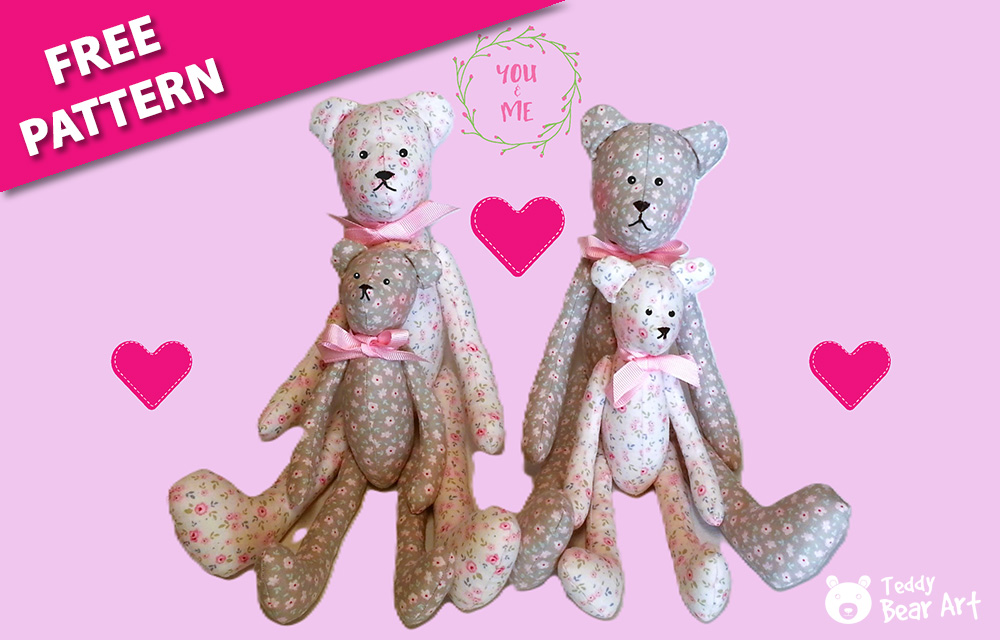
If you’ve ever thought about sewing your teddy bear but felt overwhelmed by complicated patterns and techniques, you’re in the right place. This guide on how to make a teddy bear introduces an easy teddy bear sewing pattern that perfectly blends simplicity and charm. It’s designed as a hybrid between a traditional primitive bear and a classic teddy bear: while it includes movable limbs for added character, the pattern has few parts, making it accessible even for beginners. With just a few supplies and a bit of patience, you’ll have your very own handmade bear by the end of this guide!
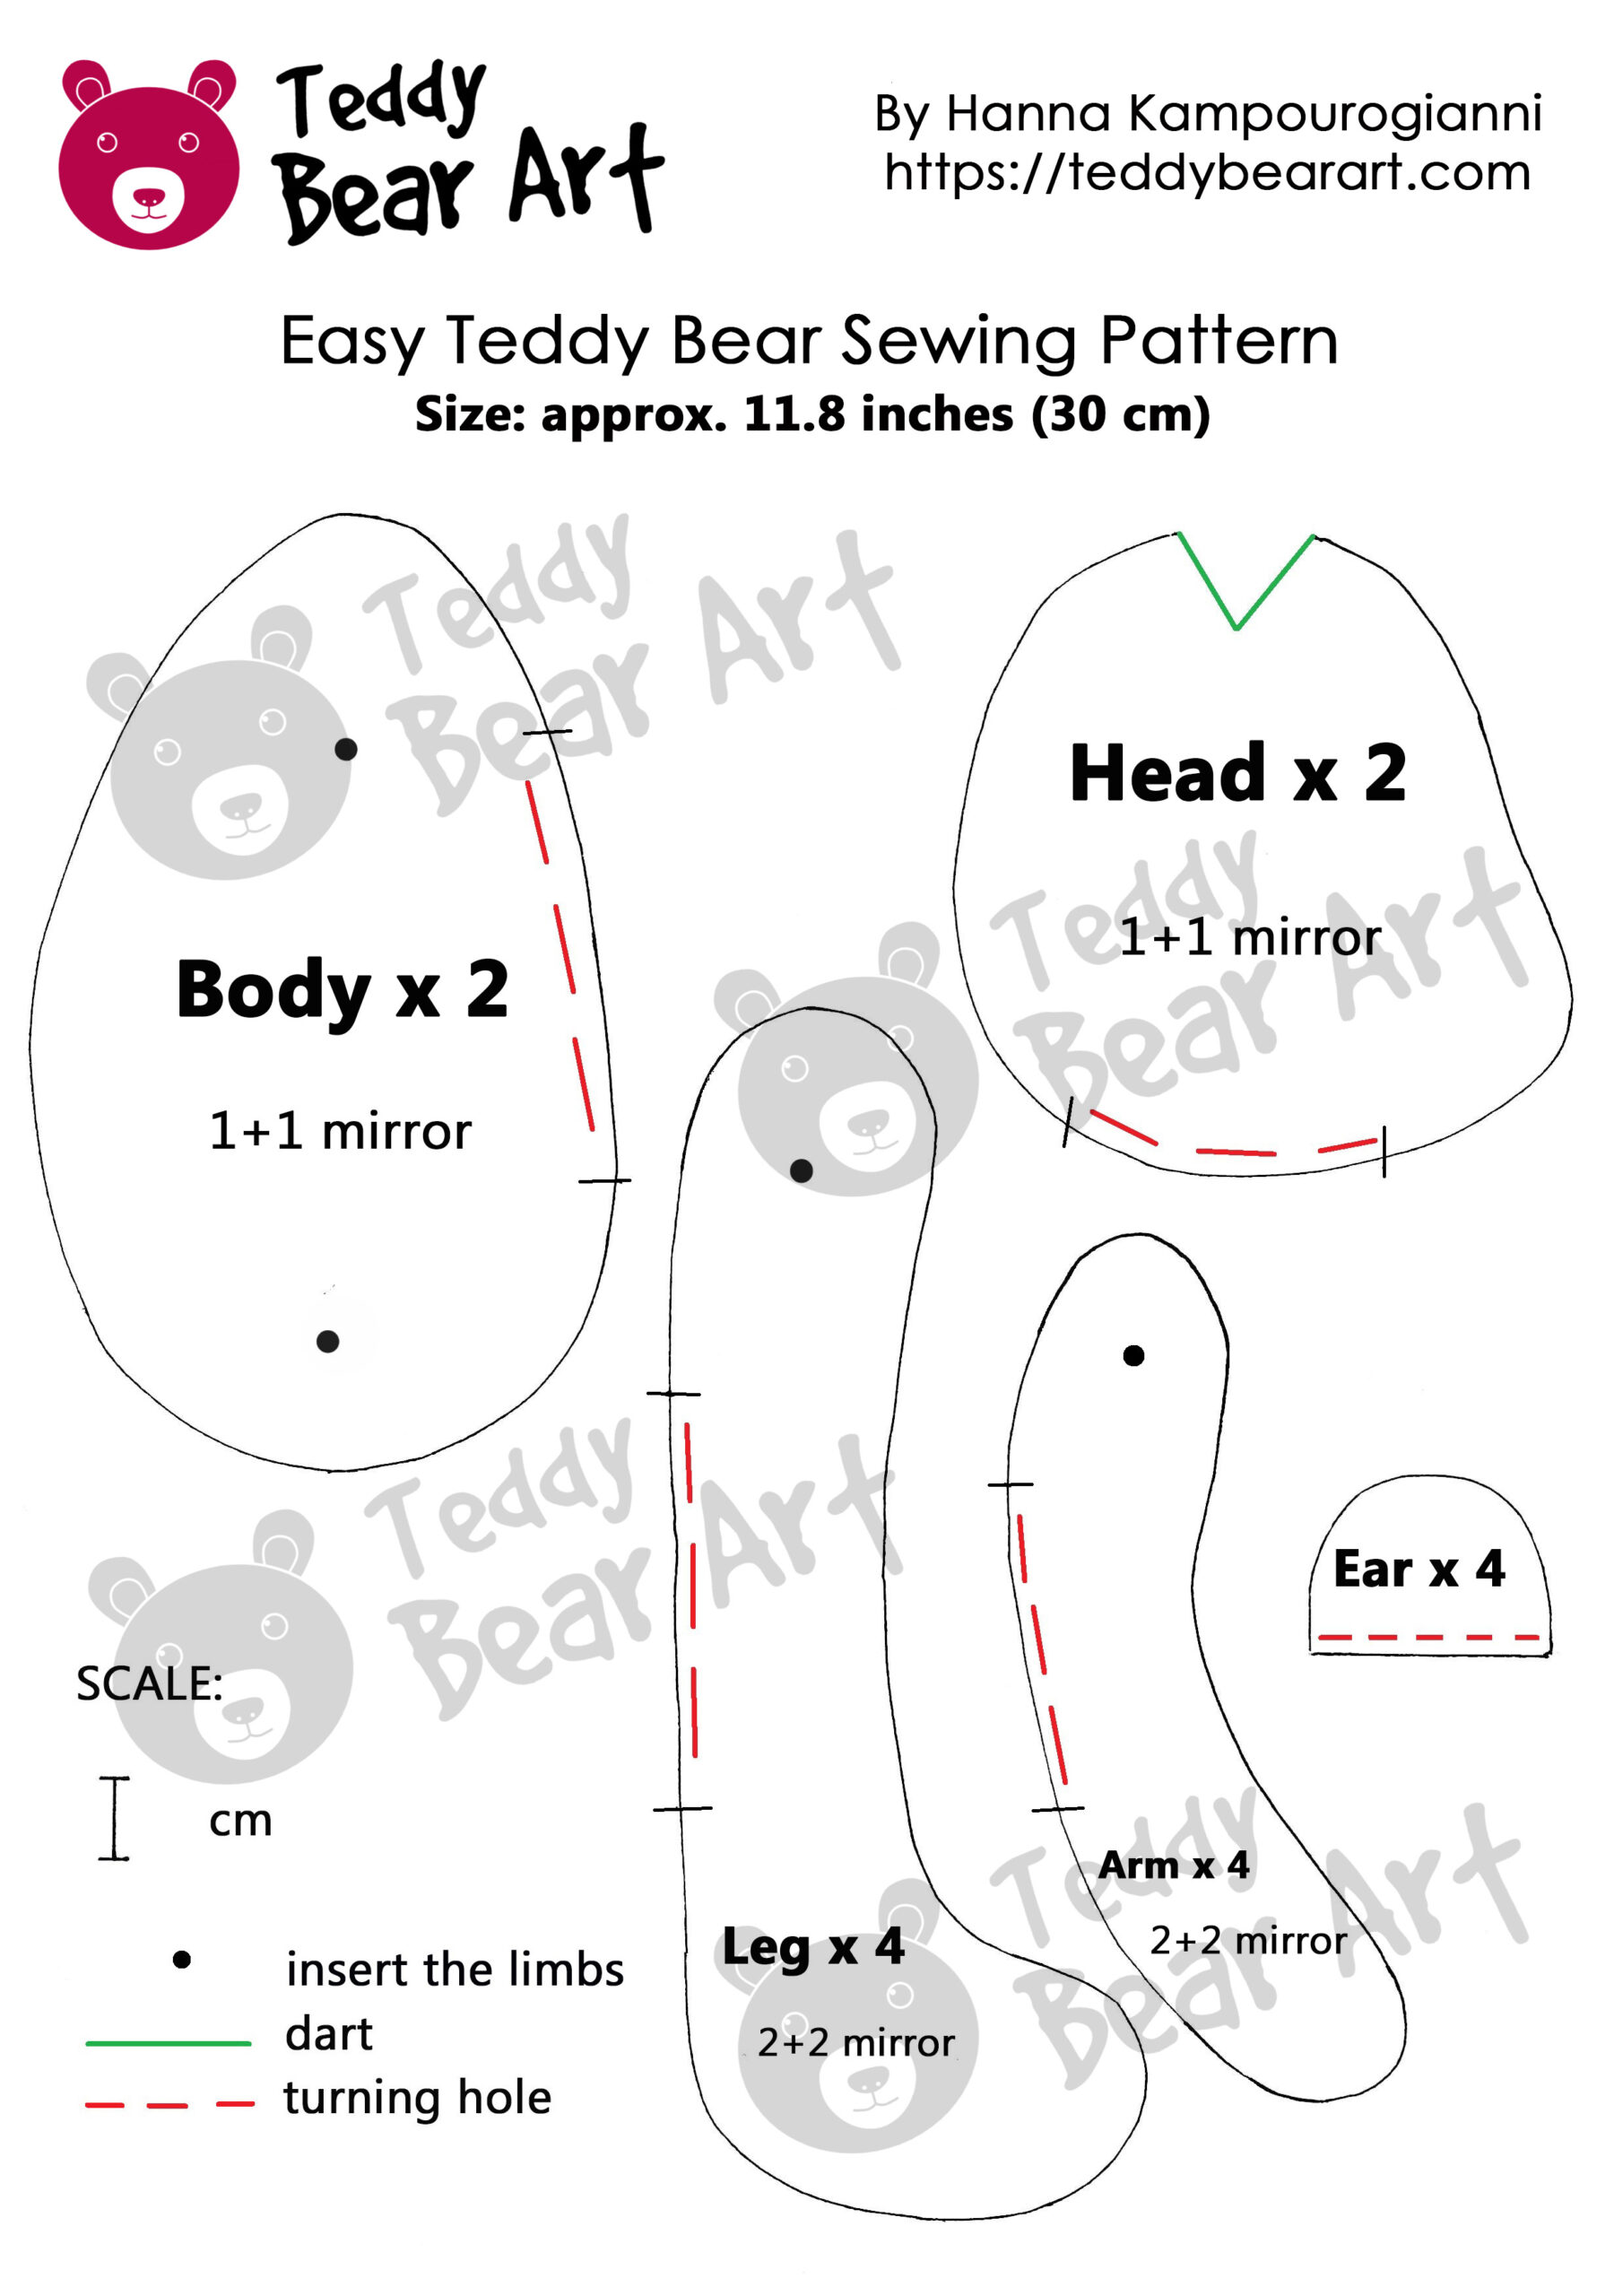
Download the Teddy Bear Pattern
To download the pattern, follow the instructions below:
From a phone or a tablet (Android): There should be something similar for mobile devices with Android or iOS. Click on the image. Save it by holding your finger on the image and selecting the “Save Image” option. Then go to your photo gallery and print it (there is an option).
From a computer (Windows): Click on the photo of the pattern you see below. In the new tab that will open, you press the right mouse button and select the “Save image as …” option. Then you choose where the image will be saved on your computer.
Materials Needed for This Easy Teddy Bear Sewing Pattern
Here’s a quick list of materials you’ll need to bring your bear to life:
- Non-stretch cotton fabric: Choose a fabric that doesn’t stretch, as it will hold the shape of the bear better. Classic floral patterns or soft pastels work well for a vintage look but feel free to choose whatever suits your taste.
- Matching thread: Try to match the color of your fabric to keep the seams subtle.
- Needle and pins: You’ll need these for hand-stitching, or a sewing machine if you prefer.
- Scissors: Fabric scissors are best, but any sharp pair will do.
- Synthetic stuffing: This will give your bear its soft, squeezable shape.
- Buttons: You will need them to attach the limbs.
- Thread, beads, or paint for the face: For an adorable face, use beads, thread, or even acrylic paint.
Once you have everything ready, it’s time to start crafting!
Step 1: Preparing the Fabric and Pattern Pieces
Lay your fabric flat and carefully transfer the bear pattern sewing template using a fabric pencil. You’ll need to cut two pieces each for the head, body, arms, and legs, and four pieces for the ears. If your fabric is light and you’re worried about marks showing through, opt for a disappearing ink marker. Alternatively, a fine-tipped chalk pencil (if available) can work well without leaving thick lines.
When tracing, be sure to add a seam allowance of 7-10 mm around each piece for easier assembly later. Taking time on this step will ensure your pieces fit together well, making the stitching process much smoother.
Tips:
- Don’t forget to mark the bear’s body and limbs to indicate attachment points.
- If you have zig zag scissors, use them to cut out the pattern pieces from the fabric, this will make it easier for you to work with seam allowances.
Step 2: Sewing the Teddy Bear
Start by sewing the bear’s body, as these are larger and will give you a feel for handling the fabric. Place two pieces of the body together (right sides facing in) and stitch along the edges, leaving the openings for stuffing. When sewing curves, try going slowly and pivoting with each stitch to avoid sharp, unnatural lines.
Move on to the bear’s head. First of all, sew up the darts. Then sew the 2 mirror parts of the head. Sew the ears in the same way.
And finally, sew the teddy bear’s limbs.
When all the parts are sewn, make small cuts on the seam allowances to prevent folds when turning, turn them right side out, and fill them with synthetic filler, except for the ears. Use a wooden stick for stuffing.
Sew up all the holes.
Tip: Use a back stitch to sew the pieces together and a ladder stitch to close the openings and to sew the head to the body.
Step 3: Attaching Limbs and Assembling the Bear
Once the limbs are sewn and turned right side out, it’s time to bring your teddy bear to life by assembling the body. Start with the head: this is where your bear’s personality shines through. You can add beads for the eyes, embroider them for a classic look, or even draw them on if you prefer a simpler style. For the nose and mouth, embroider a small, charming expression that suits your bear, and don’t forget to sew on the ears, positioning them to give your bear a playful or gentle appearance.
With the head complete, attach it to the body using an invisible stitch for a clean, seamless look. Once the head is secure, it’s time to attach the limbs. For this step, check out our detailed illustrated guide on button-and-thread limb attachment, which walks you through the process of creating a secure and movable connection. This method will give your bear’s arms and legs gentle mobility, adding an interactive touch to your finished creation.
Once the face is complete, add a ribbon around your bear’s neck or sew on any tiny accessories you’d like, like a felt heart or a mini scarf. These small details will make your bear unique and give it a touch of whimsy.
Tip: Use pins to determine the location of the ears, eyes, and nose. Start with the nose as the central starting point.
Before You Go
Congratulations! You’ve finished your very first teddy bear. This creation is not only adorable but also a great way to practice foundational sewing skills. If you’ve ever wondered how to make a teddy bear, now you know just how fun and rewarding it can be.
Your handmade teddy bear will be a beautiful creation to treasure. You can put it on a shelf, give it as a heartfelt gift, or start a unique collection.
Now that you’ve tackled your first project, you’re ready to try more patterns and experiment with different styles and fabrics.
By starting with this easy teddy bear sewing pattern, you’ve unlocked the joy of creating with your hands. Enjoy your bear and happy sewing!
Get Free Patterns & Be the First to Know!
Want free teddy bear patterns, exclusive tutorials, and a chance to win craft supplies?
Sign up for our newsletter using the subscribe form in the middle of this article to receive new patterns, insider tips, and the latest news on teddy bear art. You’ll also automatically be entered into our annual giveaway for a chance to win teddy bear crafting materials.
Bonus entry: Save one of our pins on Pinterest to increase your chances of winning!
Let’s create, inspire, and craft beautiful teddy bears together!


My neighbour recently asked me to make some teddy bears from her late brother’s shirts, but neither of us had a pattern for me to use. So I am very pleased that I came across this sewing pattern. It was very easy to download the pattern and save it. I am just not hundred percent sure about the scale that you mention, is it 1 cm?
From the image that you have there are two big teddy bears and two small ones. So is the pattern for the small bear, or the bigger bear? How easy is it to scale the pattern for a much bigger teddy bear? Thank you and I look forward to making my first bear.
Thank you for your question! Yes, the scale is 1 cm, and this pattern is for the larger teddy bear in the image.
To make the bear bigger, you can scale up the pattern by adjusting the print settings. For example, increasing the print size to 120% will make the bear about 20% larger. If you’d like a smaller bear, you can reduce the print size — setting it to 80% would create a bear roughly 20% smaller. Just make sure to adjust each pattern piece by the same percentage to keep the proportions balanced.
Good luck with your project, and feel free to reach out with any other questions!
Thank you for such a clear guide! I really liked how you explained each step and added tips—it’s so helpful. I think this bear would make a wonderful gift, especially with the option to choose different fabrics and colors. Do you have any recommendations on the best materials for this project?
You are welcome! If you’d like your bear to look like the one in my photo, I recommend using cotton fabric—it gives a neat, classic look. But if you try fleece or felt, you’ll get a slightly different bear, softer and cozier, which can also be a fun option!
I’ve always been intimidated by sewing projects, but the way you’ve broken down each step makes it feel totally achievable. I especially appreciate the tips on seam allowances and using pins to position features like the nose and ears—that’s such a game-changer!
Have you tried using different types of fabric, like minky or fleece, for a softer, cuddlier bear? I’m curious how those might affect the process. Also, how durable is the button-and-thread limb attachment? Could it handle a bit of rough play if the bear were made for a child?
Thanks for sharing this—it’s inspiring me to finally try making my first handmade bear!
Thank you for such a kind and thoughtful comment! I’m thrilled to hear that the breakdown of steps has made the idea of sewing your own teddy bear feel more approachable—it’s always my goal to make the process as beginner-friendly and enjoyable as possible. 😊
Using fabrics like minky or fleece is definitely an option, especially if you’re aiming for a softer and cuddlier bear! Both materials are wonderfully plush but can be a bit trickier to work with because they’re stretchier and tend to shift while sewing. A walking foot on your sewing machine and plenty of pins (or clips) can really help keep things aligned.
As for the button-and-thread limb attachment, it’s a classic method that works well for display or lightly handled bears. However, if the bear is intended for a child or might see some rough play, I’d recommend opting for cotter pins or securely stitched-through limb attachments instead. These methods are more durable and will hold up better over time.
I’m so excited that you’re feeling inspired to make your first handmade bear! Don’t hesitate to reach out if you have any more questions along the way—I’m here to help. Wishing you lots of fun and success with your project! 🐻✨