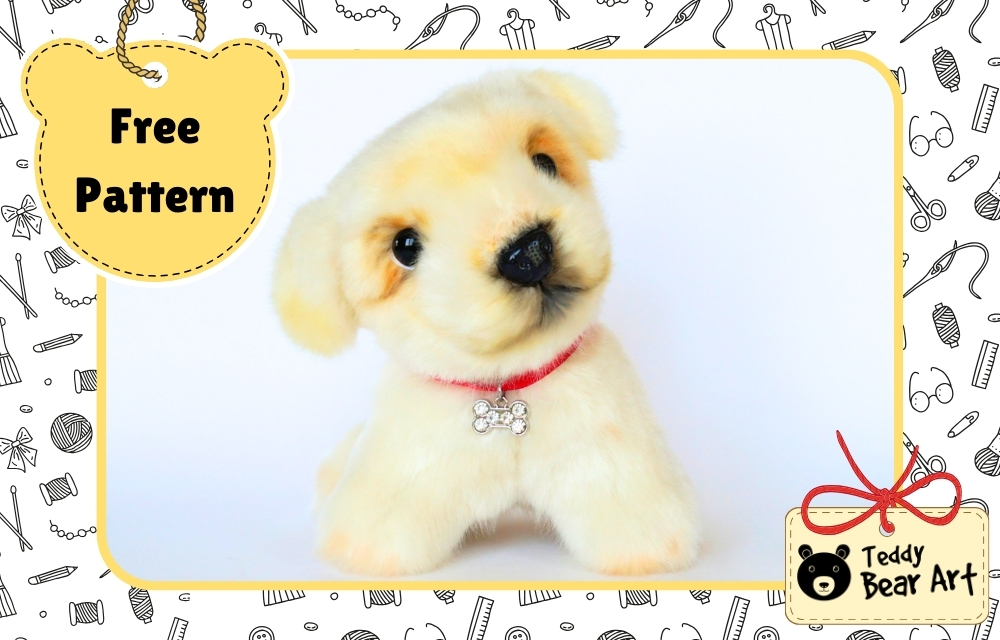
Bringing a soft, lifelike puppy into your home is easier than you might think, thanks to this free dog plush pattern. Perfect for crafters with some experience, this guide will take you step by step through creating a realistic stuffed dog that’s ready to cuddle or give as a gift.
The uniqueness of this pattern lies in its simplicity, yet the result is impressive. For example, the body is sewn quickly and easily, and only one cotter pin is needed for the head to turn. But at the same time, the limbs do not need fastenings; this puppy can sit and stand.

Download Dog Plush Pattern
Notice that seam allowances are not included.
To download the pattern, follow the instructions below:
From a phone or tablet: There should be a similar option for mobile devices with Android or iOS. Click on the image. Save it by holding your finger on the image and selecting the “Save Image” option. Then, go to your photo gallery and print it (an option available).
From a computer: Click on the photo of the pattern you see below. In the new tab that will open, you press the right mouse button and select the “Save image as …” option. Then, you choose where the image will be saved on your computer.


Materials and Tools You’ll Need
- Faux fur fabric with pile 1.5 cm (there is one trick here: it is better to choose plush with a soft rather than hard base, this will allow the puppy not only to stand, but also to sit)
- Felt fabric for the inner ears
- Glass eyes on a metal loop of 14 mm diameter
- Discs in diameter 25 mm – 2 pieces
- Washers – 2 pieces
- Cotter pin
- Matching thread and sewing needles
- Strong thread
- Long needle
- Safety plastic nose
- Synthetic or other stuffing
- Metal pellets for weight
- Paints
- Awl
- Pliers

Step-by-Step Sewing Instructions
Step 1: Sew up all the darts.
Step 2: Sew the gusset to the head pieces, matching the marks from E–E1 to G–G1.
Step 3: Sew in the chin piece, aligning the marks from E–E2 to F–F1 and F–F2.
Step 4: Turn the head right side out, insert the safety nose, stuff the head firmly, insert the disc joint, then cinch or stitch the opening closed.
Step 5: Create the eye sockets using a strong thread and a long needle. Anchor the thread in the eye socket, then bring the needle out at the corner of the dog’s mouth. Pull tight, then take the needle back into the same eye socket, pull again, and secure the thread. This will tighten the fabric to form both the eye socket and the shape of the muzzle. If you prefer to keep it simple, you can just make a light shaping for the eye sockets.
Step 6: Cut the whites of the eyes from white felt, then insert the eyes.
Step 7: Make the ears and sew them in place. To make the ears hang, simply sew them to the head.
Step 8: Sew the two belly pieces together, matching the marks from A to B.
Step 9: Sew along the marks from A–A1 to B–B1.
Step 10: Sew along the marks from A–A1 to C.
Step 11: Sew along the marks from B–B1 to D.
Step 12: Turn the body right side out and attach the head. Generously fill the legs with metal pellets—especially the back ones—then stuff the rest with fiberfill. Stitch the opening closed and sew on the tail. Thanks to the heavier back legs and the stretchiness of the plush fabric, your puppy will be able to both sit and stand.

FAQ about Free Dog Plush Pattern
How can I make my puppy plush look more realistic?
Realism comes down to the little things. Try mixing different fur textures to add depth, like a longer hair for the chin and ears. Add subtle pops of color to the paws, face, and ears. Light shading in soft brown and black around the eyes, nose, and mouth will really bring the expression to life.
To keep the nose from looking out of place, needlefelt a bit of sheep’s wool around it to create a smoother transition from the nose to the muzzle.
Brushing or lightly trimming the fur, especially around the face and tail, will give the toy an even more polished look. You can also make felted paws if you wish.
Can I make this plush in different sizes?
Absolutely. You can resize the free dog plush pattern when printing—scale it down for a pocket-sized puppy or enlarge it for a big, huggable friend. Just remember to adjust the amount of fabric and stuffing accordingly.
What’s the best way to personalize my puppy plush?
Add your own creative touch with a little scarf, a collar, or a handmade tag. For a realistic twist, match the fur colors to a real-life dog you love.

Before You Go
This dog plush pattern is a delightful way to combine creativity with hands-on sewing, producing a soft, realistic puppy plush that’s full of charm. By following the step-by-step instructions and adding your personal touches, you’ll create a toy that’s not only adorable but also a testament to your crafting skills. Gather your materials, download the pattern, and bring your very own lifelike puppy to life today.
Get Free Patterns & Be the First to Know!
Want free teddy bear patterns, exclusive tutorials, and a chance to win craft supplies?
Sign up for our newsletter using the subscribe form in the middle of this article to receive new patterns, insider tips, and the latest news on teddy bear art. You’ll also automatically be entered into our annual giveaway for a chance to win teddy bear crafting materials.
Bonus entry: Save one of our pins on Pinterest to increase your chances of winning!
Let’s create, inspire, and craft beautiful teddy bears together!
That’s a really interesting pattern. I appreciate how it simplifies the construction with the single cotter pin for the head and no fastenings for the limbs, which seems like a great way to make a realistic plush without overly complex mechanics.
A few points for discussion or constructive feedback:
-The article mentions the pattern is for those with “some sewing experience.” It would be helpful to know more about the specific skills required. Are there any parts, like turning the small pieces or attaching the head, that are particularly challenging for a new or intermediate sewer?
-Working with faux fur can be tricky, especially with seams and shedding. Do you have any tips for managing the fur to get a cleaner, more professional finish, particularly around the face and ears?
-The trick of using a “soft-based plush” and metal pellets for weight sounds ingenious. Has anyone tried this with different types of stuffing or materials, and how did it affect the puppy’s ability to sit and stand?
Overall, it’s a fantastic guide, and I think a discussion around these points could help others who are looking to tackle this project.
Thank you so much for your thoughtful feedback — I really appreciate how you noticed the small construction details!
By “some sewing experience,” I mean having some practice in making soft toys, especially teddy bears — knowing how to make cotter pin joints, insert eyes, and do basic muzzle sculpting. Turning tiny pieces like the tail or ears can be fiddly, so I usually suggest a chopstick or hemostats to help.
For faux fur — yes, it can be a fluffy battlefield! My go-to tips:
Trim the pile from the seam allowance before stitching to reduce bulk.
Use neat, not-too-large stitches so the fur stays in place.
After sewing, tease the fur back out of the seam with an awl or needle for a natural look, especially on the face and ears.
As for stuffing — soft-based plush with a little weight in the base keeps it stable without looking stiff. I’ve also tried glass beads, which give a nice balance and pleasant feel in the hands. For me, metal weighting works better.
Thank you for the detailed and clear guide! The step-by-step instructions really help break the process into manageable stages, so even those who haven’t sewn in a while can follow along. I like how you explain the materials needed and how to properly assemble all the parts.
It’s especially nice that you share tips on working with fabrics and small details — it makes the sewing process more interesting and inspiring.
I’m glad you found the guide helpful! It’s great to hear that the instructions made the process easier to follow. Working with the fabrics and details can be really fun, and I’m happy it inspired you to create your own piece.