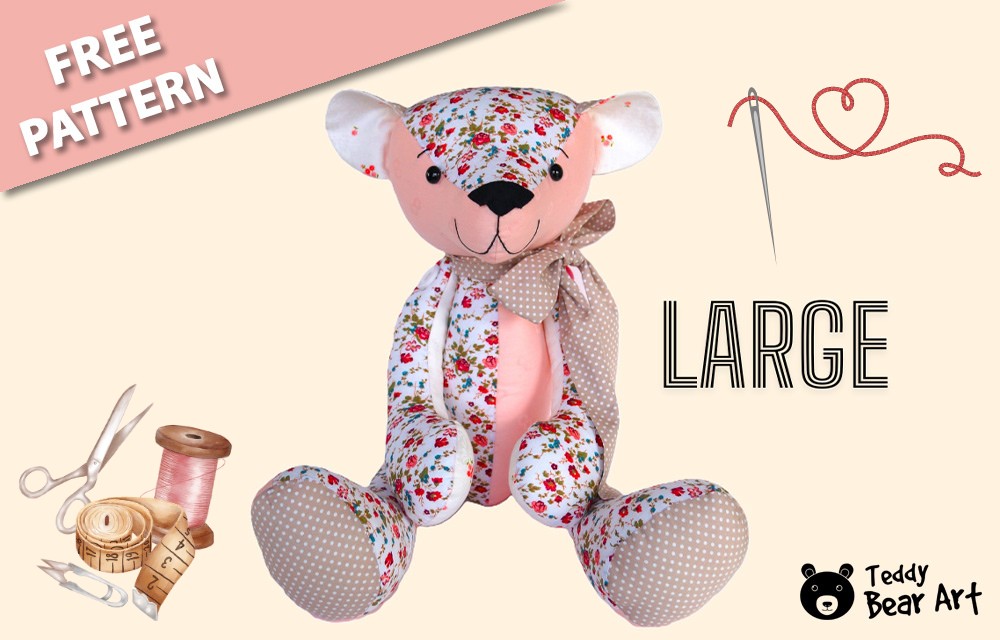
Sometimes, an ordinary stuffed toy can become something much more meaningful. A memory bear isn’t just a soft plush; it’s a heartfelt way to preserve cherished memories. You can sew it from fabric that holds special significance, your loved one’s shirt, a baby outfit, or a piece of an old blanket. In this guide, we’ll share a free memory bear sewing pattern and walk you through the process of creating a special bear with your own hands.
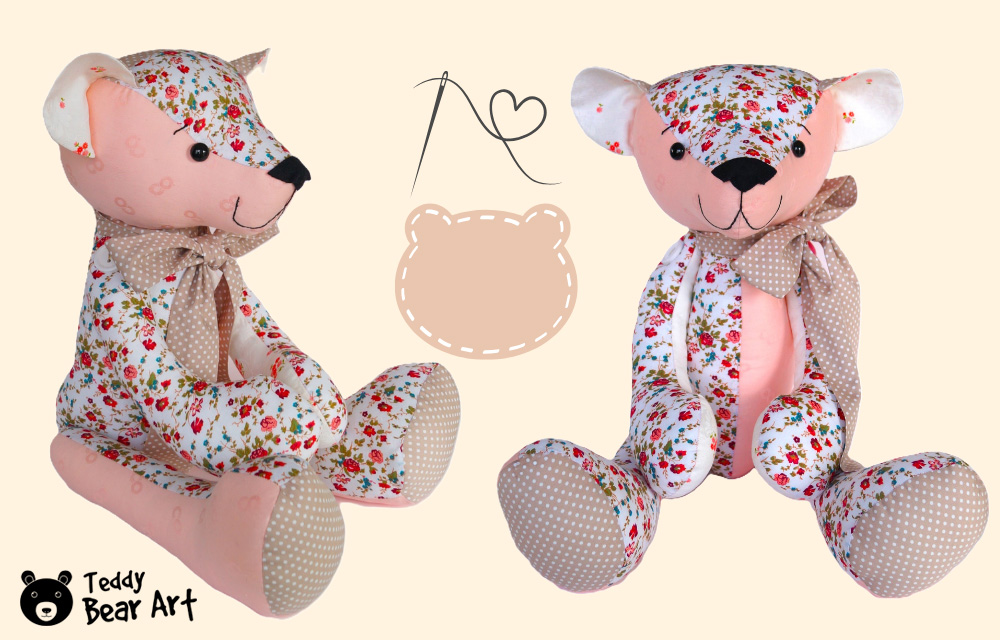
This pattern creates a classic teddy bear with movable limbs, which can be attached using either button joints or disk and washer joints, whichever you prefer. This flexibility allows you to create a bear that’s not only posable but also reflects your style, giving it character through your chosen attachment method. Our pattern with a memory bear step-by-step instructions will guide you through the process of creating a special keepsake.
What is a Memory Bear?
Memory bears are keepsake teddy bears made from sentimental fabrics, such as a beloved relative’s shirt, baby clothes, or wedding attire. These bears serve as heartfelt tributes, preserving memories in a tangible, huggable form. Unlike traditional stuffed animals, memory bears hold personal histories and are often passed down as family heirlooms.
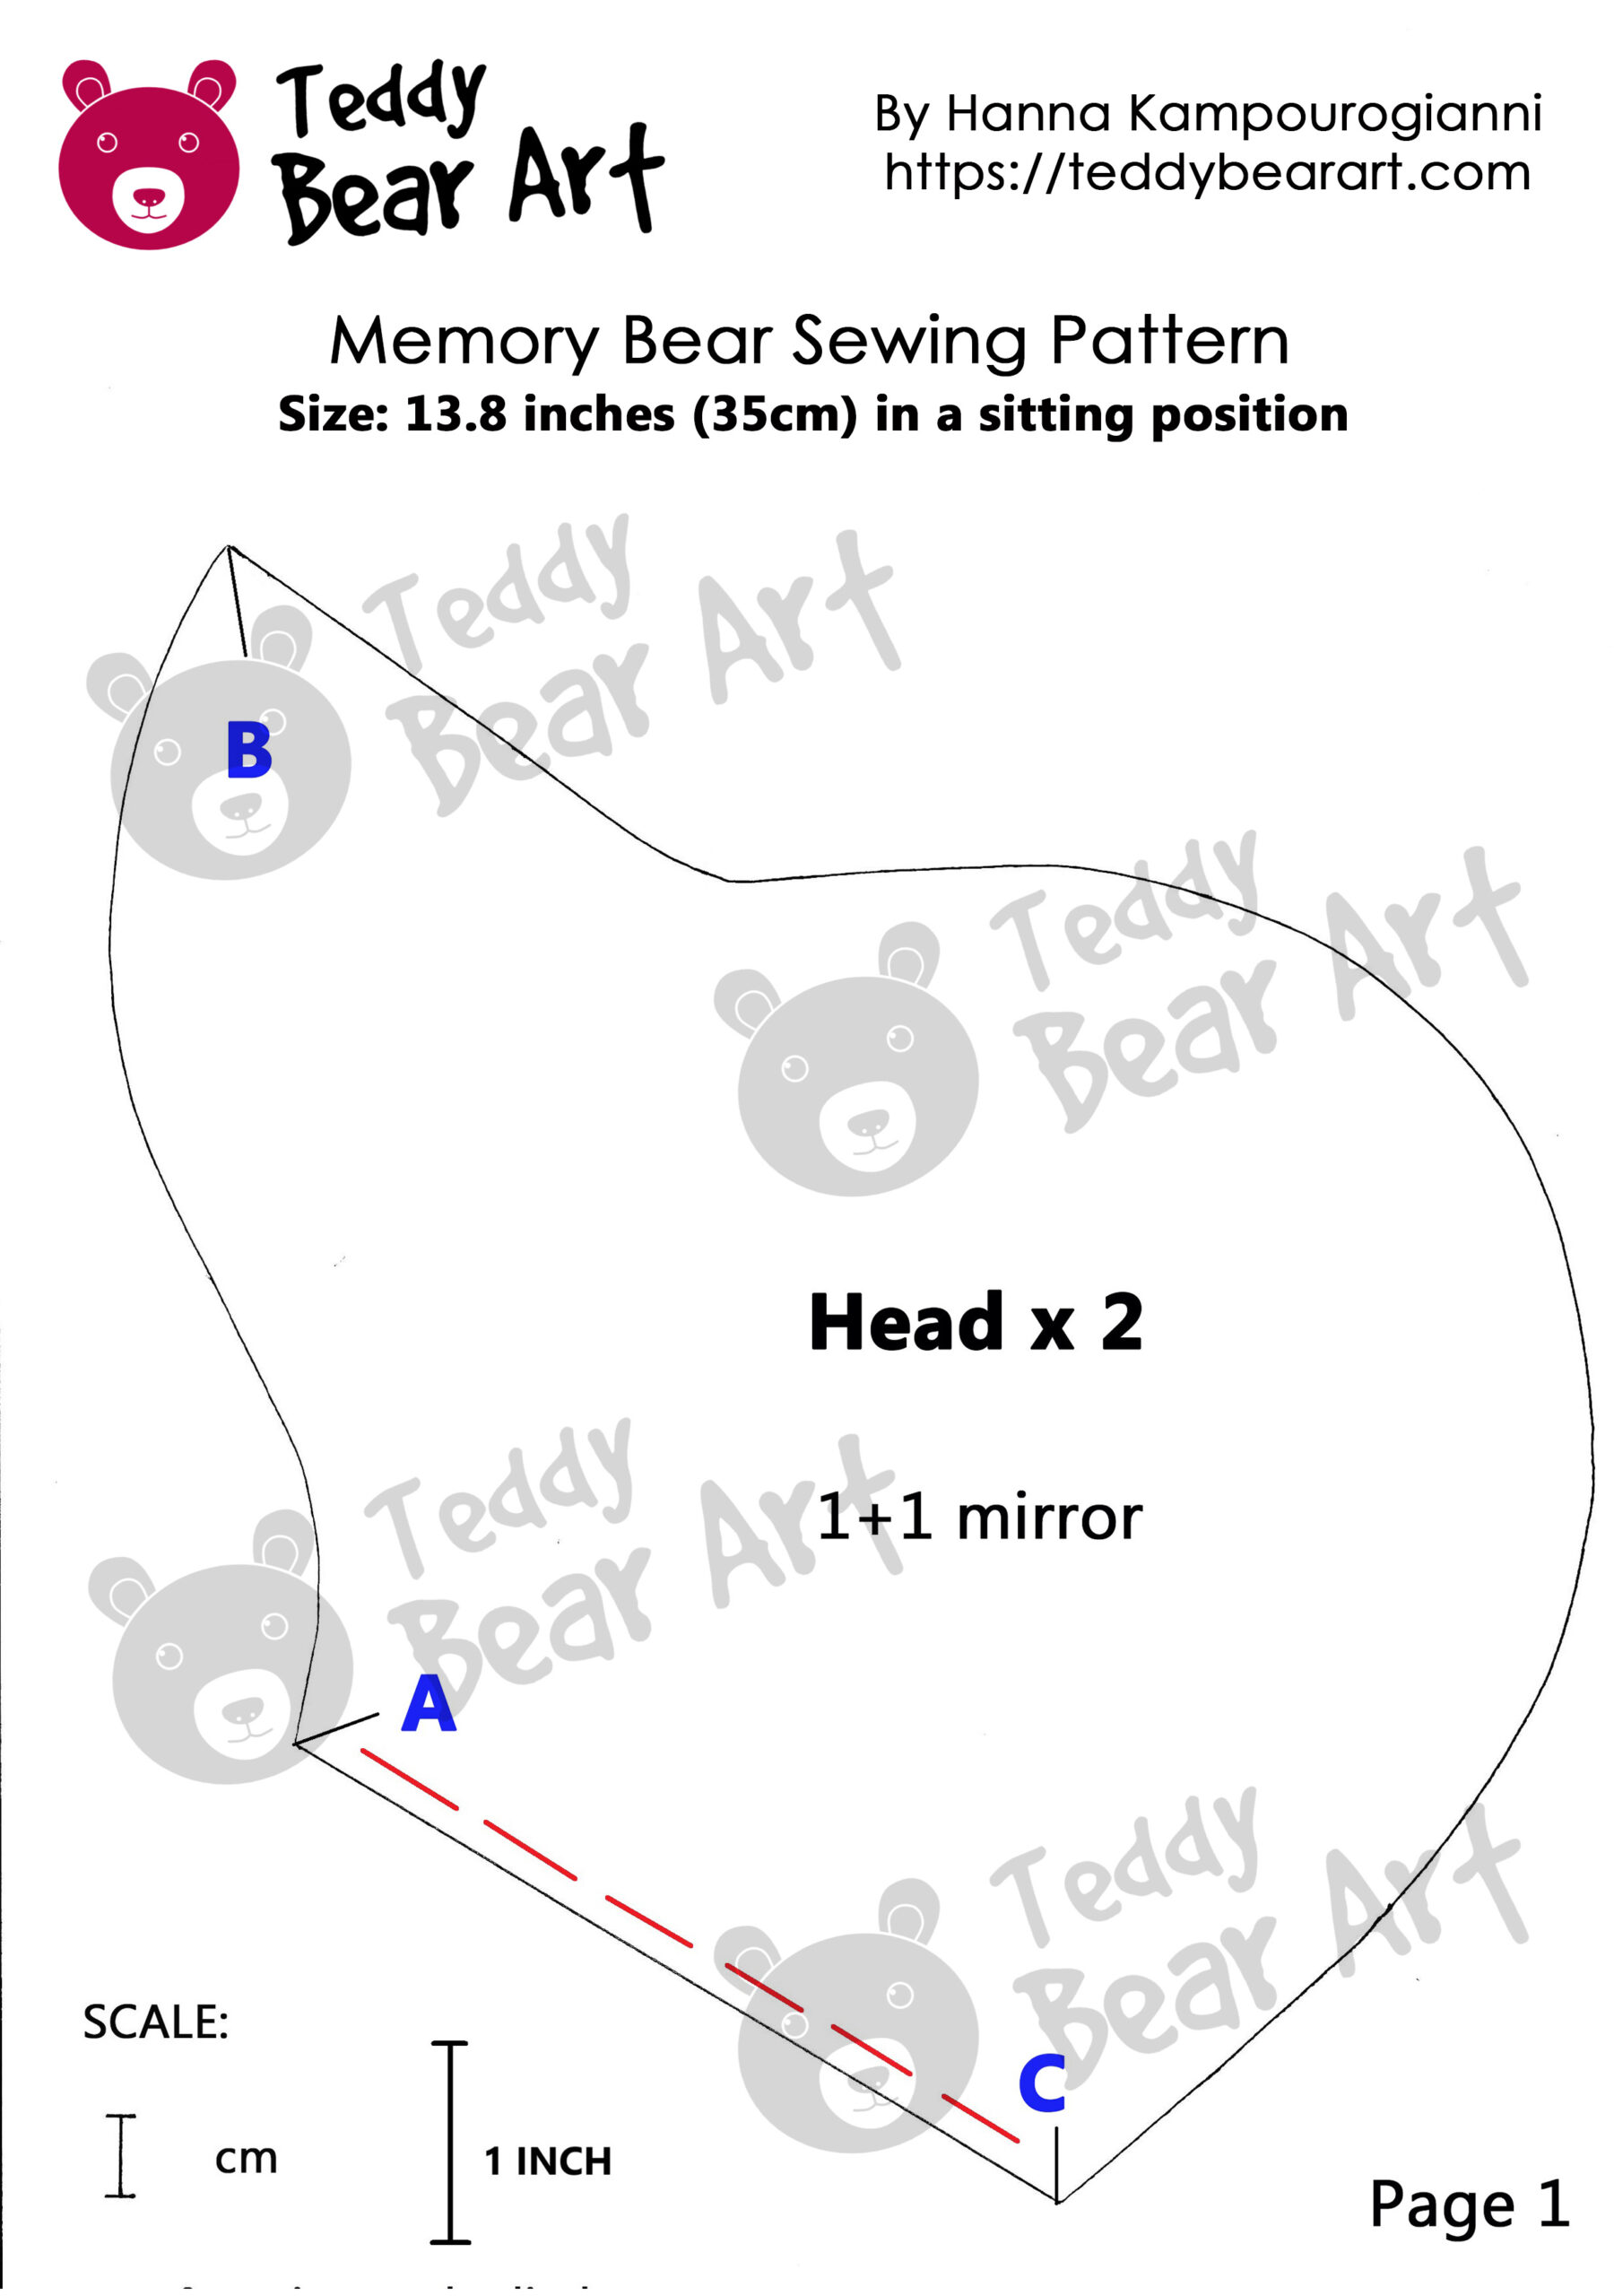
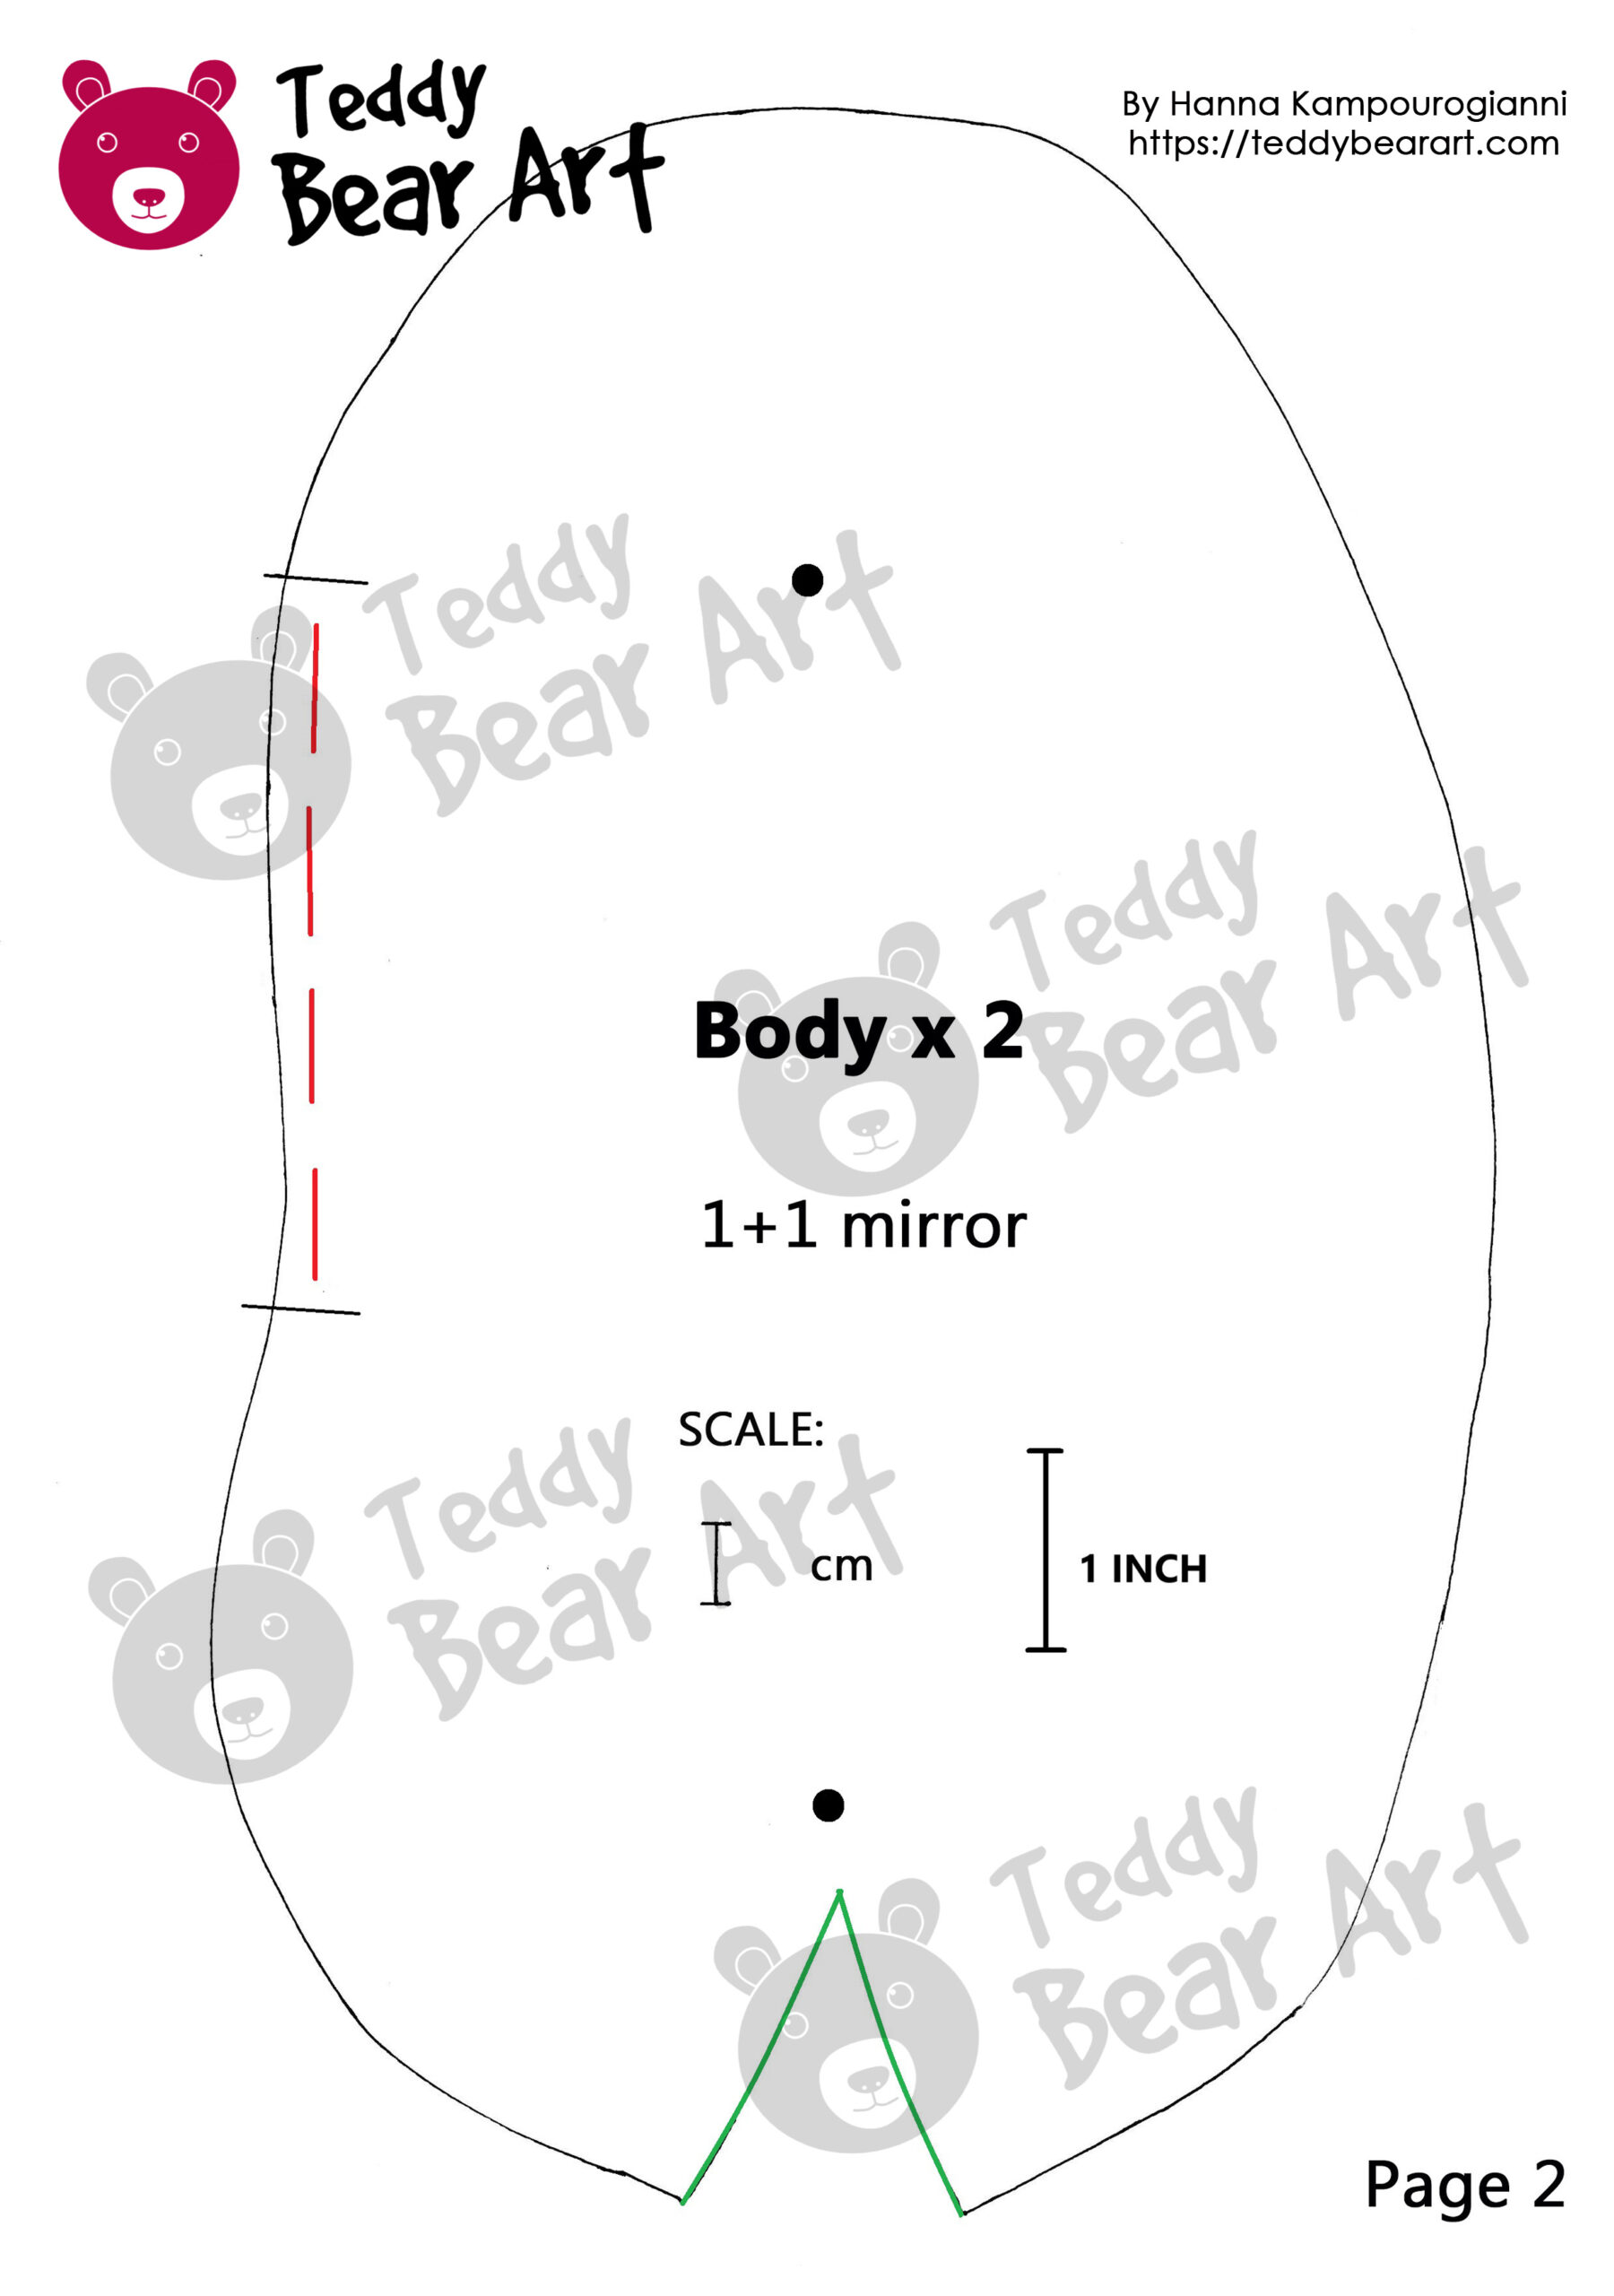
Download Your Free Memory Bear Sewing Pattern
This pattern is designed for a finished bear sitting at 35 cm (13.8 inches) and 57 cm (22.4 inches) tall. It includes clear markings for assembling each part, ensuring a smooth sewing process.
To download the pattern, follow the instructions below:
From a phone or a tablet (Android): There should be something similar for mobile devices with Android or iOS. Click on the image. Save it by holding your finger on the image and selecting the “Save Image” option. Then go to your photo gallery and print it (there is an option).
From a computer (Windows): Click on the photo of the pattern you see below. In the new tab that will open, you press the right mouse button and select the “Save image as …” option. Then, you choose where the image will be saved on your computer.

Materials and Tools Needed
Before diving into the sewing process, let’s gather everything you’ll need:
Essential Materials:
- Cotton fabric in a few different prints (a mix of patterns adds charm)
- Matching thread
- Glass eyes (20mm) for a realistic touch or eyes for your choice
- Synthetic stuffing for a soft, huggable feel
- Buttons for jointed arms and legs
Tools:
- Sewing machine (or hand-sewing supplies)
- Fabric scissors and pins
- Needle and strong thread for button joints
- Embroidery floss (for facial details, if desired)
Step-by-Step Instructions to Sew Your Memory Bear
Step 1: Preparing the Fabric
- Choose and cut fabric pieces as per the pattern.
- If using multiple prints, arrange them thoughtfully for a balanced look.
- Press the fabric to remove wrinkles before sewing.
- Mark the spots for attaching the bear’s limbs.
Step 2: Sewing the Bear’s Body
- Sew up the darts
- Stitch two body pieces together, leaving an opening for stuffing.
- Trim the edges with zig-zag scissors to prevent fraying and avoid fabric puckering when turning the piece right-side out.
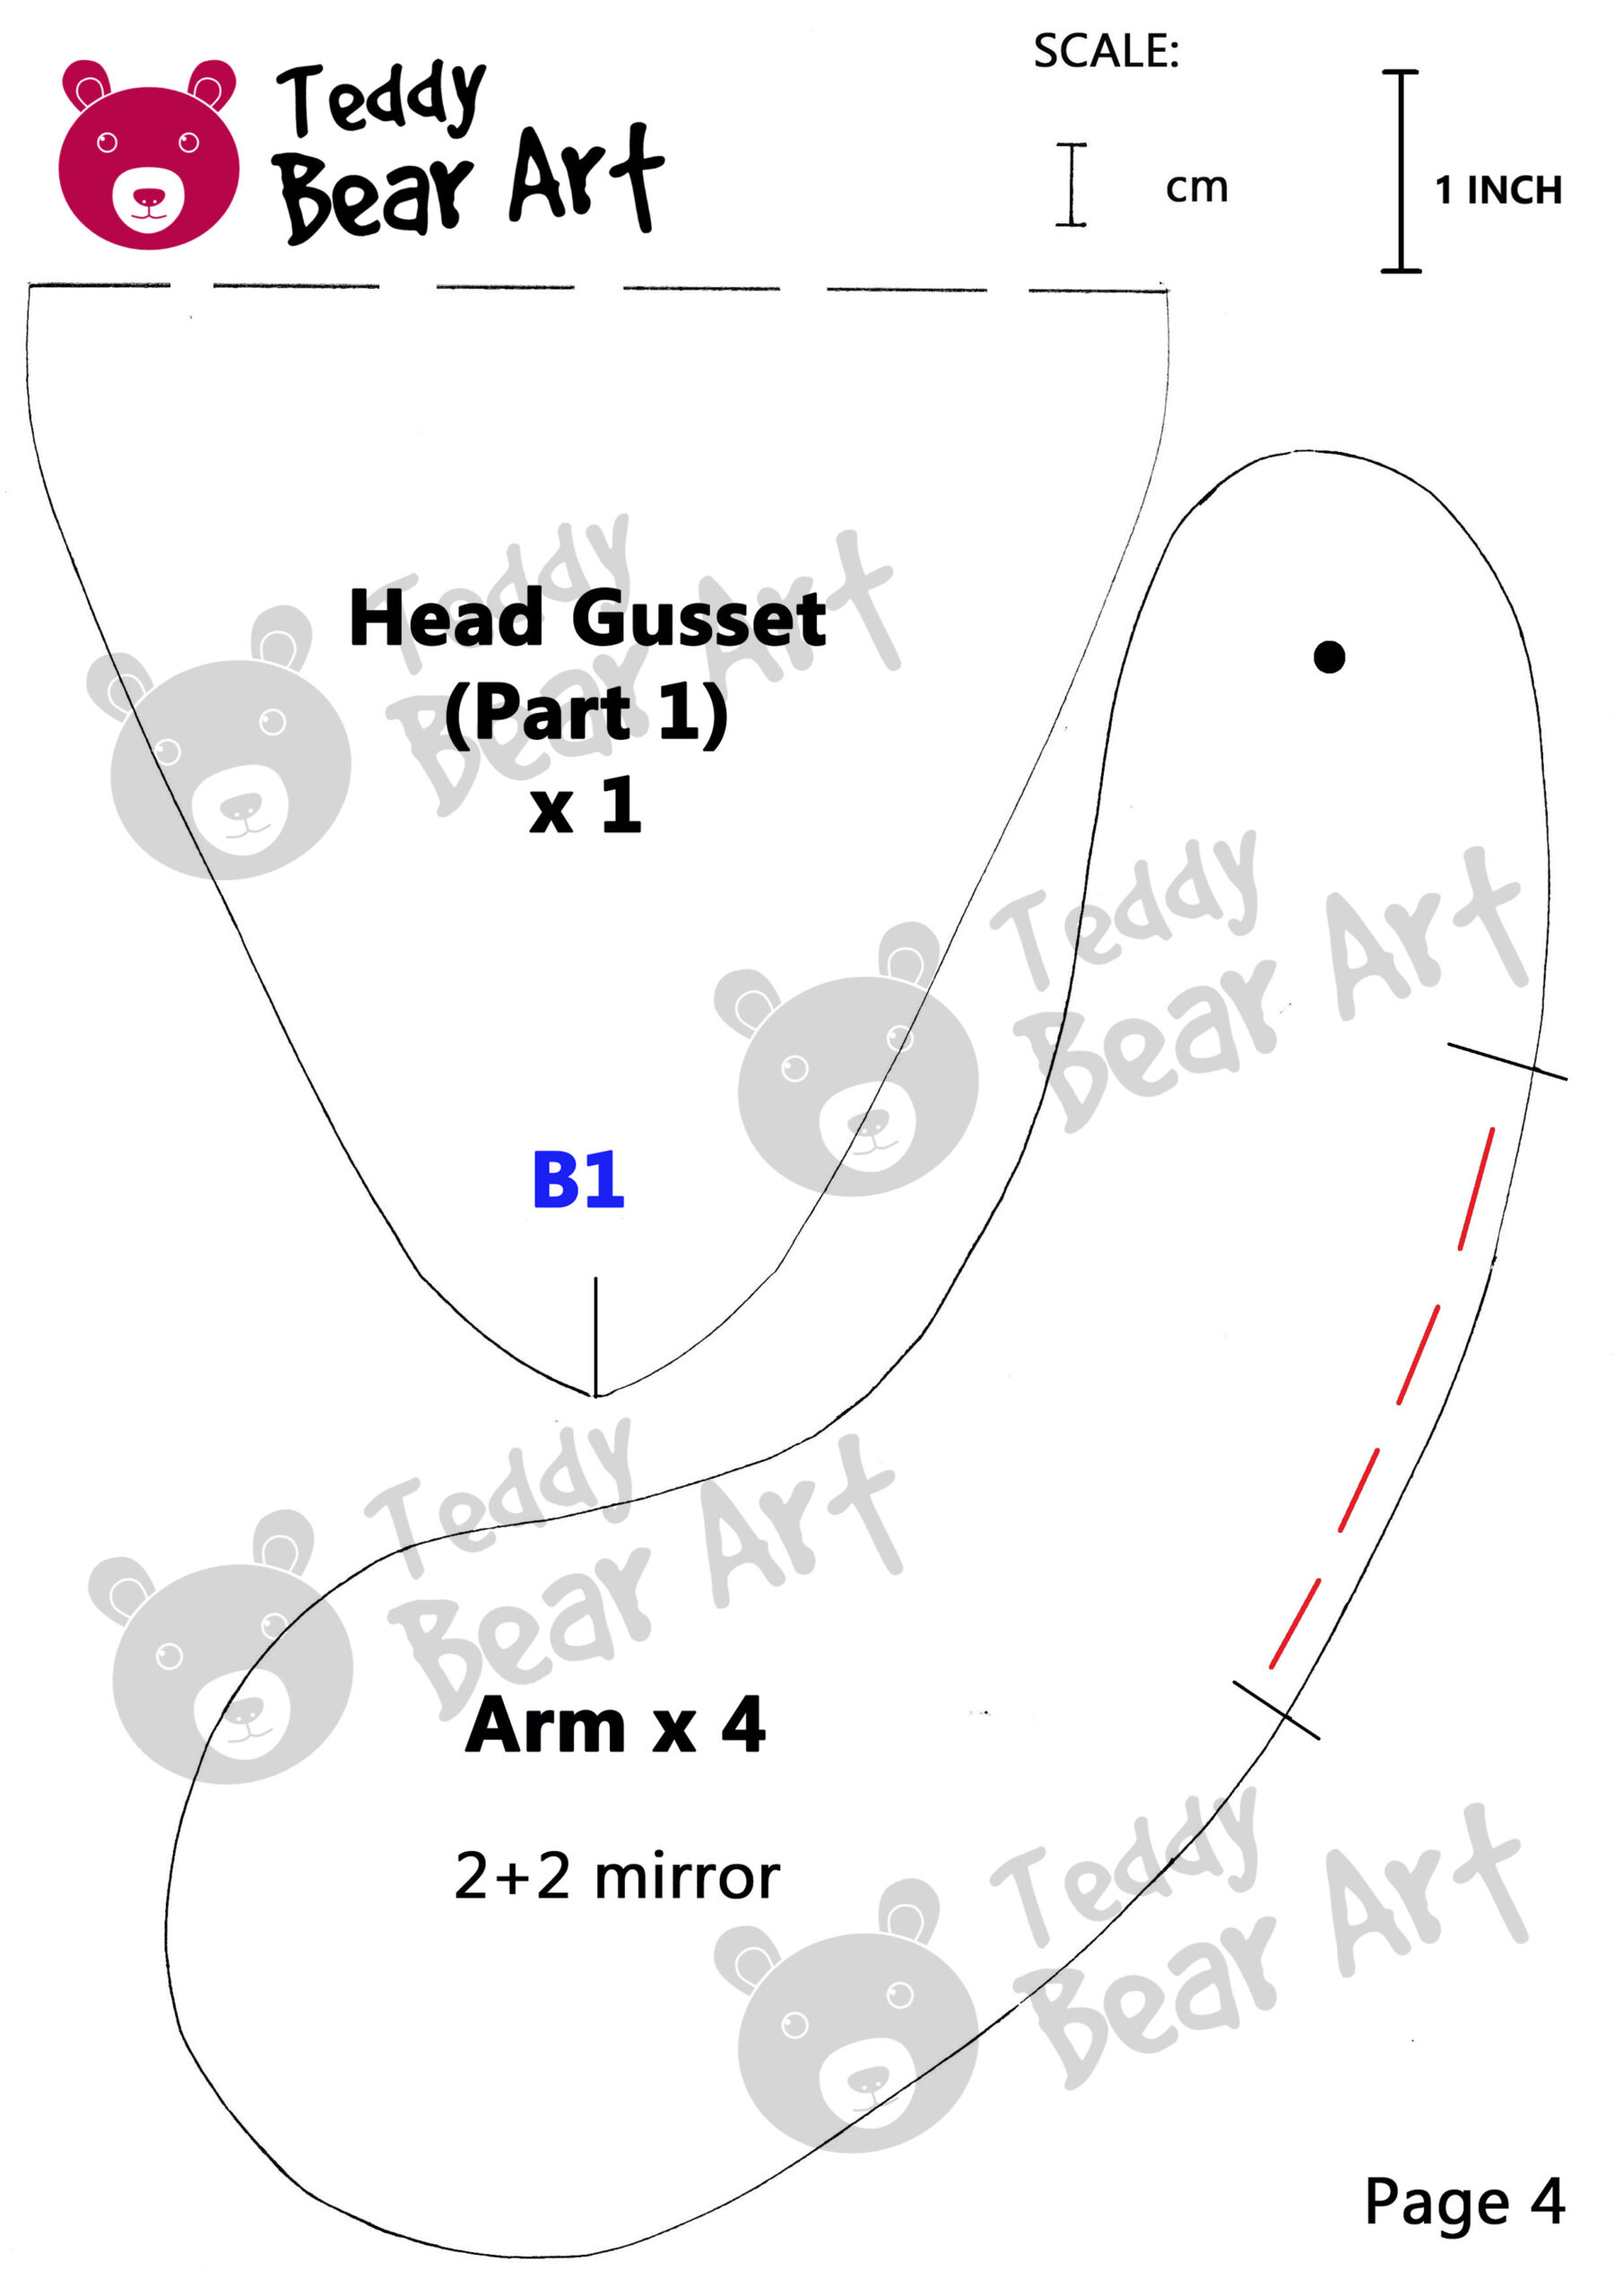
Step 3: Sewing the Bear’s Limbs
- Stitch two mirror pieces together, leaving an opening for stuffing.
- Sew the feet in place.
- Trim the edges with zig-zag scissors to prevent fraying and avoid fabric puckering when turning the piece right-side out.
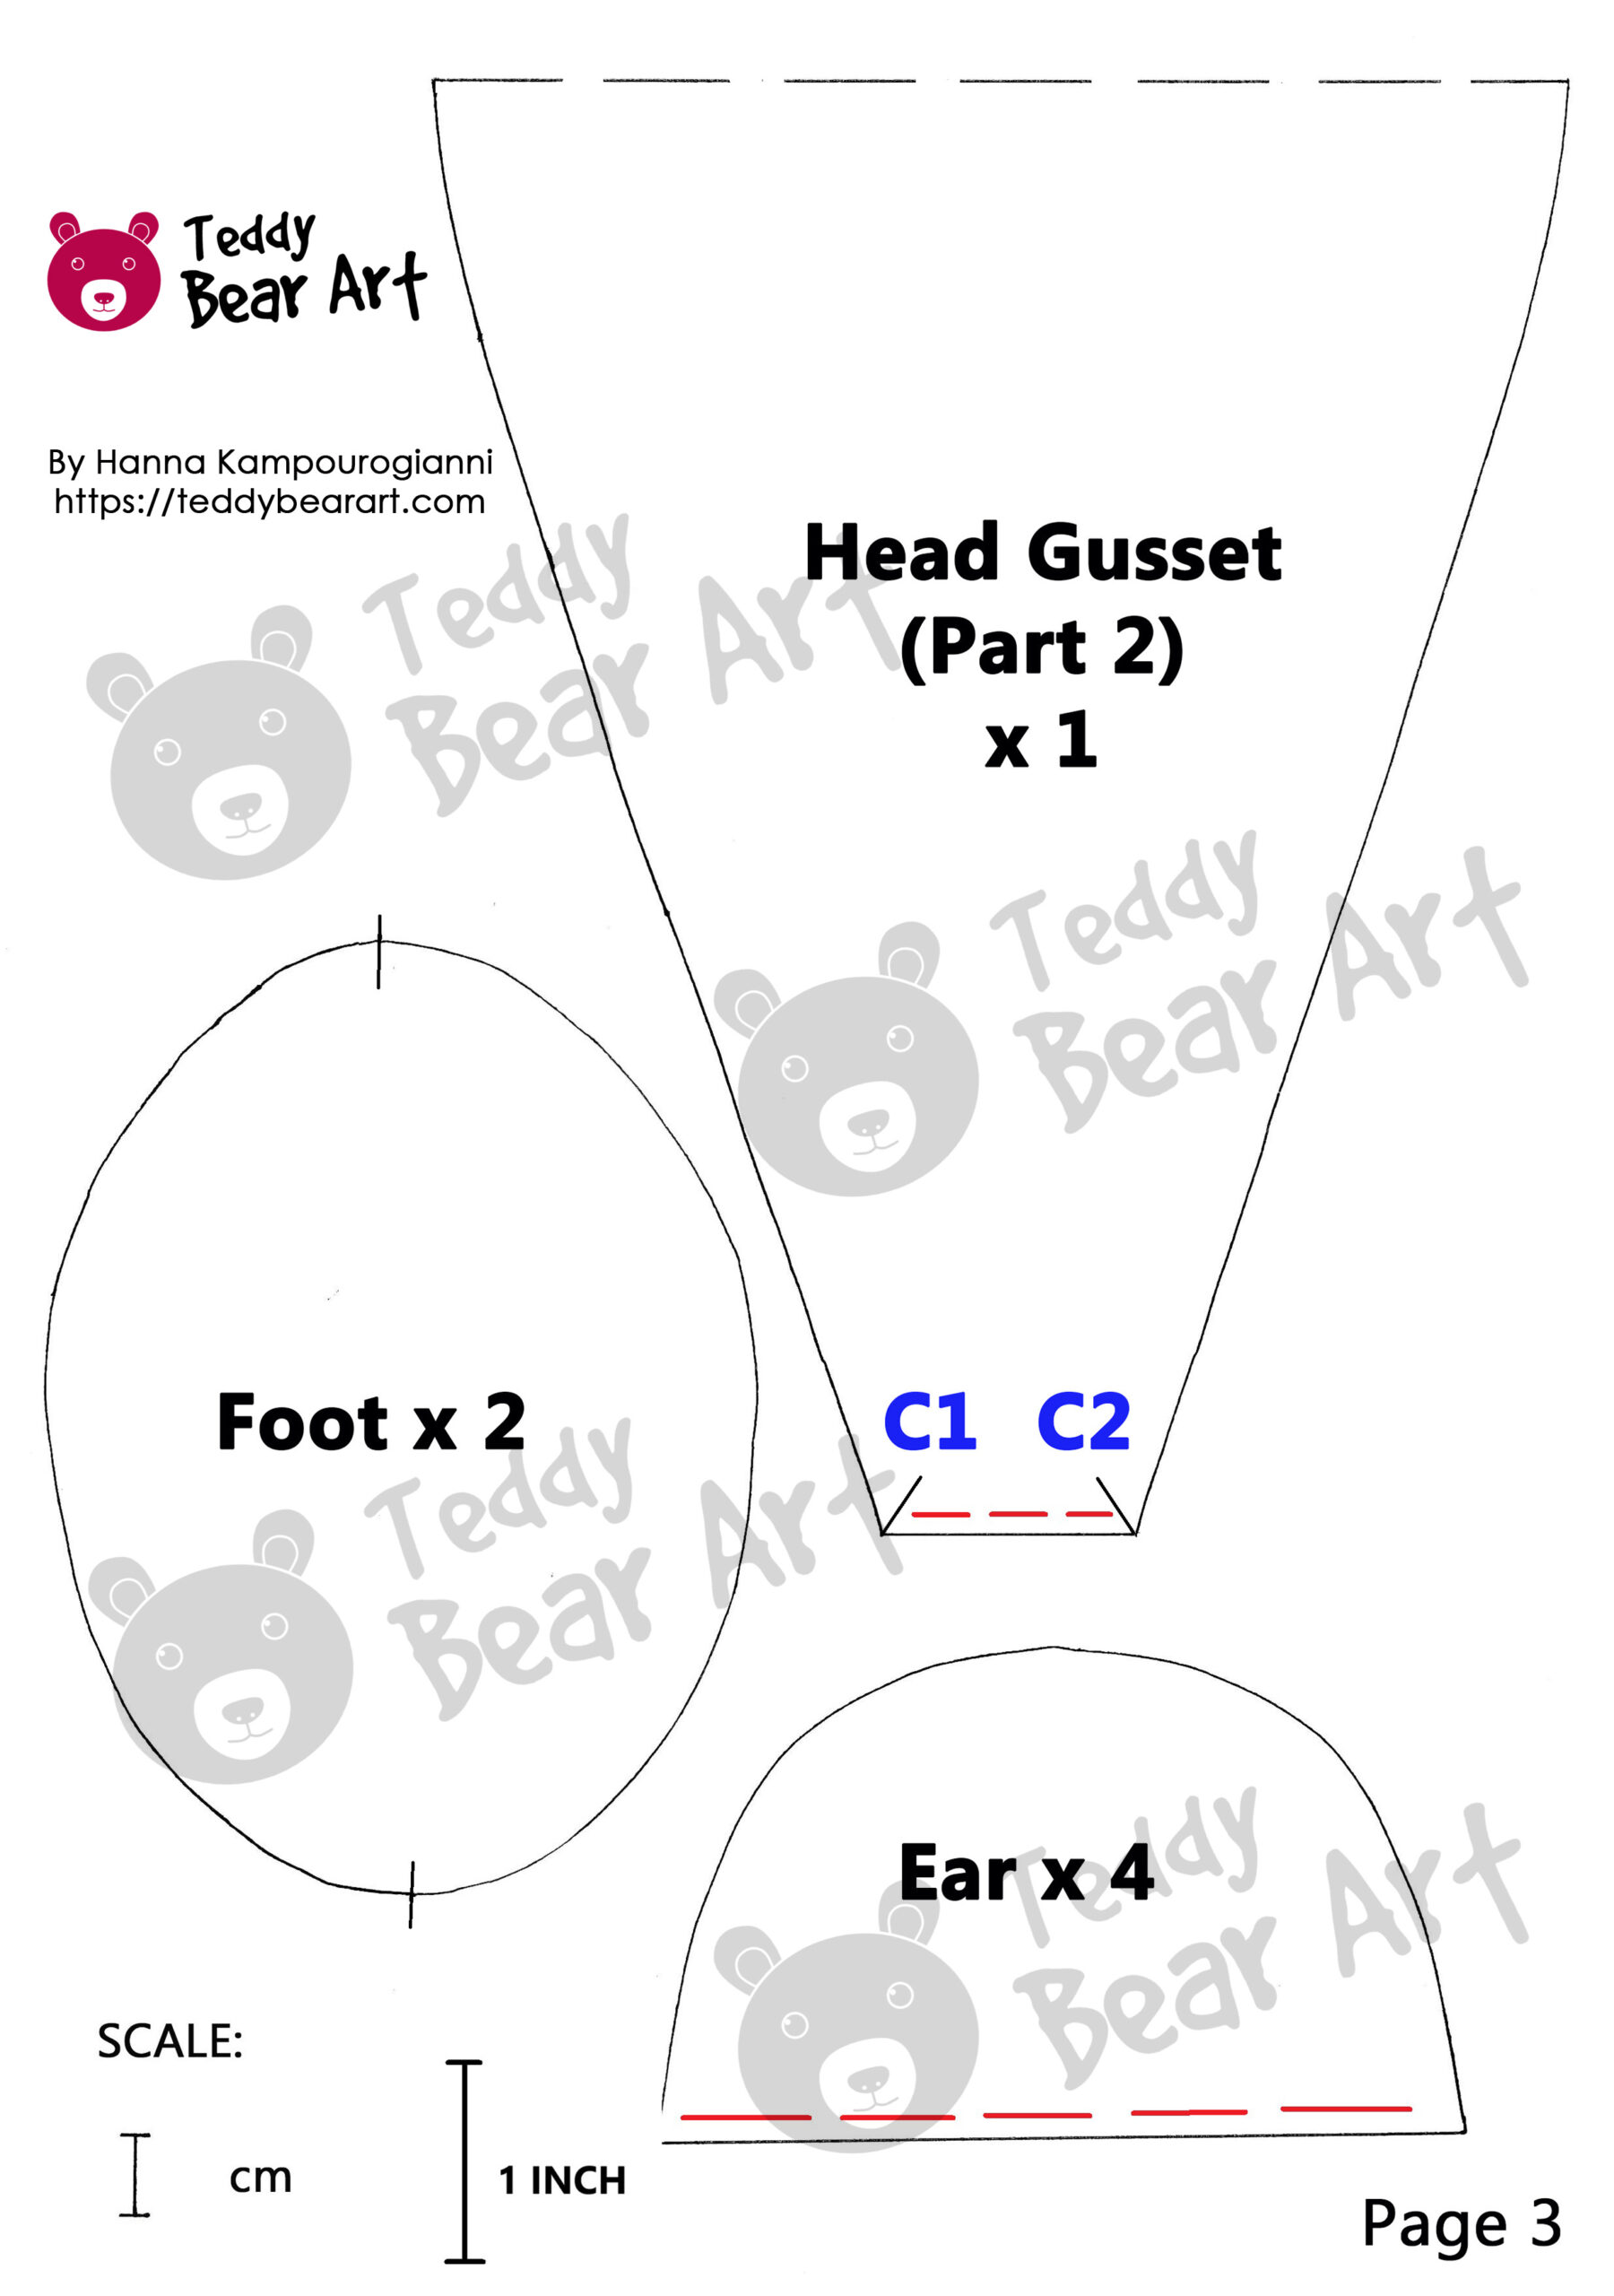
Step 3: Sewing the Bear’s Head
- Stitch the two mirror pieces together following the marks A to B.
- Stitch the two parts of the head gusset.
- Stitch the gusset into the head, following marks B-B1 to C-C1 and C-C2.
- Sew the ears by hand and set them aside for now.
- Trim the edges with zig-zag scissors to prevent fraying and avoid fabric puckering when turning the piece right-side out.
- Fill the head and tighten the neck with strong threads.
Step 3: Stuffing and Shaping the Bear
- Fill all the parts with synthetic stuffing, distributing them evenly.
- Use a small tool (like a chopstick) to push stuffing into smaller areas.
- Avoid overfilling, which can distort the shape.
Step 4: Attaching the Head, Arms, and Legs
- Head: Securely hand-sew the head onto the body.
- Arms and Legs: Use button joints for a traditional movable design.
- Ensure limbs are firmly attached while still allowing movement.
- Explore the detailed tutorial on button and disk jointing methods.
Step 5: Adding Facial Features and Final Touches
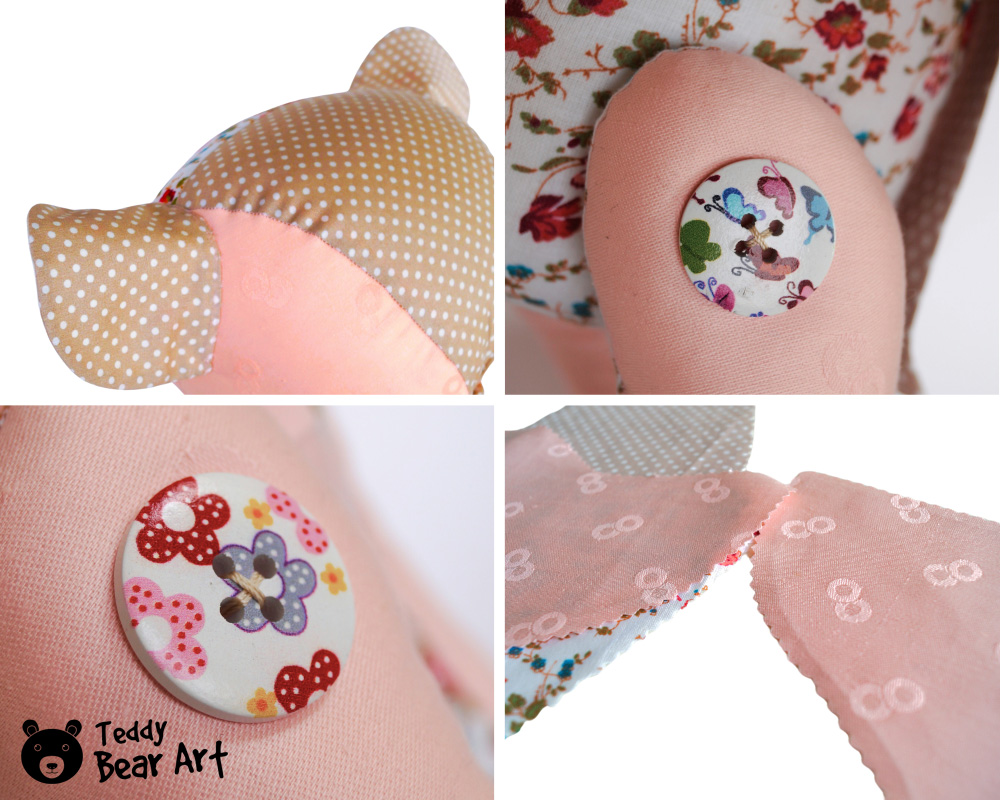
- Insert the eyes into place.
- Sew the ears to the head.
The most common way to attach teddy bear ears is with the ladder (invisible) stitch. This stitch allows the ear to be secured neatly so that the seam is almost invisible. How to make the ladder stitch:
1. Pin the ear to the head to check the correct placement.
2. Thread a strong, matching thread.
3. Make a small stitch in the fabric of the head, then in the fabric of the ear, directly opposite each other.
4. Repeat these stitches, forming a “ladder.”
5. Gently pull the thread — the stitches will disappear inside, and the ear will look as if it naturally grew from the head.
With this method, the ears are firmly attached and look very neat. - Embroider a nose and mouth for a soft, handmade touch. Or create a nose from a piece of fabric.
- Add personal embellishments such as a scarf, ribbon, or monogram.
A detailed demonstration of this technique can be seen in the following video tutorial:
Tips for Customizing Your Memory Bear
Want to make your bear even more special? Here are a few ideas:
- Embroider initials or a meaningful date onto the paw.
- Use a loved one’s fabric for a patchwork effect.
- Add accessories like a bowtie, scarf, or small pocket.
- Scent the bear lightly with lavender or another comforting fragrance.
Final Words
Creating a memory bear is a deeply rewarding experience, transforming simple fabric into a cherished keepsake. With this free memory bear sewing pattern, you can craft a beautiful, meaningful bear to treasure for years to come. Ready to start? Download the pattern and bring your memory bear to life today!
Discover 10 handmade memory bear gift ideas for loved ones!
More About Memory Bears
Dive deeper into the world of memory bears and learn how to craft these sentimental treasures.
- Step-by-Step Guide to Making Memory Bears
Discover the detailed process of creating memory bears, and learn how to turn precious fabrics into lasting keepsakes. Check out the full guide here. - Start Your Own Memory Bear Business
Ready to turn your passion for memory bears into a profitable venture? Learn how to create customized bears and start your own business with our expert tips. Find out more here.
Get Free Patterns & Be the First to Know!
Want free teddy bear patterns, exclusive tutorials, and a chance to win craft supplies?
Sign up for our newsletter using the subscribe form in the middle of this article to receive new patterns, insider tips, and the latest news on teddy bear art. You’ll also automatically be entered into our annual giveaway for a chance to win teddy bear crafting materials.
Bonus entry: Save one of our pins on Pinterest to increase your chances of winning!
Let’s create, inspire, and craft beautiful teddy bears together!
Your project is truly amazing! The concept of turning cherished fabrics into a memory bear is not only innovative but deeply touching. I can just picture the joy and nostalgia that comes with stitching together pieces of fabric that hold such special memories, creating something that your loved ones will cherish for years to come.
I appreciate how your step-by-step instructions and free pattern make this project accessible to everyone, no matter their crafting skill level. It’s such a heartfelt way to keep those memories alive! Thank you for sharing this lovely keepsake idea—your project radiates warmth and creativity.
You are welcome! I am happy that you like this pattern.
Wow, what a beautiful guide on creating memory bears! 🌟
These keepsake bears truly transform ordinary fabric into cherished mementos. I love how this post covers everything from the materials needed to the step-by-step instructions, making it easy for anyone to follow along. The idea of using sentimental fabrics like a loved one’s shirt or baby clothes adds such a personal touch.
I’m excited to try making one myself and maybe even start a new family tradition.
Thank you for sharing this wonderful pattern and all the helpful tips! 🧸💖
By the way, do you have any tips for beginners like me who are just starting? What fabrics are best?
For beginners, I recommend choosing sturdy but not too thick fabrics that are easy to sew and hold their shape well. Great options are cotton, fleece, or tweed. If you’re using stretchy materials like jersey, add interfacing or a thin stabilizer to help the bear maintain its shape.
Have you already chosen the fabric for your first bear? 😊
Hi
Let me start by saying how cute this Teddy bear look, looks like my new snuggle buddy, I can read you put much thoughts into creating a beautiful and at the same time stylish teddy bear and the idea of intergrading memorable attires like baby cloths or wedding attires make it a great memory.
Thank you very much for this great idea and the free pattern!
Hi! Thank you so much for your kind words! I’m so glad you like the idea of making memory bears—using sentimental fabrics makes them extra special. I hope you enjoy creating your snuggle buddy! If you have any questions while sewing, feel free to ask. Happy crafting! 🧸✨
Thank you for this site I want to make a memorial bear from a friend of mine that lost her son ?I had no idea where to begin I found a bear pattern I like from your site going to be honest I have a little anxiety when it comes to the head
I understand that making the head can be a bit nerve-wracking, but don’t worry — we have a detailed step-by-step guide that will help you do it right. In the article, you’ll find all the necessary tips for sewing the head of a memorial bear, and taking it step by step will make the process much easier. Try not to rush, and everything will turn out great. If you have any questions along the way, I’m always here to help! By the way, what exactly about the head is making you uneasy? Maybe I can help you sort it out.
Nice one. I really like the idea of making a memory bear. I haven’t really looked into it before, but this actually makes me want to give it a try. I’ll probably print it out and go through it properly later.
Just curious, what sort of stuffing would you recommend?
Thank you!
For stuffing, I usually recommend high-quality polyester fiberfill (toy stuffing). It’s lightweight, keeps its shape well, and is easy to adjust while you’re shaping the bear. Try to avoid very cheap filling, as it can become lumpy over time.
If you’d like a firmer bear, you can pack the fiberfill a bit more tightly or even combine it with a small amount of wool stuffing for extra density.