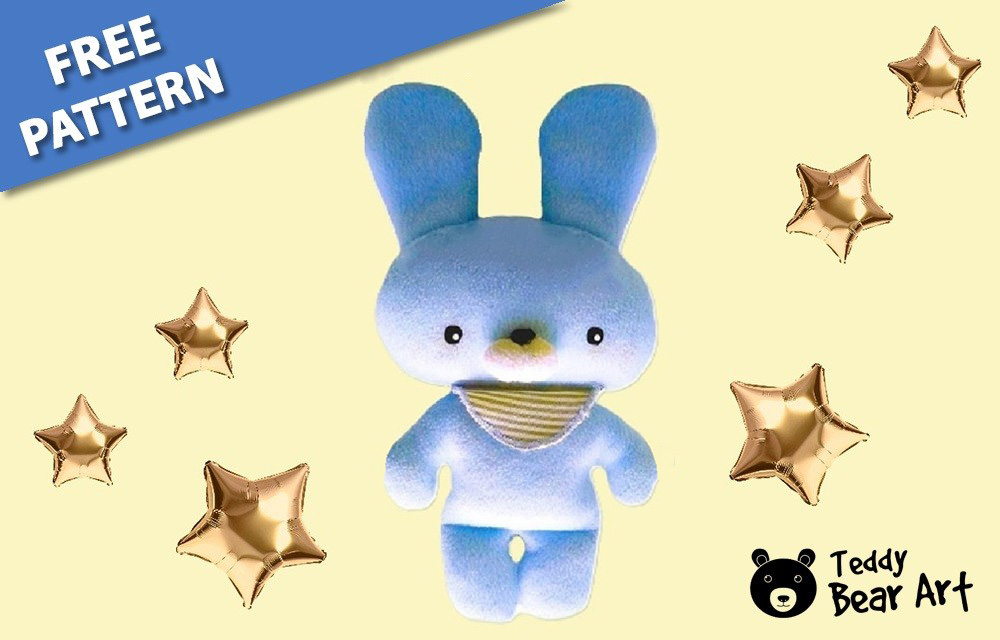
Creating a stuffed bunny is a perfect first project for those new to sewing. This guide walks you through an easy, beginner-friendly process using a free stuffed bunny sewing pattern. With just a few materials and simple steps, you’ll be able to craft an adorable bunny plushie that you’ll love! Plus, the skills you learn here will give you the confidence to take on more sewing projects.
Download Your Pattern
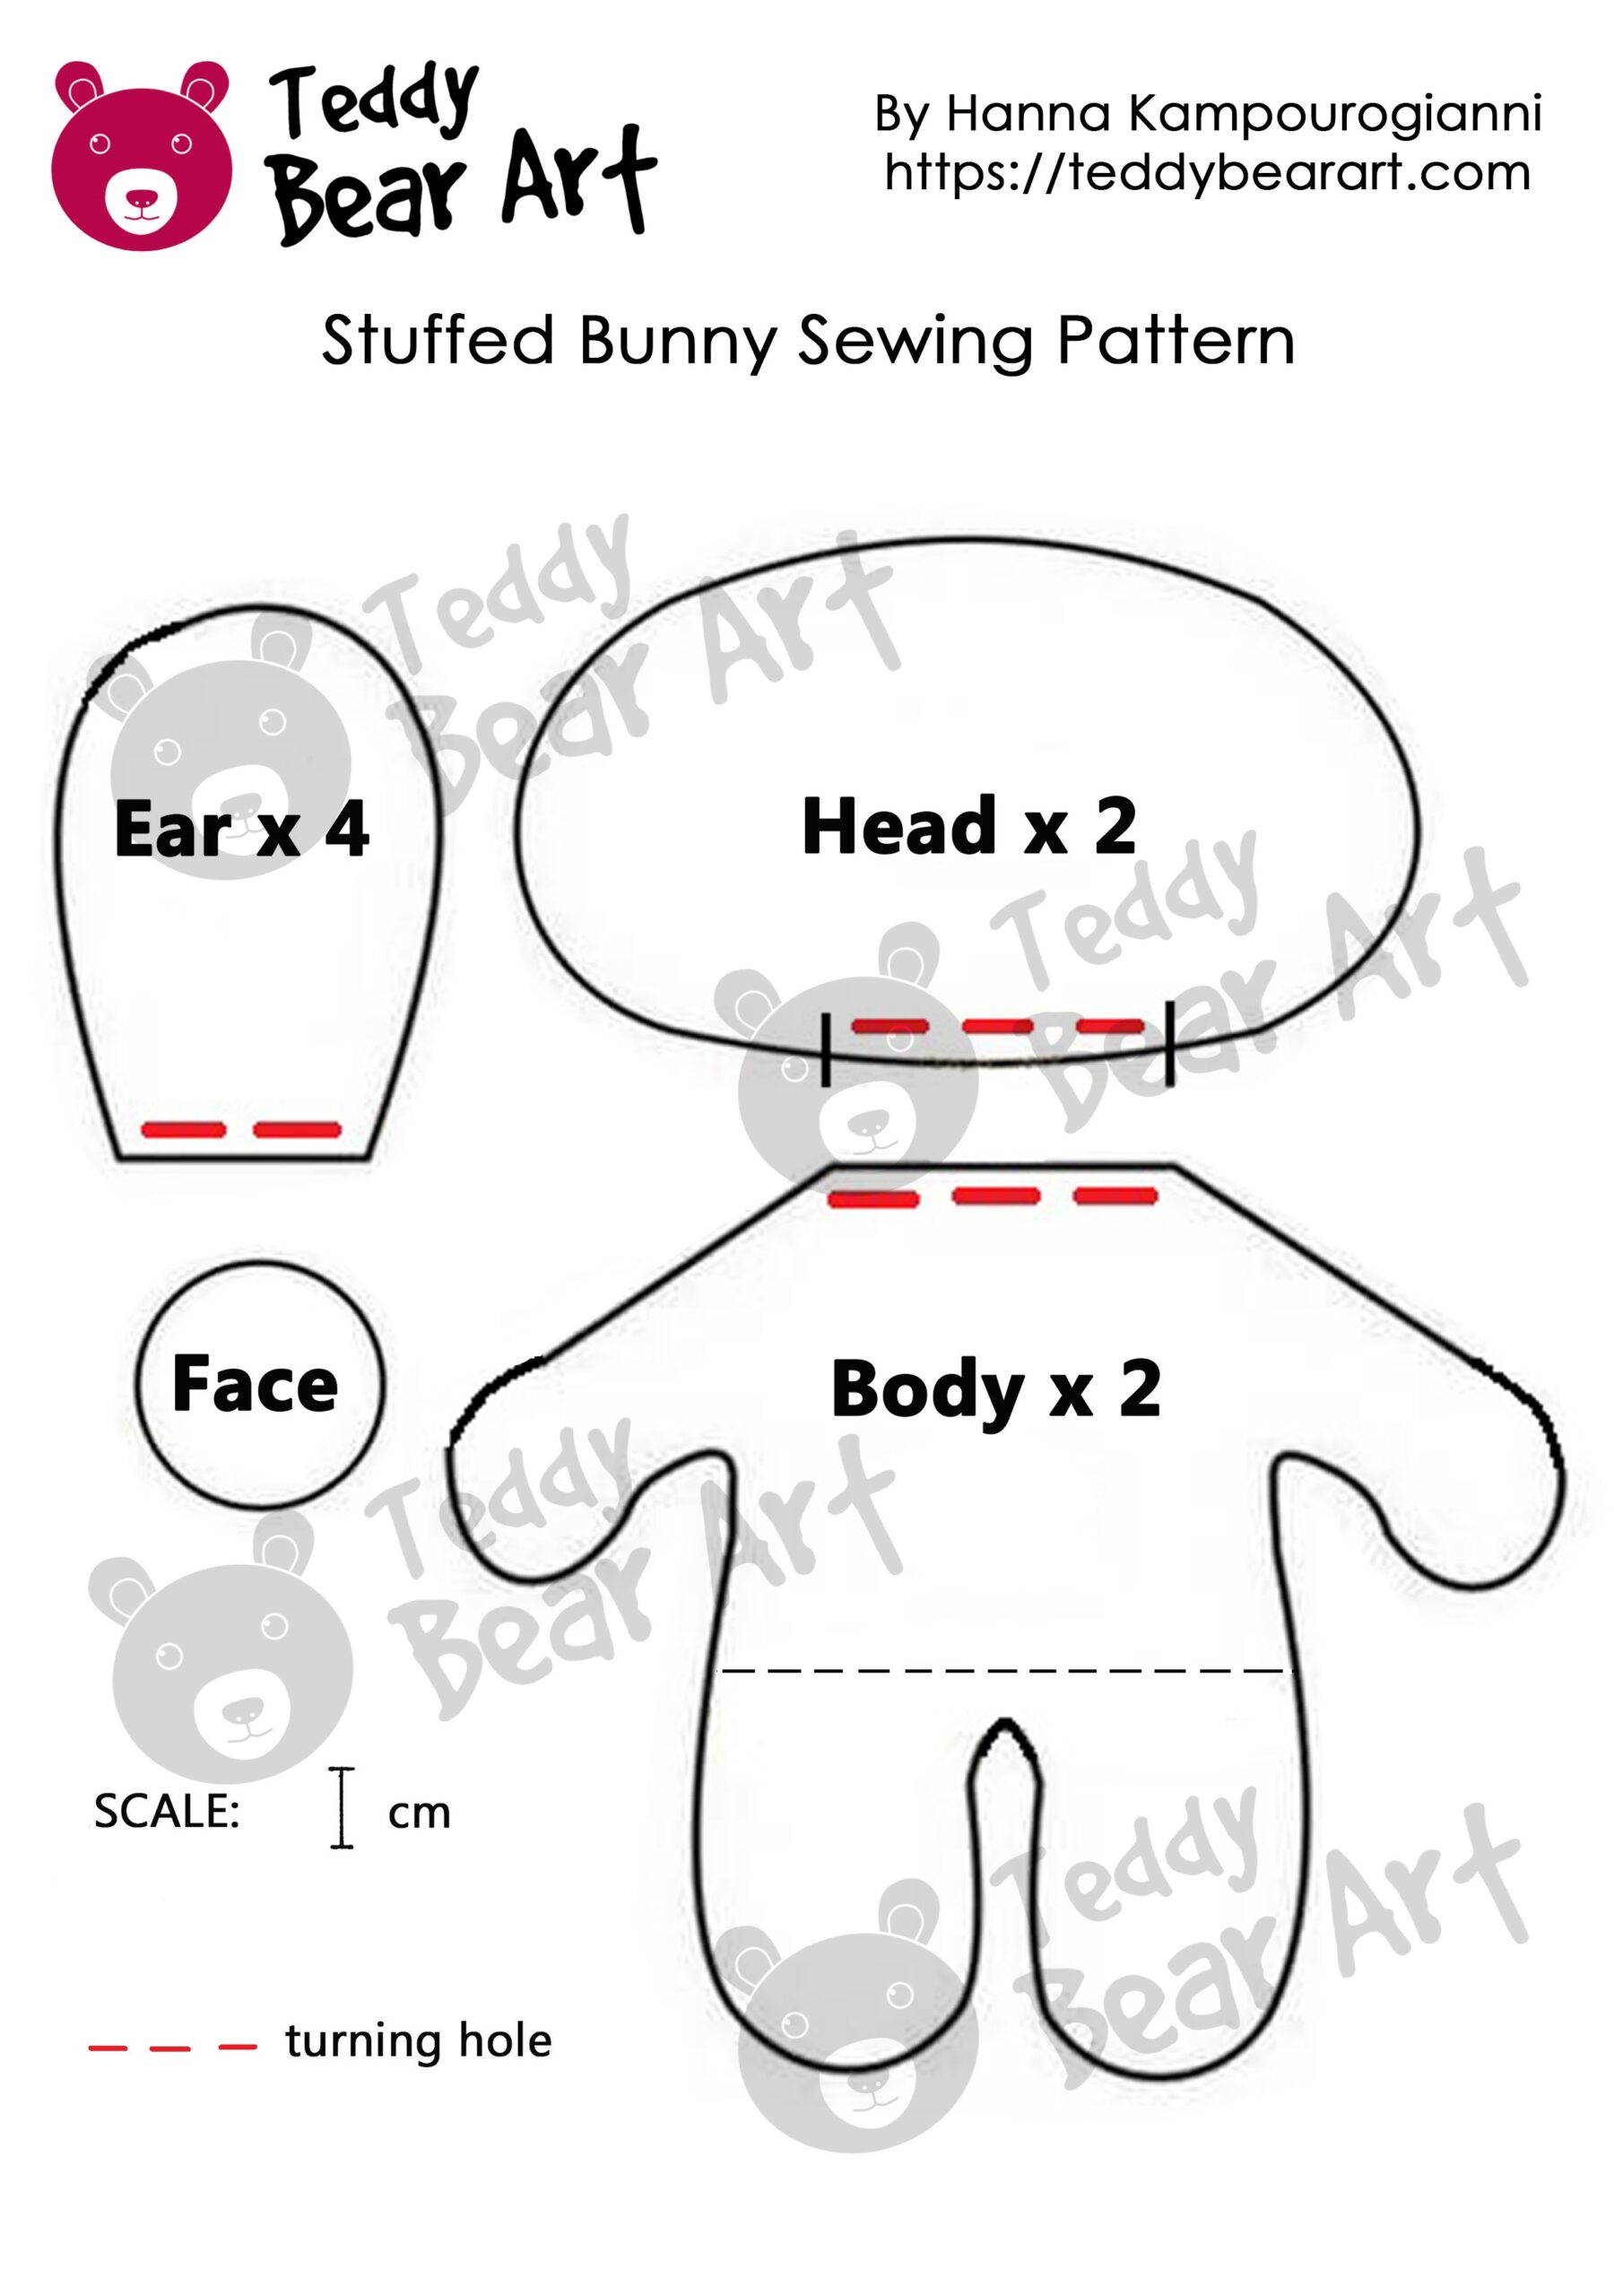
Now, let’s get started by downloading the pattern! This pattern is designed specifically for beginners, so don’t worry about complicated shapes. It comes with clear markings and simple outlines to make the cutting process smooth and easy.
To download the pattern, follow the instructions below:
From a phone or a tablet (Android): There should be something similar for mobile devices with Android or iOS. Click on the image. Save it by holding your finger on the image and selecting the “Save Image” option. Then go to your photo gallery and print it (there is an option).
From a computer (Windows): Click on the photo of the pattern you see below. In the new tab that will open, you press the right mouse button and select the “Save image as …” option. Then you choose where you want the image to be saved on your computer.
Materials You’ll Need
Before we begin, let’s gather the essential materials. Don’t worry if you don’t have much experience, these items are easy to find, and working with them is straightforward!
- Fabric: Soft cotton or fleece (recommended) is perfect for beginners—it’s easy to handle and feels cozy to the touch. You can experiment with solid colors or fun patterns.
- Stuffing: Polyester fiberfill works great. Make sure you have enough to fill your bunny and give it that plush look.
- Sewing Needle or Sewing Machine: Either will do! If you don’t own a sewing machine, hand sewing is absolutely an option.
- Thread: Pick a color that matches your fabric, or go for a contrasting shade if you’re feeling bold.
- Scissors: Sharp fabric scissors will help with precision cutting.
- Pins: These will hold your fabric in place while you sew.
- Optional Extras: Embroidery thread for stitching the face, black bead for a nose, acrylic paints, or fabric markers if you prefer to draw on the features.
Step-by-Step Instructions
Now that you have your pattern, it’s time to dive into the fun part—putting your bunny together! Before you begin, check out this list of sewing stitches to help you get the job done.
Step 1: Cut Your Fabric
Start by laying out your fabric and pinning the pattern pieces on top. Leave a seam allowance: after tracing the pattern, step back from the traced line and leave about 0.5 cm to 1 cm around the edges.
Carefully cut around each piece, making sure you’re as precise as possible. Pro tip: if you’re using fabric with a pattern, pay attention to the direction of the print to make sure it looks the way you want on the finished bunny.
Step 2: Sewing the Bunny’s Head
Once you’ve cut out the head pieces, place them with the right sides facing each other. Sew around the edges, leaving a small opening at the bottom for stuffing. If you’re using a machine, remember to go slow to avoid any accidental slippage of fabric. If you’re sewing by hand, a backstitch stitch will do the trick.
Step 3: Sewing the Bunny’s Body
Do the same with the body, leaving a small opening at the top for stuffing.
Step 4: Sewing the Ears
Next up are the ears! Sew the ear pieces together and turn them right-side out. Close the openings with the ladder stitch. You can even add a little extra stuffing to the ears if you want them to have more structure.
Step 5: Stuffing the Bunny
Carefully fill the bunny’s head and the body with stuffing. Start with small amounts to ensure that the stuffing spreads evenly. Use your hands to gently mold the shape until the bunny is plump and huggable. Avoid overstuffing, as this might stretch the fabric or cause the seams to pop. Clothe the openings.
Step 6: Assembling the Parts
Attach the ears to the head, ensuring they’re positioned symmetrically. Attach the head to the body. Use a running or back stitch on the body to visually separate the bunny’s legs.
Step 7: Adding the Bunny’s Face
Cut out a circle (mark FACE), pull it together with a simple stitch, add stuffing, and then pull it together in the middle — you’ll get the rabbit’s cheeks. Sew them to the head.
You can sew a black bead instead of a nose. The eyes can be embroidered or painted with acrylic paints or markers. Pro tip: it is better to use stretching fabric for the face.
Tips for Beginners
Sewing your first stuffed animal can feel a little intimidating, but remember to take it slow. Here are a few extra tips to ensure your first sewing project goes smoothly:
- Use Pins Generously: Pinning your fabric securely can save you from uneven edges and misaligned seams.
- Start with Small Stitches: If you’re hand-sewing, small, even stitches help ensure your bunny is durable and well-made.
- Trim the Curves: When sewing a bunny, it’s important to trim the curves to prevent the fabric from bunching up when you turn it inside out. This is especially necessary for curved areas like the ears, paws, and legs. If not trimmed properly, the fabric may wrinkle or stretch when flipped. To avoid this, carefully make small cuts along the curves, making sure not to cut too close to the seam. The cuts should be about 3 mm apart, allowing the fabric to stretch evenly when turned. This helps create a smooth, rounded shape with no unwanted folds. If you’ve already used zigzag scissors, the task becomes even easier!
- Practice Makes Perfect: Don’t be afraid to practice on scrap fabric before diving into the actual project. This will help you get used to your materials and tools.
Personalizing Your Bunny
Want to make your bunny even more special? Here are some fun ideas to give it a personal touch:
- Add a Bow or Scarf: Use scrap fabric or ribbon to create a little accessory for your bunny.
- Experiment with Fabrics: Try mixing patterns or using a different color for the ears and body.
- Create a Whole Bunny Family: Make bunnies in different sizes using the same pattern—just scale it up or down on your printer!
Final Words
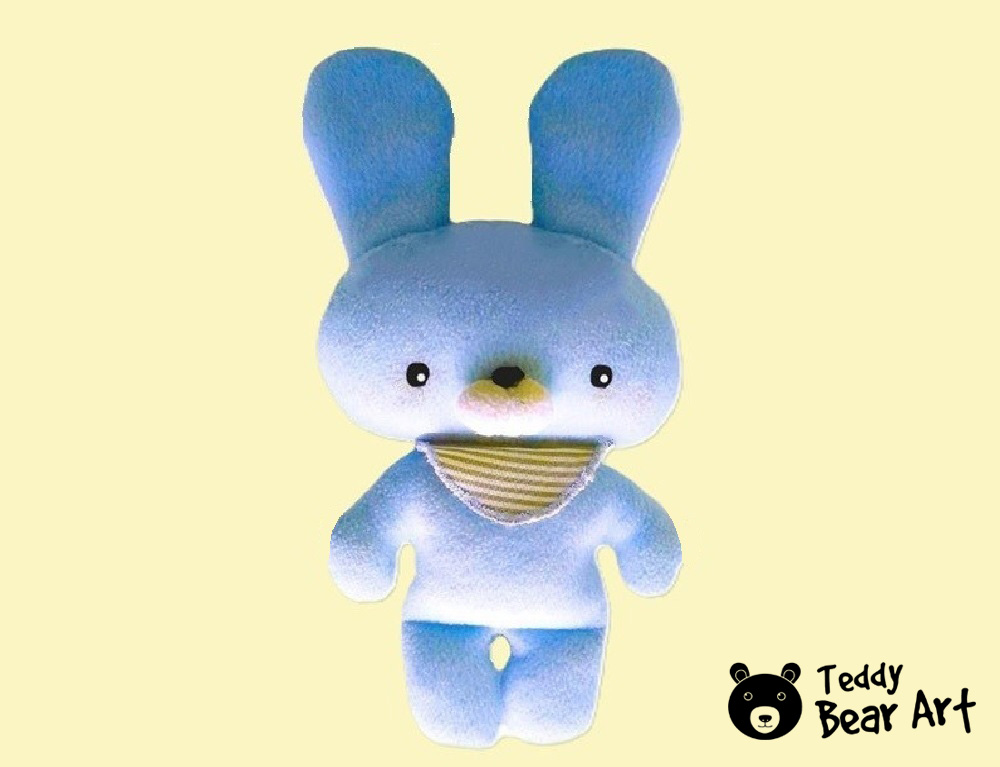
That’s it! You’ve successfully completed your stuffed bunny using a free pattern, and you now have a cute, handmade friend to show for it. This project is simple enough for beginners but still offers plenty of room for creativity and customization.
Don’t forget to share your finished bunny with us on social media using the hashtag #teddybearart, and feel free to leave any questions in the comments below.
For more goodies, be sure to check out the teddy bear sewing pattern for beginners! This step-by-step guide is perfect for those taking their first steps into sewing, offering clear instructions to help you create your very first bear.
Also, don’t miss the tips and tricks for choosing the perfect plush. This guide will walk you through how to pick the best fabric for your bear-making projects, with expert advice for beginners to get the perfect plush texture!
Happy sewing!
Get Free Patterns & Be the First to Know!
Want free teddy bear patterns, exclusive tutorials, and a chance to win craft supplies?
Sign up for our newsletter using the subscribe form in the middle of this article to receive new patterns, insider tips, and the latest news on teddy bear art. You’ll also automatically be entered into our annual giveaway for a chance to win teddy bear crafting materials.
Bonus entry: Save one of our pins on Pinterest to increase your chances of winning!
Let’s create, inspire, and craft beautiful teddy bears together!
Hey thank you for this post!
My sewing passion came when we were taught how to sew in school a couple years ago, I didn’t know how fun it I can be until we were taught and since then I have been thinking to maybe sometime create a awesome teddy or some sort of product.
Coming across your post has made me realise that it can be easy to sew even if you aren’t a pro. I really appreciate how you have included all the required resources, it makes it all the more easier
Thanks again and have a great day!
Hi there! Thanks so much for your lovely comment! I’m so glad to hear that you discovered your passion for sewing in school—it really can be a lot of fun! Creating a teddy or any stuffed product sounds like an amazing project, and I’m here to help you every step of the way. It’s true that sewing doesn’t have to be intimidating, especially with the right resources. If you have any questions or need tips as you get started, feel free to reach out. Happy sewing, and have a fantastic day!
I’ve always wanted to try sewing stuffed animals, but I wasn’t sure where to start. Your step-by-step guide makes it seem so doable, and I love that it’s beginner-friendly! I’m definitely planning to give this a shot. Have you made any other patterns that you’d recommend for beginners? I’d love to see more cute projects like this! Thanks for sharing
Thank you so much for your kind words! 😊 I’m so happy to hear that this guide inspired you to try sewing stuffed animals. It’s definitely doable, especially with a bit of patience. For beginners, I’d recommend one more simple and cute pattern. You can find it here: teddy bear sewing pattern for beginners. I hope you find it helpful, and feel free to reach out if you have any questions. Happy sewing! 🧵🐻
This guide is absolutely fantastic for beginners! I love how clear and straightforward the steps are. The tips about trimming the curves are especially helpful. The downloadable pattern makes it so easy to get started. I appreciate the emphasis on taking things slow and practicing on scrap fabric. It’s all about enjoying the process, I wish I’d known that when I first started sewing! Can’t wait to give this bunny a try!
Thank you so much for your kind words! I’m delighted that you found the guide helpful, especially the tips on trimming curves. Taking it slow and practicing on scrap fabric can make the process more enjoyable. I hope you have fun making your bunny, and I’d love to see how it turns out!