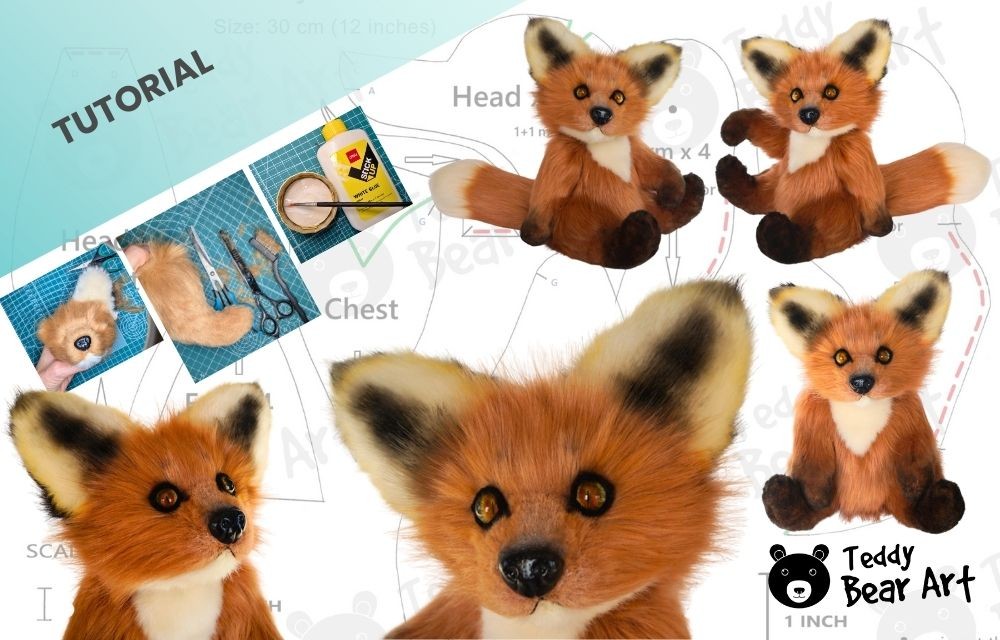
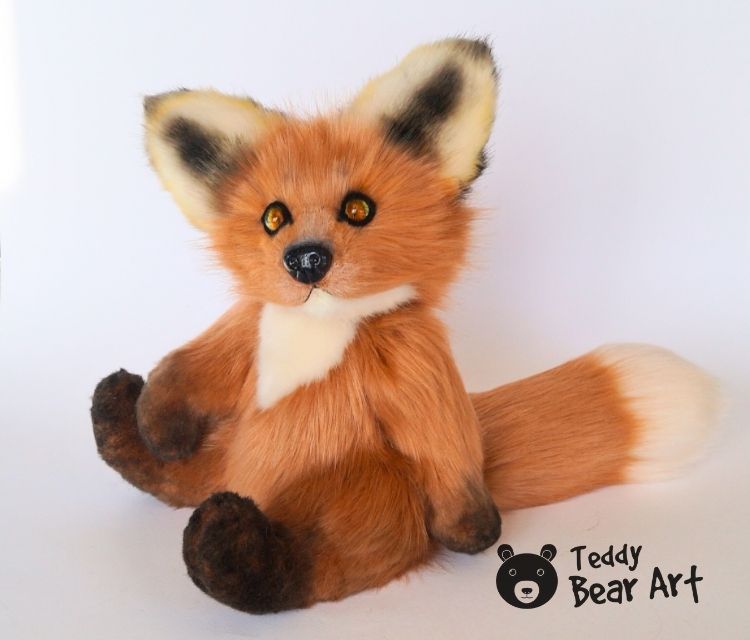
Creating an artist fox in traditional teddy technique is a rewarding project for experienced makers who enjoy working with faux fur, joints, and sculpted details. In this guide, we demonstrate how to sew a fox teddy bear using a free pattern and a detailed, step-by-step tutorial that incorporates professional techniques.
This project is designed for experienced teddy artists and confident plush makers, rather than beginners, as it involves jointed construction, fur trimming, sculpting, and advanced surface finishing. If you already have experience with classic teddy bears, this fox will be an exciting and satisfying challenge.
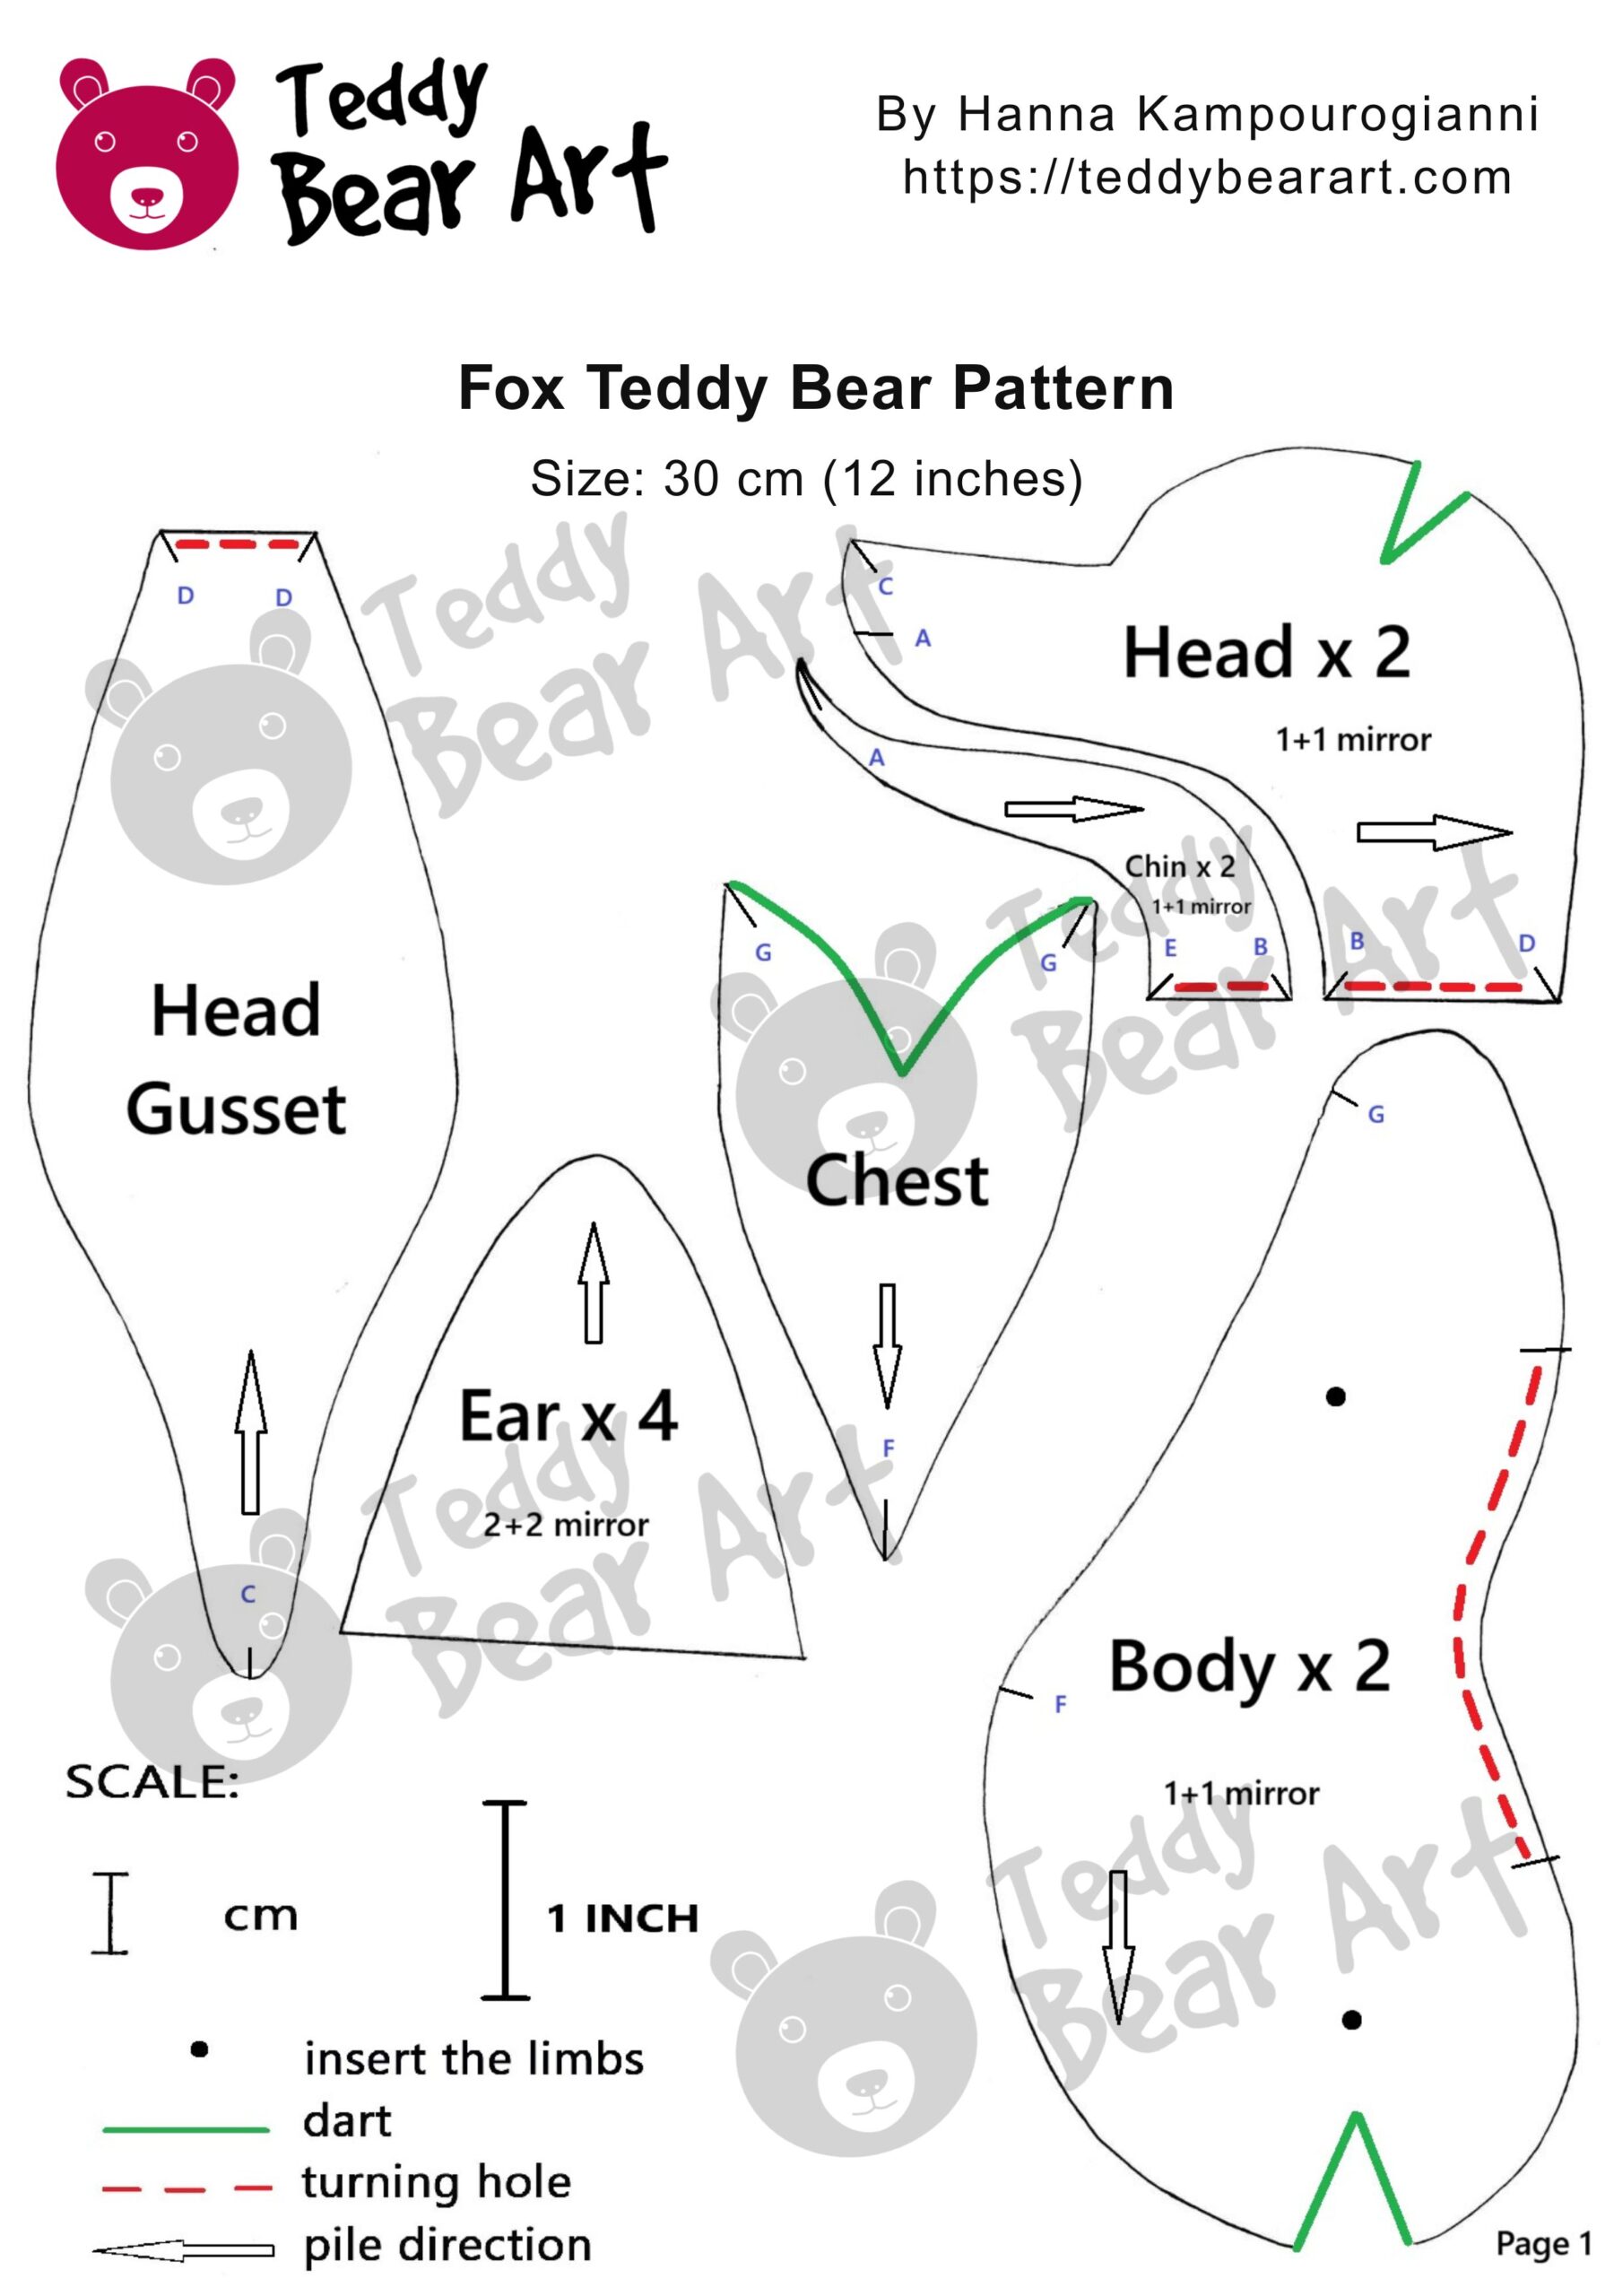
Download the Pattern
Notice that seam allowances are not included.
To download the pattern, follow the instructions below:
From a phone or tablet: There should be a similar option for mobile devices with Android or iOS. Click on the image. Save it by holding your finger on the image and selecting the “Save Image” option. Then, go to your photo gallery and print it (an option available).
From a computer: Click on the photo of the pattern you see below. In the new tab that will open, you press the right mouse button and select the “Save image as …” option. Then, you choose where the image will be saved on your computer.

Materials and Tools
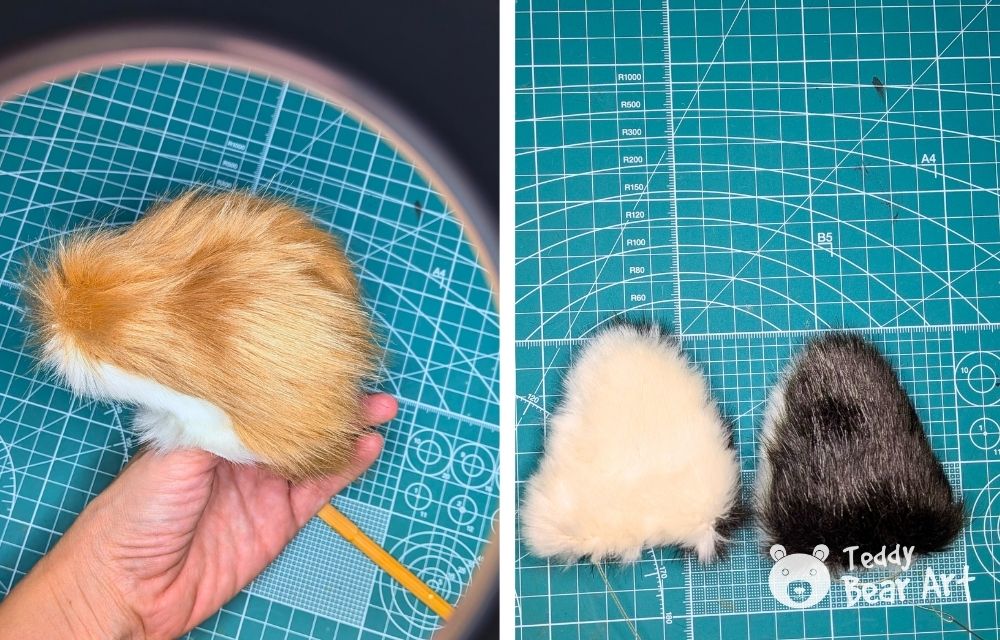
Faux fur
- Orange faux fur, pile length about 3 cm
- White faux fur, pile length 1.5–2 cm, for chin, inner ears, and chest
- White faux fur, pile length about 4 cm, for the tail tip
- Black faux fur, pile length 1.5–2 cm, for the outer ears
Eyes and nose
- Realistic glass eyes made from epoxy, half sphere shape, 14 mm diameter
- Alternatively, black glass eyes on a metal loop
- Plastic safety nose with stopper
Jointing supplies
- Discs 50 mm in diameter, 4 pieces, for legs
- Discs 30 mm in diameter, 4 pieces, for arms
- Discs 25 or 30 mm in diameter, 2 pieces, for the head
- Washers, 10 pieces
- T-shaped or O-shaped pins, 5 pieces
Threads and filling
- Strong thread for hand sewing
- Waxed thread for sculpting
- Metal pellets or glass pellets for weight
- Synthetic filler or sheep wool filler
Tools
- Long doll needle
- Scissors
- Pliers
- Awl
Finishing materials
- White PVA glue
- Paints for toning
Step-by-Step Sewing & Making Instructions
All darts on the pattern are sewn first. These darts are marked in green on the pattern pieces and help shape the body and head. Taking time at this stage ensures clean lines and a professional finish.
The head is sewn in several stages. First, the chin piece is sewn by matching points A-A to B-B. Next, the two mirrored head pieces are sewn together from points E-E to A-A. After that, the head gusset is inserted and sewn from points C-C to D-D. This construction creates a rounded, expressive head typical of artist teddy bears.


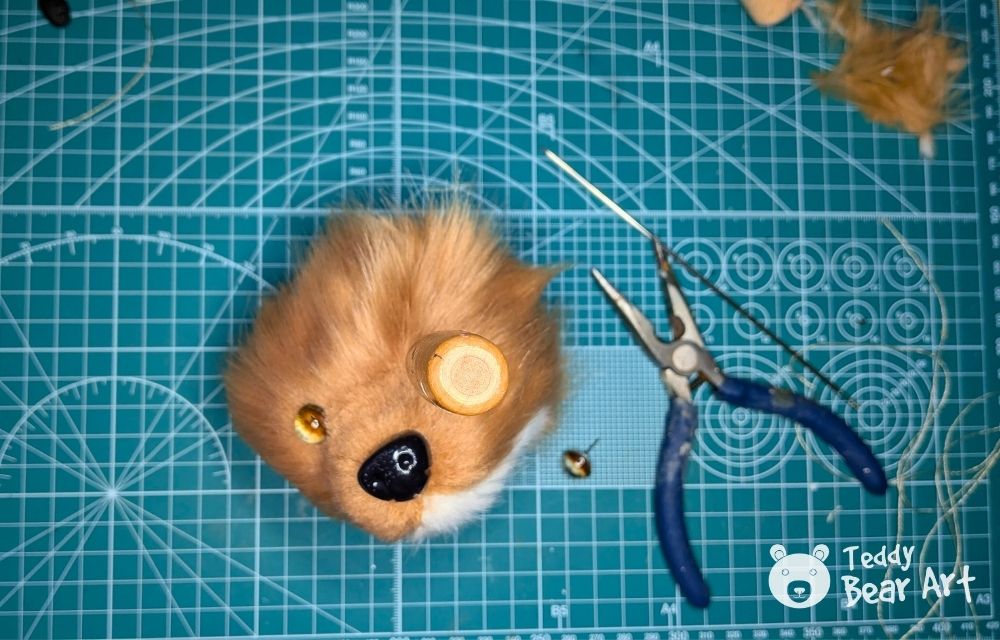
Once the head is sewn, the safety nose is inserted. If a safety nose is not used, the nose can be sculpted or embroidered later, but in this project, a ready-made nose is chosen to demonstrate a special surface treatment.

The head is stuffed firmly, the head disc is inserted, and the opening is closed. Eye sockets are sculpted using strong thread, pulling gently to create depth. Fur is trimmed on the muzzle and chin, then the eyes are inserted. Eyelids are created from wool or felt.

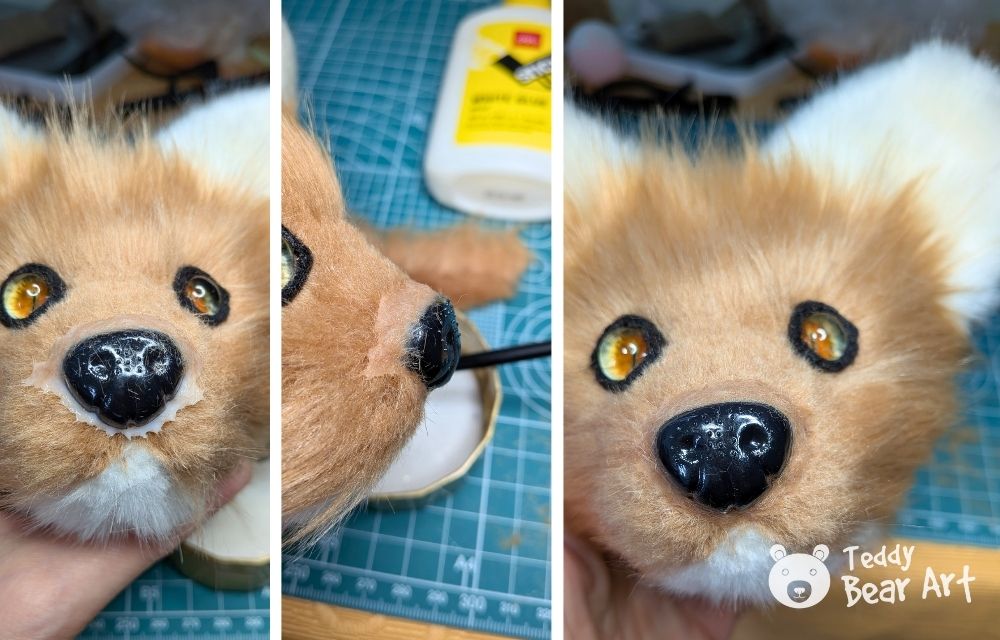
A rare and little-known technique is used around the nose, called flocking. Small pieces of orange faux fur are cut very finely, almost into dust. PVA glue is mixed with water in a 1:1 ratio. Using a brush, small amounts of fur dust are placed around the nose, and a single drop of the glue mixture is applied.

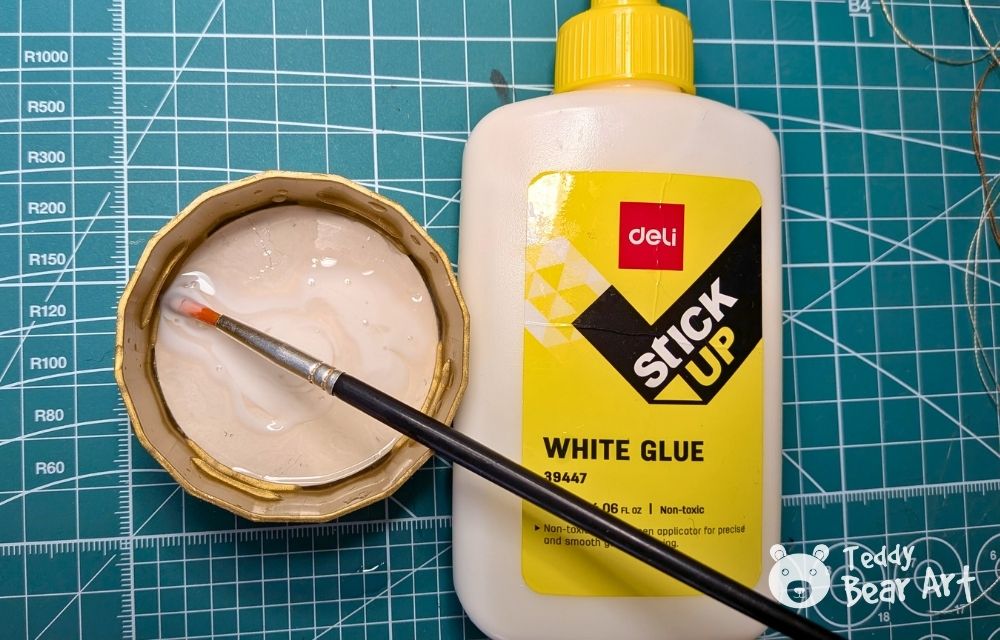
This is done slowly, layer by layer, to soften the transition between the plastic nose and the fur. The area is left to dry completely. When dry, it should feel hard. If it remains soft, the glue mixture contained too much water, and another layer with less water should be applied.

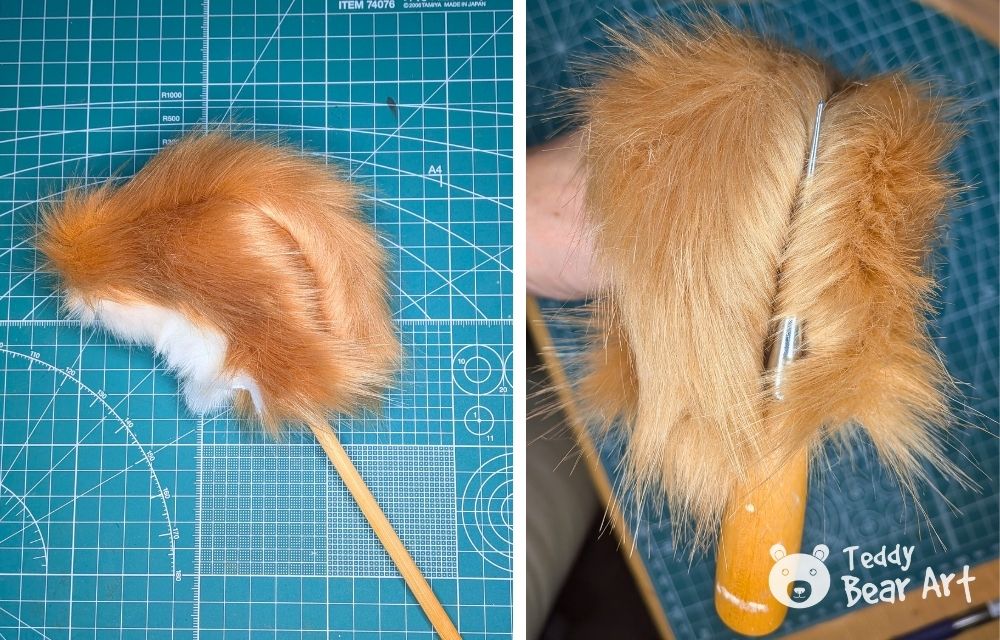
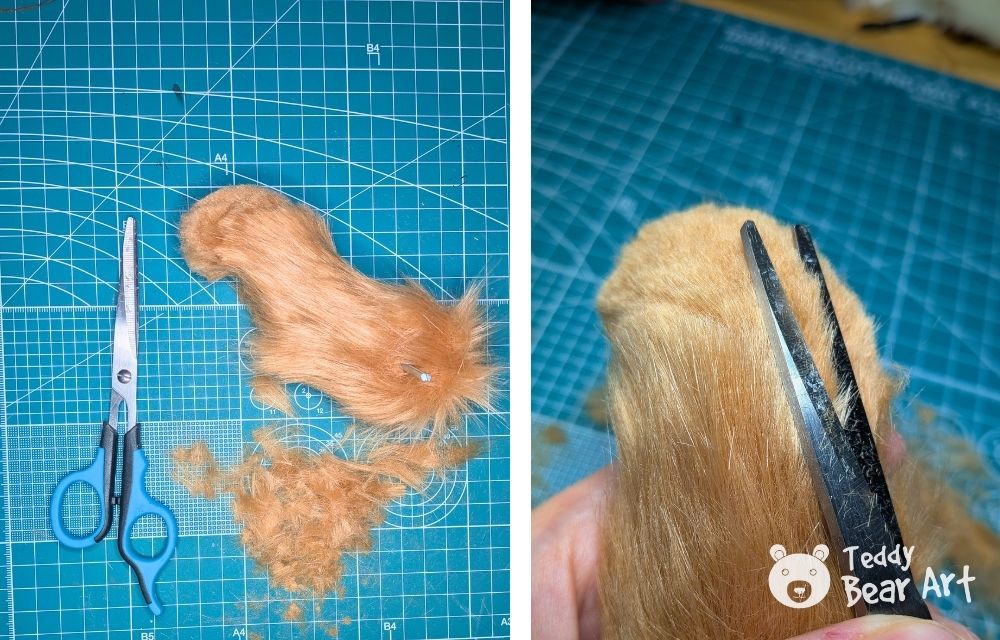
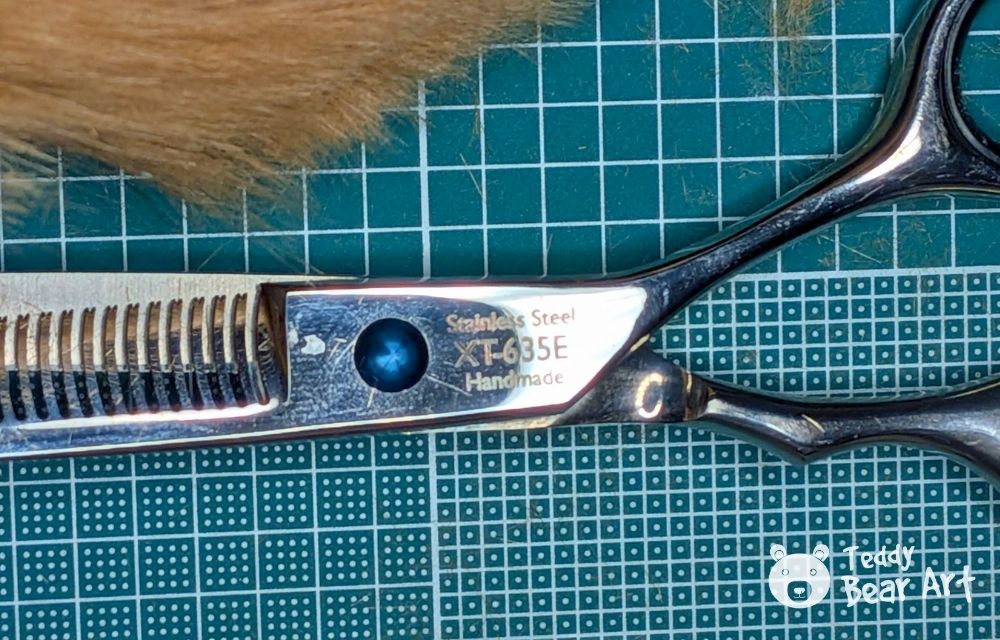
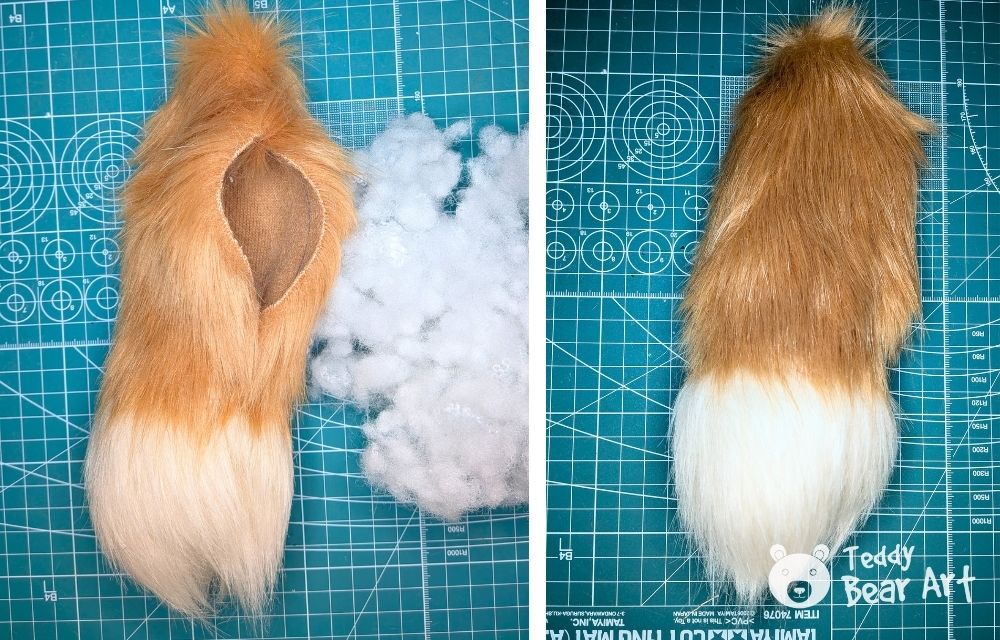
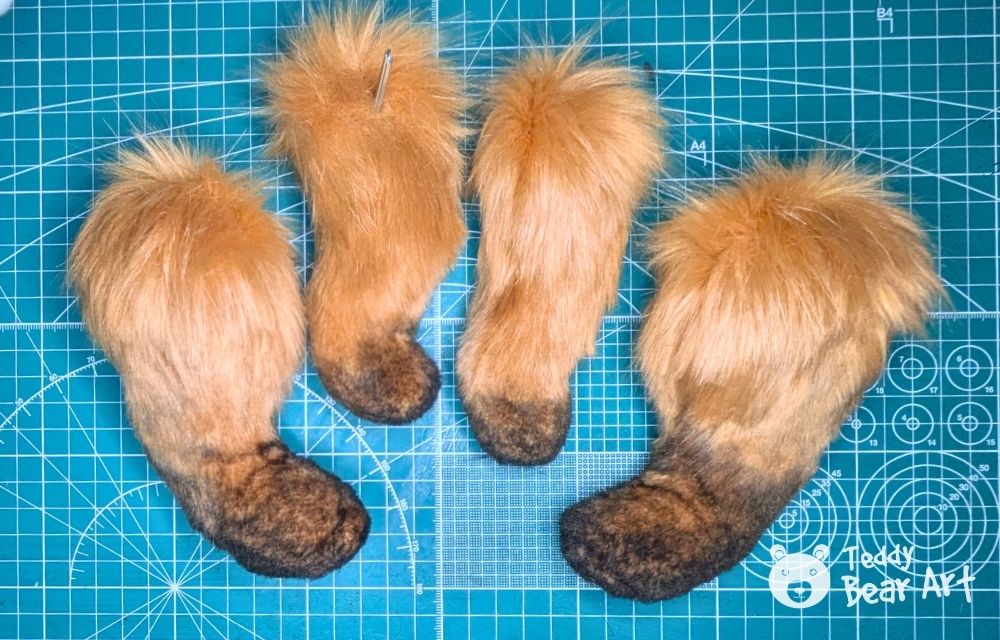
While the head is drying, the arms and legs are stuffed and shaped. Excess fur is trimmed to define the form. Some artists use hair clippers, but scissors also work well, especially when combined with thinning scissors. The key is to cut in the direction of the fur, not against it. The tail is also stuffed so it feels full and balanced.


The body is assembled by sewing the dart on the white chest piece first. Then the white chest is attached to the orange body piece by matching points F-F to G-G. After this, the two mirrored body pieces are sewn together.
Arms and legs are sewn using classic teddy bear techniques. Each limb is sewn, turned, and prepared for jointing later. The ears are made from two layers of fur, white fur on the inside and black fur on the outside. The tail is sewn by first attaching the white tail tip to the orange tail piece, then sewing the two mirrored tail pieces together.
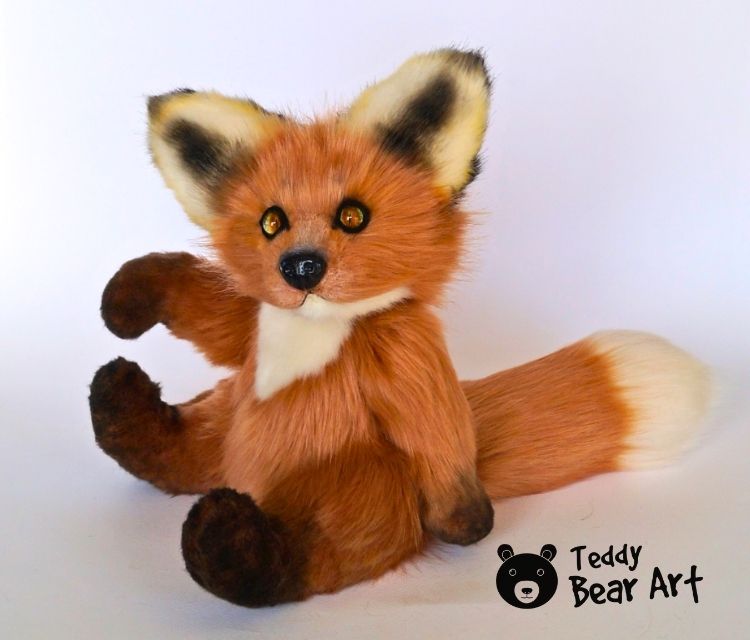
The last stage brings the fox to life. Final trimming is done to refine the silhouette. Toning adds depth and expression. The inside of the ears adds a little bit of black color, and the edges of the ears are toned with orange.
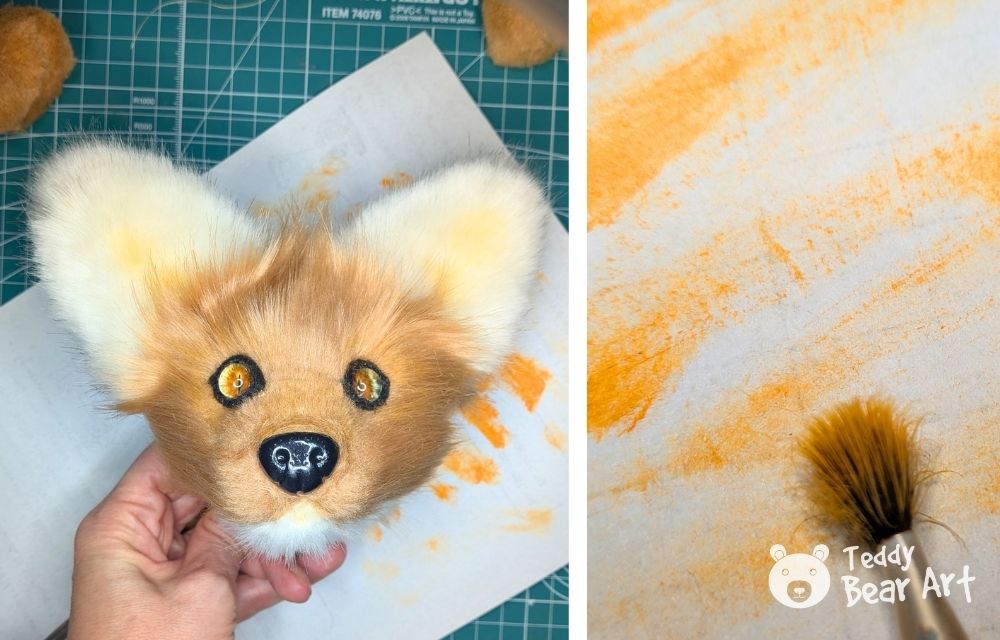

Around the nose, a slightly darker shade adds definition. The cheeks are highlighted with white, and a soft brown or orange tone is applied around the eyes. The mouth is embroidered carefully to complete the expression.


Black paint is applied lightly to the paws.

These details transform the fox from a sewn object into a character, and they are an important part of the artist’s teddy work.
Finally, the fox teddy bear is assembled. The head is attached to the body, followed by the arms and legs, using joints. Weight is added to the body, final stuffing is adjusted, and the tail is sewn in place.

Frequently Asked Questions
Can different faux fur be used for this fox teddy bear?
Yes, different faux furs can be used, but pile length and density will affect the final look. Adjust trimming and shaping accordingly.
How long does it take to make this fox teddy bear?
The time required depends on your working speed, experience, and how many breaks you take during the process. For most makers, this fox is created over several working sessions rather than in one sitting. Certain stages, such as drying after the flocking technique or shaping the face, naturally require pauses and should not be rushed.
Can the process be simplified, or some steps skipped?
Technically, some steps can be simplified, such as choosing a basic nose finish or reducing the amount of toning. However, these details are exactly what shape the character and expressiveness of the fox. In combination with traditional teddy bear techniques, an artist’s approach is what creates such a refined and distinctive result, so for the best possible outcome, it is recommended to complete all steps.
Before You Go
This fox teddy bear project is a wonderful opportunity to practice advanced teddy techniques and experiment with surface finishing. Take your time with each step, especially trimming and sculpting, and enjoy the process. Finished foxes can vary greatly in character, even when made from the same pattern, and that is part of the magic of artist teddy bears.
Get Free Patterns & Be the First to Know!
Want free teddy bear patterns, exclusive tutorials, and a chance to win craft supplies?
Sign up for our newsletter using the subscribe form in the middle of this article to receive new patterns, insider tips, and the latest news on teddy bear art. You’ll also automatically be entered into our annual giveaway for a chance to win teddy bear crafting materials.
Bonus entry: Save one of our pins on Pinterest to increase your chances of winning!
Let’s create, inspire, and craft beautiful teddy bears together!
I really enjoyed this tutorial. Everything is explained so clearly and in such a calm, easy to follow way. I especially appreciate the free pattern and the step by step photos, they make the whole process much less intimidating. The fox teddy bear turned out absolutely adorable, and I love the little details on the face. This article truly inspired me to start a new project and try something a bit more challenging. Thank you for sharing your experience and for making such high quality tutorials available for free.
Thank you so much for your kind words. I am really happy to hear that the tutorial inspired you and that the pattern and photos were helpful. I would love to see your fox when it is finished.
This project is very interesting!
If my mom is alive, she would have made these huggables, she can make anything, from dresses to accessories.
It takes a lot of focus and patience to create these teddy bears. I believe somebody needs to have that rare artistic capability to make this challenging project a reality.
Thank you so much for your kind words. Handmade teddy bears really do take patience, focus, and a lot of heart. It means a lot that this project reminded you of your mom and her creativity.
I saw this fox pattern about a month ago and kept wondering if I should start it, not because I’m not confident (I’m not a beginner!), but I just didn’t have the right fur. Finally, I found the perfect fur and got some matching eyes made, and now I’ve finally finished my fox! Hanna, I sent you photos by email and would love to know what you think.
That sounds great! I’m looking forward to seeing your fox. I’ll check my email and tell you what I think.