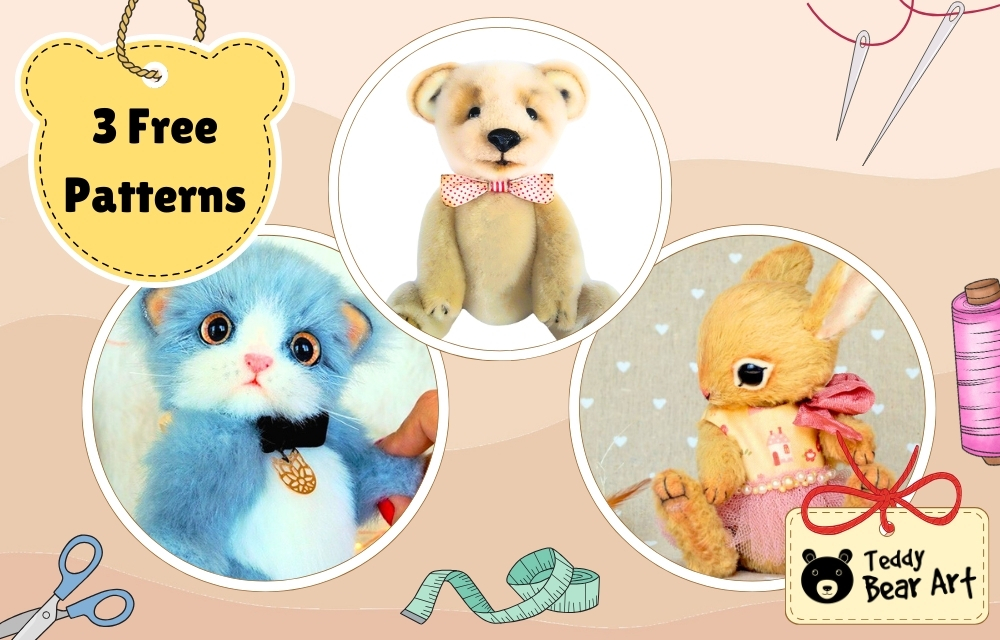
Handmade plushies carry a special kind of charm, and with the right tools and a touch of patience, they can come to life in our hands. Today, we want to share 3 animal sewing patterns for DIY plush toys that are perfect for more experienced makers. These patterns are not just about stitching fabric together; they invite us to explore details, personality, and finishing touches that make each creation unique.
1. Teddy Bear Sewing Pattern
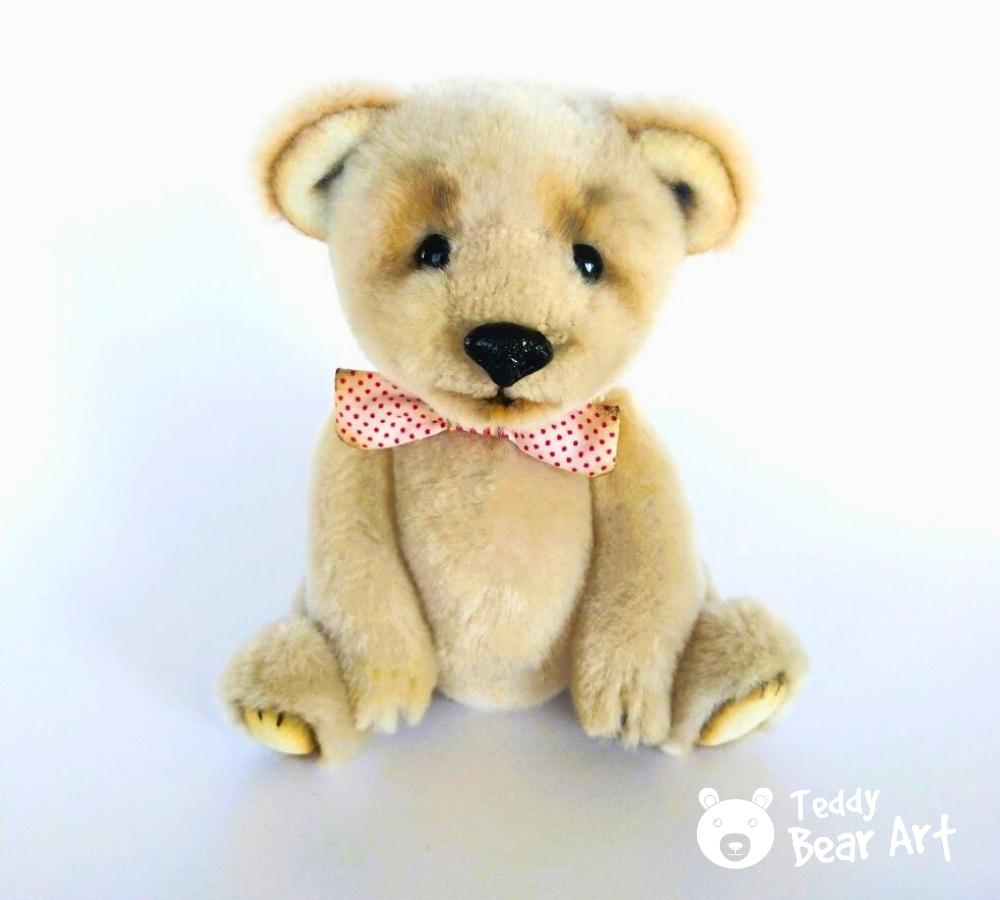
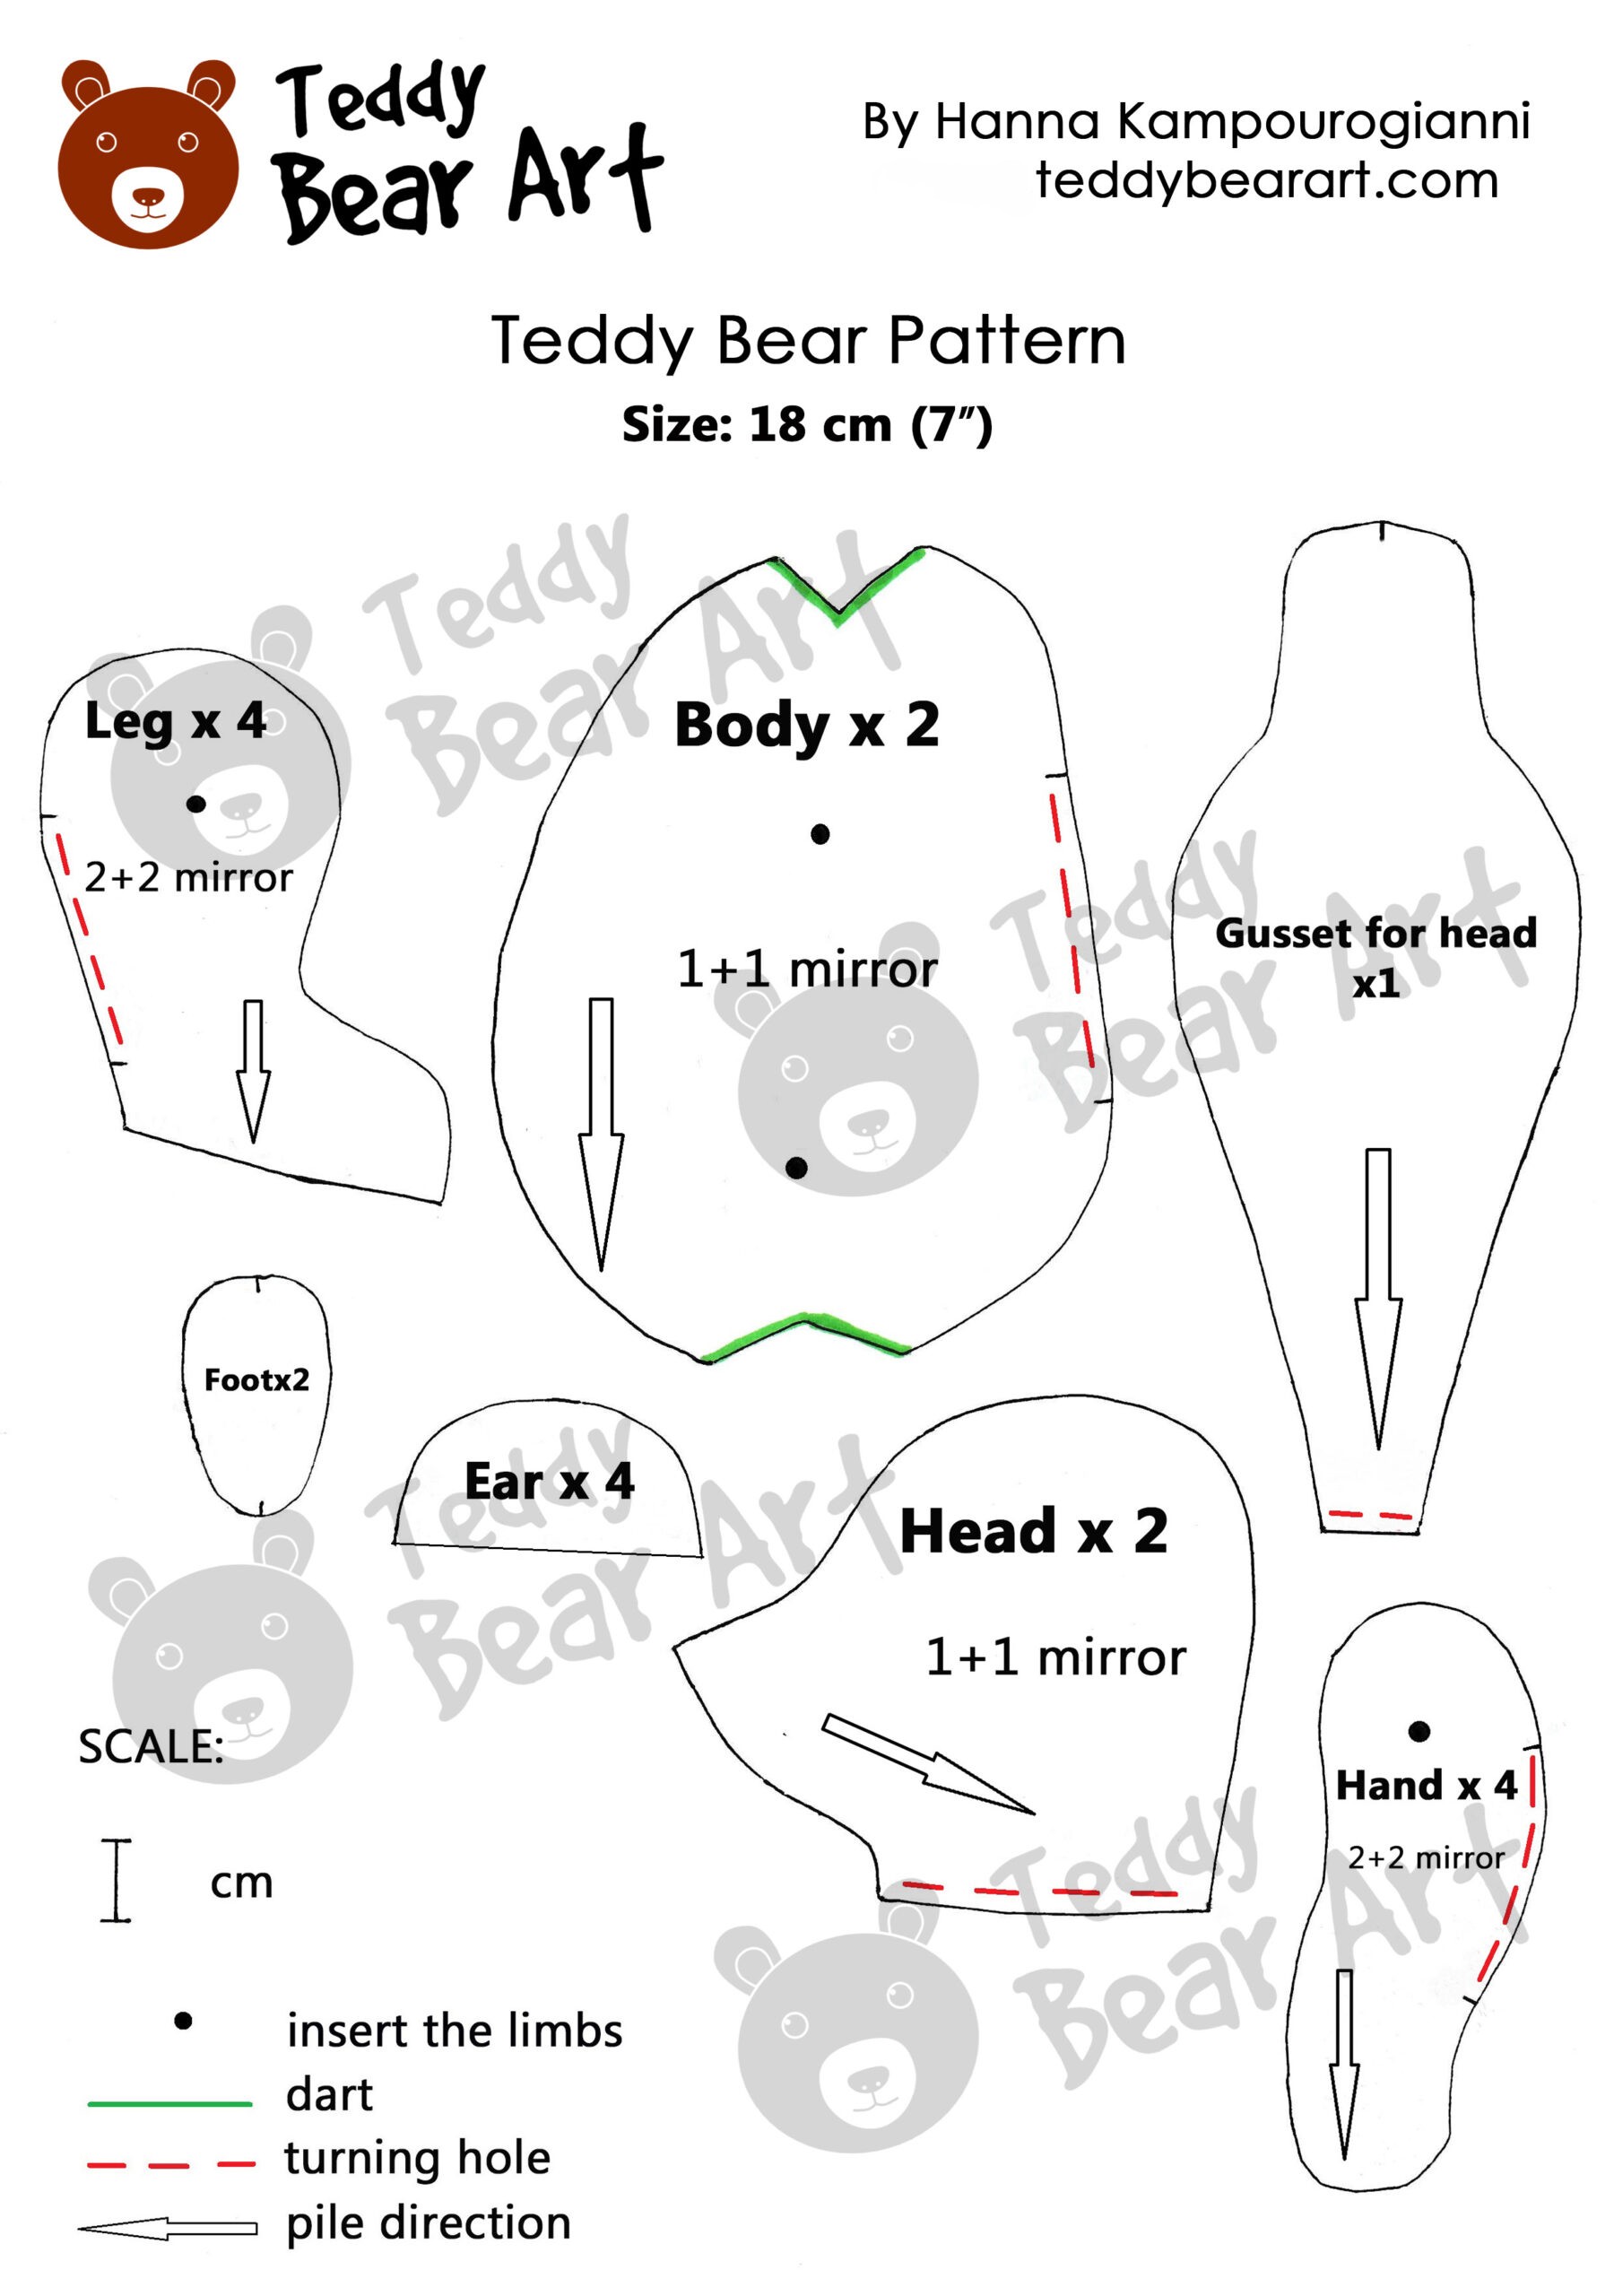
The teddy bear is a timeless classic, and our perfect teddy bear sewing pattern is a wonderful starting point for anyone who wants to refine their sewing skills. This design creates a jointed bear, which means the arms and legs can move for different poses. The pattern produces a bear of medium size, perfect for display or gifting.
Materials you’ll need: discs and cotter pins, mohair or soft faux fur, joint discs, polyester stuffing, strong thread, and glass eyes.
You can explore the full Teddy Bear sewing pattern and step-by-step guide to see detailed instructions and the complete list of materials.
Download Bear Pattern
To download the pattern, follow the instructions below:
From a phone or tablet: There should be a similar option for mobile devices with Android or iOS. Click on the image. Save it by holding your finger on the image and selecting the “Save Image” option. Then, go to your photo gallery and print it (an option available).
From a computer: Click on the photo of the pattern you see below. In the new tab that will open, you press the right mouse button and select the “Save image as …” option. Then, you choose where the image will be saved on your computer.
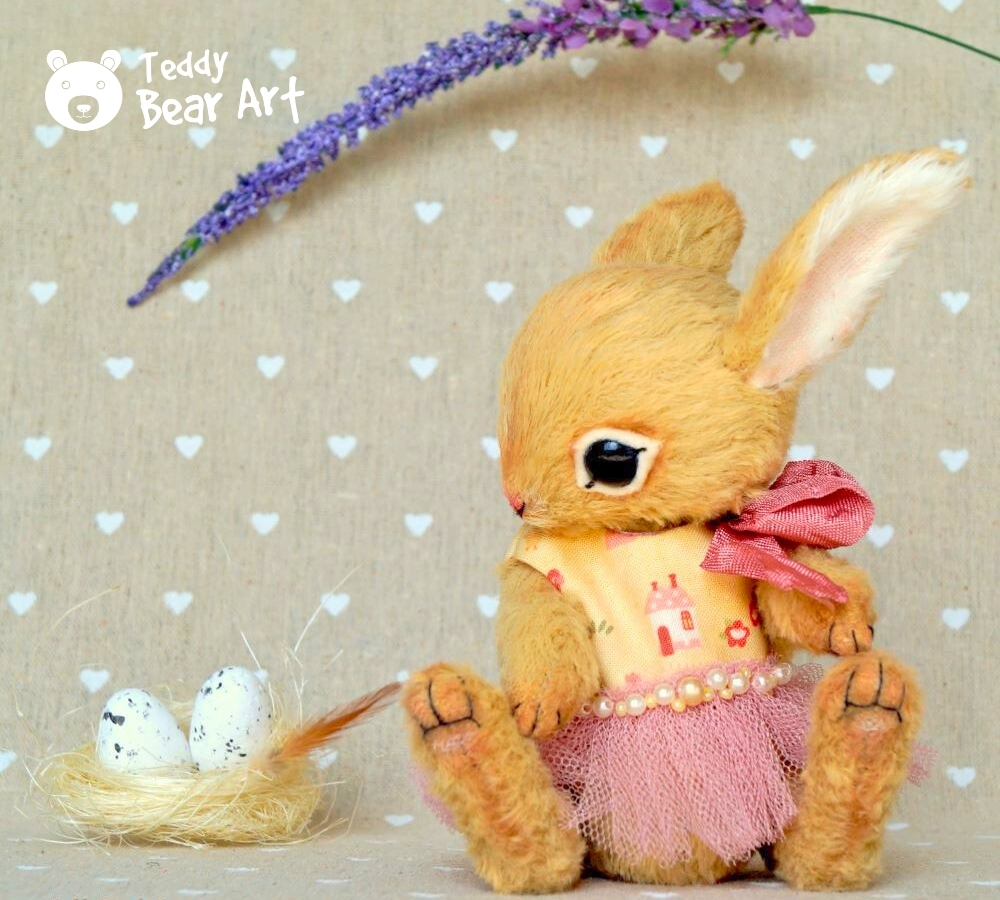
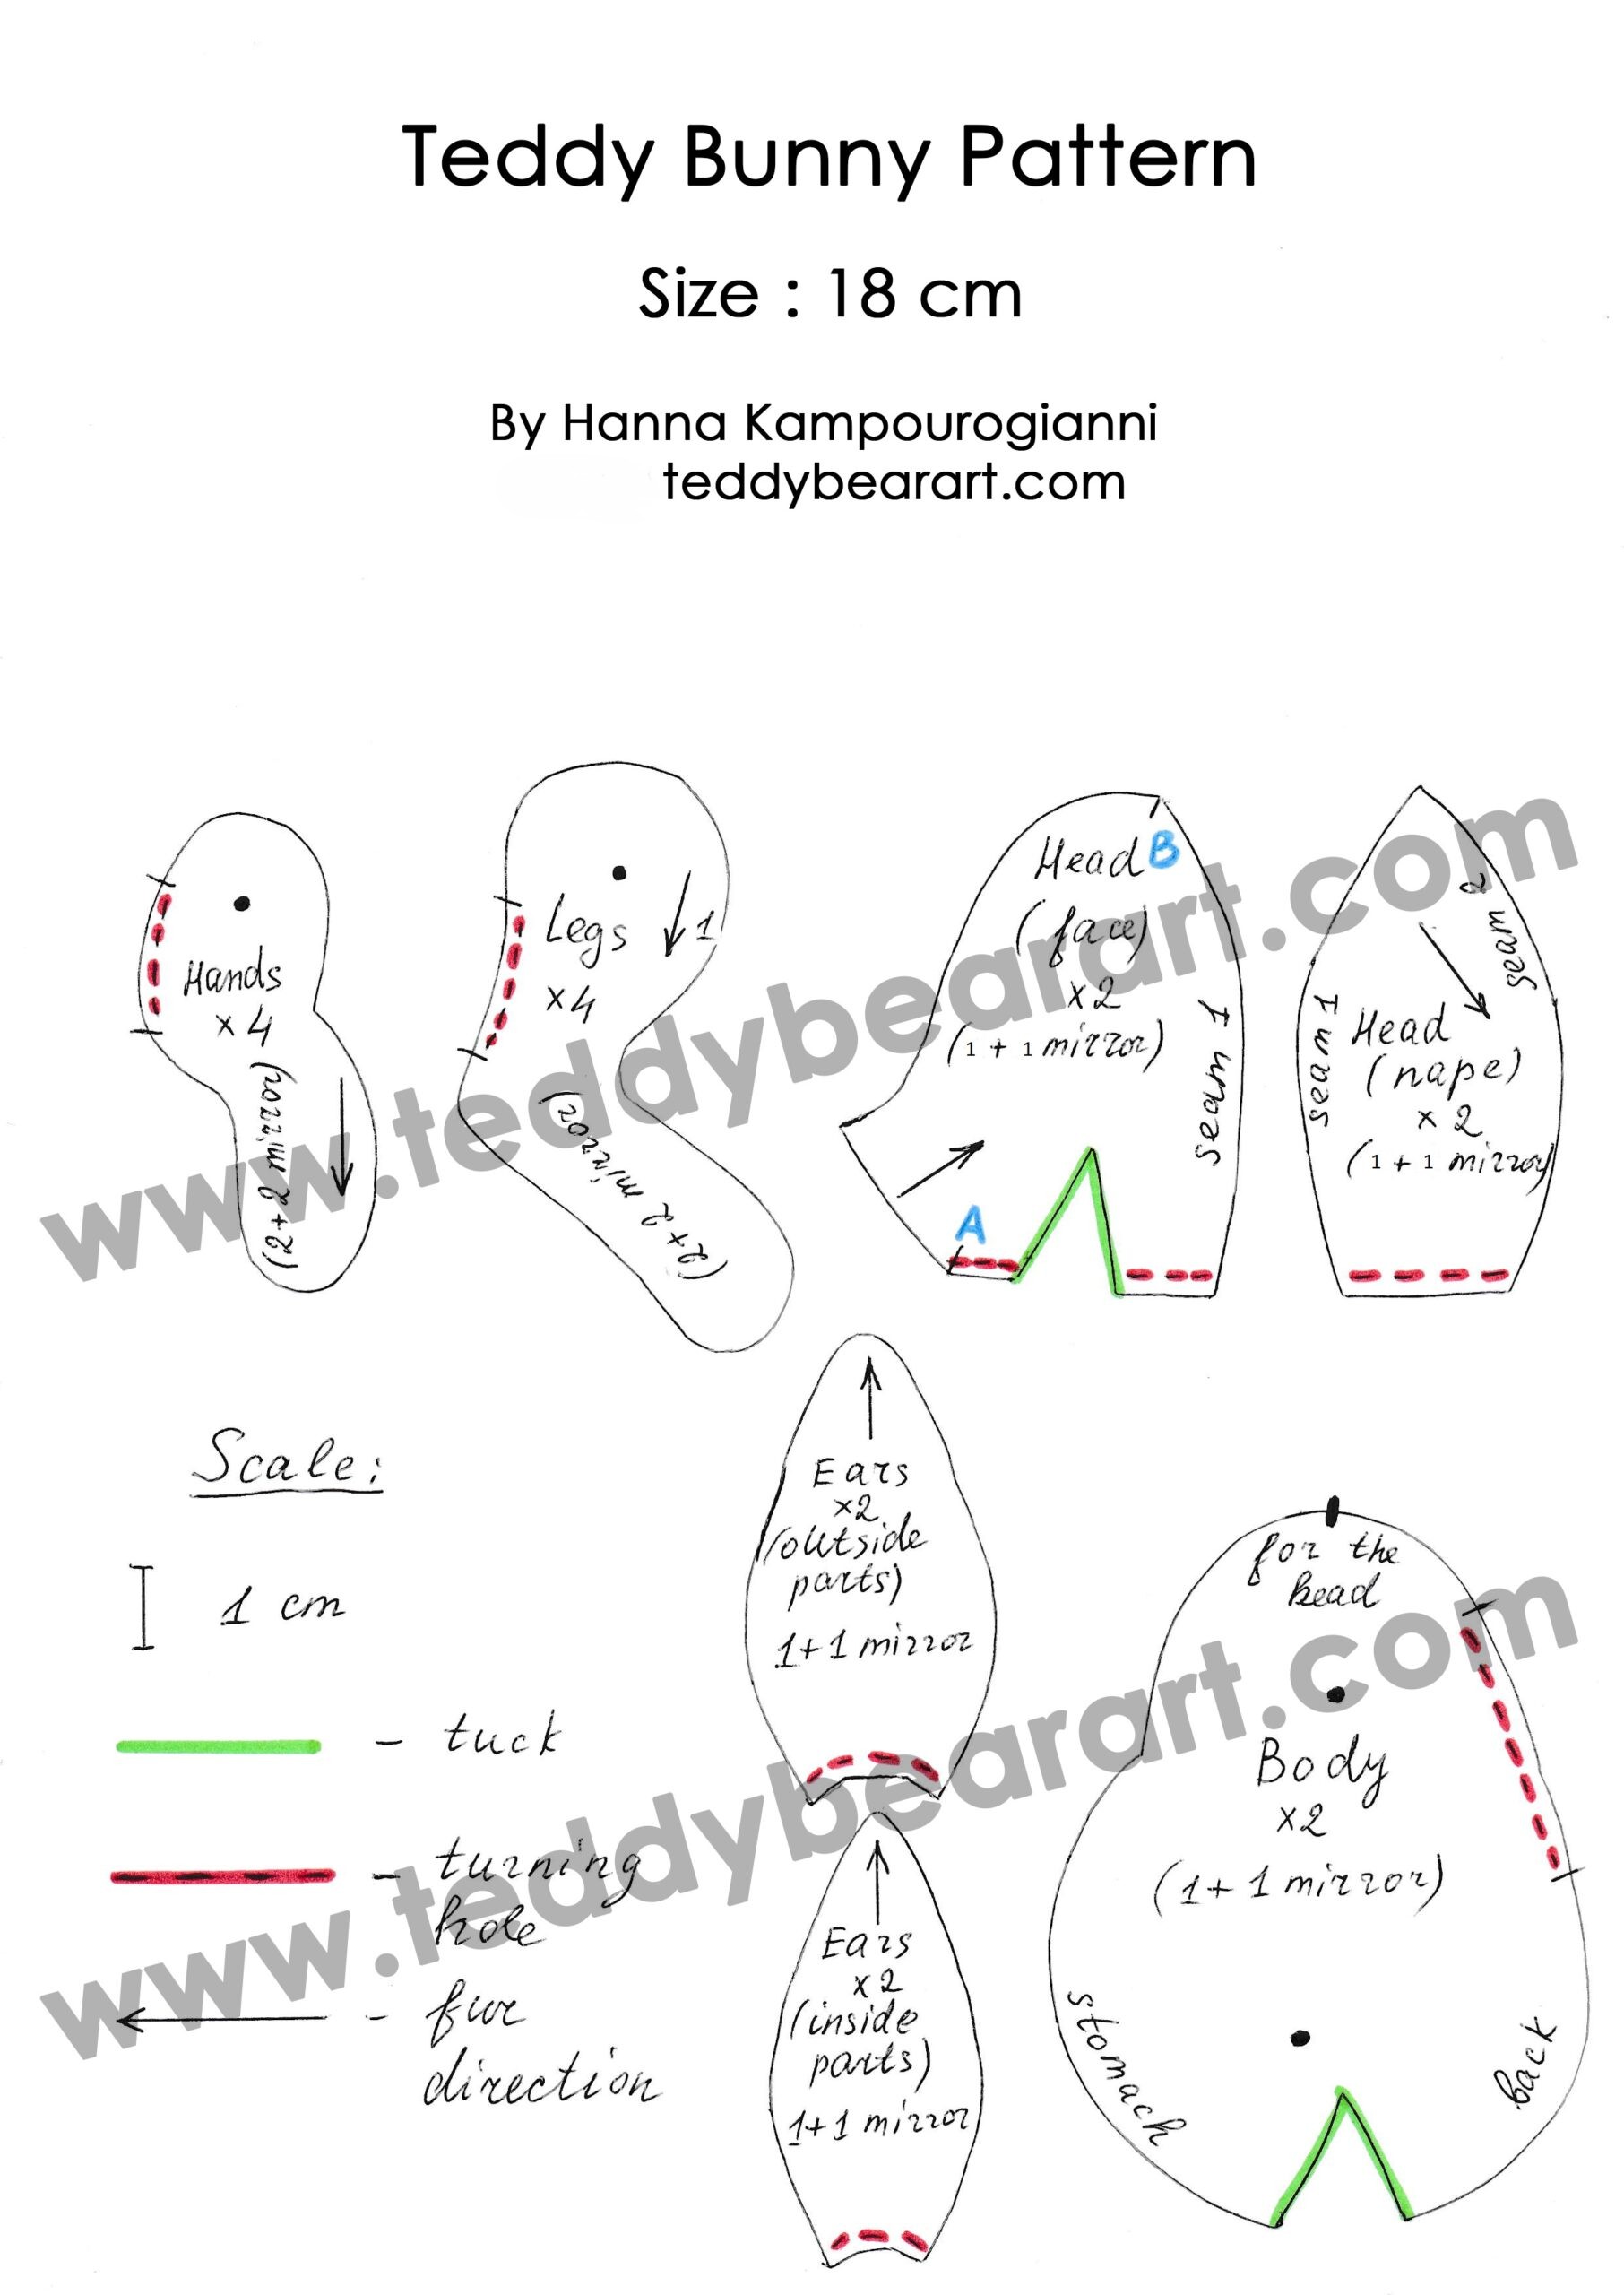
2. Bunny Sewing Pattern
The second design is a jointed teddy bunny pattern. With its long floppy ears and round face, this bunny has a softer, playful feel compared to the traditional bear. The pattern is a little more detailed than the teddy, which makes it a rewarding project.
Recommended fabrics: German viscose for teddies. Pastel colors are a lovely choice for a bunny.
You can explore the full Bunny soft toy pattern and tutorial to learn every step in detail and check the recommended materials and tools.
Download Bunny Pattern
To download the pattern, follow the instructions below:
From a phone or tablet: There should be a similar option for mobile devices with Android or iOS. Click on the image. Save it by holding your finger on the image and selecting the “Save Image” option. Then, go to your photo gallery and print it (an option available).
From a computer: Click on the photo of the pattern you see below. In the new tab that will open, you press the right mouse button and select the “Save image as …” option. Then, you choose where the image will be saved on your computer.
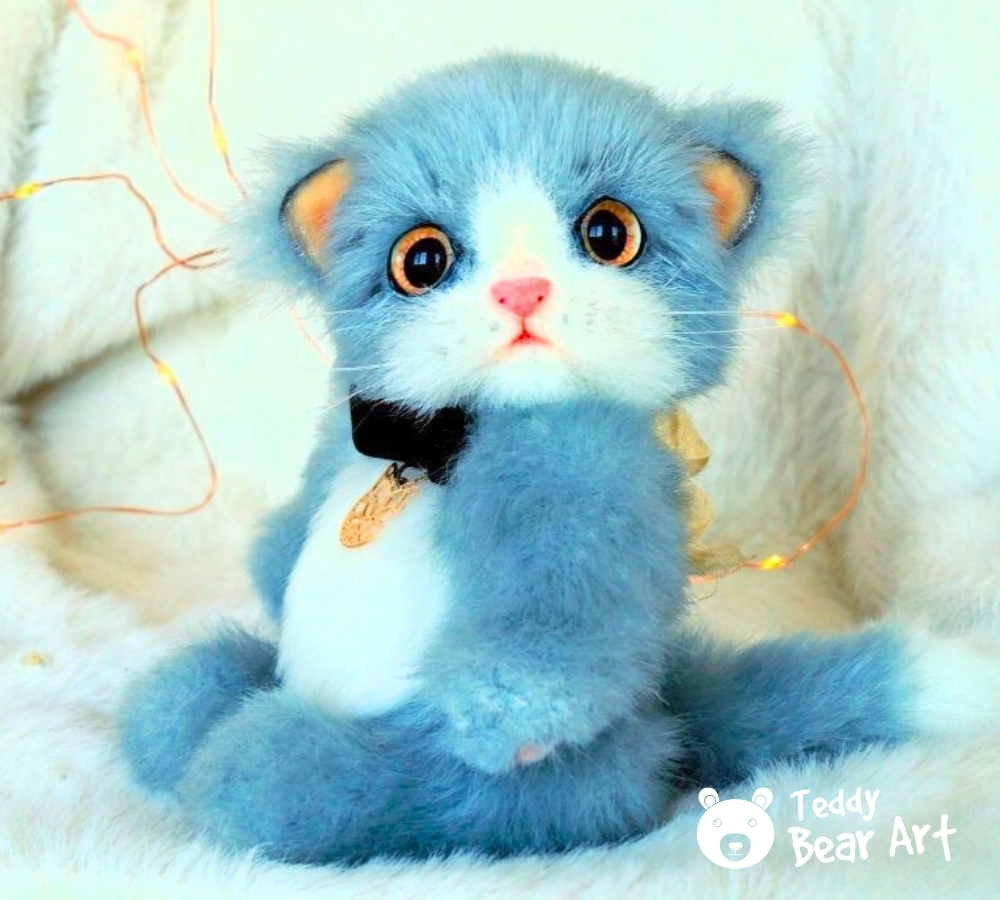
3. Kitten Sewing Pattern
For those ready to try something more advanced, the stuffed kitten pattern is a beautiful challenge.
Materials you’ll need: discs and cotter pins, faux fur, glass eyes, polymer clay, and thin fishing line for whiskers.
Because this project is a bit trickier, it’s worth taking time with the face. Molding a tiny pink nose and the eyelids, carefully needlfelting paw pads instantly makes the kitten look alive. Changing the fur color completely transforms its personality—from a sleek black cat to a playful ginger kitten.
You can explore the full Kitten sewing pattern and advanced guide to follow detailed instructions and discover tips for realistic finishing touches.
Download Kitten Pattern
To download the pattern, follow the instructions below:
From a phone or tablet: There should be a similar option for mobile devices with Android or iOS. Click on the image. Save it by holding your finger on the image and selecting the “Save Image” option. Then, go to your photo gallery and print it (an option available).
From a computer: Click on the photo of the pattern you see below. In the new tab that will open, you press the right mouse button and select the “Save image as …” option. Then, you choose where the image will be saved on your computer.

Frequently Asked Questions
Are these patterns suitable for beginners?
The teddy bear and bunny can be managed with patience, but the kitten is best suited for makers with more sewing practice.
What fabrics are easiest to use?
For these projects, it’s strongly recommended to use the materials listed in each pattern’s materials list. Deviating from these fabrics can make the sewing more challenging and may affect the final appearance.
Do I need a sewing machine?
No, you don’t need it.
Can I sell toys made with these patterns?
Yes, these handmade toys are loved by collectors and gift buyers.
Where can I find more free patterns?
Explore additional designs in the patterns section; they are all free.
Before You Go
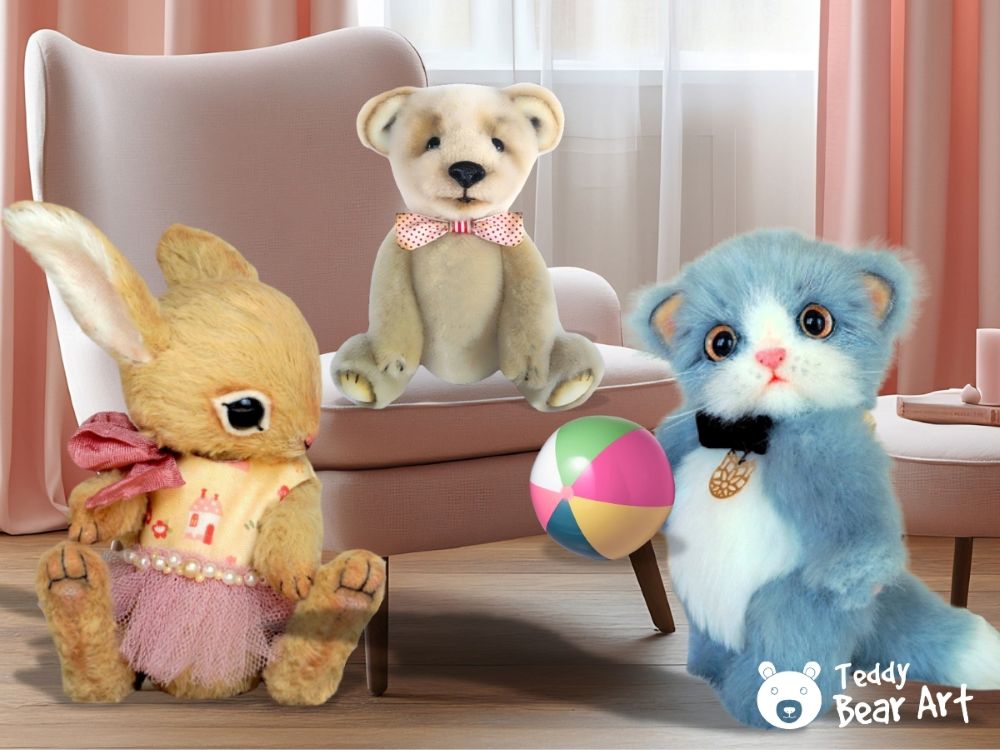
We now have 3 animal sewing patterns for DIY plush toys: a teddy bear, a bunny, and a kitten. Each one offers a different level of complexity, and all of them can be transformed into something truly personal with the choice of fabrics and finishing details. Before you go, you might enjoy these related posts:
- 3 Dog Sewing Patterns Free Printable
- How to Become a Successful Teddy Bear Artist
- Free Teddy Bear Clothes Patterns
Get Free Patterns & Be the First to Know!
Want free teddy bear patterns, exclusive tutorials, and a chance to win craft supplies?
Sign up for our newsletter using the subscribe form in the middle of this article to receive new patterns, insider tips, and the latest news on teddy bear art. You’ll also automatically be entered into our annual giveaway for a chance to win teddy bear crafting materials.
Bonus entry: Save one of our pins on Pinterest to increase your chances of winning!
Let’s create, inspire, and craft beautiful teddy bears together!
Oh these are soooo cute! I’m a huge sucker for stuffies and plushies. They’re not just for kids! I’ve always been interested in sewing – I think the ability to make your own things, whether it’s toys, clothes, or something else, is so valuable. Unfortunately, I’ve never really been taught or gotten any sewing experience.
You mention that these patterns are suitable for more experienced sewers, where would you suggest a beginner start if they want to work up to doing patterns like these ones?
Thank you so much! And you’re absolutely right — stuffies aren’t just for kids, they bring joy at any age. If you’re just starting with sewing, no worries at all — everyone begins somewhere! On this website, we actually have some guides especially for beginners on where and how to start. You might like this article: Teddy Bear Tutorial for Beginners – How to Start. It’ll walk you through the very basics step by step. Once you get comfortable, it’ll be much easier to move on to more detailed patterns like these.
These patterns are adorable! I really like how you broke them down by skill level, it makes it less intimidating for someone who’s still learning. The detail about adding whiskers to the kitten or using pastel fabric for the bunny shows how much personality you can bring into each project. Definitely inspiring to see how handmade plushies can be both creative and personal.
Thank you so much for such a warm comment! I really want the process to feel easy and inspiring for anyone trying their hand at making plushies. It’s those little touches that make each creation special and unique. Wishing you lots of joy and creativity in every new project!