
Creating a soft bunny by hand is always a joy, and in this bunny stuffed animal DIY tutorial, we walk through the entire process step by step, following the style our readers love, where every detail is shown and explained so clearly that even beginners feel confident. You will find photos, practical tips, and little tricks we have collected over the years while making our fluffy little creatures.

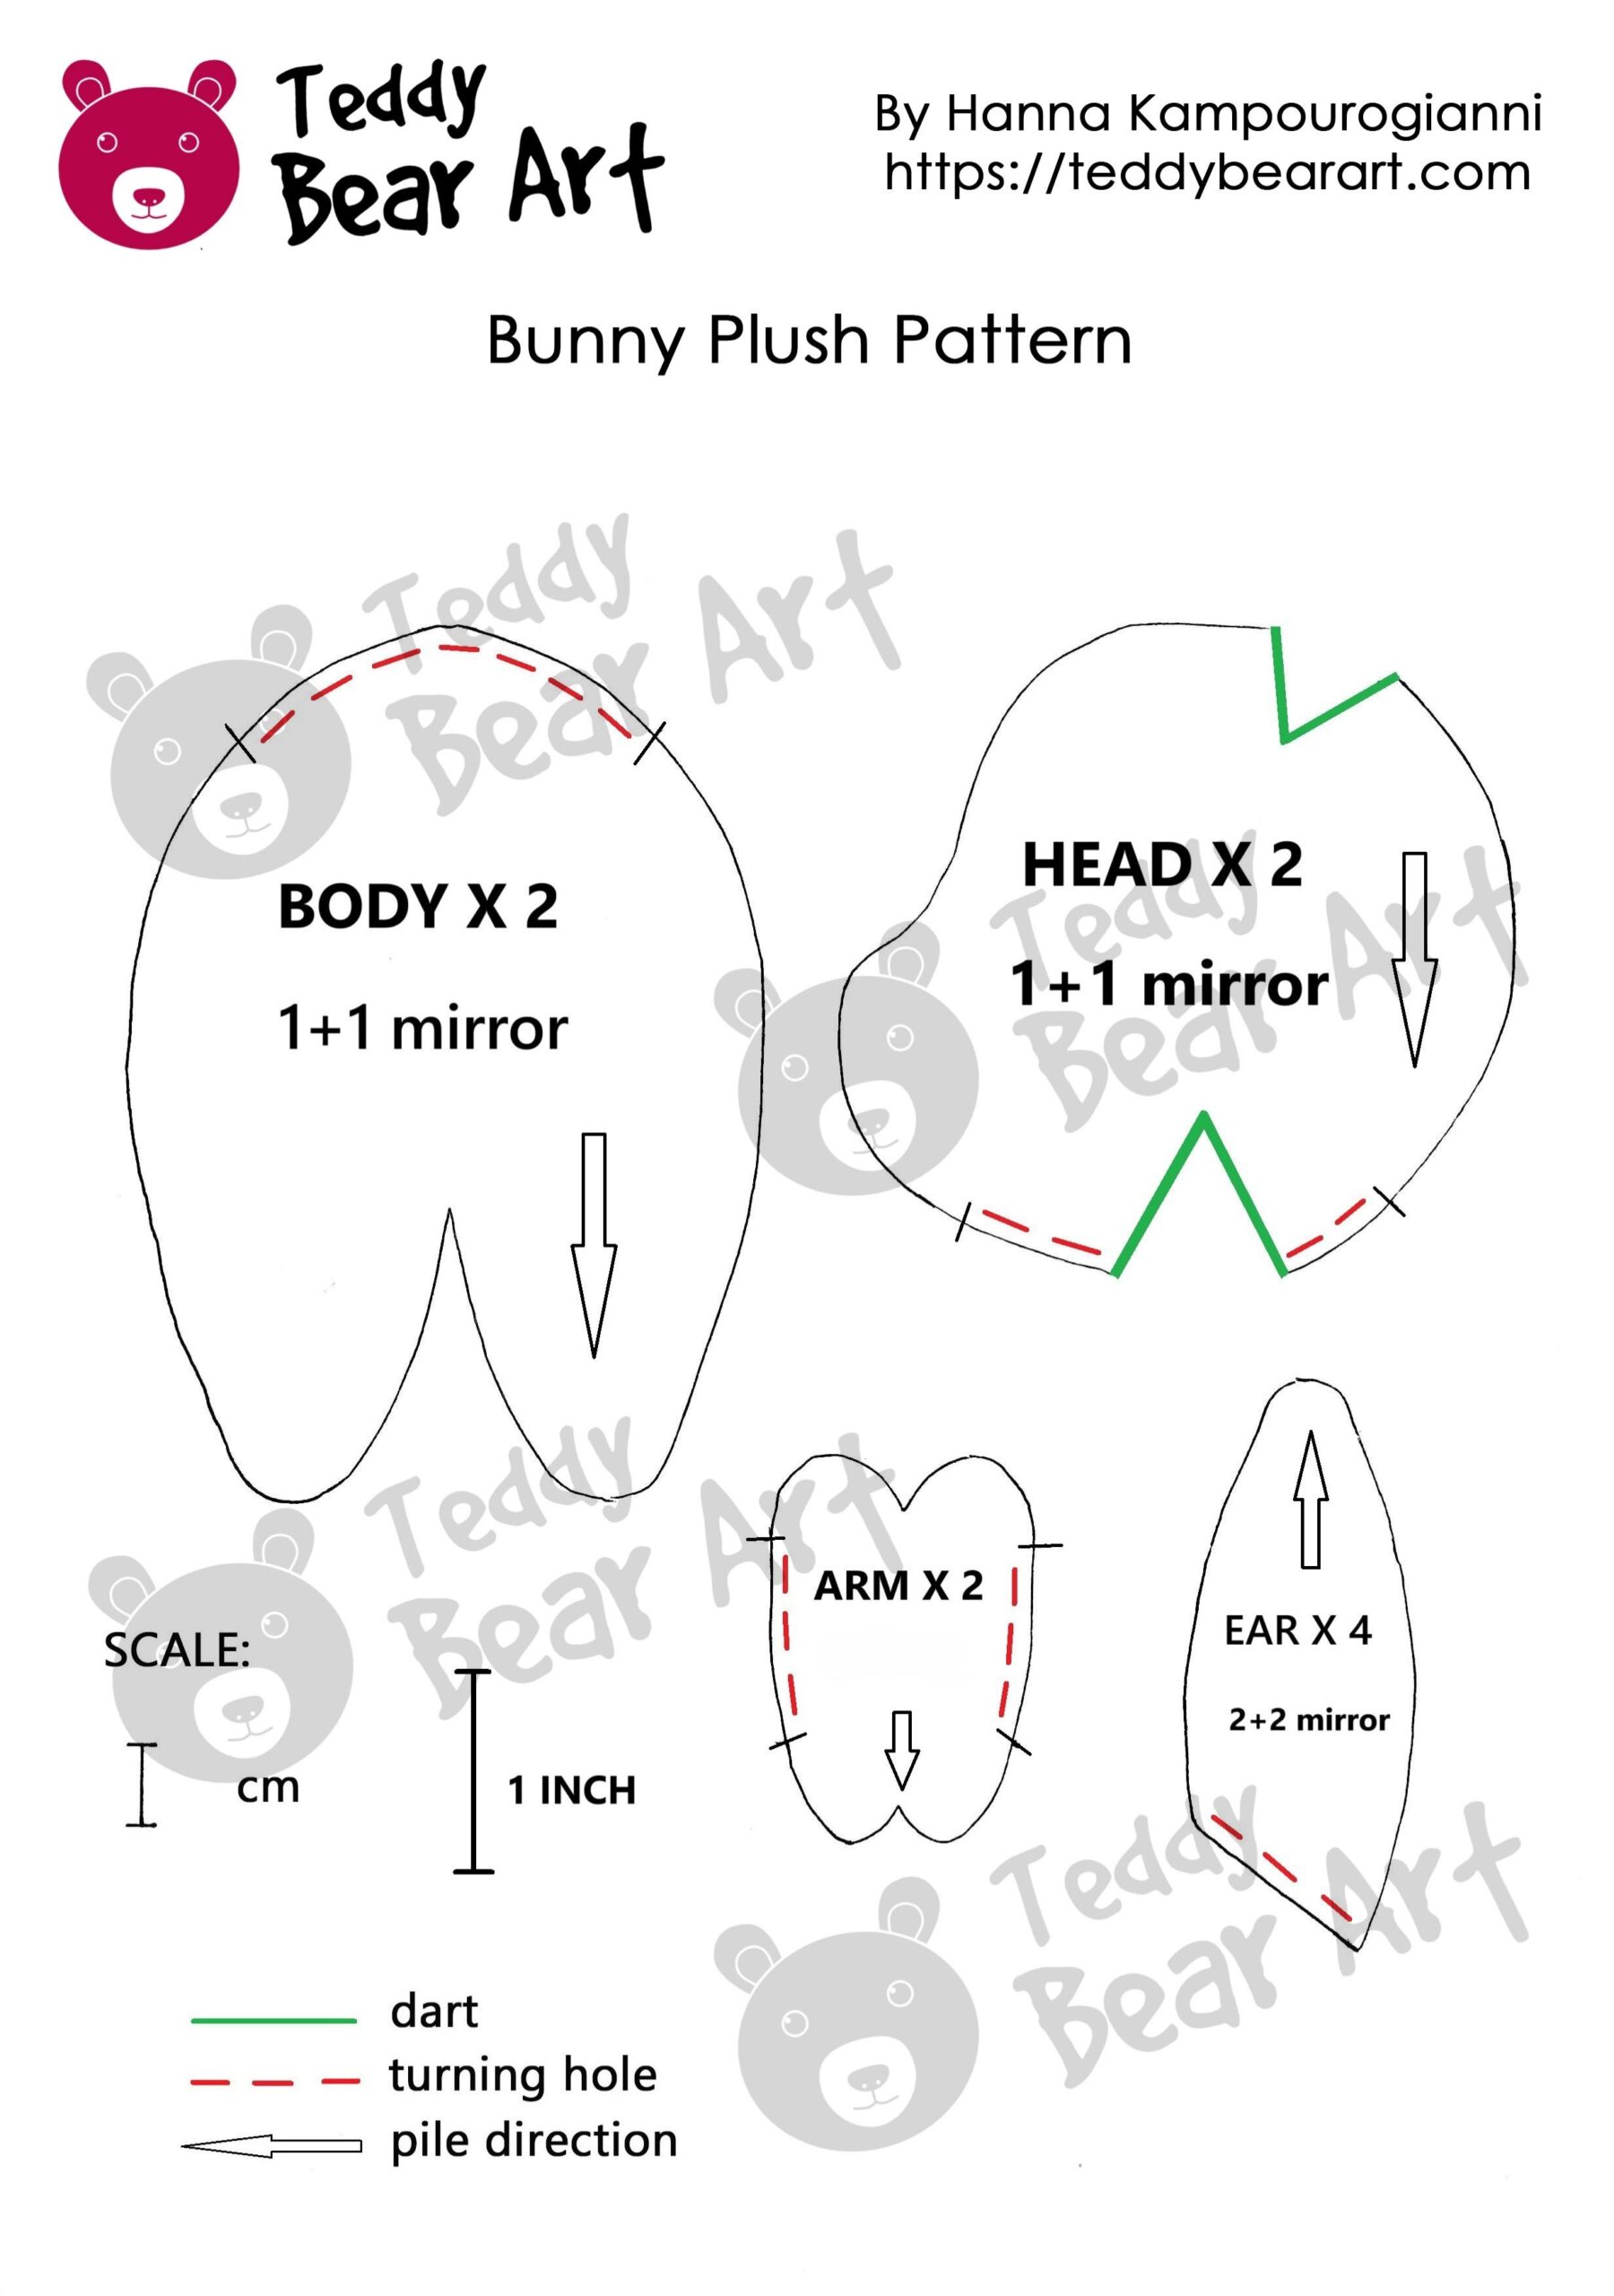
Download Free Bunny Sewing Pattern
Notice that seam allowances are not included.
To download the pattern, follow the instructions below:
From a phone or tablet: There should be a similar option for mobile devices with Android or iOS. Click on the image. Save it by holding your finger on the image and selecting the “Save Image” option. Then, go to your photo gallery and print it (an option available).
From a computer: Click on the photo of the pattern you see below. In the new tab that will open, you press the right mouse button and select the “Save image as …” option. Then, you choose where the image will be saved on your computer.
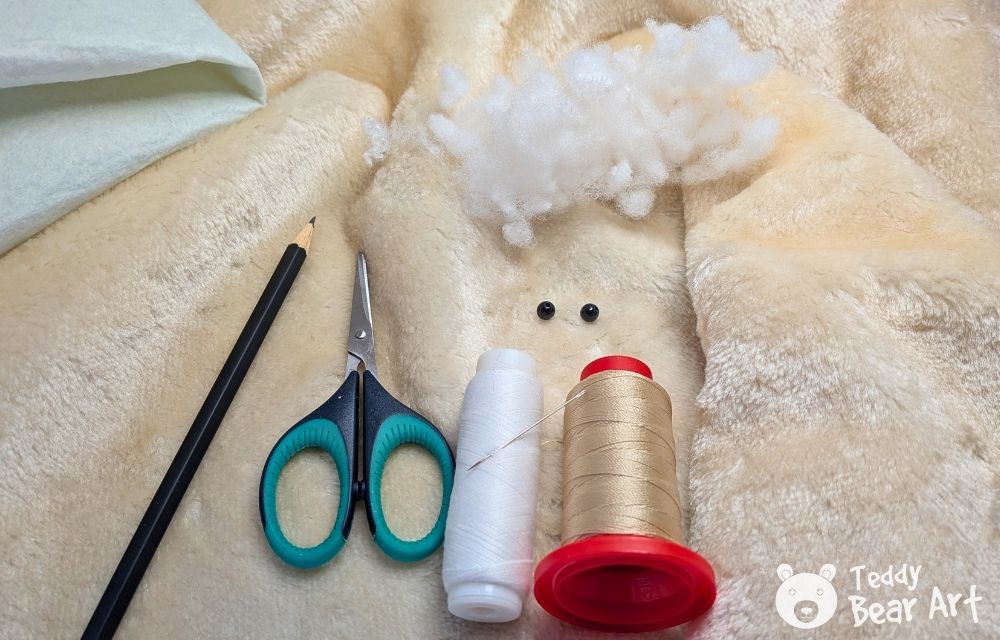
Materials You’ll Need
- Cream-colored plush with a pile length of about 5 mm
- Felt fabric
- Black round beads, 6 mm in diameter, for the eyes
- Thread in a matching color to the plush
- Black thread for embroidering the nose
- Synthetic stuffing
- Scissors
- Regular sewing needle and doll needle (optional)
- Markers or soft pastels for light shading (optional)
- Strong thread for securing the eyes (optional)
Step-by-Step Bunny Sewing Tutorial
Download the free bunny pattern at 100 percent scale before starting. When transferring the template to your fabric, pay attention to the pile direction, especially on the face. This helps the bunny look soft and expressive. We recommend short plush, viscose, or short pile soft faux fur. For the inner ear pieces, you can use felt, cotton, fleece, or flannel for a nice contrast.
1. Preparing the Pieces
Lay out all pattern pieces on the fabric, trace them, and cut every pair. Make sure the fur follows the correct nap direction; the pile must lie in the same direction as the arrows on the pattern. This keeps the bunny smooth and natural-looking.
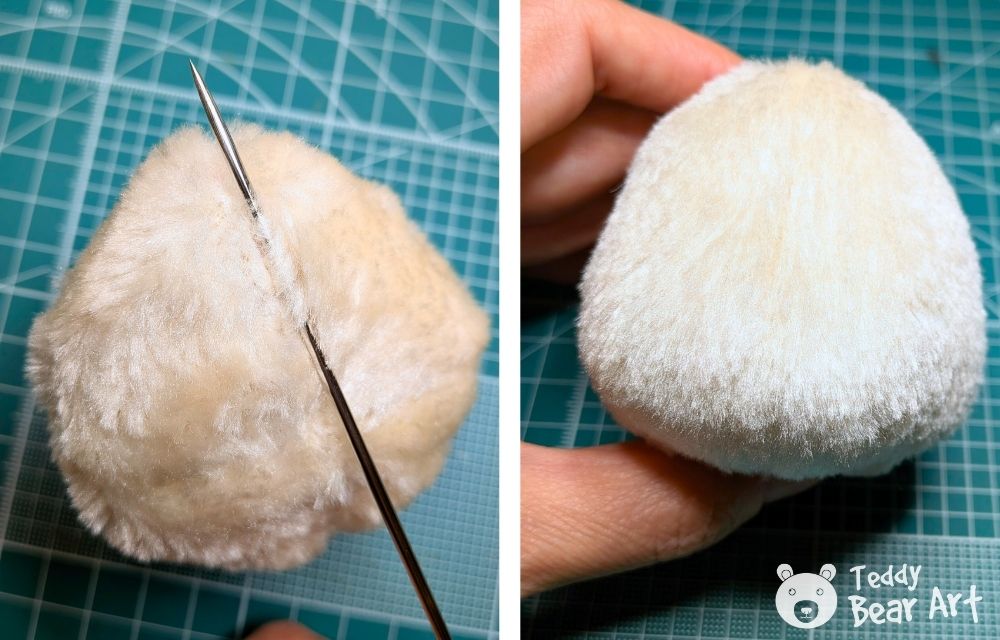
2. Sewing the Head
Before joining the head pieces, sew all darts first; they are marked clearly on the pattern and help shape the face. After the darts are done, sew the side parts of the head together, leaving a small opening for turning. Turn the head right side out, using a wooden stick to gently push out and smooth the seams.
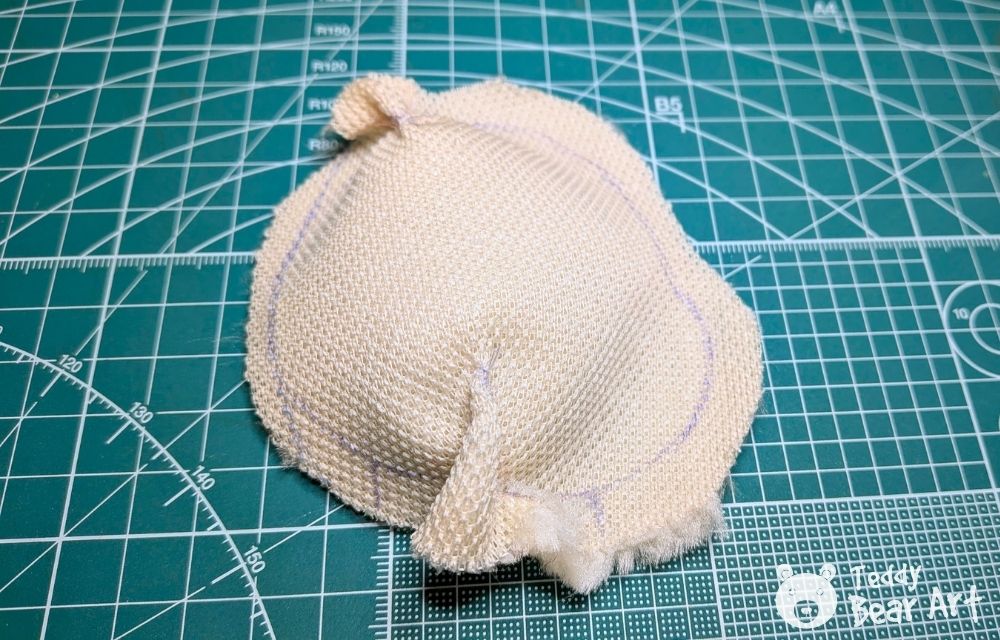


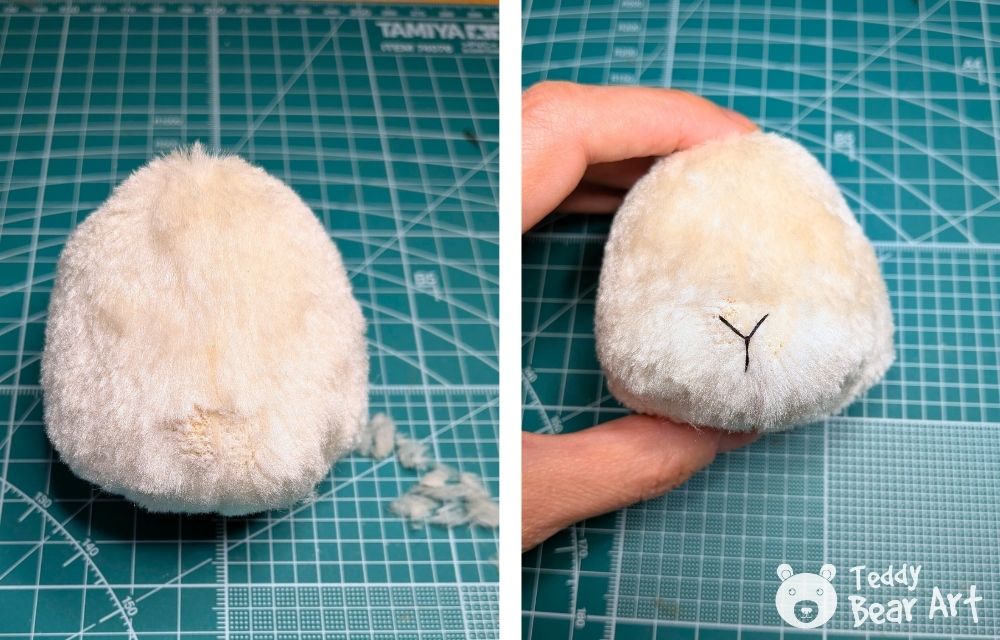
Begin stuffing slowly from the nose toward the back of the head, adding small portions of filling so the shape stays even and the face becomes expressive. When the stuffing is complete, you can close the opening in two ways: either sew it shut with a ladder stitch or tighten it with strong thread to create a firm closure.

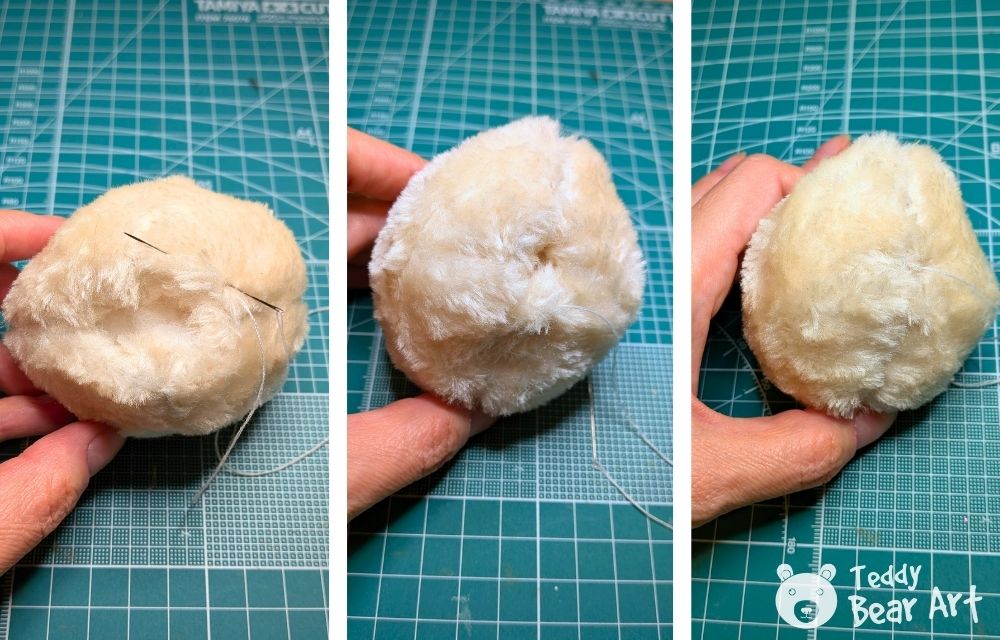
Once the opening is secured, lift the fur out of the seams carefully with a needle or soft brush to hide the stitch lines, then brush the entire head to fluff the pile and restore its natural look.
3. Adding the Eyes and Face Details
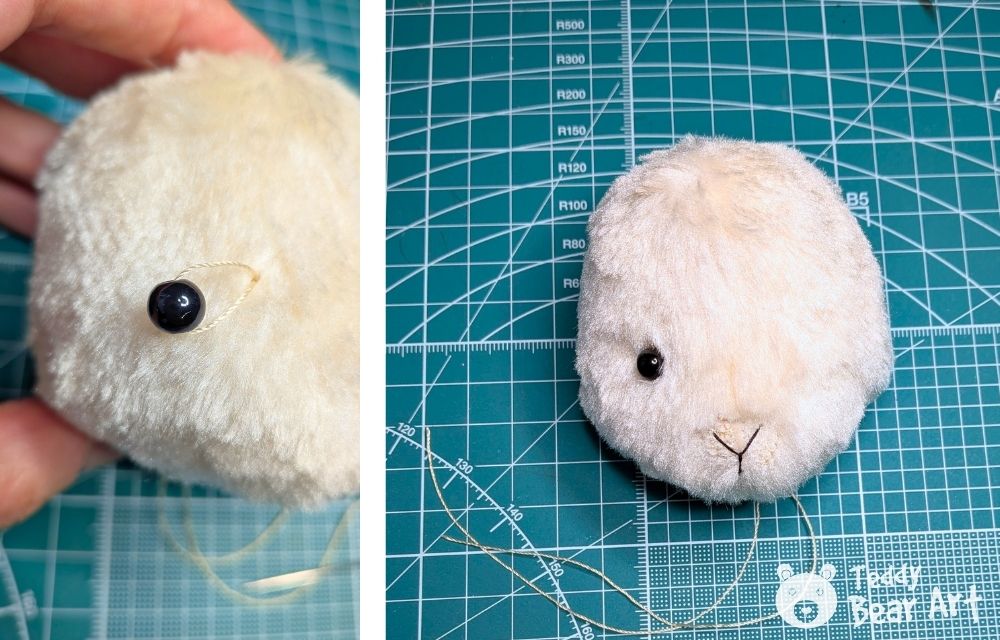
Start by embroidering the nose. Trim a tiny amount of fur in the nose area so the stitches sit neatly and do not sink into the pile. Use short, tight stitches to create a clean shape.
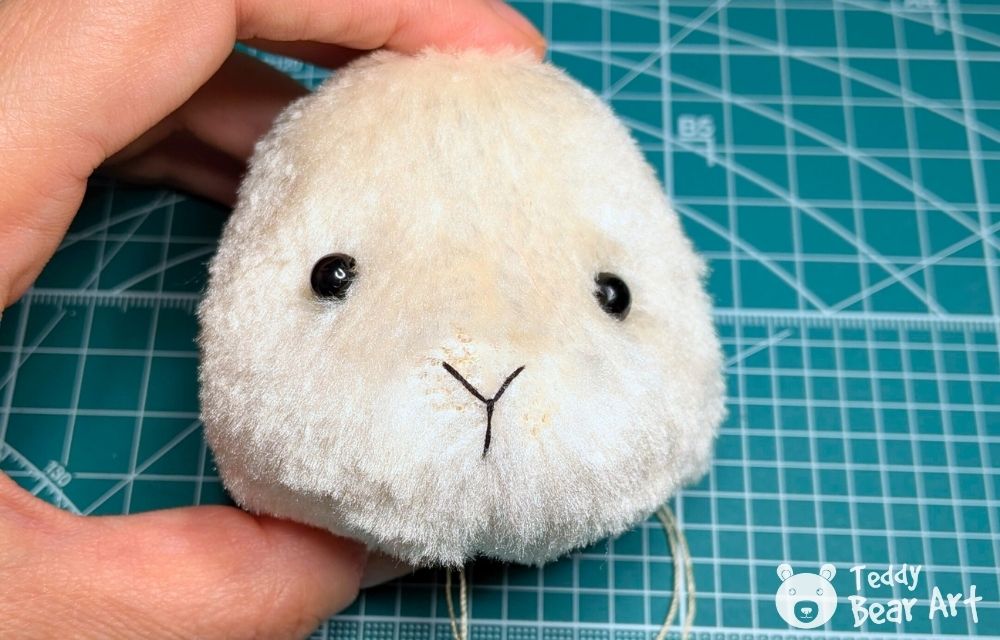
After the nose is finished, sew on the bead eyes. Position them symmetrically, then pass the needle through the head so the thread tails exit at the neck opening. Pull gently to set the eyes in place and secure the ends of the threads inside the neck area. This keeps the face tidy and the knots hidden.
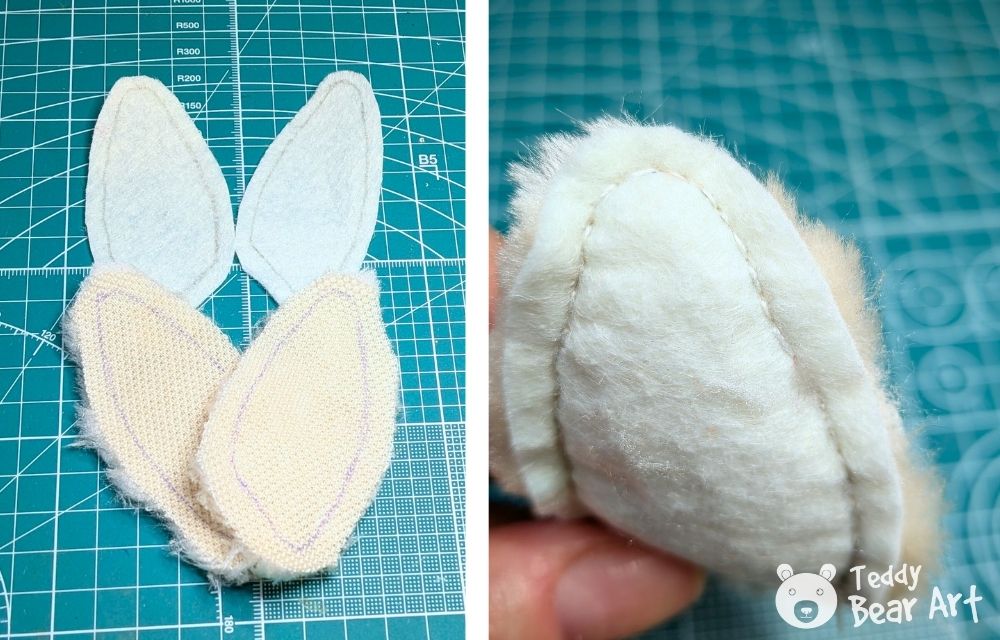
4. Sewing the Ears
Sew the ear pieces together, turn them right side out, lift the fur out of the seams, and close the turning opening.

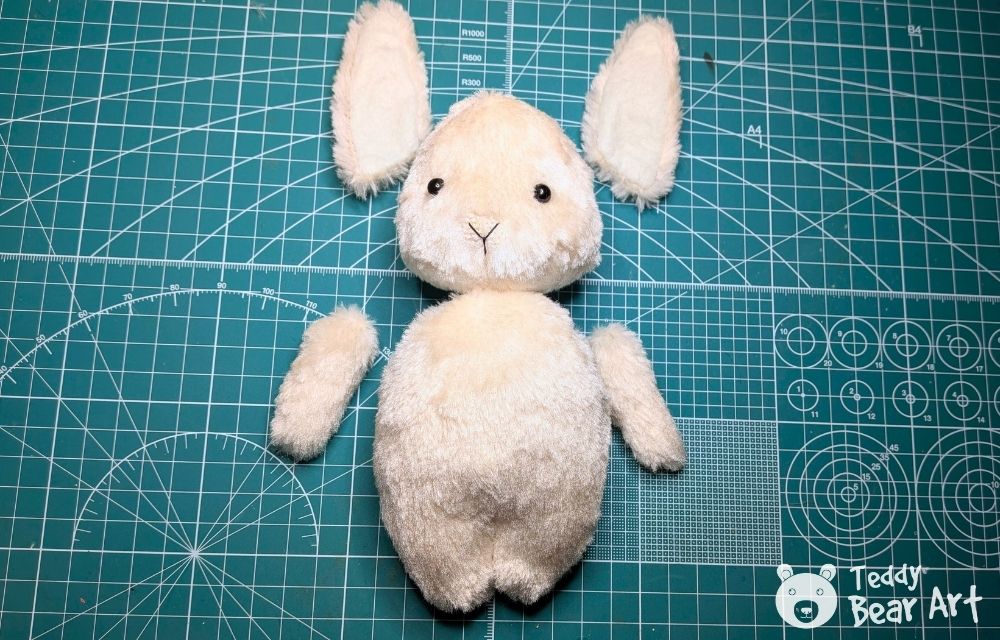
5. Sewing the Body
Sew the front and back body pieces together, leaving an opening for stuffing. Fill the body gradually. Sew the arms separately, stuff them lightly to create soft rounded shapes.


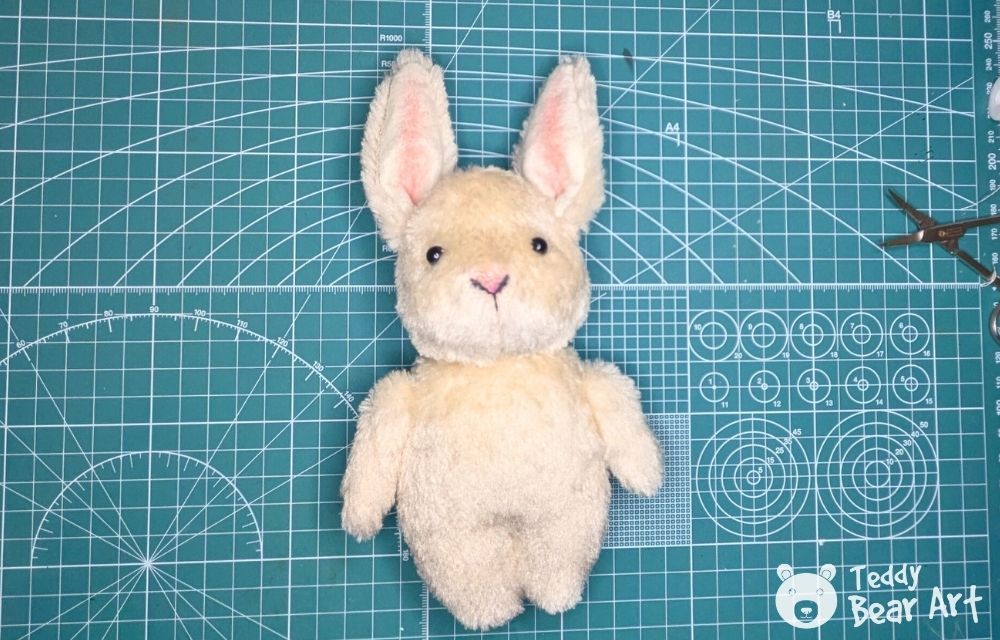
7. Final Closing and Shaping
Now, focus on the finishing touches. Brush the fur gently with a soft brush to fluff it up and even out the pile.

Then, add pink shading to the nose and the inner parts of the ears. If you like a sweeter expression, apply a hint of blush to the cheeks.

Attach the ears to the head using a ladder stitch, adjusting their angle so the expression looks natural. After the ears are secured, sew the head to the body with the same ladder stitch, keeping the seam tight and clean. Then attach the arms, also with a ladder stitch, so the joints look smooth and soft.
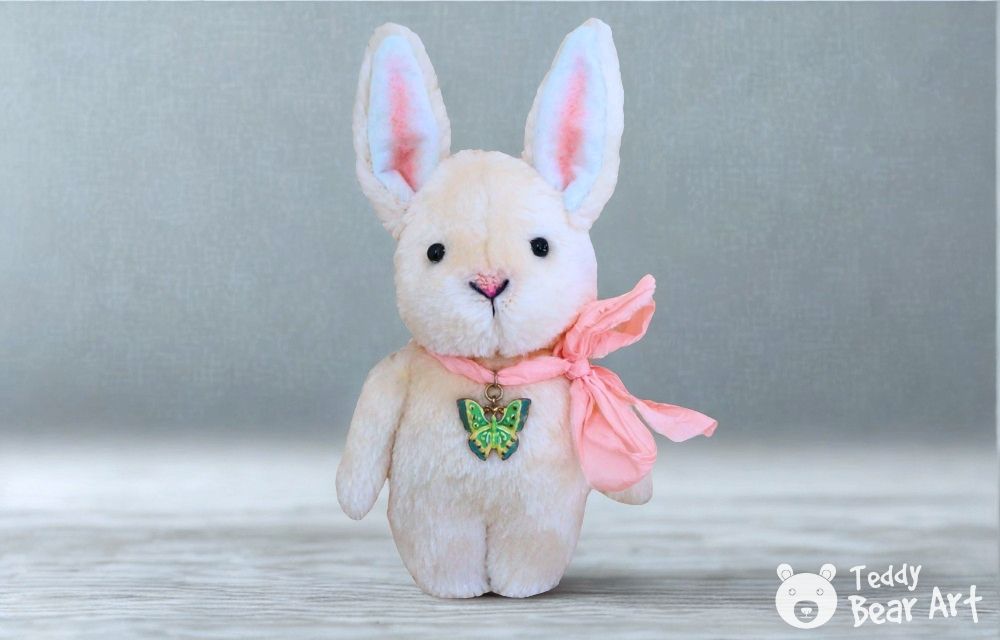
Finish the bunny with any accessories you prefer, a small bow, a scarf, or a tiny charm always adds personality.
Frequently Asked Questions
How can I keep the fur neat while cutting the pattern pieces?
To avoid cutting the pile, guide the scissors under the fur, cutting only the base fabric and leaving the fur intact. This keeps the edges smooth and preserves the length of the fur.
What stuffing method gives the bunny the nicest shape?
Add the filling in small portions and shape each area as you go. Start with the nose and move toward the back of the head, then fill the body gradually. This method ensures a soft, evenly shaped bunny.
Can I sell bunnies made from this pattern?
Yes, you can sell the finished bunnies! Please remember, you cannot distribute or sell the pattern itself, only the completed plush toys.
Before You Go
Creating your own plush bunny is a rewarding experience, and following this bunny stuffed animal DIY tutorial ensures every step is clear and achievable. By paying attention to the fur direction, carefully sewing and stuffing, and adding thoughtful finishing touches, you can make a bunny that is soft, expressive, and full of personality.
Remember, small details like the nose shading, ear positioning, and optional accessories give your bunny charm and character. Enjoy the process, take your time with each step, and don’t forget to share your creations—seeing your finished bunnies always inspires others to try their own handmade toys.
Get Free Patterns & Be the First to Know!
Want free teddy bear patterns, exclusive tutorials, and a chance to win craft supplies?
Sign up for our newsletter using the subscribe form in the middle of this article to receive new patterns, insider tips, and the latest news on Teddy Bear Art. You’ll also automatically be entered into our annual giveaway for a chance to win teddy bear crafting materials.
Bonus entry: Save one of our pins on Pinterest to increase your chances of winning!
Let’s create, inspire, and craft beautiful teddy bears together!
Thank you for this generous sharing, so clear and so patient. This post is not just a tutorial, it is an ode to sweetness.
Stitch after stitch, we don’t just sew a rabbit, we sew memories, we assemble childhood gestures giving shape to tenderness.
In a fast-paced world, this type of creation reminds us that slowness can be an act of love, because to create is to transmit. And to transmit is to resist forgetting.
Thank you so much for your kind words! Truly touched. Enjoy your crafting!
How lovely! My daughter asked me to find a pattern for her, and I finally found it here. The step-by-step photos and instructions are so clear that even a beginner can follow them easily. Your site is amazing, so many treasures and wonderful ideas to explore! Thank you for sharing such a wonderful tutorial and inspiring us to create.
Thank you! I’m glad you found the pattern and that the tutorial was helpful. Enjoy creating it together with your daughter!