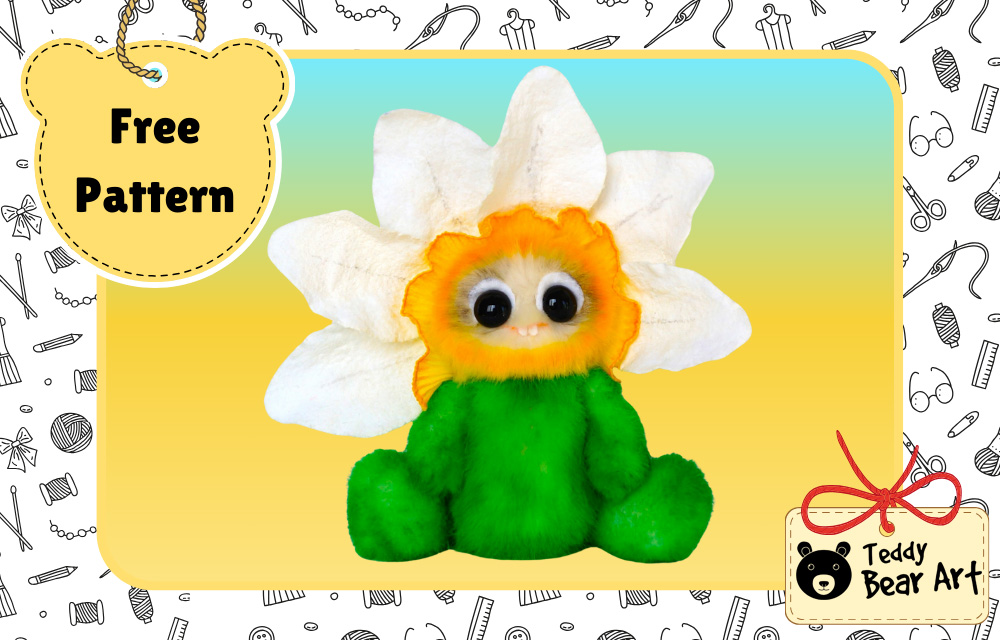
Looking for a delightful blooming project? This free flower plush sewing pattern might be just what your crafty heart needs. Inspired by the cheerful beauty of daffodils, this soft and smiling doll is more than just a toy—it’s a character with personality, perfect for plush collectors and creative makers alike. Let’s bring a daffodil to life, one stitch at a time.
Meet Your New Favorite Plush: The Daffodil Doll
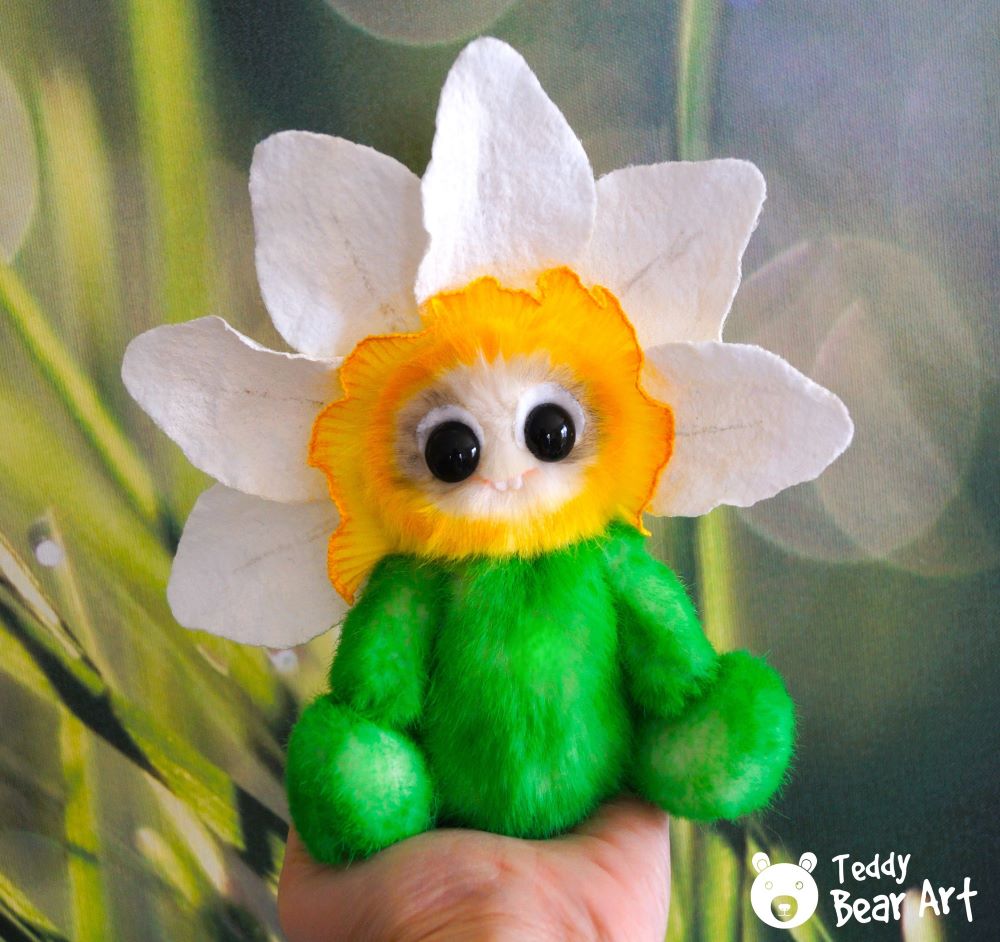
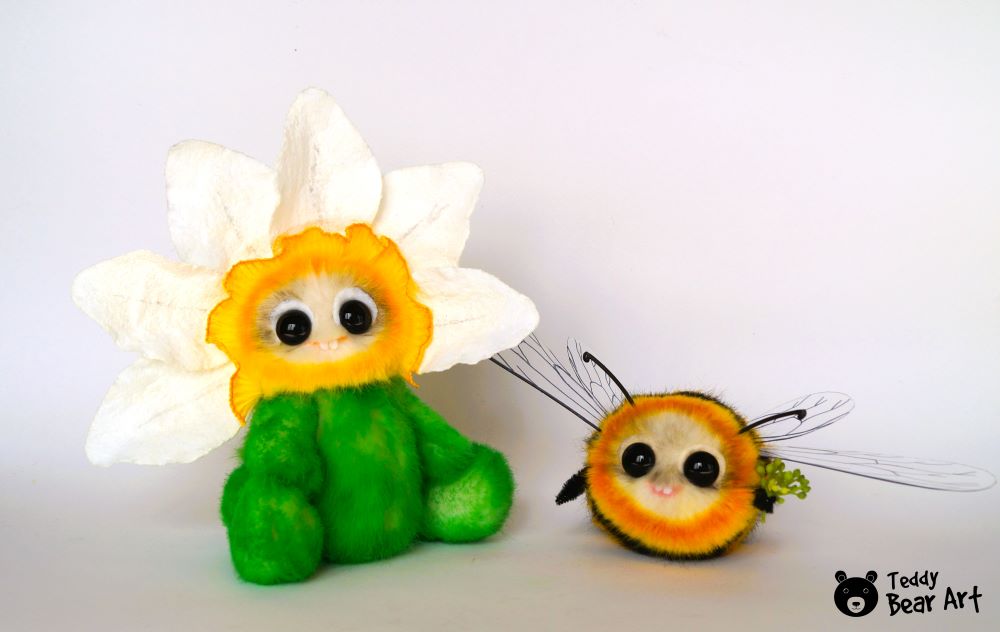
This isn’t your average stuffed flower. Our daffodil plush doll has a charming little face with wide, sparkling eyes and a gentle smile. The fluffy body is stitched from faux fur, and the oversized felt petals frame the doll’s face like a soft, blooming crown. It’s the kind of creation that instantly lifts your mood and sparks curiosity. Kids will adore it, but this design is aimed at grown-up crafters who love character plushies, fantasy creatures, and handmade art toys.
Its head and limbs are fully movable thanks to traditional cotter pin joints, giving it extra charm and poseability. Please note: this plush is not intended for children—it’s a collectible art doll made with delicate materials and techniques.
It’s ideal for spring decorating, an Easter surprise, or just adding whimsy to your handmade plush collection. Think of it as a flower fairy’s cozy little cousin.
Download Free Flower Plush Sewing Pattern – Easy to Access, Easy to Love
You can download the free flower plush sewing pattern directly from our website—no sign-ups or email gates.
To download the pattern, follow the instructions below:
From a phone or a tablet: There should be something similar for mobile devices with Android or iOS. Click on the image. Save it by holding your finger on the image and selecting the “Save Image” option. Then go to your photo gallery and print it (there is an option).
From a computer: Click on the photo of the pattern you see below. In the new tab that will open, you press the right mouse button and select the “Save image as …” option. Then, you choose where the image will be saved on your computer.
What You’ll Need for This Project
Here’s a quick list of tools and materials to gather before you start:
- Soft faux fur in green and white colors (or just in white color, which you will paint after). The pile length should be approximately 15 mm. For the arms, use short pile faux fur, like 10 mm pile length.
- Felt sheets in white color
- Black glass eyes on a metal loop with a diameter of 14 mm
- Pleated lace or fabric (white or yellow; white can be dyed)
- Stuffing (polyfill or wool)
- Joints: discs 18 mm in diameter – 6 pieces (for the head and legs), 9 mm in diameter – 4 pieces (for the arms), washers 10 pieces, cotter pins – 5 pieces
- Strong thread, sewing needles, pins
- Fabric scissors and a turning tool
- Oil paints and brushes
- Strong glue
- An awl
- Pliers
How to Sew the Daffodil Doll: A Quick Overview
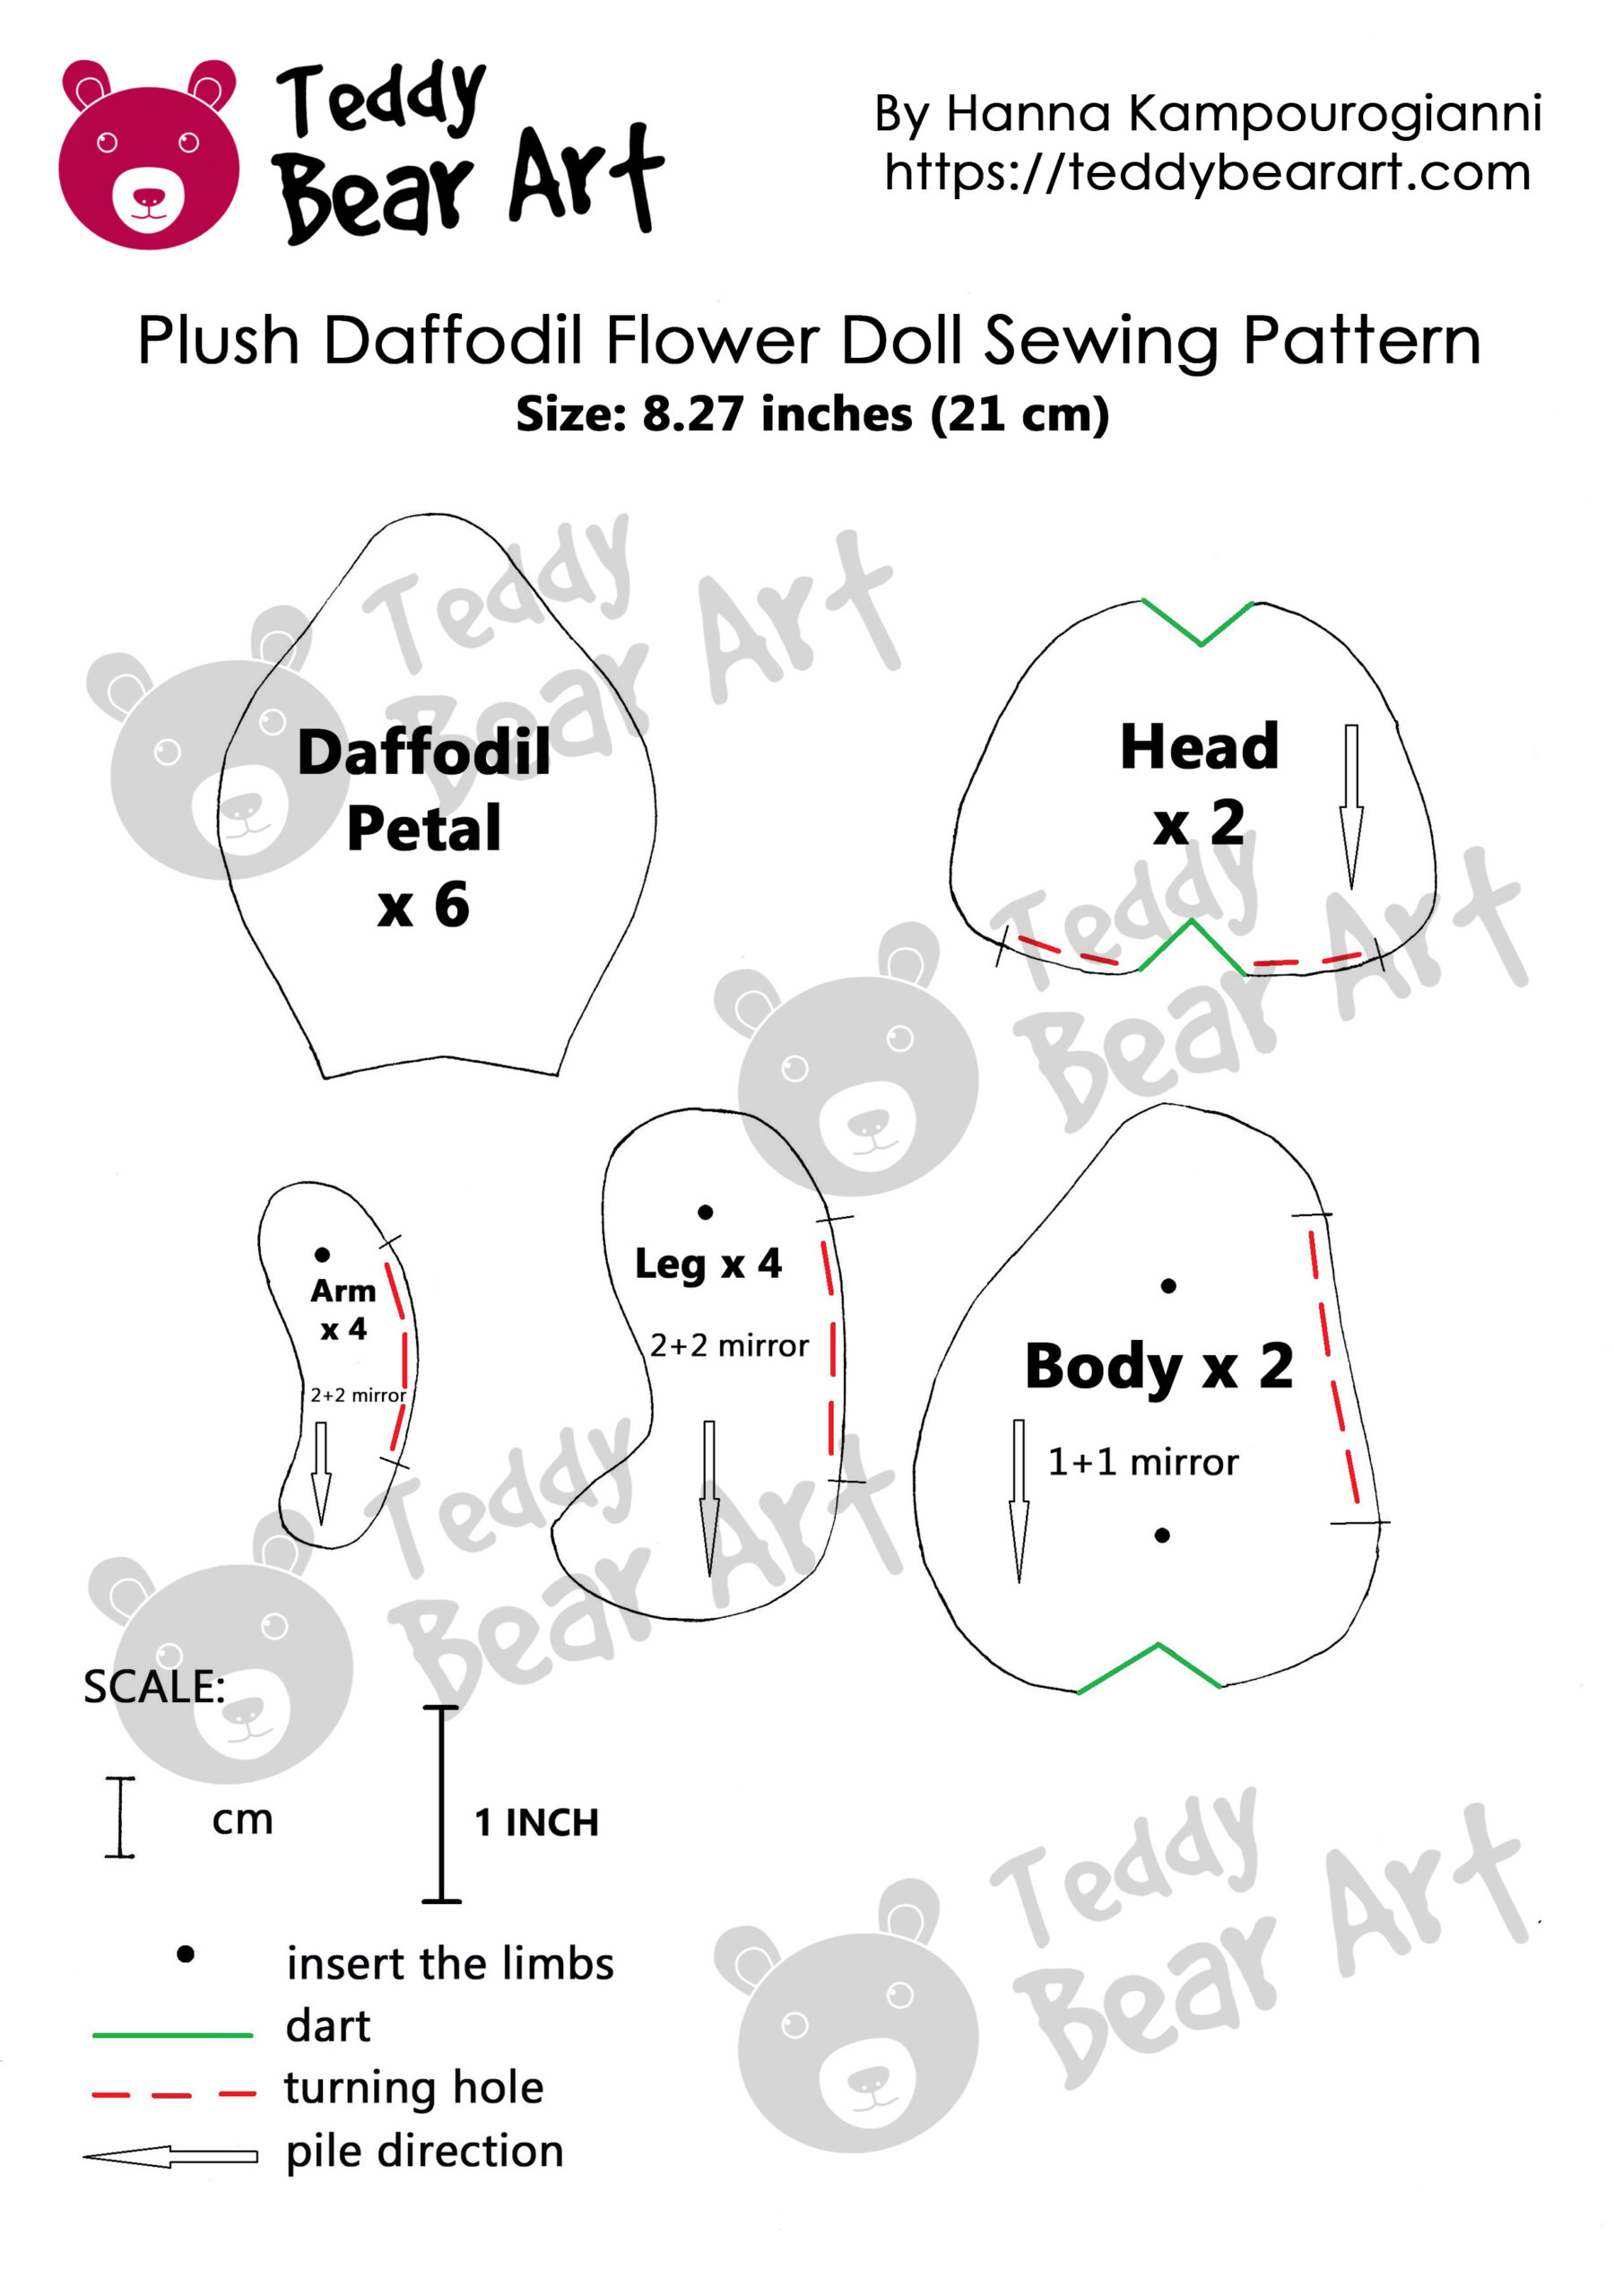
1. Cutting and Preparing the Fabric
Carefully cut all fabric pieces from faux fur and felt. For faux fur pieces, be sure to leave a seam allowance of about 7 mm. Felt pieces should be cut without seam allowances.
2. Sewing the Darts
Sew all darts on the head and body parts as marked.
3. Assembling and Turning
Sew together all parts: the head, body, arms, and legs. Turn each piece right side out.
4. Forming the Head
Stuff the head with synthetic filling and insert the disc with a cotter pin. If you are a beginner, learn how to make joints by following this detailed guide on how to make plush joints and how to use cotter pins.
Next, paint the entire head yellow with oil paint, leaving the face area white. Use a wide, dry brush and dip it lightly into the paint. Then wipe it thoroughly on a sheet of white paper until only a dry trace remains. This helps avoid clumps of paint on the fur. It’s best to practice on fabric scraps first! Let the head dry for a few days.
5. Preparing the Limbs and Body
Insert discs and cotter pins into the arms and legs, stuff them, sew the openings closed, and brush out the seams. Paint the limbs and the body green using the same dry-brushing technique. Do not stuff the body yet. If you’re using green fur, you can skip the painting step. Let everything dry completely.
6. Detailing the Head
Once the head is dry, insert the eyes. Make eyelids from white felt — you can either glue or needle-felt them in place. Trim the fur slightly to form a cute smile and glue in two tiny felt teeth.
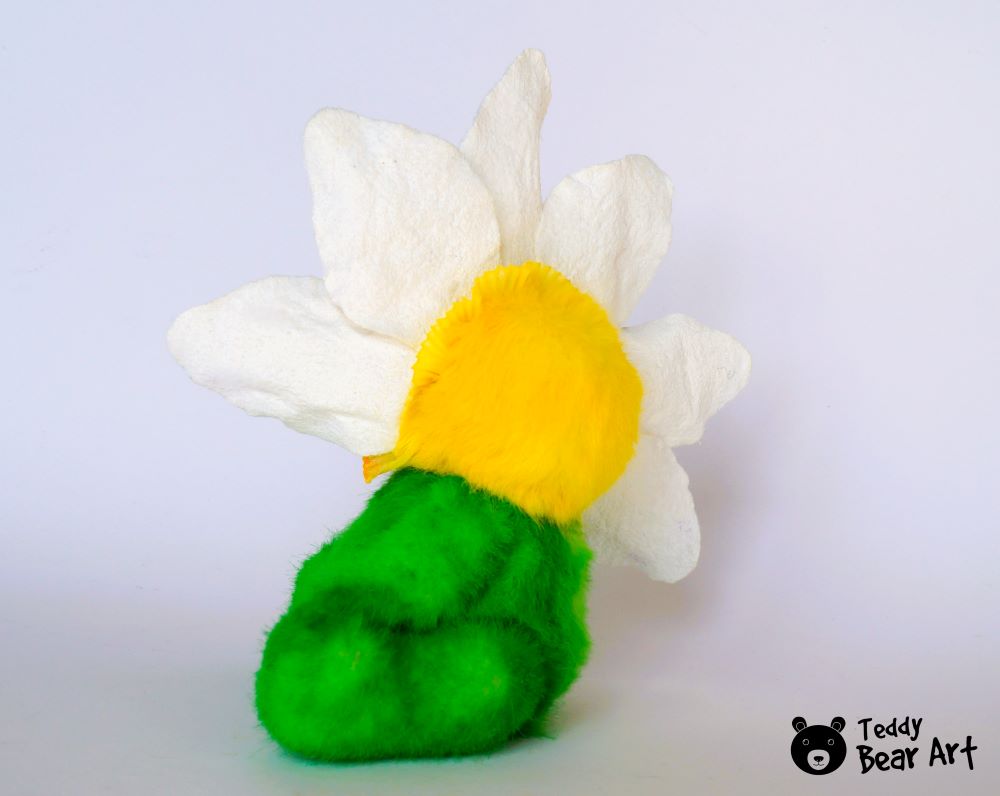
Create the flower center using pleated lace, pre-dyed in yellow. Sew it around the face like a soft floral frame. Lightly shade the felt petals and attach them as well. Add soft grey shading around the eyes and a touch of pink to the smile. Now the head is complete.
7. Final Assembly
Attach the head to the body, then join the limbs. Add weight to the bottom of the body and stuff it. Close the stuffing opening, and your little daffodil plush is ready to charm everyone!
Love This Pattern? Here’s More
If this project made you smile, we’ve got more where that came from. Browse our blog for free patterns, including teddy bear clothes, whimsical soft animals, and other fantasy-inspired plushies. Each one is designed with heart, and we love seeing how makers like you bring them to life. For example, you can find patterns for cute bees and bumblebees, which will make perfect friends for your flower plushie.
Get Free Patterns & Be the First to Know!
Want free teddy bear patterns, exclusive tutorials, and a chance to win craft supplies?
Sign up for our newsletter using the subscribe form in the middle of this article to receive new patterns, insider tips, and the latest news on teddy bear art. You’ll also automatically be entered into our annual giveaway for a chance to win teddy bear crafting materials.
Bonus entry: Save one of our pins on Pinterest to increase your chances of winning!
Let’s create, inspire, and craft beautiful teddy bears together!
This Daffodil Doll pattern is just too cute!
As someone who’s absolutely in love with stuffed toys, I got really excited seeing this. I’ve been collecting plushies for years, and in recent years I’ve started making some of my own—it’s such a rewarding experience! There’s something magical about sewing something soft and sweet from scratch, and this daffodil design is so creative and cheerful, it’s now on my “must-make” list.
I’ve made a few plush flowers before, but this one really stands out with its charming little face and whimsical shape. Can’t wait to add it to my collection!
I’d love to hear from others—have you made this Daffodil Doll yet? Do you collect or sew plushies too? What’s been your favorite project so far? Let’s share and inspire each other!
Thank you so much for your lovely comment! It truly warms my heart to hear from fellow plushie lovers and creators. You’re absolutely right—there is something magical about turning soft fabric into something full of character and charm. I’m so happy the Daffodil Doll has found a place on your “must-make” list!
Plush flowers are such a fun twist on traditional soft toys, and it’s wonderful to hear you’ve made a few yourself! If you ever feel like sharing photos of your creations, I’d love to see them—it’s always inspiring to see how each maker adds their own special touch.
And yes, let’s keep the conversation going! To anyone reading this, what plushies are you working on right now? Or which project has brought you the most joy? Let’s share ideas and keep inspiring one another.
This is such a lovely and creative idea! I’ve always been fascinated by plush sewing patterns, especially ones inspired by nature like this daffodil doll. The combination of soft textures and floral shapes feels so whimsical and comforting. I’m curious, what type of fabric would you recommend for the petals to keep them soft but structured enough to hold their shape?
I’ve dabbled in making plush toys before, but I haven’t tried floral designs yet. It seems like a fun challenge, especially when it comes to getting the curves and layering of the petals just right. I can already imagine how beautiful this daffodil would look as a spring decoration or part of a handmade gift.
Thank you so much for your kind words.
For the petals, I would recommend using medium-weight felt or cotton reinforced with a thin layer of batting — this way, the petals stay soft but still hold their shape. Minky plush or soft velour also work well if you add interfacing; they give a very gentle feel but need extra support to avoid collapsing.
Floral shapes are definitely a fun challenge, especially with layered petals. But the end result is worth it — it looks very unique and eye-catching. I think you’d really enjoy trying it. If you do, I’d love to see what you create.
This is so sweet! I’ve been looking for a fun, hands-on project to do with my niece, and this daffodil doll pattern is just adorable. I love how clear your instructions are, even for someone like me who’s still learning the ropes with sewing.
How long does it usually take to make this toy? Do you think we could finish it over a weekend?
Have you thought about making other flower-themed toys too? It would be so lovely to have a whole little garden!
Thank you so much for your kind words! This is a really sweet project, but I wouldn’t recommend it for complete beginners — it’s best if you’ve already sewn at least one toy before.
It’s unlikely you’ll finish it in just a weekend, since the fabric needs to be hand-dyed first, and it has to dry completely — that takes some time. But the result is definitely worth it!
The toy is meant to sit, not stand.
And I love the idea of a flower garden — I’ve already made a rose, and I’m thinking about adding a tulip or anemone next!
Hi Hanna!
What a lovely and heartfelt project — the plushie turned out so sweet! You explained everything so clearly and in such detail that even the tricky parts, like using cotter pin joints, don’t feel intimidating anymore. The daffodil has so much personality — that gentle face and the flower petals around the head make it feel cozy and magical. The materials you chose work beautifully together and bring the toy to life. It really makes me want to sew one too — as a spring decoration or just something to lift the mood. Thanks so much for the inspiration!
Hi!
Thank you so much for your kind words — that truly means a lot to me! I’m so happy to hear the tutorial felt clear and encouraging. I always try to make even the tricky parts feel doable, and knowing it inspired you really makes my day. I hope your own daffodil plushie brings you just as much joy — I’d love to see it if you ever feel like sharing!