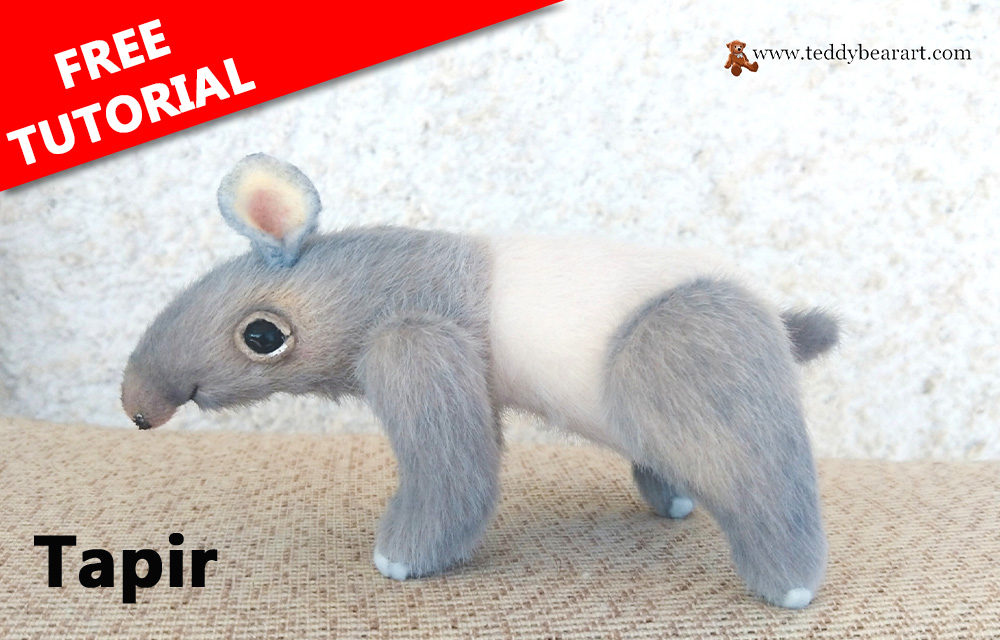
Welcome to teddybearart.com/, the cozy corner of the internet dedicated to all things teddy bears and cuddly creations. I’m thrilled to introduce you to our latest crafting adventure: making your very own homemade tapir plush! Whether you’re a seasoned teddy bear maker or just starting your creative journey, this step-by-step guide will walk you through the process of crafting an adorable tapir pal.
Our goal has always been to inspire and educate; this tutorial is no exception. We’ll explore fabric choices, sewing techniques, and the little details that make a tapir special.
But crafting is more than just following instructions; it’s about infusing your unique personality into your creation. That’s why we’ll also discuss ways to personalize your tapir plush, so it becomes a cherished companion that reflects your creativity.
So, grab your crafting supplies, and let’s embark on this delightful journey from pattern to pal. Your tapir adventure begins here!
Download the Pattern
- From a computer (Windows).
Click on the photo of the pattern, and select the “Save image as …” option. - From a phone or a tablet (Android). There should be something similar for the iPad.
Click on the image. Save it by holding your finger on the image and selecting the “Save As” option. Then go to your photo gallery and print it (there is an option).
Gathering Your Materials
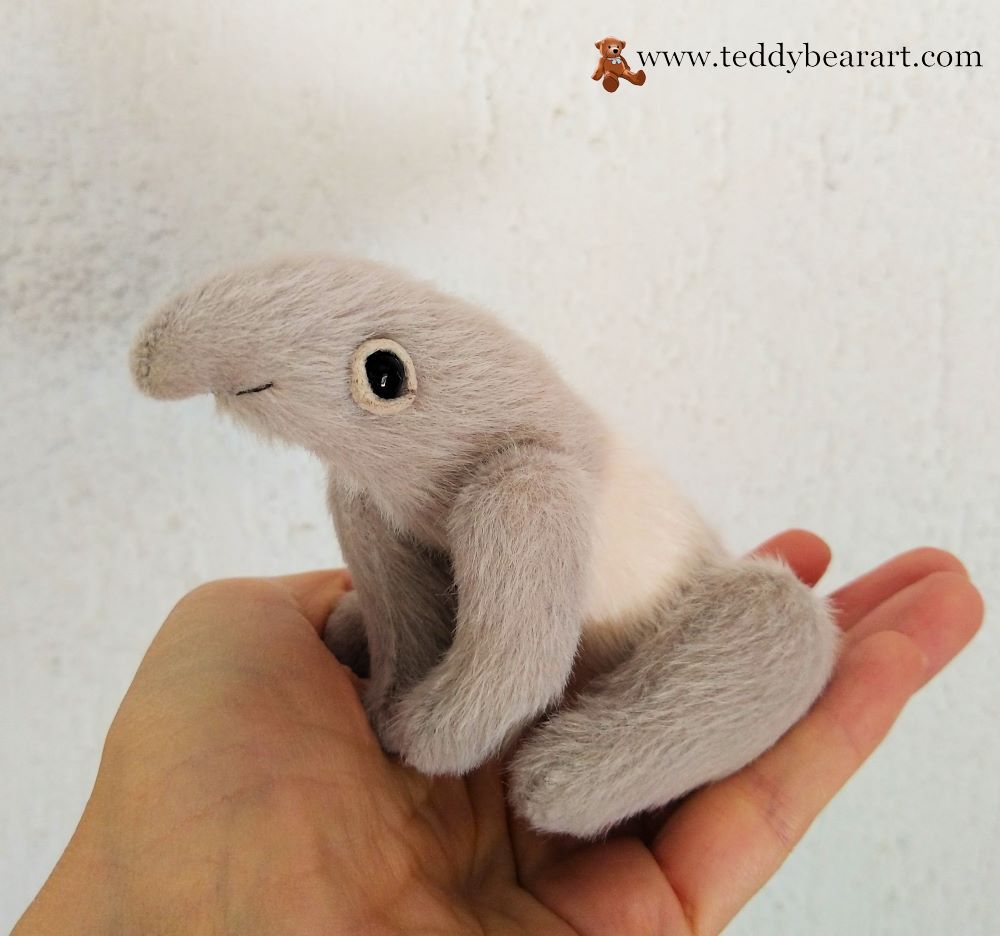
1. A piece of black (brown or dark grey) faux fur for miniature teddies, approximately 25×25 cm for the head and limbs. A piece of white faux fur for mini teddies, approx. 18×18 cm for the body. I didn’t have any black or brown plus,h so I had to paint my tapir dark gray in the end.
2. Strong threads, the same color as your plush fabric, and a needle for hand sewing.
3. Scissors.
4. A pair of glass eyes – approx. 8 mm in diameter.
5. Discs: for the hands, 12 mm – 4 pieces, for the leg,s 20 mm – 4 pieces.
6. Washers – 8 pieces.
7. T-shaped cotter pins – 4 pieces.
8. Synthetic filler.
9. Metal or glass pellets for the weight (small diameter).
10. A small piece of felt for the ears, fingers, and eyelids.
12. Glue UHU.
13. White, pink, oil colors, and white and black acrylic colors.
14. Paintbrushes.
18. Pliers.
19. An awl.
Sewing and Assembly
Now that you have your tapir pattern and selected fabrics, it’s time to roll up your sleeves and dive into the sewing process. Don’t worry if you’re new to sewing; we’ll guide you through each step, making it an enjoyable and rewarding experience.
1. Cutting Out the Pieces:
Take your pattern and lay it out on the fabric, making sure it follows the direction of the fur. Arrange the pattern pieces so that the fur lines up with the arrows marked on them. Don’t forget to leave a little extra space, about 5-7 mm, for the seams.
Now, grab your scissors and start cutting out all the pattern pieces. Be extra careful here and keep your scissors as close to the fabric base as you can. This way, you’ll avoid accidentally snipping the fur along the edges.
2. Sewing the Body:
Start by sewing up all the marked tucks (indicated in green). Then, sew each side of the head with each part of the tapir’s body following the marks: A to A1 and B to B1.

Now pin in the front and back body pieces together, with the right sides of the fabric facing each other. Using a sewing machine or hand stitching, sew along the edges, leaving a small opening for turning the tapir right-side out. Be sure to backstitch at the beginning and end of your seams for added durability.

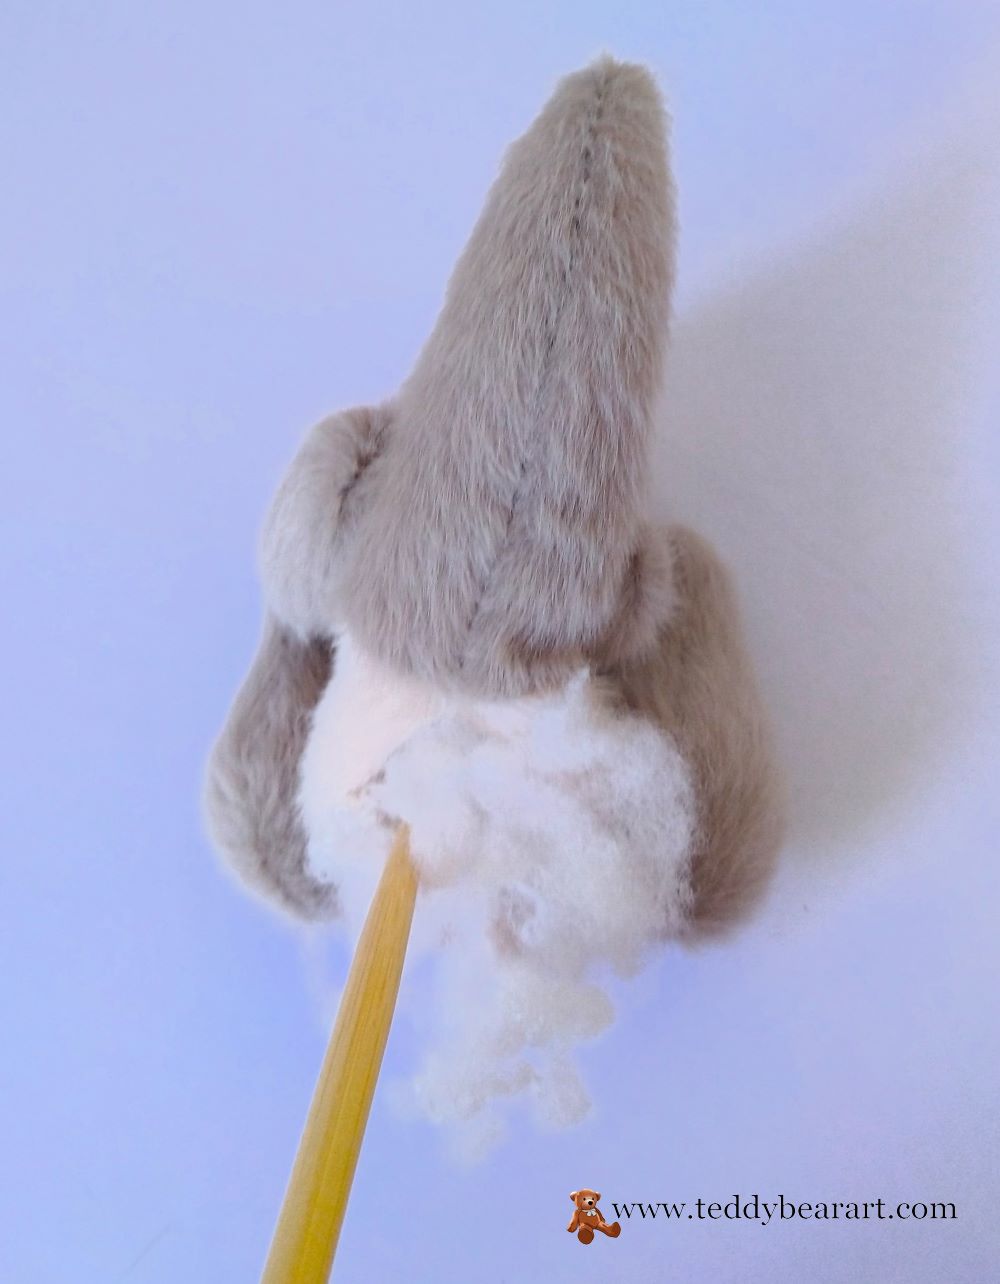
3. Stuffing Your Tapir:
Once your tapir’s body is sewn, it’s time to give it that delightful plushy feel. Carefully turn the tapir right-side out through the opening you left. Now, using polyester stuffing, gradually fill only the head.
4. Sewing the Limbs:
Moving on to the limbs, follow the same process as with the body. Similarly, sew the outer and inner parts of the arms (1 + 1 as a mirror image), leaving an opening for eversion (highlighted with a red dotted line). Repeat this step for the legs, leaving an opening for eversion (highlighted with a red dotted line).
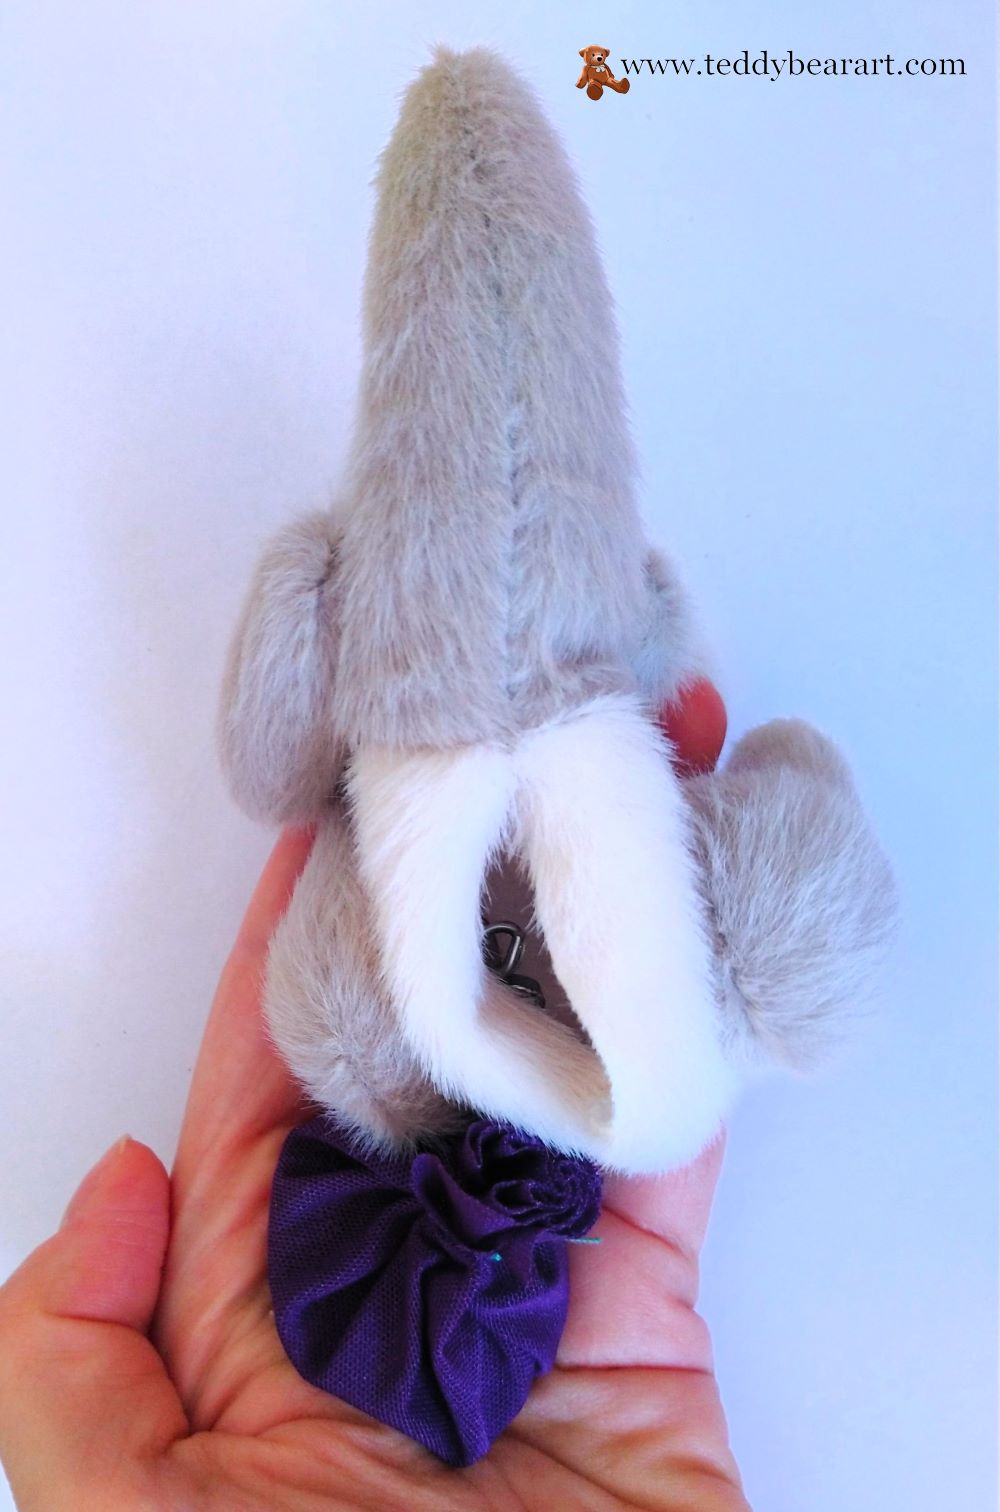
Once sewn, turn them right-side out. Turn out the finished parts of our elephant using a wooden stick with a blunt end. Take together discs and washers (metal disks), and then insert cotter pins into them. In our case, smaller discs will be for hands.
With an awl, make small holes in the marked places on the arms and legs of the elephant (inside). Insert all the discs and cotter pins into the arms and legs of the elephant. Now fill them with synthetic filler quite tightly. Tamp down with a wooden stick. Sew up the openings with a ladder stitch.
5. Attaching the Limbs:
Before attaching the limbs to the body, use a needle or awl to pull the fur out of the seams and comb it in different directions.
Find the marks inside the body, make holes with an awl, and insert the limbs there. Twist the ends of the cotter pin so that it is not very tight or very loose.
6. Closing the Opening:
Stuff the tapir’s body. Place the pouch with the metal pellets inside of the body. Take your time to ensure your tapir is evenly stuffed and feels huggable.
With your tapir fully stuffed, it’s time to close the opening. Using a ladder stitch, carefully sew up the gap. Make your stitches as invisible as possible to maintain a neat finish.
Using a needle or an awl, remove the pile from the seams and comb it in different directions to make the toy look neat.
7. Attaching the Eyes:
Mark the places where you plan to insert the eyes. Using an awl, carefully make holes in these marked spots, gently parting the threads without tearing the fabric. Next, thread a strong thread through the eye loop and use a needle to guide it into the hole.
Secure the thread on the opposite side of the tapir’s head, where you intend to sew on the ear. Repeat the same process for the second eye.
As you follow these steps, remember that crafting is about creativity and enjoyment. Each tapir you create will have its personality and charm. So, take your time, savor the process, and embrace the joy of turning a simple pattern into a lovable tapir pal.
In the next section, we’ll explore how you can personalize your tapir to make it truly one-of-a-kind. Whether you’re creating a tapir for yourself or as a heartfelt gift, your finished plush will be a testament to your crafting skills and imagination. Happy sewing!
Adding the Details
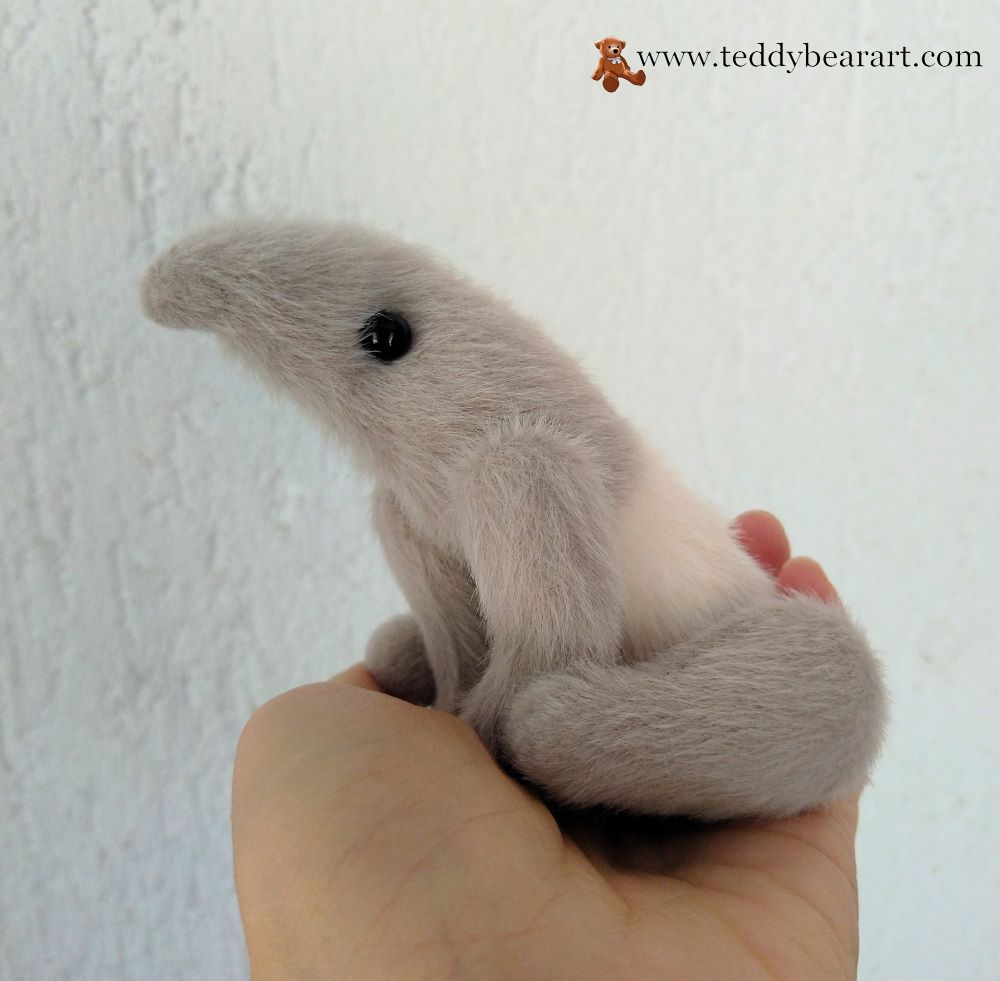
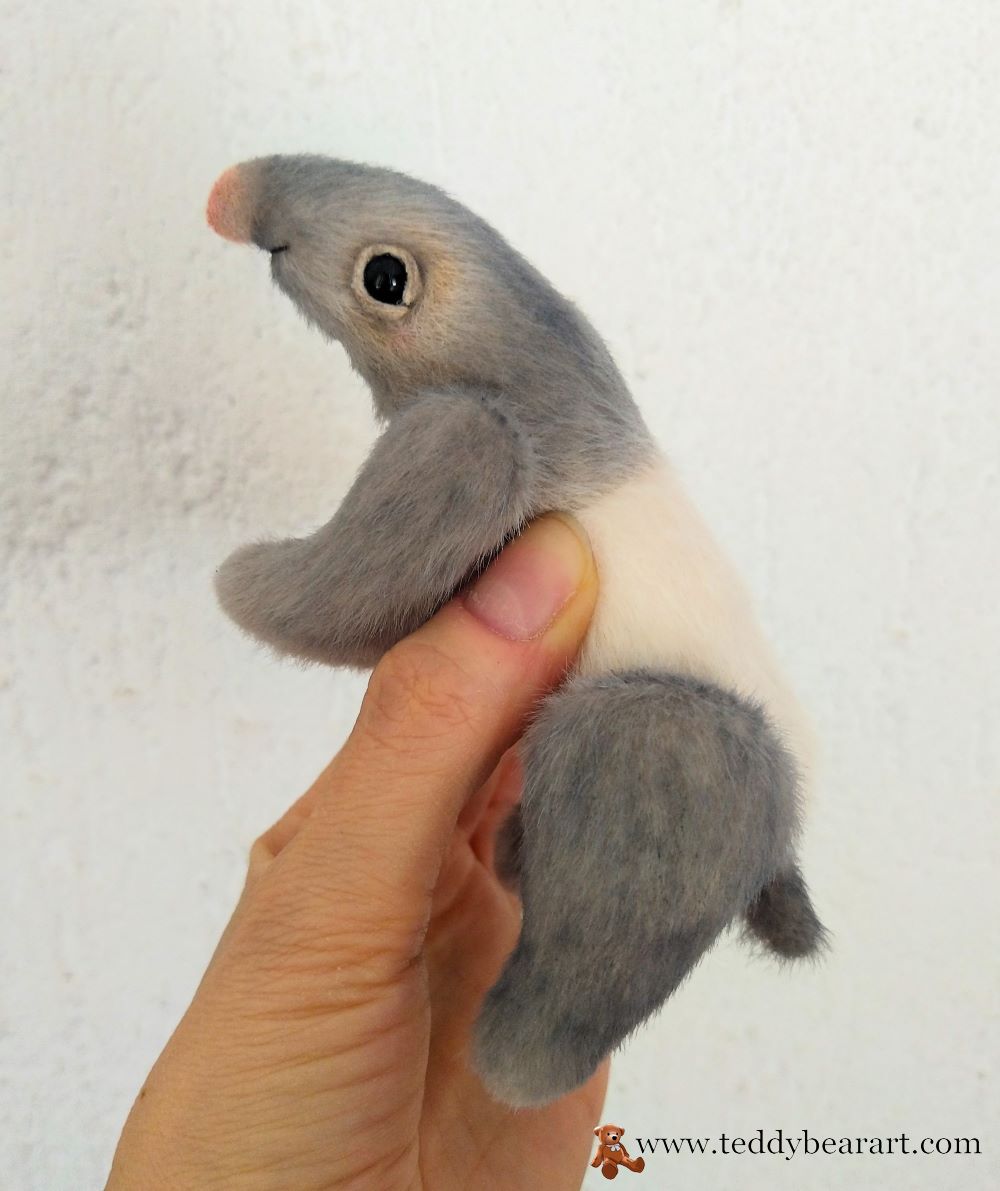
Your tapir plush is coming to life, and now it’s time to add those captivating tapir features that make it truly unique. These details will give your creation its distinct personality and charm.
- Improvement of the Snout:
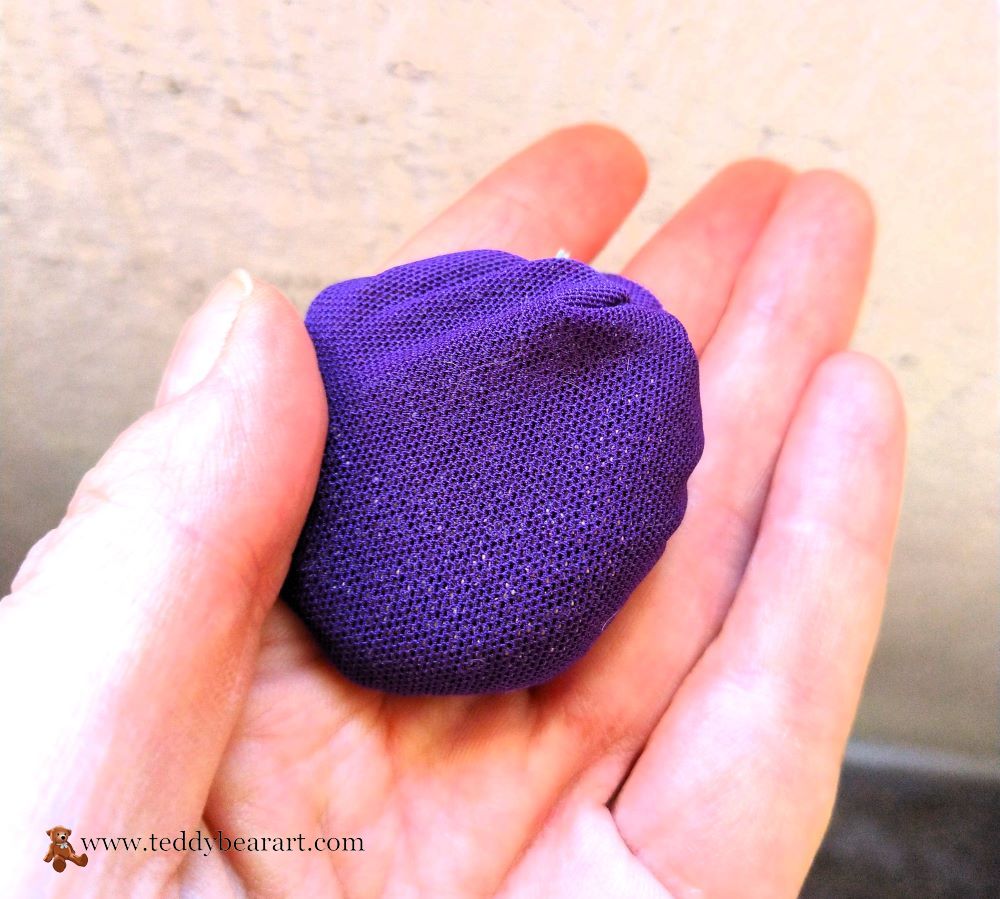
The tapir’s snout is a defining feature. Trim all the fur off the area of his nose to highlight it. - Adding the Tail:
Tapirs have short, stubby tails that add to their charm. Create a tail and attach it to the back of your tapir, making sure it’s securely sewn for durability. - Facial Features:
Make eyelids out of felt and glue them onto your eyes. Embroider the mouth, bringing your tapir’s facial expression to life. The placement of the eyes and mouth will determine your tapir’s personality, so take your time. Trim the fur from the tapir’s legs and glue tiny felt fingers to each limb. There are 4 toes on the front paws and 3 on the hind paws.
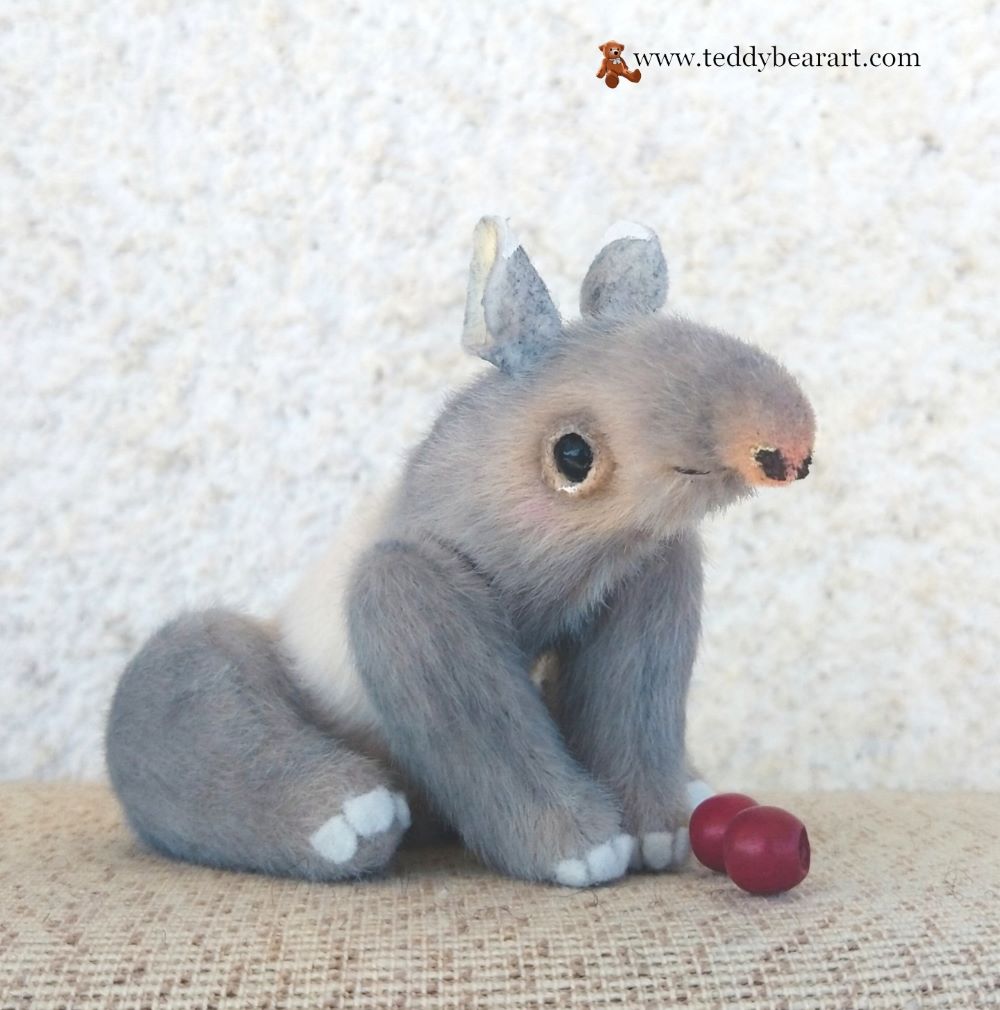
4. Developing the Ears:
Tapirs are known for their adorable, rounded ears. Craft two earpieces from your chosen fabric, ensuring they match in size and shape. Attach them securely to the sides of your tapir’s head, positioning them to capture that sweet tapir expression.
By adding these charming details, you’re turning your tapir into a lovable companion with its own unique character. Now that your tapir plush is nearly complete, in the next section, we’ll discuss personalizing it to make it truly one-of-a-kind.
Personalizing Your Tapir
Now that your plush tapir has taken shape, it’s time to infuse it with your creativity and make it unique. Personalization is where your imagination can truly shine.
- Colorful creativity. Choose the color scheme you like. Whether you prefer classic tapir coloration or want to experiment with vibrant hues, your tapir can reflect your artistic vision.
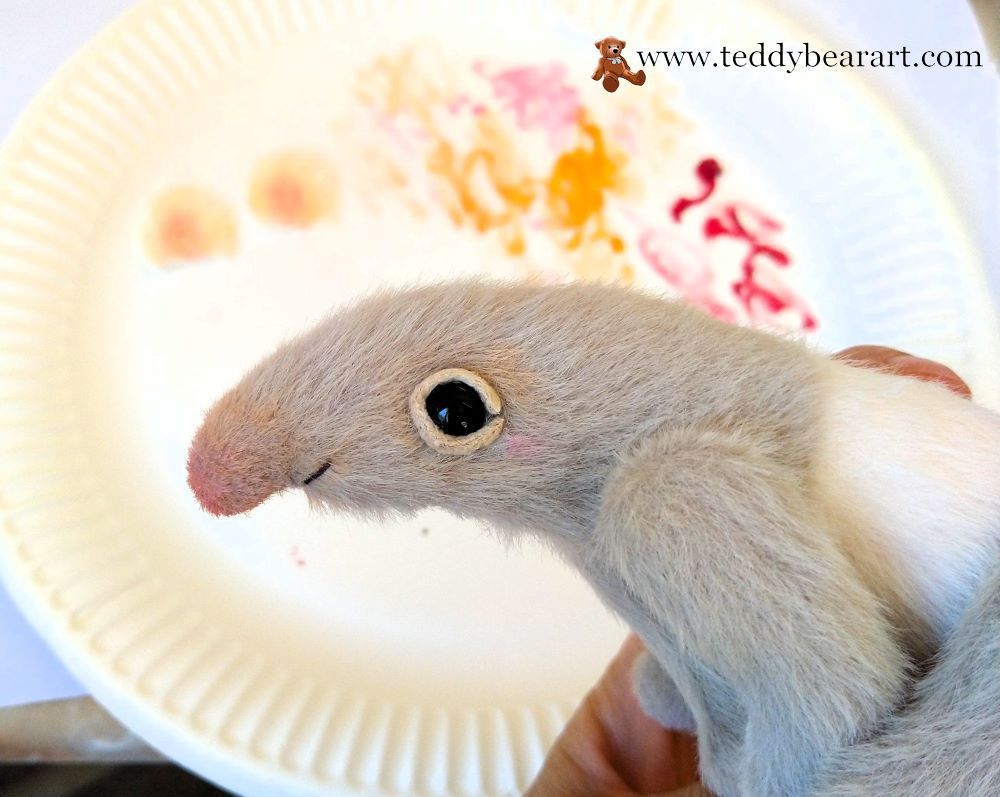
For my tapir, I highlighted the area around the eyes with light tones, embroidered the mouth, and painted the nose and inside the ears pink.
Using acrylic paint, I painted his nostrils. I cut and glued small pieces out of felt to create his fingers.
2. Name your creation. Every plush has a story. Give your tapir a name and a backstory that will make it special to you.
By personalizing your tapir, you ensure it’s not just a toy; it is a treasured companion that carries your unique personality.
Common Questions
1. What if I don’t have all the recommended materials?
No need to worry! You can always let your creativity shine by using whatever materials you have on hand. Feel free to experiment with different fabrics and decorations to give your tapir a one-of-a-kind personality.
2. I’m new to sewing. Is this project suitable for beginners?
Absolutely! We’ve crafted the Teddy Tapir pattern with everyone in mind, including those new to sewing. Take your time, and if you ever need assistance, don’t hesitate to reach out for help.
3. How do I choose the right fabrics to capture the unique appearance of a tapir?
Short Pile Faux Fur on a Fine Backing: Faux fur is an excellent choice for the main body of your tapir. Look for dark brown or black faux fur for the body. You can find faux fur in various textures, so choose one that mimics the tapir’s fur as closely as possible.
Minky Fabric: Minky is a soft and plush fabric that works well for the light-colored areas on the tapir’s face and legs. Opt for a light gray or beige minky fabric for these parts. Minky is known for its smooth texture, which can provide a nice contrast to faux fur.
Troubleshooting
1. My sewing machine is acting up. What should I do?
Check your machine’s manual for helpful troubleshooting tips. If all else fails, consider the relaxing and rewarding alternative of hand-sewing.
2. My tapir doesn’t quite look as expected. Any suggestions?
Don’t worry; even seasoned crafters sometimes face this challenge. Take a close look at the instructions, and if necessary, don’t hesitate to undo seams and make adjustments.
Remember, crafting is all about learning and enjoying the process. If you have more questions or encounter unique challenges, feel free to connect with our crafting community. We’re here to support you on your Teddy Tapir journey!
Conclusion
Crafting a tapir plush can be a delightful and rewarding experience. As you bring your creation to life, remember that every stitch is a step closer to having a charming tapir pal. Whether you’re a seasoned crafter or just starting your journey, we hope this guide has been educational and inspiring.
Before we wrap up, if you’re looking for more patterns and crafting resources, be sure to check out this fantastic collection of animal plush patterns. It’s a treasure trove of inspiration for your future projects.
Thank you for joining us on this crafting adventure. Stay tuned for more exciting tutorials and creative ideas here on teddybearart.com. Happy crafting!
If you ever need a hand or have any questions, feel free to leave them in the comments below, and I will be more than happy to help you out.
Get Free Patterns & Be the First to Know!
Want free teddy bear patterns, exclusive tutorials, and a chance to win craft supplies?
Sign up for our newsletter using the subscribe form in the middle of this article to receive new patterns, insider tips, and the latest news on teddy bear art. You’ll also automatically be entered into our annual giveaway for a chance to win teddy bear crafting materials.
Bonus entry: Save one of our pins on Pinterest to increase your chances of winning!
Let’s create, inspire, and craft beautiful teddy bears together!
This is a great guide on how to make a Tapir plush. It clearly outlines the materials I am going to need and includes step by step detailed instructions on how to assemble it. This guide seems very beginner friendly and anyone can follow along. I will definitely be saving this guide to use for the next rainy day to keep me busy. I was just wondering, for a beginner, roughly how long would it take from start to finish to complete making the plush?
Thank you! I don’t know the level of your sewing skills, so it’s difficult to say how much time you will need. If you know basics sewing, maybe a few days…
Oh my gosh, this is so cute, I have never seen a pattern for a homemade tapir plush and wasn’t aware that I needed one, but now I NEED one haha! Can I ask where you get the ideas from to create these patterns yourself? Do you “just” sit at the drawing table and have those patterns in your head, ready to be drawn? What an artist! thanks for these patterns!
You are welcome!) I get inspired by cute animals, then I figure out in my head what I would like the toy to look like, and then I draw it and design the pattern.