How to create your own stuffed animal? This is a question beginners ask themselves when they start thinking about making their plush friends. It may seem like a complicated task, especially if you have no sewing experience. But in reality, it’s quite achievable for anyone, even for those picking up a needle and thread for the first time. In this post, we will share some simple and helpful tips on how to create your own stuffed animal, from choosing materials to the finishing touches that give your creation its unique character.
Getting Started with Your Stuffed Animal Project
Starting small is key when you’re a beginner. Instead of tackling an elaborate design right away, opt for a simple shape—like a basic teddy bear, bunny, or even a heart. The process typically involves sketching your design, cutting fabric, sewing the pieces together, stuffing them, and adding finishing touches.
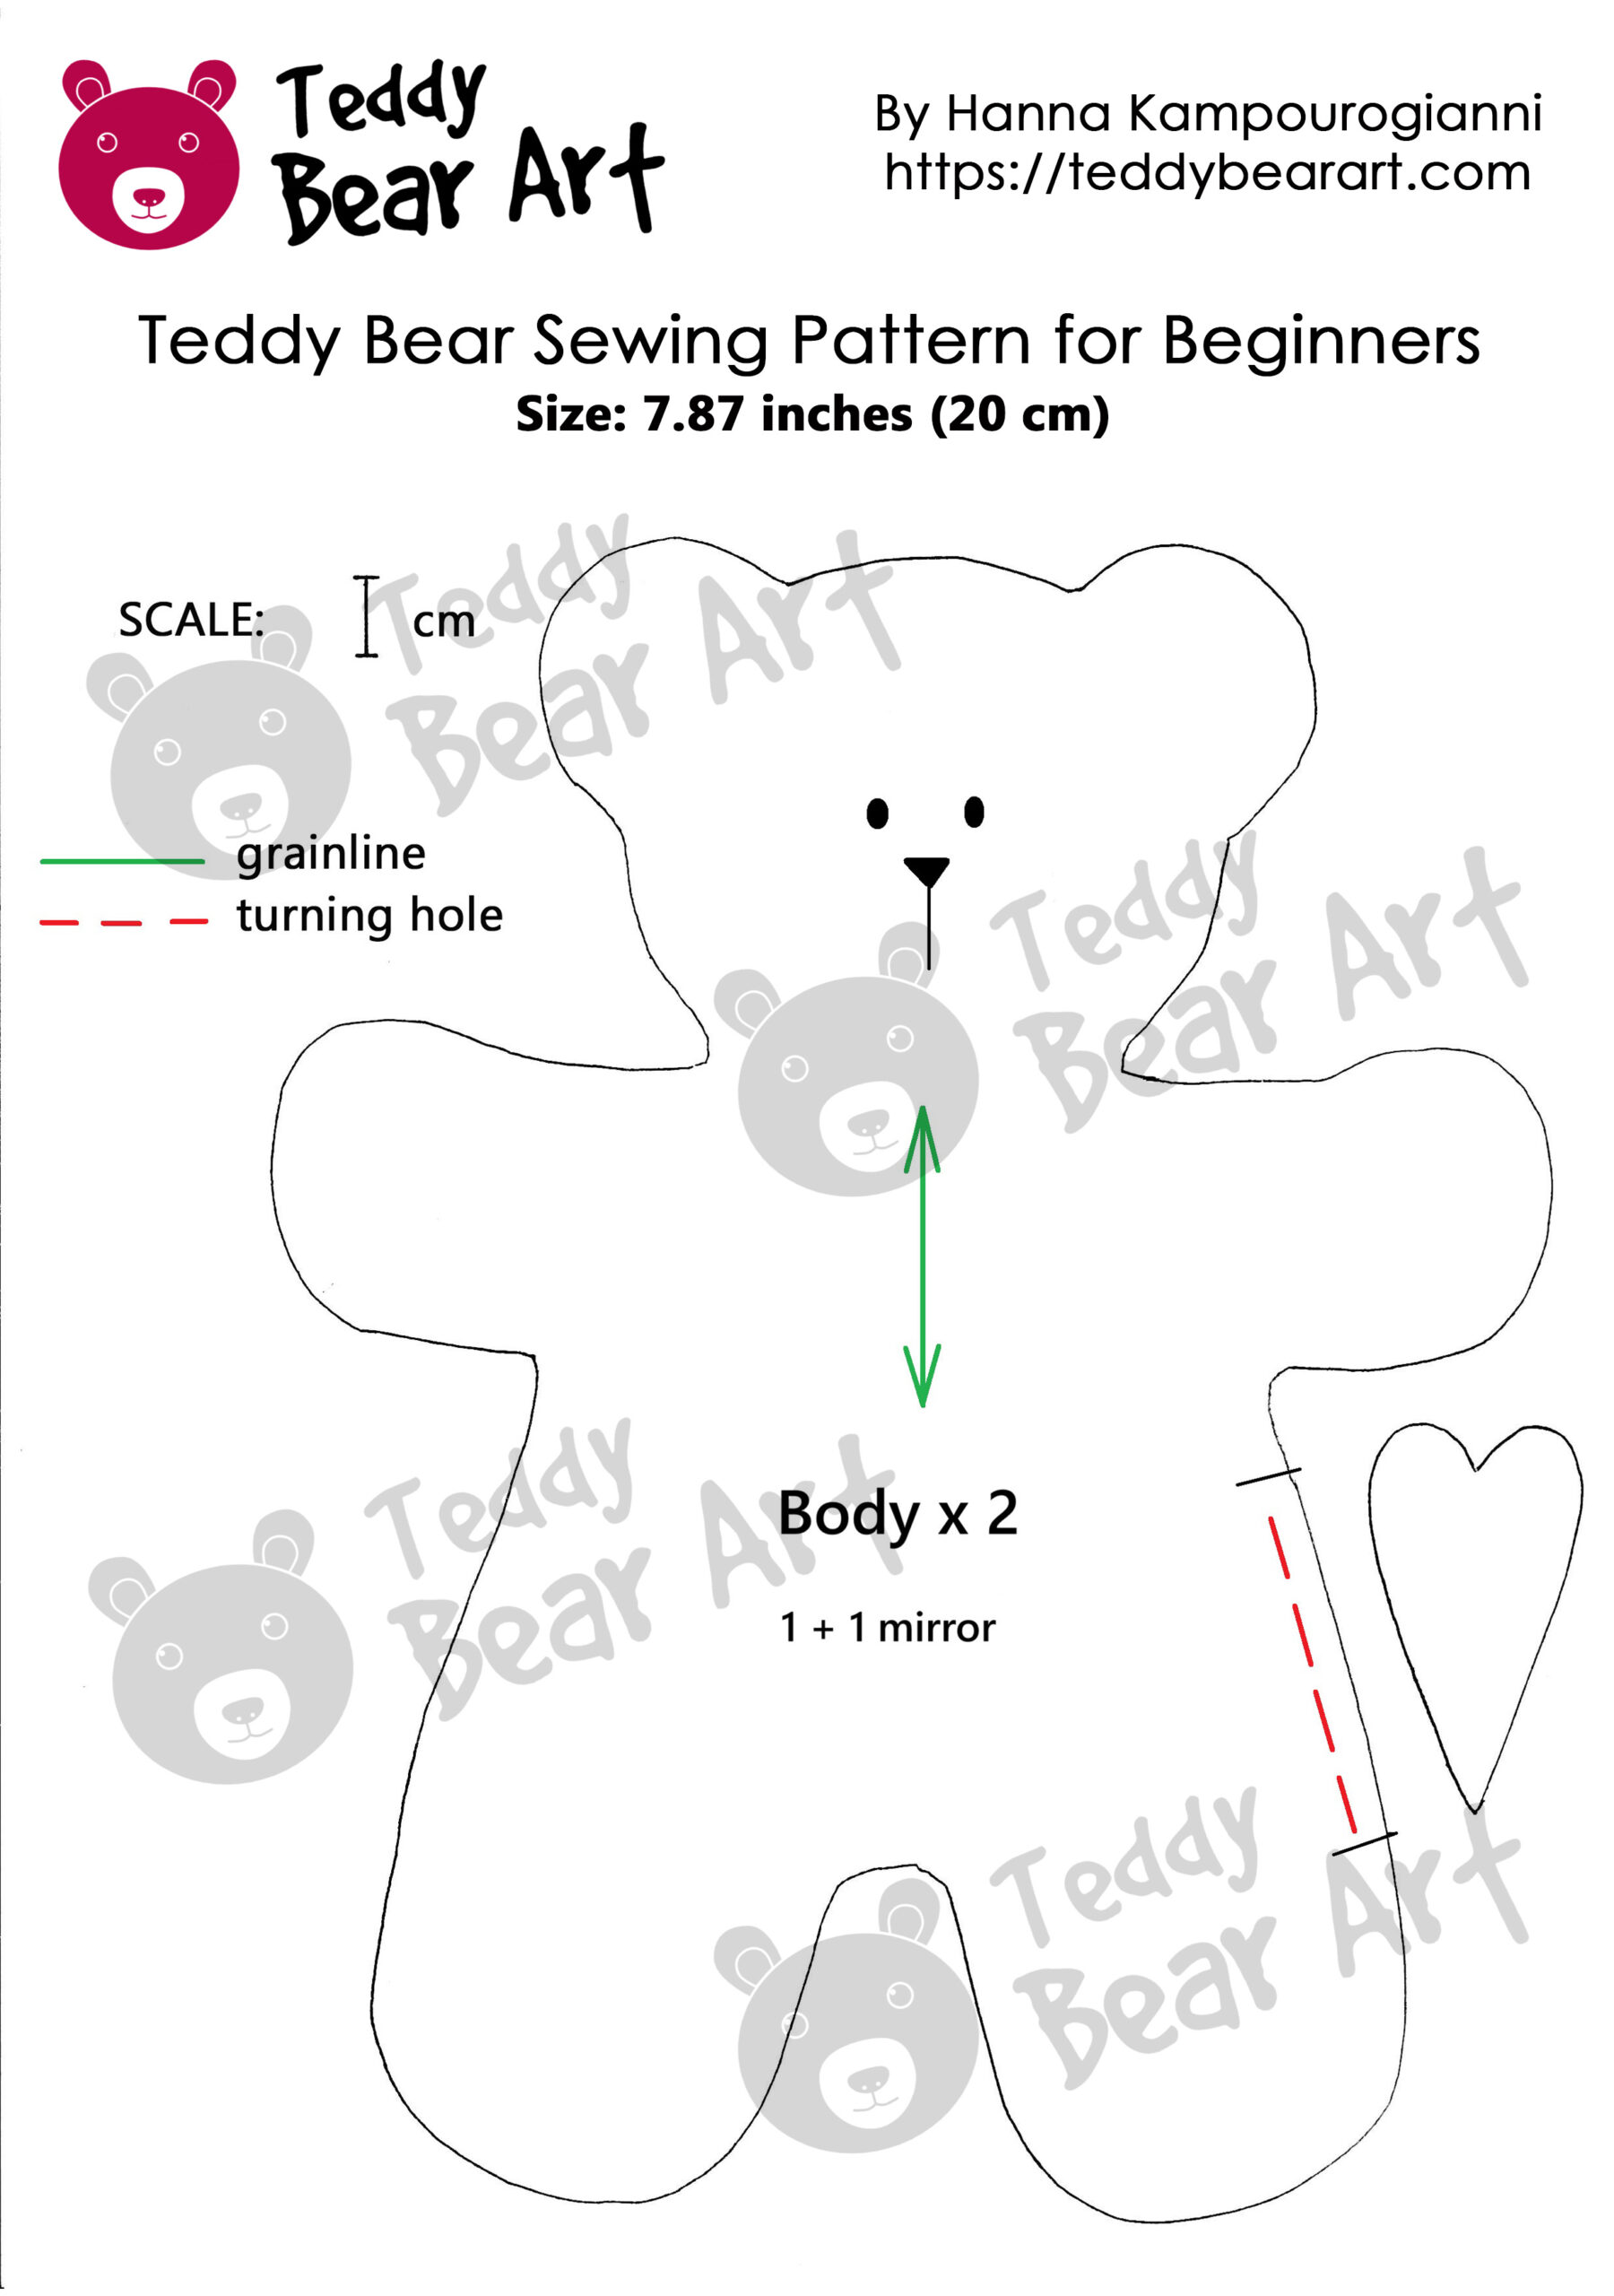
If drawing your own pattern feels daunting, there are plenty of free patterns available online to help you get started. For example, the Teddy Bear Art free patterns section offers beginner-friendly designs you can download and try.
Essential Materials and Tools for Beginners
To begin, you’ll need a few simple tools and materials:
- Fabric: Choose something easy to work with, like fleece, felt, or cotton.
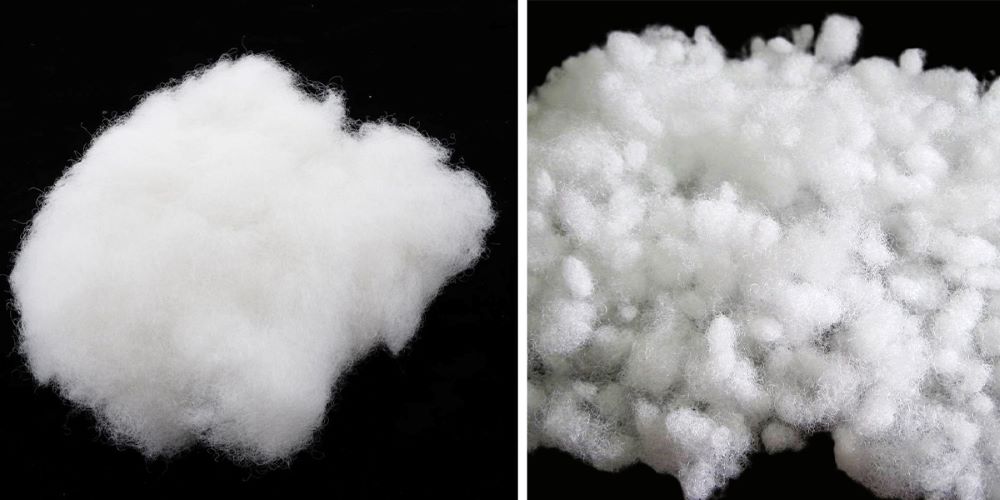
- Stuffing: Polyester fiber fill is the most common and affordable option.
- Thread: Match the thread color to your fabric for a polished look.
- Sewing needles or a sewing machine: Either works fine, but hand sewing can be more manageable for beginners.
- Scissors, pins, and a fabric marker: Basic supplies that make cutting and assembling your pieces easier.
For those on a budget, consider upcycling old clothing or blankets for fabric. Thrift stores can also be a treasure trove of affordable materials!
Choosing the Right Fabric for Your Stuffed Animal
Fabric choices can make or break your first project. Fleece and felt are excellent for beginners because they don’t fray and are forgiving if your stitching isn’t perfect. Cotton is another great option, though it may require extra care to avoid fraying edges.
If you’re aiming for a soft, cuddly feel, look for slightly stretched fabrics. Just be sure to test a small piece before committing to ensure it holds its shape well after being stuffed.
Sewing Techniques Made Simple
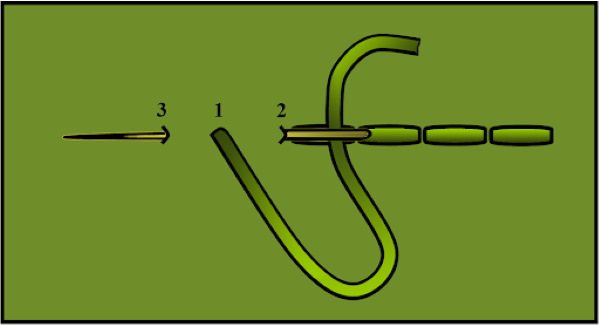
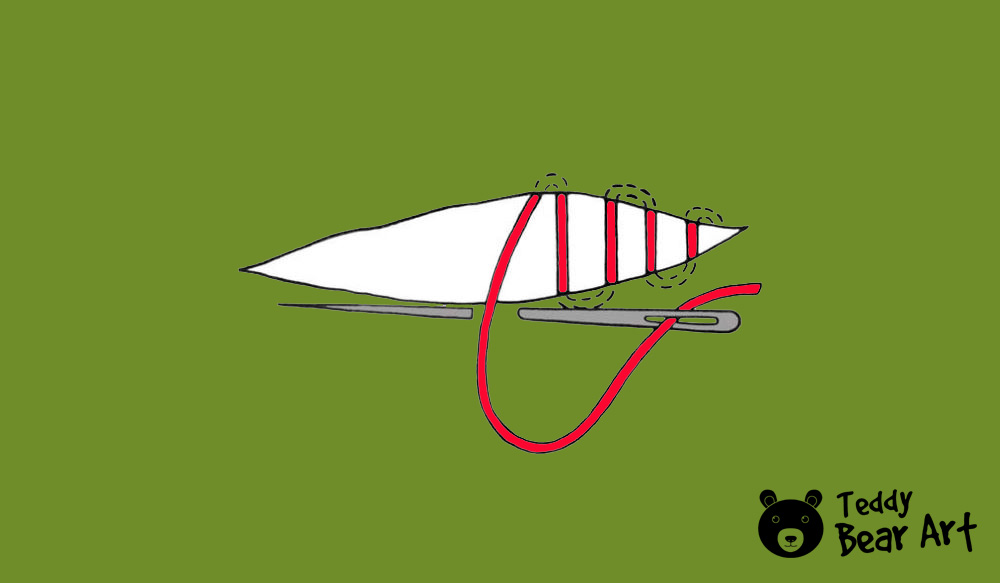
You don’t need to be a sewing expert to make your first stuffed animal. Start with basic stitches like the backstitch for seams or the ladder stitch to close up your project after stuffing.
Take your time and focus on keeping your stitches even. Sewing slower may feel tedious, but it will give your stuffed animal a clean and professional appearance.
Stuffing and Shaping Tips
Stuffing your creation is one of the most rewarding steps! Begin by adding small amounts of stuffing and gradually shaping your animal as you go. This prevents lumps and ensures a smooth, even surface.
For small or narrow parts, like arms or tails, use a chopstick or the end of a paintbrush to gently push the stuffing into place. Remember to pack the stuffing lightly—overstuffing can distort your design.
Adding Personality to Your Stuffed Animal
What makes your stuffed animal truly special is the personality you give it. Add embroidered eyes, felt patches, or a colorful ribbon for a unique touch. Beginners can start with simple embellishments, like buttons for eyes or a sewn-on heart.
If you feel adventurous, try experimenting with small accessories, such as hats, scarves, or even tiny outfits. These details can bring your creation to life and make it stand out.
Troubleshooting Common Beginner Mistakes
When you’re just starting out, it’s completely natural to make a few mistakes. But don’t worry—these are easily fixable, and learning from them is part of the process! Here are a few common problems beginners face and how to solve them:
- Uneven Stitches
If your stitches are too loose or uneven, don’t panic! Simply go back and tighten them. While sewing, try to maintain even tension on the thread without pulling it too tightly. If your stitches still seem uneven, try sewing a bit slower—it will help you better control the process. - Fabric Creases or Wrinkles
If the fabric starts to gather into creases or wrinkles while sewing, it could be because you’re pulling the fabric too tightly or guiding it unevenly through the sewing machine. To fix this, make sure you’re not pulling the fabric too tightly and keep it aligned as you sew. Additionally, if you’re working with thicker fabric, consider using a larger needle or adjusting the stitch length to better suit the fabric. To remove creases along seams, especially in curves, make small snips along the edges or corners. Snipping helps the fabric lie more smoothly and releases the tension that causes creases. Be sure not to snip directly on the seam, leaving 1-2 mm from the edge to avoid cutting through the stitching. Once done, you can carefully press the seams with an iron to smooth out the snipped areas and improve the overall look. - Stuffing Issues
If you’ve overstuffed or understuffed your animal, it can lead to uneven or floppy results. Add small amounts of stuffing at a time, gently distributing it into every corner and limb. If your stuffed animal feels too hard, remove some filling. If it feels too soft, add more. - Difficulty Closing the Opening After Stuffing
When closing the opening after stuffing, use a ladder stitch to make the seam almost invisible. If you’re having trouble making neat and even stitches, make sure you pull the thread gently but firmly. We recommend beginners sew in small sections, carefully tightening the fabric to achieve an even closure.
Remember, mistakes are part of the process, and with each one, you’ll get better. Take your time and enjoy the creative journey of making your very own stuffed animal!
Conclusion
Creating your own stuffed animal is a joyful, rewarding experience that combines creativity with crafting. With a little patience and practice, you’ll be amazed at what you can achieve. Remember, the key is to start small, experiment with simple designs, and enjoy the process.
Thank you to DALL·E from OpenAI, for providing the tools to create the featured image in this post. The image was modified.
If you’re ready to dive in, why not check out a free beginner pattern to start? And don’t forget to share your creations and progress—we’d love to hear your stories!

To download the pattern, follow the instructions below:
From a phone or a tablet (Android): There should be something similar for mobile devices with Android or iOS. Click on the image. Save it by holding your finger on the image and selecting the “Save Image” option. Then go to your photo gallery and print it (there is an option).
From a computer (Windows): Click on the photo of the pattern you see below. In the new tab that will open, you press the right mouse button and select the “Save image as …” option. Then, you choose where the image will be saved on your computer.
Additional Resources to Help You Create the Perfect Stuffed Animal
- Teddy Bear Tutorial for Beginners: How to Start
If you’re just starting out with teddy bear making, this beginner-friendly tutorial will walk you through the basics, including choosing the right tools and fabric. Perfect for anyone new to the world of plush creations! - How to Choose the Perfect Plush for Teddy Bears: Tips and Tricks for Beginners
Choosing the right fabric is key to making your stuffed animal look its best. This article shares expert tips on selecting plush fabrics that will give your creations a professional finish.
Get Free Patterns & Be the First to Know!
Want free teddy bear patterns, exclusive tutorials, and a chance to win craft supplies?
Sign up for our newsletter using the subscribe form in the middle of this article to receive new patterns, insider tips, and the latest news on teddy bear art. You’ll also automatically be entered into our annual giveaway for a chance to win teddy bear crafting materials.
Bonus entry: Save one of our pins on Pinterest to increase your chances of winning!
Let’s create, inspire, and craft beautiful teddy bears together!

This is such a fun and inspiring guide for beginners! I love how approachable you’ve made the process, especially with tips on starting small and using forgiving fabrics like fleece or felt. The troubleshooting section is super helpful too—those little snips along the seams to prevent wrinkles are genius! I’ve always been nervous about trying something like this, but your step-by-step breakdown makes it feel doable, even for someone with zero sewing experience. The free pattern idea is fantastic—can’t wait to give it a shot! What’s your favorite beginner-friendly project for adding personality to a stuffed animal?
Thank you so much for your kind words! I’m so glad you found the guide helpful and approachable. It’s great to hear that the troubleshooting tips, especially the snips along the seams, resonated with you! As for a beginner-friendly project to add personality to a stuffed animal, I’d suggest focusing on simple accessories like little scarves, hats, or even tiny bows. These little touches can really bring out the character of your bear without being too complicated. Plus, it’s a great way to personalize them while practicing your sewing skills. What kind of stuffed animal are you thinking of making next?
Creating your own stuffed animal sounds like a delightful project, especially with the step-by-step guidance you’ve provided.
It’s reassuring to know that even without prior sewing experience, one can start with simple shapes and work their way up. I love the idea of using upcycled materials, which adds an eco-friendly twist to the craft.
One thing I’m curious about is the choice of stuffing. You mentioned polyester fiber fill as the most common option, but are there any alternatives for those looking for a more sustainable option? Thanks for the inspiring post!
Thank you for your comment! I’m so glad you enjoyed the idea of making your own stuffed animals and starting with simple shapes.
As for stuffing, you’re absolutely right—polyester fiberfill is the most popular choice, but there are several great alternatives for those looking for more eco-friendly options. For example, you can use recycled polyester, natural wool, cotton, or bamboo fiber. If you’d like to add some weight to your stuffed animal, you can also use glass or plastic pellets, which are often available in recycled materials.
Thank you for bringing up this important topic—it’s definitely a key consideration for anyone mindful of sustainability!
Thank you for this helpful and inspiring guide! I’ve always been curious about making my own stuffed animals, but it seemed overwhelming at first. Your step-by-step tips make it feel much more approachable—especially starting with simple shapes and using beginner-friendly fabrics like fleece and felt.
I recently tried making a small plush bunny using an upcycled sweatshirt, and it was a lot of fun! One challenge I faced was closing the final seam after stuffing without it looking obvious, but the ladder stitch worked perfectly once I got the hang of it.
In your experience, which fabric holds its shape best over time while staying soft and cuddly? I’d love to experiment with different materials for my next project. Looking forward to more crafting tips!
Thank you so much for your feedback! I’m so glad you enjoyed the guide and gave plush-making a try—upcycling old clothing for stuffed animals is always a great idea! The ladder stitch really does help create a neat finish.
As for fabrics, if you’re looking for something that holds its shape well while staying soft, I recommend mohair with a firm backing, alpaca, or high-quality plush. If you want something more accessible and easy to work with, try velsoft or microfiber—they’re both soft and durable. I’m sure your next project will turn out wonderful!
This is broken down very well for people new to this sort of thing. The steps don’t seem overly complex-even for someone like me who has no experience sewing.
Selecting slightly stretched fabrics to get a more soft, plushy feel sounds like some good advice. Starting with a small piece of said material to make sure it keeps it’s shape after stuffing is a great way to ensure you don’t do all the work for nothing.
Thanks again for this fantastic guide. It is making me feel inspired to tackle this project sometime. Can’t wait to see what I come up with.
Thank you so much for your feedback! I’m really happy to hear that the guide felt clear and inspiring to you. Starting without prior experience can be a little intimidating, but trying something new is always exciting!
You’re absolutely right—testing fabric beforehand helps avoid unexpected surprises. If you decide to tackle this project, I’d love to hear how it turns out! Happy crafting!