
Creating a teddy bear is a delightful experience that brings a touch of joy to any crafter’s heart. A well-crafted simple teddy bear sewing pattern is the foundation for your project, making it easier to bring your vision to life. With the right pattern in hand, you can focus on the fun aspects of sewing and personalizing your cuddly companion. Today, we’ll explore a charming bear pattern and delve into two popular methods for attaching limbs: thread, buttons, and cotter pins and discs.
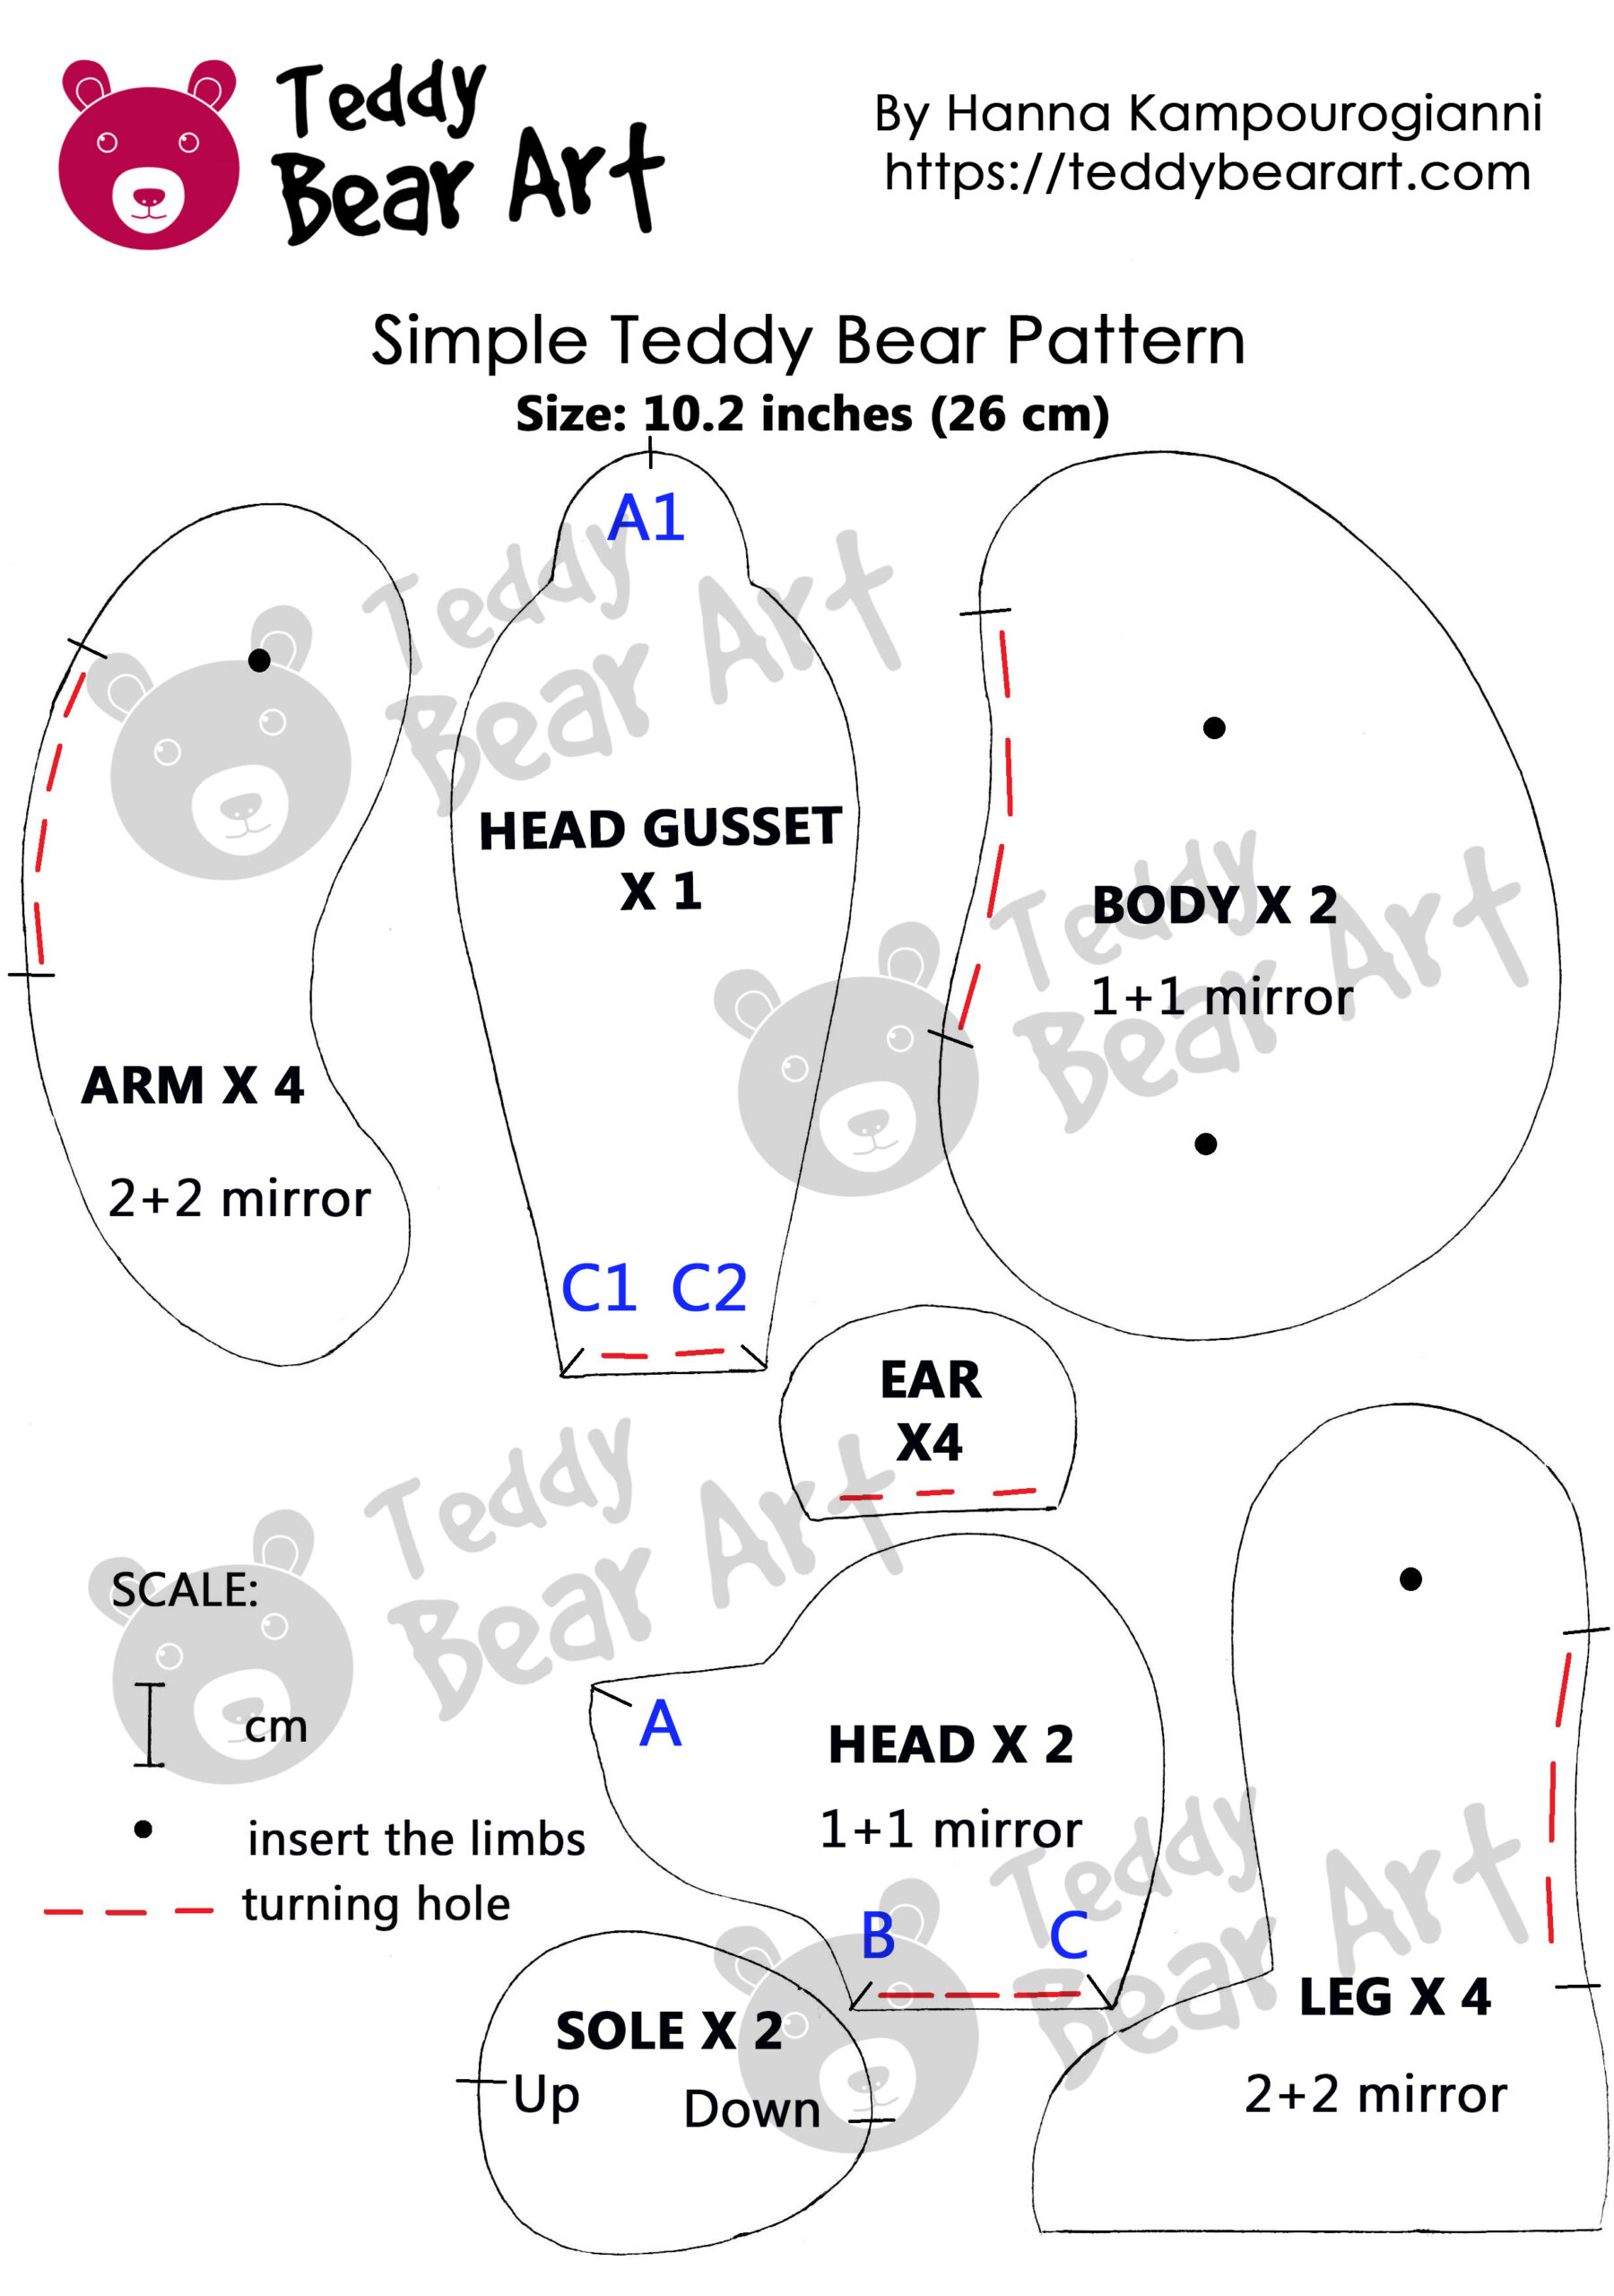
Download the Simple Teddy Bear Sewing Pattern
Before diving into the sewing process, you’ll want to download the teddy bear sewing pattern.
To download the pattern, follow the instructions below:
From a phone or a tablet (Android): There should be something similar for mobile devices with Android or iOS. Click on the image. Save it by holding your finger on the image and selecting the “Save Image” option. Then go to your photo gallery and print it (there is an option).
From a computer (Windows): Click on the photo of the pattern you see below. In the new tab that will open, you press the right mouse button and select the “Save image as …” option. Then you choose where the image will be saved on your computer.
Materials You Will Need
Before we dive into the limb attachment techniques, let’s gather our materials for this delightful project. You’ll need:
- Fabrics: Choose soft fabrics like felt or fleece for a cozy feel.
- Stuffing: Polyester fiber fill is a great choice for a cuddly bear.
- Thread: Opt for a thread that matches your fabric color, and an extra strong thread for attaching the limbs.
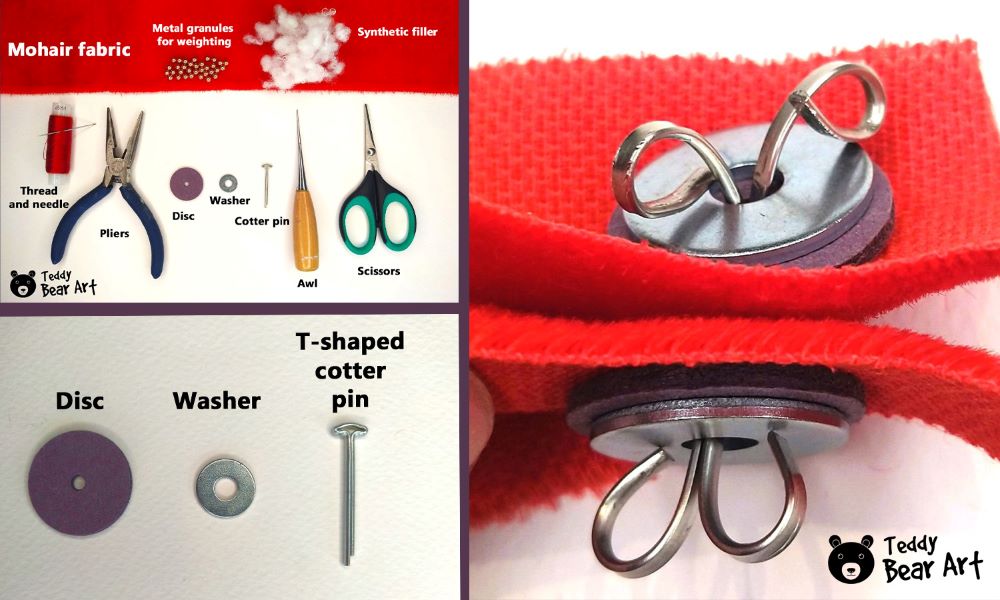
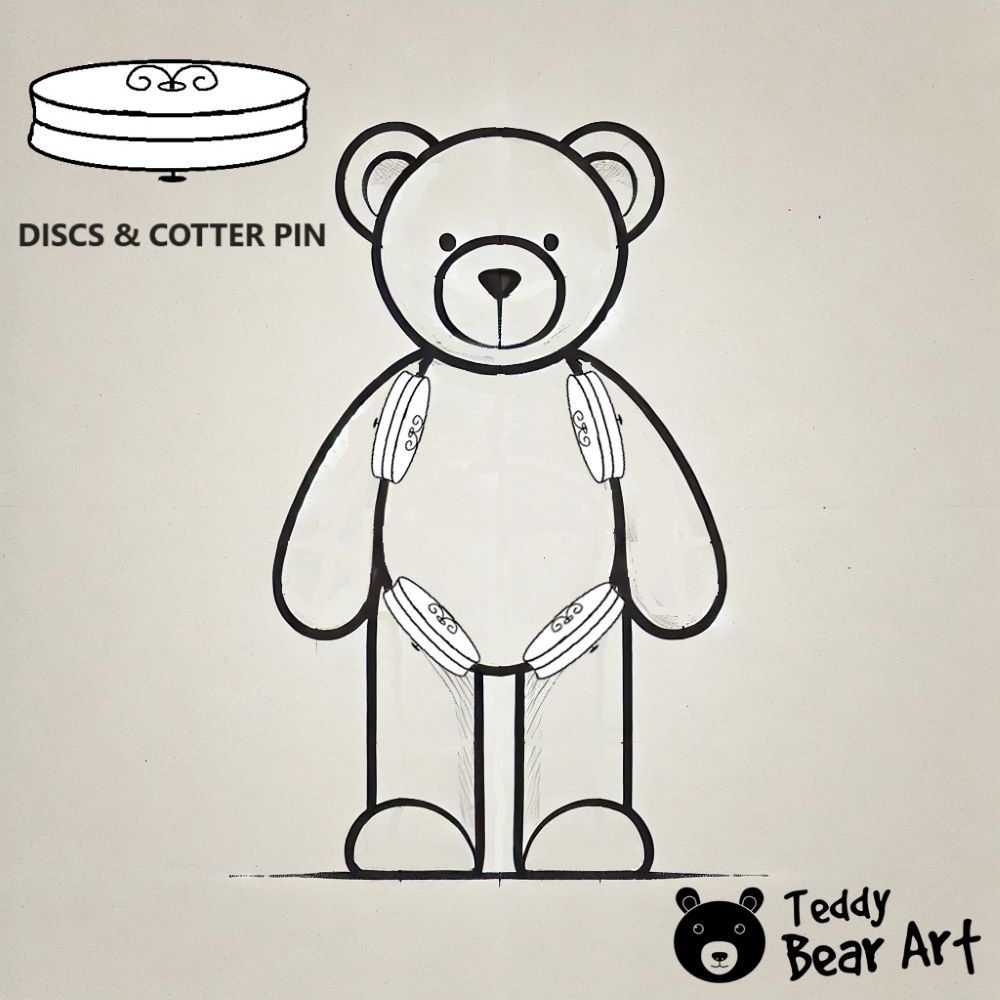
- Buttons or Discs with Cotter Pins: Prepare 4 buttons or 8 discs with a diameter of 20 mm or 25 mm and 4 T-shaped cotter pins.
- Beads or Glass Eyes: You can use black beads approximately 6 mm in diameter for the eyes, or you can choose the same size or slightly larger glass eyes with a metal loop.
- Tools: Have scissors, a hand-sewing needle or sewing machine, a long needle for attaching the eyes and limbs, pliers if you are going to use the cotter pins limbs attachment method, and pins ready at hand.
Instructions for Sewing the Simple Teddy Bear Using Buttons for Limbs Attachment
Once you have the pattern, follow these steps to sew your teddy bear:
- Cut Out the Pattern Pieces: Carefully cut along the lines of the printed pattern pieces. Remember to include seam allowances if they are not marked (5-7 mm).
- Pin the Fabric: Lay the fabric pieces flat, and use pins to secure the pattern pieces onto the fabric. This will help keep everything in place while you cut.
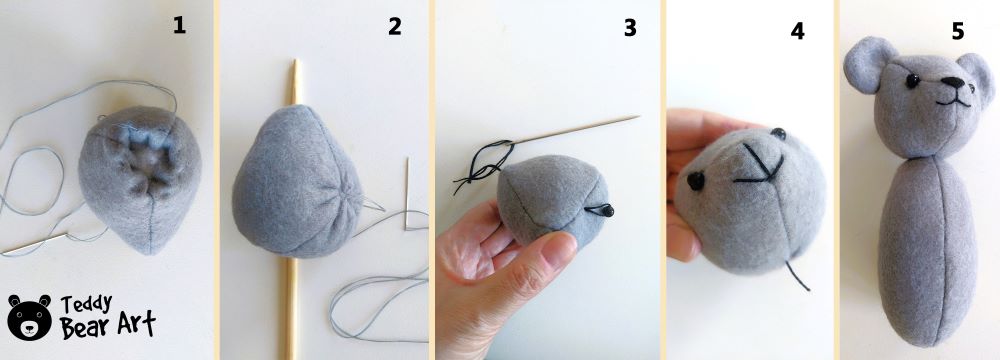
- Sew the Pieces Together: Start by sewing the two mirrored parts of the head together at points A to B using a backstitch or a sewing machine. Next, insert the head gusset into the head at the markings from A-A1 to C-C1 and A-A1 to C-C2. Turn the head inside out and stuff it with synthetic filling. Gather the opening and stitch it closed.
- Insert the Eyes: If you are using beads for the eyes, pull the fabric tight while inserting them to create eye sockets. If you are using glass eyes, tighten the fabric before inserting them. Secure the thread ends at the spots where the ears will go, hiding the ends inside the head.
- Create the Nose: Embroider the mouth and nose, using a simple glued piece of felt that works well for beginners. If you’re more experienced, you can embroider the nose and mouth by following the diagrams provided in this article.
- Sew the Ears: Stitch the ears together and attach them symmetrically. The head is now ready.
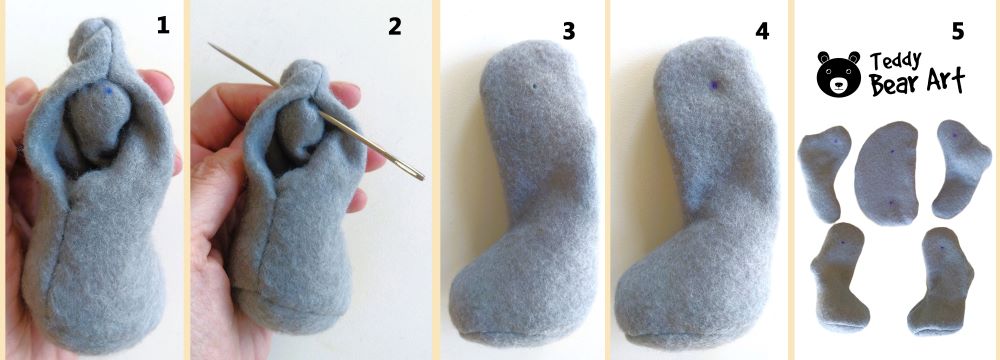
- Sew the Body and Arms: Now sew the body and arms, then turn them inside out. For the legs, sew the two mirrored parts together, attach the feet, and turn them inside out as well.
- Marking for Attachment: Before this step, remember to leave markings on both the body and limbs where they will be attached. To do this, make internal markings on the body and limbs, and then transfer these marks to the outside before stuffing. You can use a thick needle to make a hole and place a mark right away. Don’t worry; these marks will not be visible under the buttons.
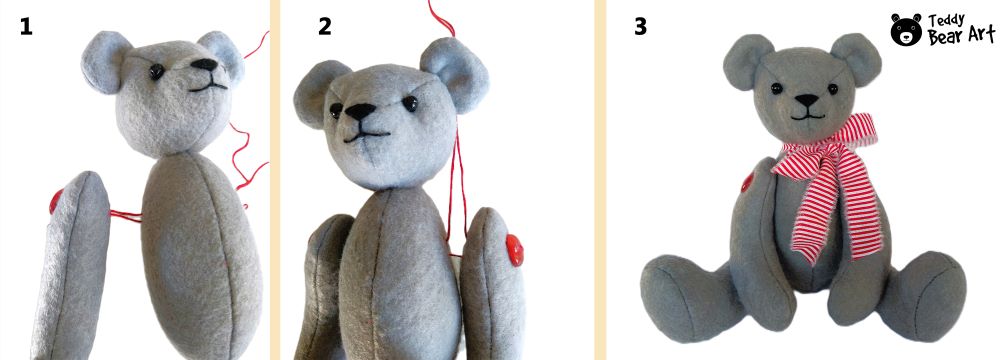
- Attach the Head: Attach the head to the body using an invisible stitch.
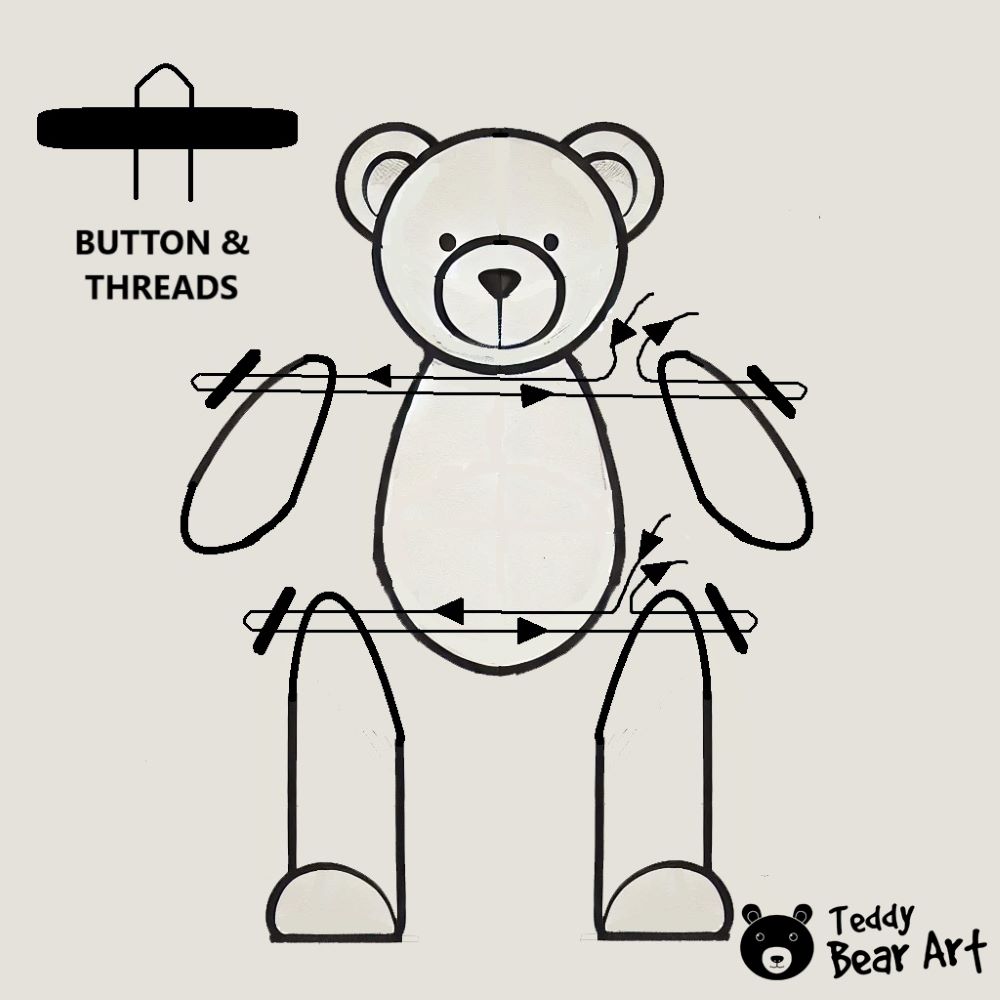
- Using Buttons and Thread: Now let’s discuss the first method of attaching the limbs: using buttons and thread. In this case, stuff both the body and limbs and sew the openings closed with a ladder stitch.
- Threading the Limbs: Take a super strong thread, preferably cotton rather than synthetic, as the synthetic thread can slip too much. Thread it through as follows: through the body – through the arm – through the button – through the arm – through the body – through the second arm – through the button – and secure it. I will provide a diagram showing how this is done. Repeat the same process for the legs.
- Final Checks: All done! It’s important to pull the threads taut but not too tightly and be careful not to tangle the threads inside the body, as this will prevent the limbs from rotating.
Pros and Cons
Using buttons and thread has several advantages and disadvantages:
Pros:
- Decorative Element: Buttons can serve as decorative elements that highlight the unique appearance of your handmade bear. They can contrast with the fabric or complement its color, adding charm to the overall look.
- Simplicity and Cost-Effectiveness: This method is easy to execute and budget-friendly, as buttons can often be found at home or purchased for a small price.
- Flexibility in Movement: Attaching limbs with buttons allows for some flexibility in movement, making the bear more huggable and giving it a playful character.
- Personalization: You can easily choose buttons of different shapes, sizes, and colors, allowing for personal touches that reflect your style or the theme of the bear.
Cons:
- Questionable Durability: While buttons are generally reliable, attention should be paid to the strength of the threads. Suppose you’re not using super-strong threads (like those for sewing wallets). In that case, it’s better to use sturdy thread folded four times instead of twice to ensure the durability of the connections, especially if the bear is intended for active use or play.
- Not Suitable for Expensive Collectible Bears: This method may not be appropriate for expensive collectible bears, where durability and appearance are paramount.
Instructions for Sewing the Simple Teddy Bear Using Discs and Cotter Pins for Limbs Attachment
- Cut Out the Pattern Pieces: Carefully cut along the lines of the printed pattern pieces. Remember to include seam allowances (5-7 mm) if they are not marked.
- Pin the Fabric: Lay the fabric pieces flat, and use pins to secure the pattern pieces onto the fabric. This will help keep everything in place while you cut.
- Marking for Limb Attachment: Be sure to leave marks for attaching the limbs inside the limbs and the body, but not on the outside.
- Sew the Pieces Together: Start by sewing the two mirrored parts of the head together at points A to B using a backstitch or a sewing machine. Next, insert the head gusset into the head at the markings from A-A1 to C-C1 and A-A1 to C-C2. Turn the head inside out and stuff it with synthetic filling. Gather the opening and stitch it closed.
- Insert the Eyes: If you are using beads for the eyes, pull the fabric tight while inserting them to create eye sockets. If you are using glass eyes, tighten the fabric before inserting them. Secure the thread ends at the spots where the ears will go, hiding the ends inside the head.
- Create the Nose: Embroider the mouth, and for the nose, a simple glued piece of felt works well for beginners. If you’re more experienced, you can embroider the nose and mouth by following the diagrams provided in this article.
- Sew the Ears: Stitch the ears together and attach them symmetrically. The head is now ready.
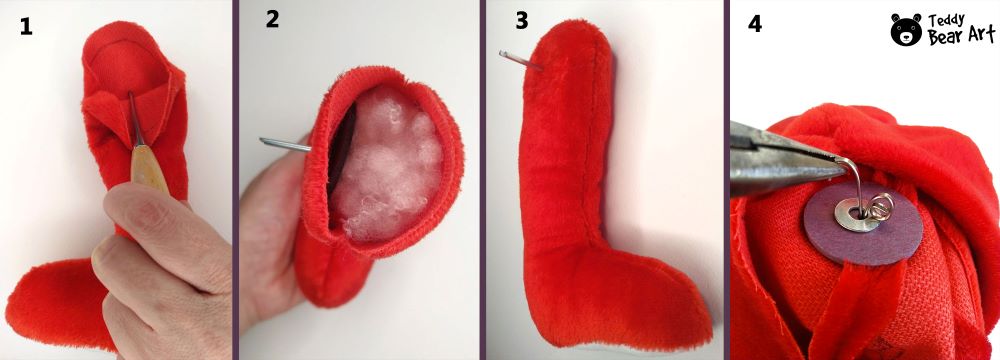
- Sew the Body and Arms: Now sew the body and arms, then turn them inside out. For the legs, sew the two mirrored parts together, attach the feet, and turn them inside out as well.
- Attach Discs with Cotter Pins: Next, insert the discs with cotter pins into the arms and legs as shown in the photo. If you’re making a simple bear from felt fabric or similar material for home use or children, there’s no need to use washers. Stuff them and sew the openings closed.
- Attaching the Limbs: Carefully use a thick needle to create openings, gently parting the fabric. Insert the arm, then inside the body, place the disc onto the cotter pin, and use pliers to twist the ends of the cotter pin.
- Final Assembly: When all limbs are securely attached but not too tightly, stuff the body, sew the opening closed, and attach the head with an invisible stitch.
Pros and Cons
Pros
- Durability and Strength: Cotter pins and discs create a secure connection between the limbs and the body, ensuring they stay firmly attached even during active play. This method is suitable for bears that will be used frequently or for larger, heavier models.
- Improved Movement: This attachment method allows the limbs to move more naturally, making the bear more cuddly and interactive.
- Ideal for Collectible Bears: The aesthetic appeal of cotter pins and discs can enhance the overall appearance of the bear, making them a popular choice for collectible toys. They add a touch of craftsmanship and sophistication, improving the presentation of the bear.
- Long-Term Reliability: Compared to threads and buttons, cotter pins and discs offer greater durability. Once securely fastened, the limbs are less likely to loosen over time, making this method reliable for bears intended for long-term preservation.
- Minimal Visibility of Fasteners: This method often leaves less noticeable details compared to buttons, contributing to a cleaner and neater appearance.
Cons
- Need for Precision: Proper placement of cotter pins and discs is crucial for ensuring the correct movement of the limbs. Mistakes can lead to improper alignment or ineffective functioning of the limbs.
- Complex Setup: Attaching limbs using cotter pins and discs can be more complicated than using threads and buttons, especially for beginners. It requires additional tools and a good understanding of how to properly secure the fasteners.
- Initial Costs: Cotter pins and discs may require a small investment in materials and tools, which might not be as readily available as buttons and thread.
- Time-Consuming: The process of inserting discs and securing cotter pins can take longer than simpler methods. This may deter those looking for a quick project.
Comparing the Two Techniques
So, which method should you choose? It depends on your project needs! Thread and buttons are perfect for a traditional soft teddy bear with gentle movements, while cotter pins and discs are ideal for a more dynamic bear that might see some rough play.
If you’re a beginner, you might find it easier to use the thread and button method. However, if you’re ready to test your skills and create a bear that will last, the cotter pins and discs method may be worth the effort.
When deciding on your attachment technique, consider whether the bear is intended for a child or an adult. If the bear is for a child, think about how active they are. For a playful little one, cotter pins and discs will provide increased durability and movement, making the bear more engaging and fun. On the other hand, if it’s a decorative piece or a gift for an adult collector, thread and buttons can offer a softer look and feel.
It’s also important to consider whether the bear will primarily be used for cuddling or as a toy. For bears that will be regularly handled and subjected to active play, cotter pins and discs may be the better option due to their sturdiness. Meanwhile, for a bear that will be gently displayed on a shelf, the more traditional method with buttons and thread may suffice.
For those looking to create a collectible bear, the aesthetic appeal of cotter pins and discs can enhance the overall attractiveness and value of the piece. This method not only ensures durability but also adds character to the bear, making it an appealing addition to any collection.
By weighing these factors, you can make an informed decision about which attachment technique is best suited for your project and its intended purpose!
Final Words
Learning to master both methods of limb attachment can significantly enhance your teddy bear-making skills. With this simple teddy bear sewing pattern and the two techniques explored, you’re well on your way to creating a beloved companion. Don’t hesitate to experiment and find the best approach that suits your style!
Now, gather your materials, pick your technique, and let your creativity shine! Happy sewing!
More Goodies
For a detailed masterclass on using cotter pins and discs for secure limb attachment, visit our Mastering Limbs with Discs and Cotter Pins guide.
Want to know more about how to attach eyes to your teddy bears? Discover five different methods to bring your bear’s eyes to life in our article on 5 Ways to Attach Teddy Bear Eyes.
Get Free Patterns & Be the First to Know!
Want free teddy bear patterns, exclusive tutorials, and a chance to win craft supplies?
Sign up for our newsletter using the subscribe form in the middle of this article to receive new patterns, insider tips, and the latest news on teddy bear art. You’ll also automatically be entered into our annual giveaway for a chance to win teddy bear crafting materials.
Bonus entry: Save one of our pins on Pinterest to increase your chances of winning!
Let’s create, inspire, and craft beautiful teddy bears together!
Hey Hanna,
I really enjoyed reading your recent blog post on teddy bear crafting! Your breakdown of the different methods for attaching limbs, especially the contrast between buttons and cotter pins, was super helpful. It’s interesting how the choice of technique can influence both the look and durability of the finished bear.
One thing I’m curious about—do you have a personal preference between using buttons or cotter pins for your own projects, or does it depend entirely on the design?
Looking forward to seeing more of your creative tips!
Best,
Eric
Hi Eric,
Thanks for your question! When I started sewing bears and other animals from cotton fabric, I often used the button to attach the limbs and head. It was simple, quick, and a charming, vintage look suited my early creations.
Now that I work with mohair and faux fur, I’ve been using discs and cotter pins exclusively for over 10 years. Not only do they offer better mobility and durability, but they also provide a more professional finish, which is crucial for making realistic or collectible bears.
I’m glad my blog has been helpful to you! 😊
Hanna
This is such a delightful guide for crafting a teddy bear! I love the simplicity of the pattern, and your instructions are clear and easy to follow. The comparison between using buttons and cotter pins for attaching limbs is really helpful, especially for beginners like me who might be unsure which method to choose. The button method sounds like a great way to add a personal touch, especially with all the decorative possibilities! I’m definitely going to give this a try. Thanks for the detailed explanations and tips!
Thank you so much for your kind words! I’m really glad you found the guide helpful and easy to follow. 😊 The button method is indeed a fun way to add a personal touch to your teddy bear, and it’s great for experimenting with different styles! If you give it a try, feel free to share how it turns out. I’d love to hear about your experience. Happy crafting, and don’t hesitate to reach out if you have any more questions! 🧸✨
Dear Hanna, thank you for all your information about making Teddybears. Is it possible to give the adress where we could buy the soften fabrics for mini bears please ? Many thanks in advance, your sincerely, Leentje❣️❤️?❤️❣️
Dear Leentje, thank you so much for your kind comment, it really means a lot! Are you looking for soft fabrics for mini bears in Europe or in other regions? And would you prefer fabrics with pile or without? This will help me suggest the right stores for you. ?❤️
I have just started making teddies. Thanks for all your methods, which are so helpful and useful for beginner like me. I have a question that the size 26cm. Is this from head to foots or sitting position size? The patterns appears smaller on my PC, so I want to enlarge the patterns.
You are very welcome!
This is the size of the bear when standing.
There is a scale on the pattern, use it as a guide (1 cm).