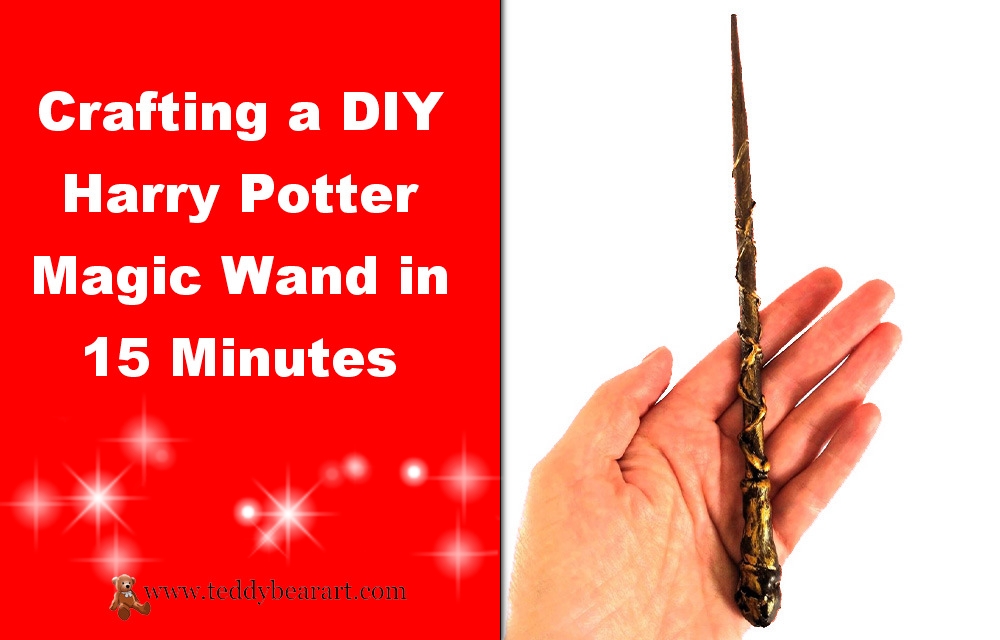
Welcome to the magical world of crafting, where you can bring the enchantment of Harry Potter into your own hands. In just 15 minutes, you can create your very own DIY Harry Potter magic wand, which can become a perfect accessory to your teddy bear or yourself. The best part? It’s a simple and enjoyable project that combines creativity and a touch of wizardry. Let’s dive into the world of crafting and wand-making.
Are you ready to craft your own DIY Harry Potter magic wand?
Materials Needed
Before we begin, let’s gather the materials you’ll need for this enchanting project:
- A wooden dowel (approximately 10-12 inches long) or a thick wooden food stick
- A hot glue gun and glue sticks
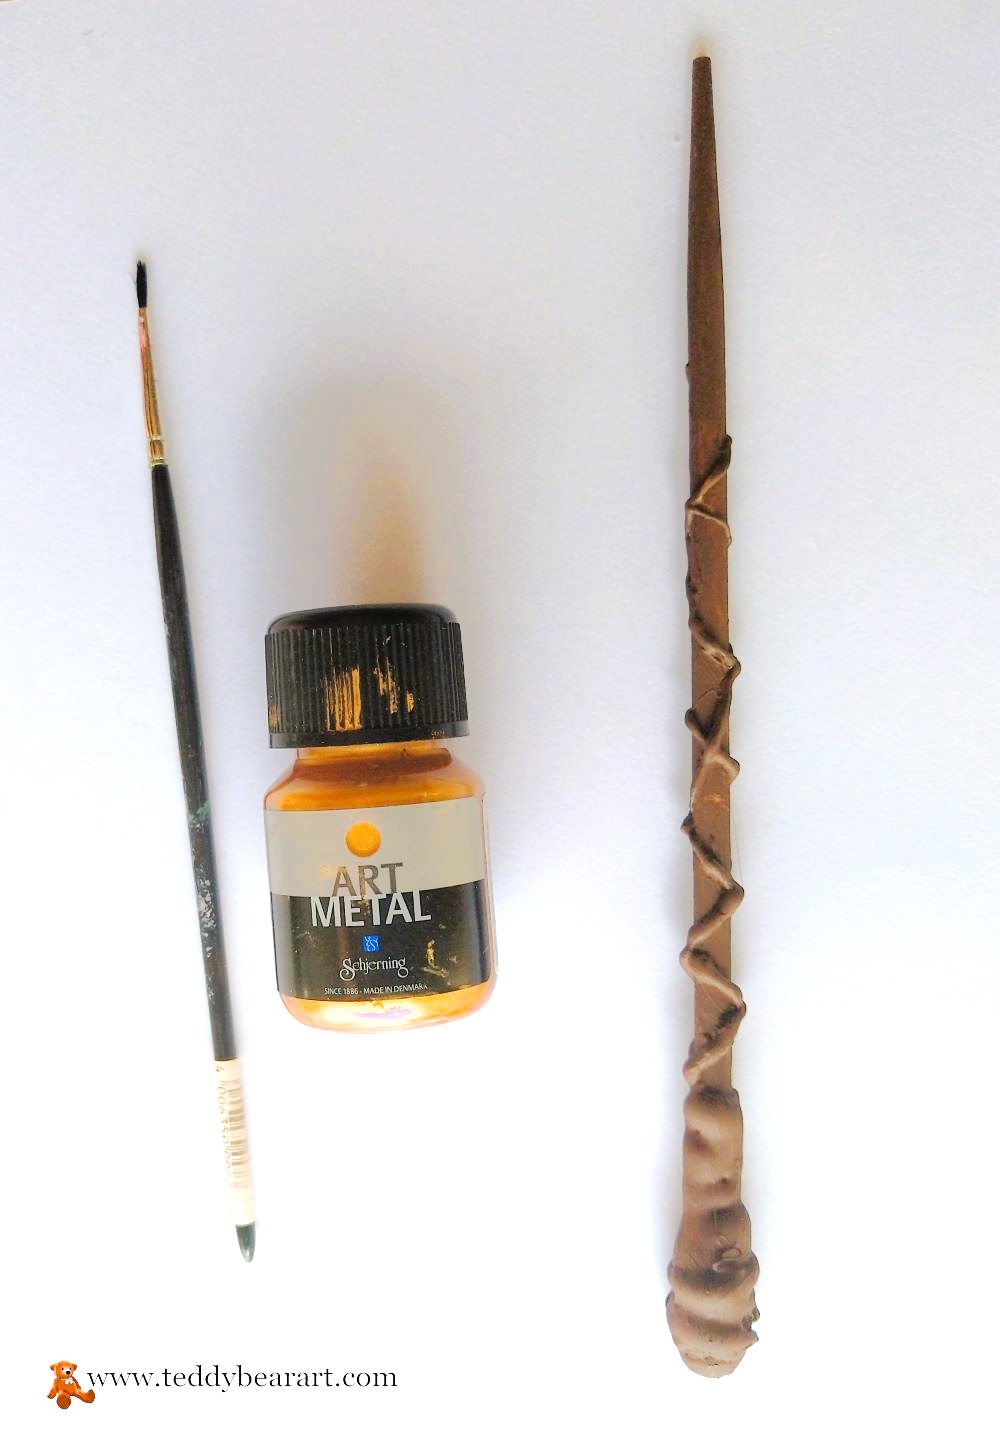
- Acrylic paint in the colors of your choice (typically brown, black, and gold)
- Decorative embellishments such as rhinestones, beads, or twine
- A paintbrush
- Top coat for acrylic paints as a sealant
- Sandpaper (optional)
Now that you have your materials ready, let’s embark on this magical journey.
Step-by-Step Tutorial
Step 1: Adding the Handle
When choosing a wooden stick, be guided by the size of your bear so that it looks harmonious with it. If the stick is too long, then simply break it off or cut it along the base to the desired size. Don’t worry if the gap is uneven. It will not be visible under a thick layer of hot glue.

With your wooden dowel in hand, it’s time to infuse your DIY Harry Potter magic wand with personality by crafting the handle. This is where your creativity truly takes flight. Wizards and witches in the magical world often wield wands with distinctive handles, and now it’s your turn to design one.
Remember to take precautions when working with a hot glue gun!
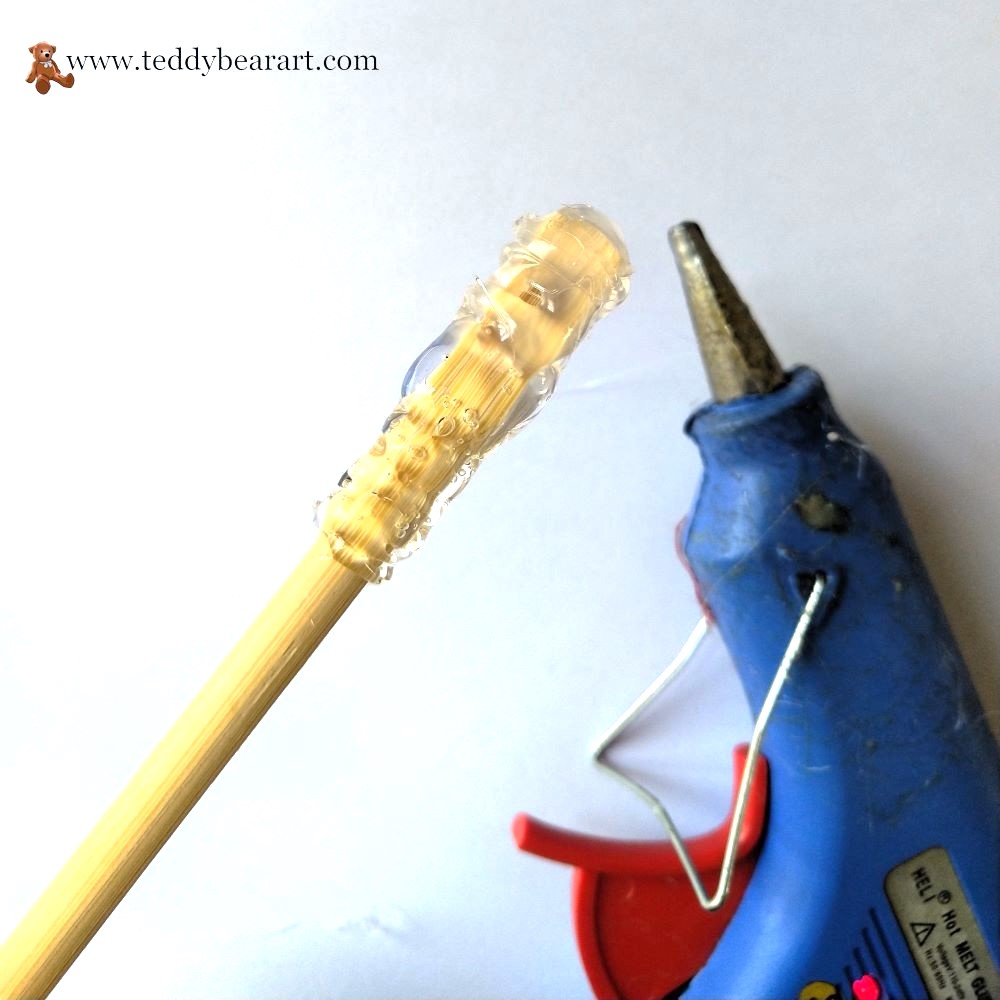
Using a hot glue gun, start by creating the base of your handle, ensuring it’s securely attached to the dowel. The size and shape of the handle are entirely up to you. You might opt for a simple, elegant design or embrace intricate patterns reminiscent of your favorite wizard’s wand.
Add fancy curls by slowly twisting the dowel with one hand and applying hot glue with the other hand, starting at the base and gradually thinning each curl towards the end of the stick.

Now do the same, turning the stick in the opposite direction.
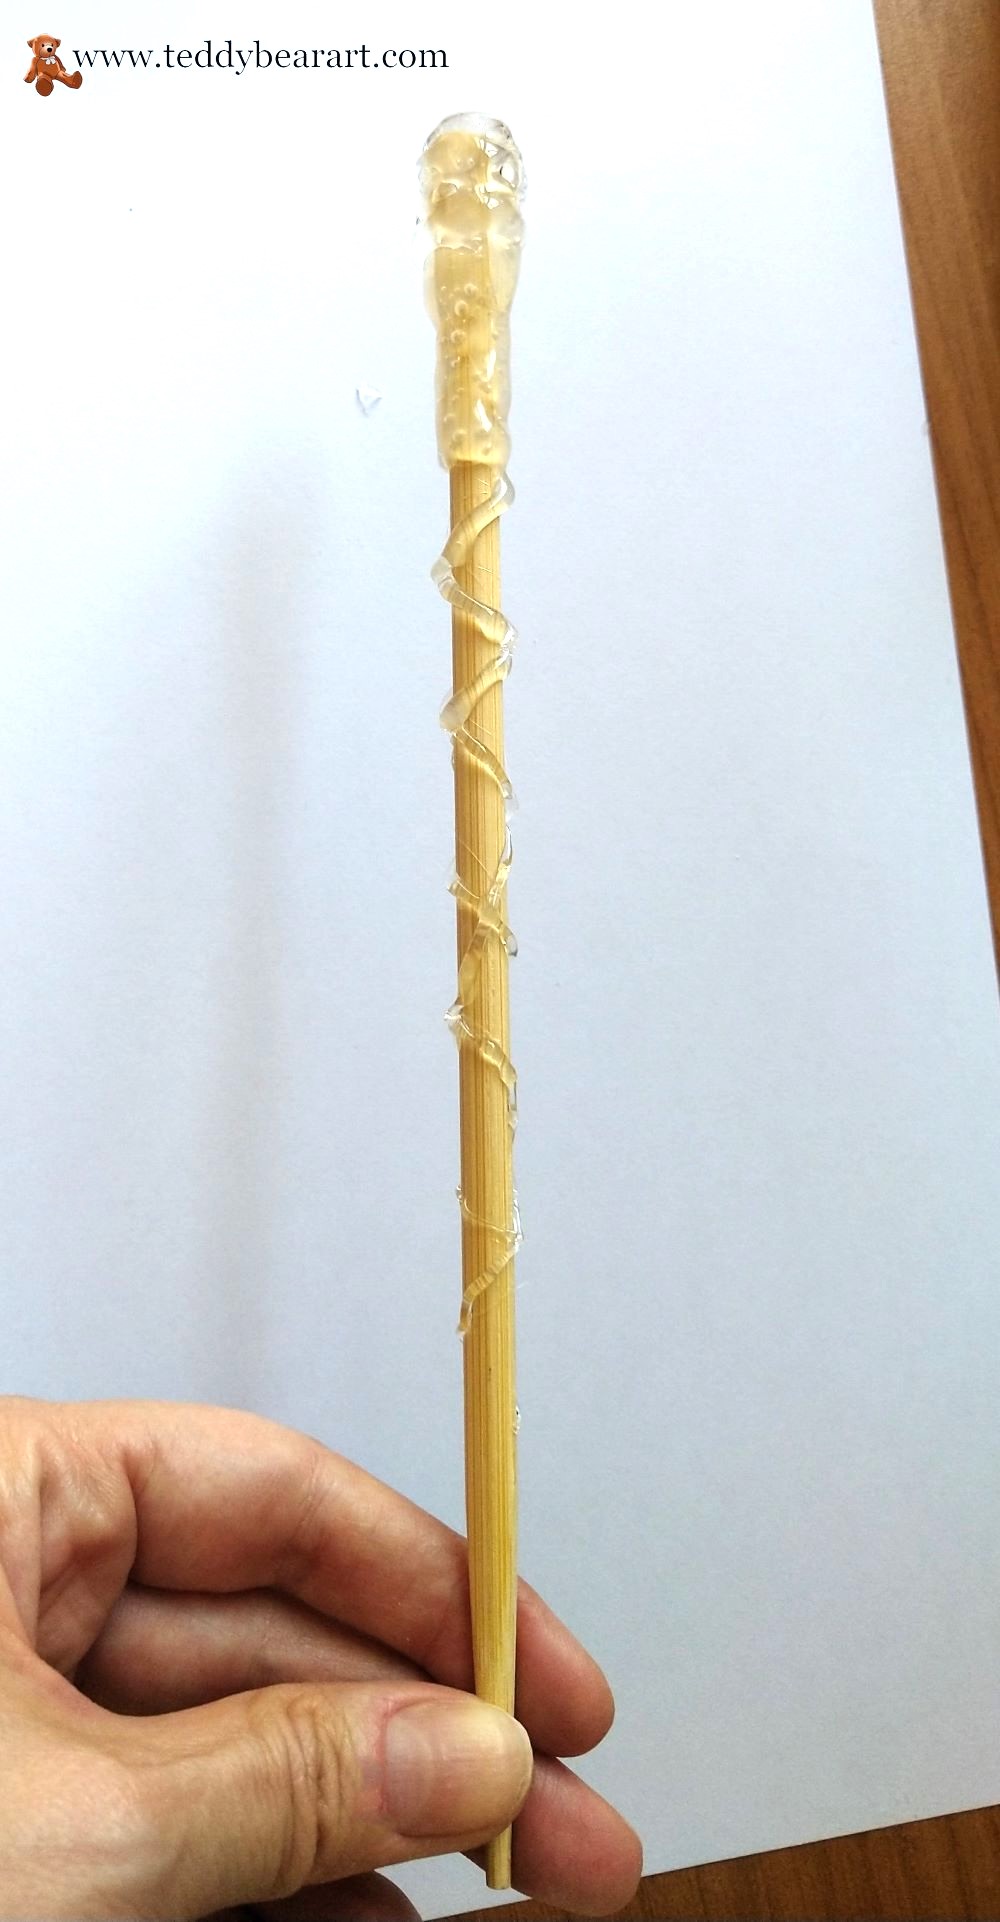
Allow the hot glue to cool and harden, forming the foundation of your handle’s design. This step sets the stage for the wand’s unique character and ensures it’s a perfect fit for your magical adventures. Now that you’ve added the handle and swirls, your wand is one step closer to becoming a true work of art.
Step 2: Painting Your Wand
Now that your wand has a well-crafted handle, it’s time to breathe life into it with a burst of color. Traditionally, Harry Potter’s wand is depicted with earthy tones like brown and black, but don’t hesitate to let your creativity flourish and choose colors that resonate with your wizarding spirit.
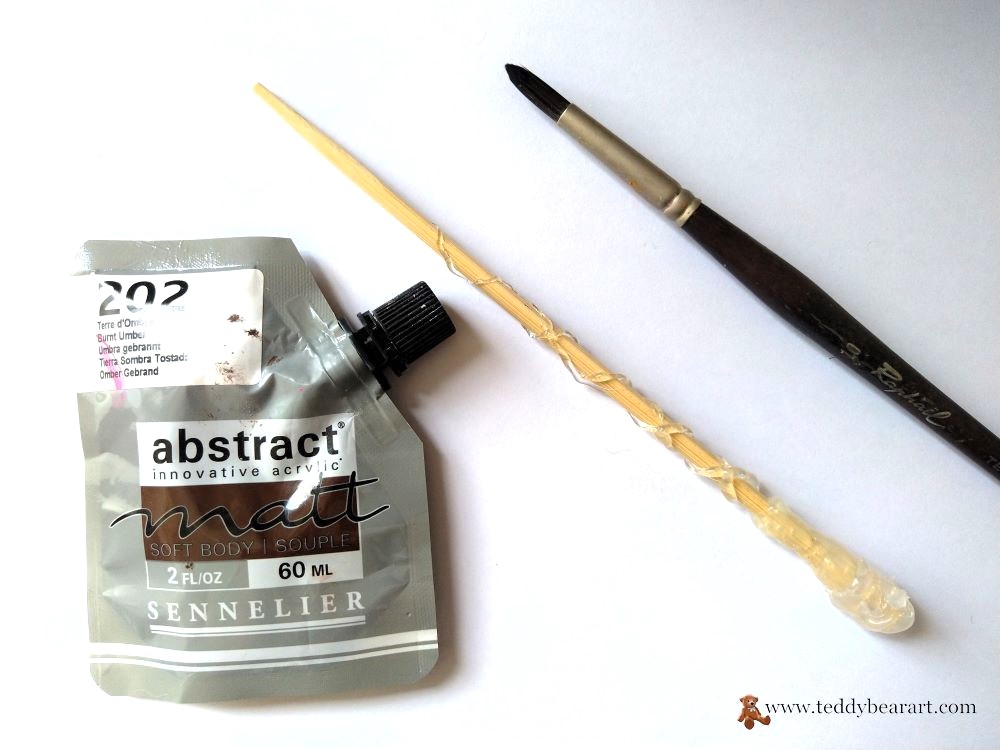
Using acrylic paint, apply an even coat to the entire surface of your wand. Ensure that the paint covers the wood completely and smoothly. You can add depth to your design by layering paint and allowing each coat to dry before applying the next.
If you’re looking to achieve an antique or weathered look, once the paint has dried, gently sand it in select areas to reveal the wood underneath, creating a time-worn appearance.
Or do as I did, paint it with gold paint.
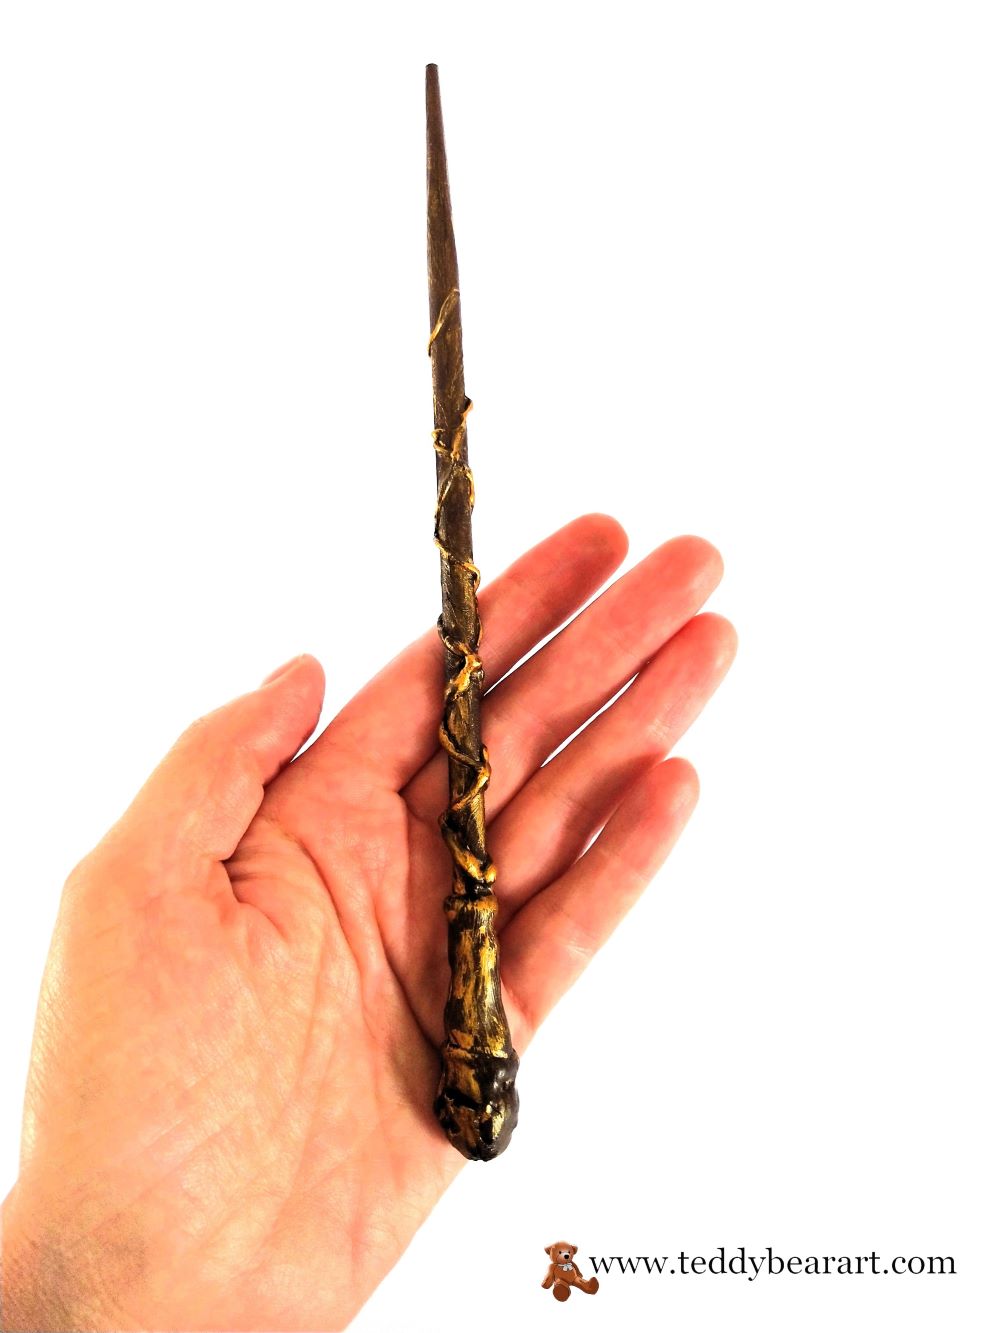
The painting stage is where your wand truly begins to take shape and reflect your magical vision. Whether you opt for traditional colors or a more whimsical palette, let your artistic instincts guide you as you bring your DIY Harry Potter magic wand to life.
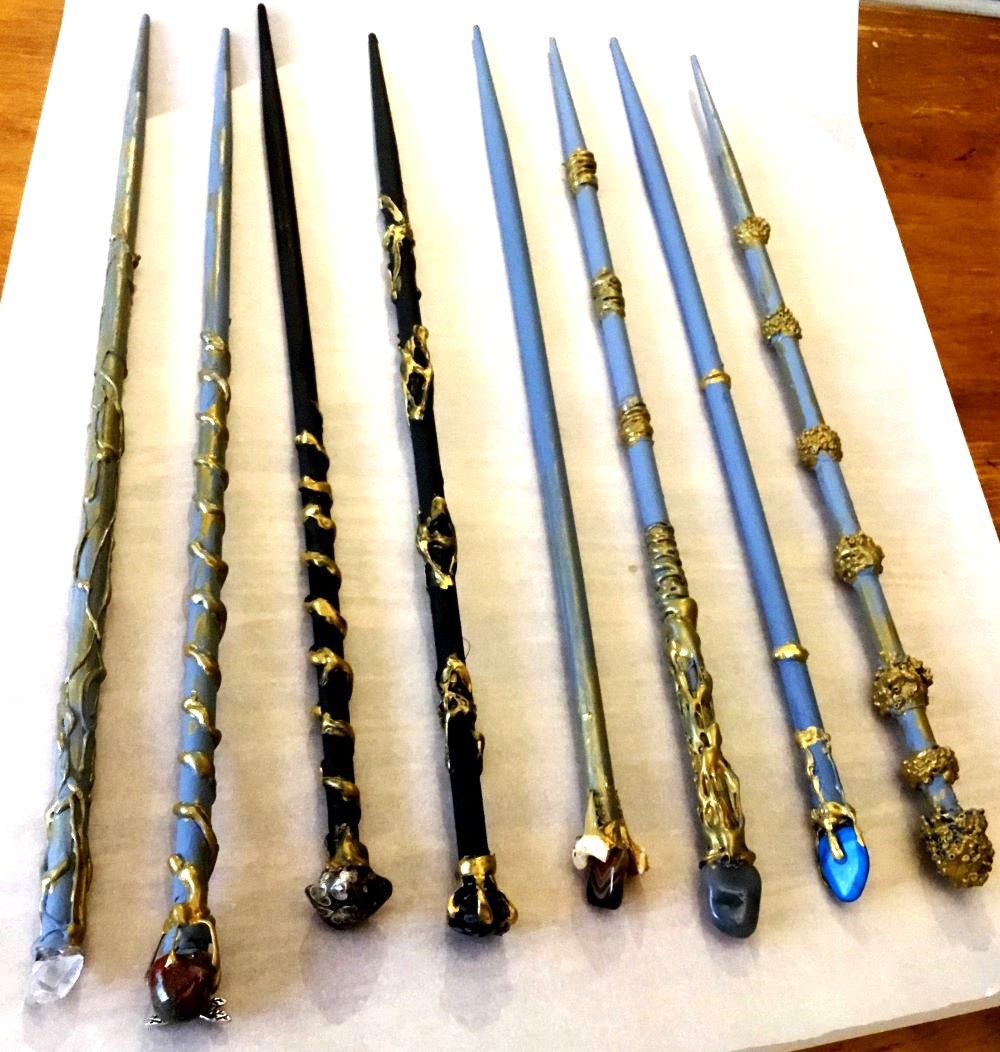
Step 3: Embellishing Your Wand
To make your DIY Harry Potter magic wand truly enchanting, it’s time to add those special finishing touches. Embrace your creativity and consider embellishing your wand with decorative elements like rhinestones, beads, or twine.
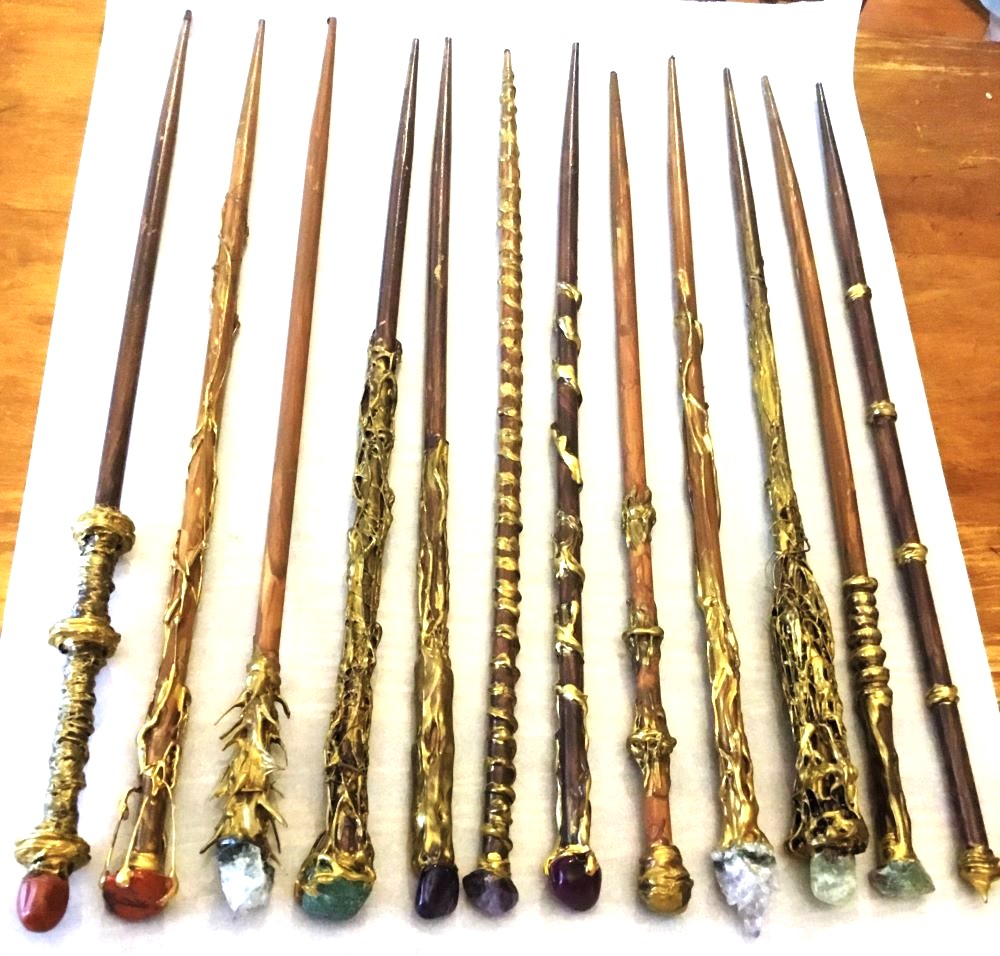
These additions can give your wand a unique and personalized charm. Whether you choose a subtle hint of sparkle or an elaborate design, remember that it’s these details that make your wand one-of-a-kind. Allow your imagination to flourish as you adorn your wand, adding that extra touch of magic to your creation.
Step 4: Finishing Touches
Before you declare your wand complete, it’s essential to ensure its longevity and protect its magical appearance. Start by applying a sealant to your painted wand. This step not only preserves the paint but also shields it from wear and tear, ensuring your wand maintains its enchanting beauty over time.
Once the sealant has dried, your DIY Harry Potter magic wand is ready to cast spells and inspire wonder. Whether you’re using it as an accessory for your teddy bear, as a display piece, as a prop for cosplay, or simply as a magical reminder of your crafting prowess, you’ve now embarked on a creative journey that brings a touch of wizardry into your life.
Conclusion
Crafting your own DIY Harry Potter magic wand in just 15 minutes is a delightful way to immerse yourself in the wizarding world. Whether you’re a Potterhead or simply love crafting, this project allows you to blend your creative spirit with a touch of enchantment. Now, go forth with your newfound wand-making skills and let your imagination run wild. Accio creativity!
Final Thoughts
Crafting your very own Harry Potter-inspired magic wand has been a journey filled with creativity and enchantment. This project is not just about making a wand; it’s about infusing your personality and imagination into every inch of it.
As you hold your finished wand, think about the spells you or your teddy bear will cast, the adventures you’ll embark on, and the magic you’ll create.
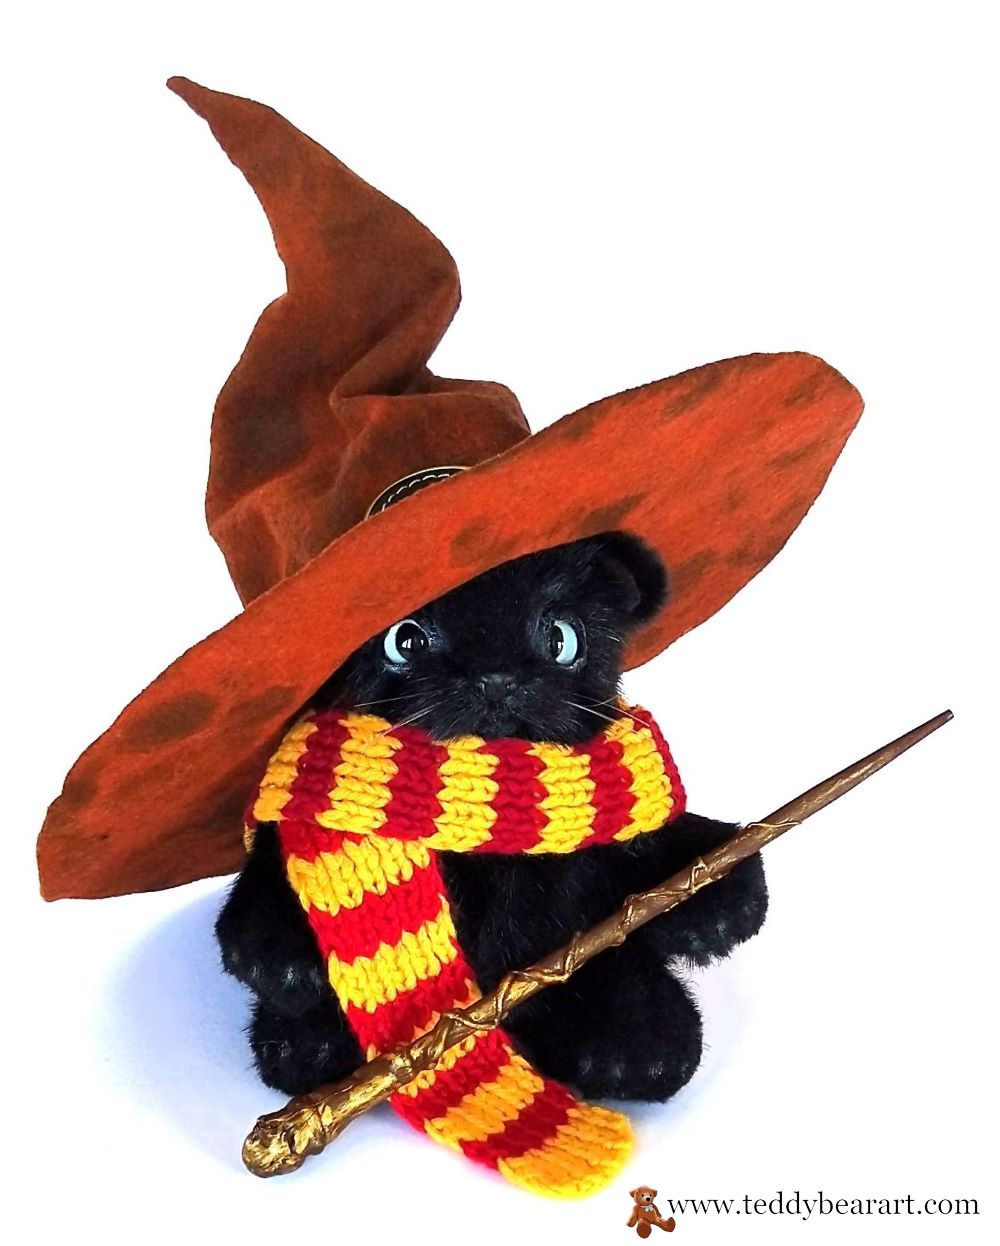
I made my magic wand for this teddy kitten.
Now it’s your turn to choose a free teddy bear pattern or another animal pattern and create your own Harry Potter.
Crafting is a gateway to the world of possibilities, and your DIY wand is a testament to that. So, embrace your inner wizard or witch, wield your wand proudly, and let your imagination soar. May your DIY magic wand be a reminder that the magic of crafting knows no bounds and that you have the power to conjure your own enchanting world.
If you ever need a hand or have any questions, feel free to leave them in the comments below and I will be more than happy to help you out.
Get Free Patterns & Be the First to Know!
Want free teddy bear patterns, exclusive tutorials, and a chance to win craft supplies?
Sign up for our newsletter using the subscribe form in the middle of this article to receive new patterns, insider tips, and the latest news on teddy bear art. You’ll also automatically be entered into our annual giveaway for a chance to win teddy bear crafting materials.
Bonus entry: Save one of our pins on Pinterest to increase your chances of winning!
Let’s create, inspire, and craft beautiful teddy bears together!
Wow! this looks like so much fun. You have a lot of creativity and you were able to explain this in simple steps. My grandchildren love Harry Potter and they enjoy their teddy bears (or stuffies, as they are called in their family). I will need to show them this fun craft so they can make a wand for their favorite stuffed friend and pretend it is attending Hogwarts!
Thank you! Enjoy it together with your grandchildren!
What a great idea! This looks really authentic, especially with the gold paint finish. We used a moonstone from an old ring to put on the top of ours and it looks amazing, so good I almost believe it could be used to cast a real magic spell. Thanks for the fabulous tips. So great for keeping the kids busy over the summer as well as for classy decorations to existing models we have.
Thank you! Happy to hear that you already made your own magic wand, it is really very easy.
This article is a great guide for anyone who loves Harry Potter and wants to make their own magic wand. The steps are easy to follow and well explained, the photos are very helpful, and the results are amazing. The author shows how to use simple materials like a wooden dowel, hot glue, paint, and varnish to create a realistic and unique wand. The article also includes helpful tips and tricks, such as how to add texture and details to the wand, and how to make it look more aged and authentic. I think this is a fun and creative project that anyone can enjoy. Thank you for sharing this wonderful idea!
Thank you very much for your feedback!
I never thought I could make my very own Harry Potter magic wand! It’s such a fun way to satisfy my love for the series. The instructions were so detailed and easy to follow.
Have you ever tried making your own wand? Did you go for the traditional Harry Potter colors, or did you choose something entirely different to reflect your unique wizarding style? I would love to hear more about it!
I used traditional Harry Potter colors, but I am planning to make more different designs.