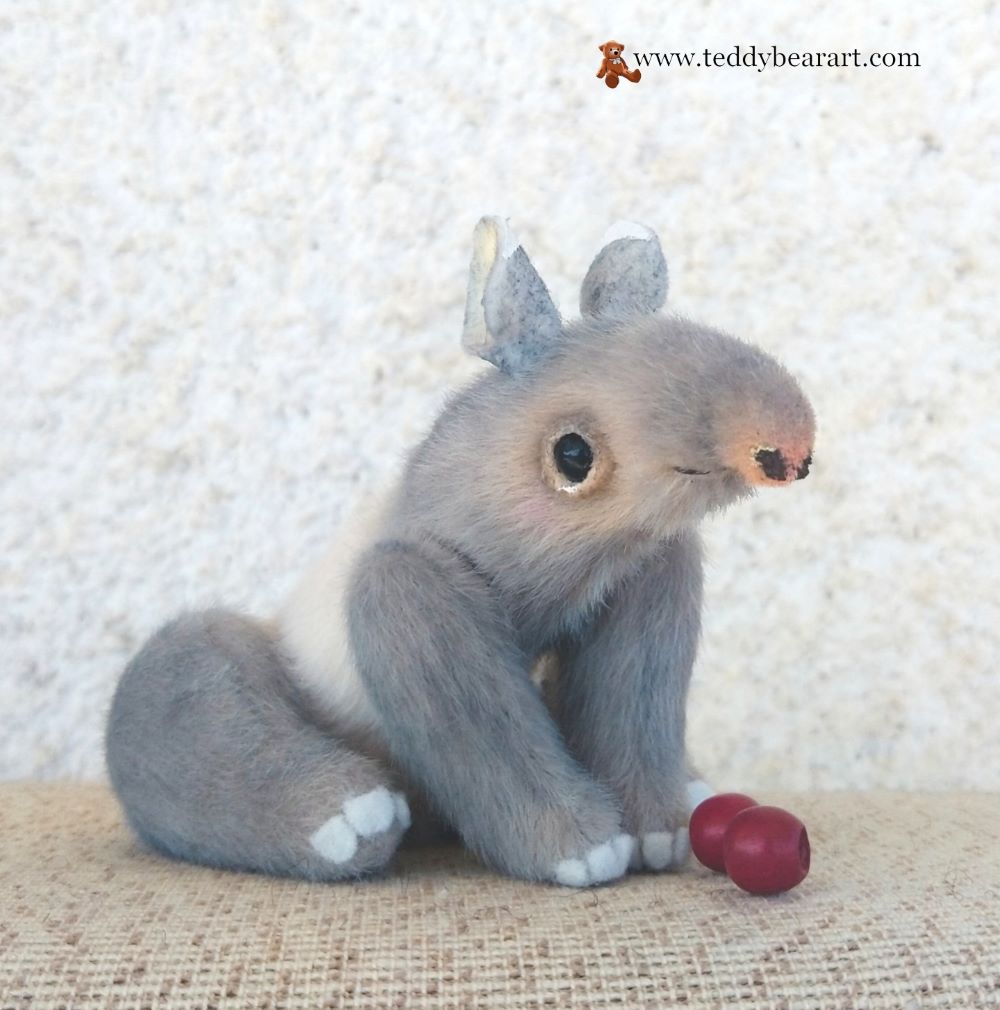
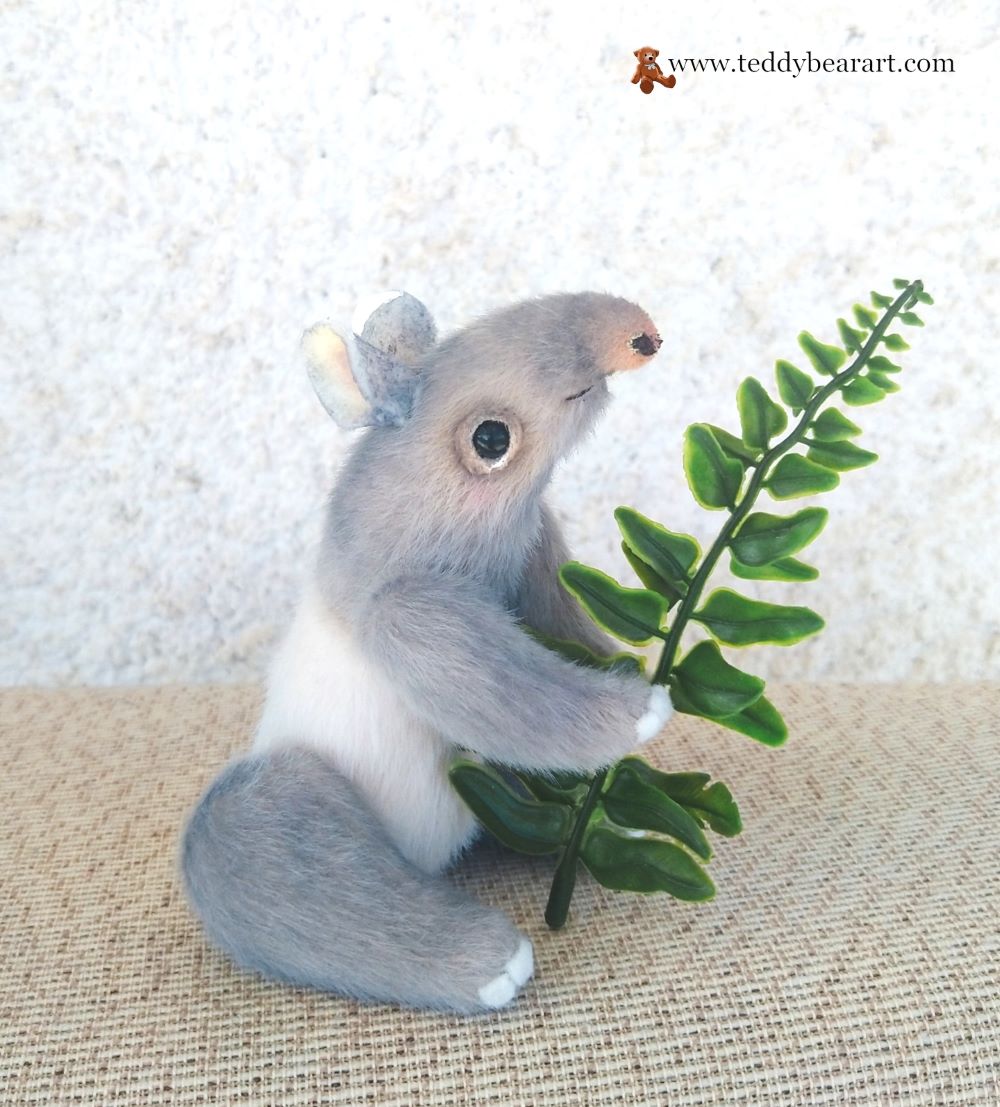
We’re thrilled to unveil our latest creation – the Teddy Tapir Sewing Pattern! If you’ve ever been enchanted by the world of stuffed animals and have a soft spot for crafting, you’re in for a real treat.
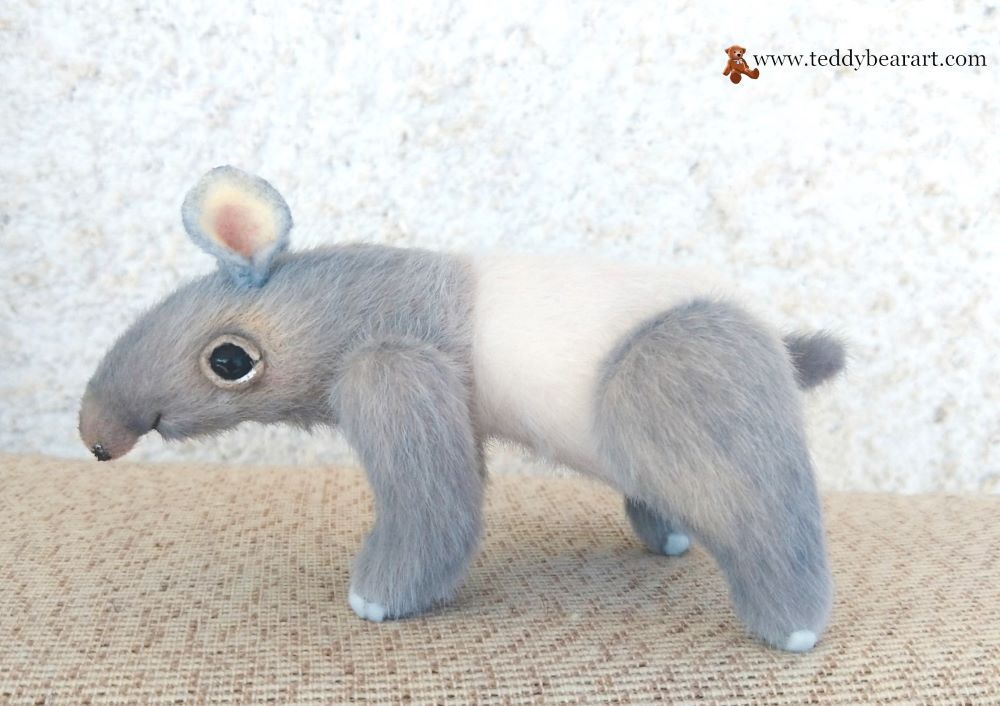
Stuffed animals have held a special place in our hearts for generations, bringing comfort, joy, and endless cuddles. But what if we told you that there’s a delightful twist to this classic craft? Enter the Teddy Tapir – a unique and charming plush companion that combines the timeless appeal of teddy bears with the exotic allure of tapirs.
In this blog post, we’ll embark on a journey of creativity and craftsmanship, exploring what makes the Teddy Tapir so special. We’ll guide you through the process of gathering the materials and FAQs. By the end, you’ll have a one-of-a-kind Teddy Tapir to call your own.
So, let’s dive into the world of cuddly creativity, where stitches become smiles and plushies come to life. Get ready to unleash your imagination and bring a touch of whimsy to your crafting table.
Getting Started: Materials and Tools
1. A piece of black (brown or dark grey) faux fur for miniature teddies, approximately 25×25 cm for the head and limbs. A piece of white faux fur for mini teddie,s approx. 18×18 cm for the body.
2. Strong threads, the same color as your plush fabric, and a needle for hand sewing.
3. Scissors.
4. A pair of glass eyes – approx. 8 mm in diameter.
5. Discs: for the hands 12 mm – 4 pieces, for the legs 20 mm – 4 pieces.
6. Washers – 8 pieces.
7. T-shaped cotter pins – 4 pieces.
8. Synthetic filler.
9. Metal or glass pellets for the weight (small diameter).
10. A small piece of felt for the ears, fingers, and eyelids.
12. Glue UHU.
13. White, pink, oil colors, and white and black acrylic colors.
14. Paintbrushes.
18. Pliers.
19. An awl.
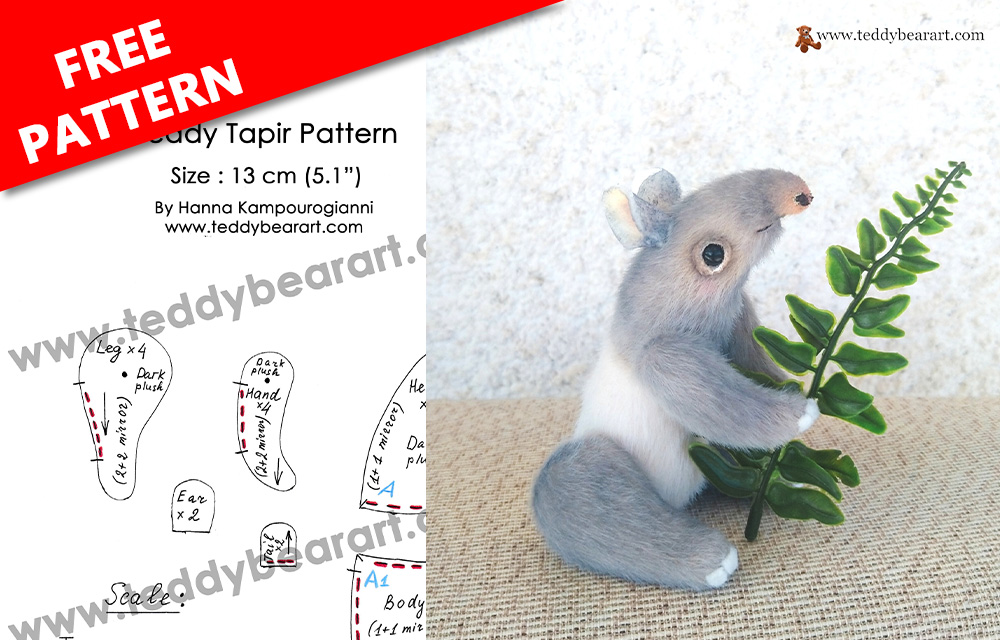
Teddy Tapir Sewing Pattern Download
- From a computer (Windows).
Click on the photo of the pattern, and select the “Save image as …” option. - From a phone or a tablet (Android). There should be something similar for the iPad.
Click on the image. Save it by holding your finger on the image and selecting the “Save Image” option. Then go to your photo gallery and print it (there is an option).
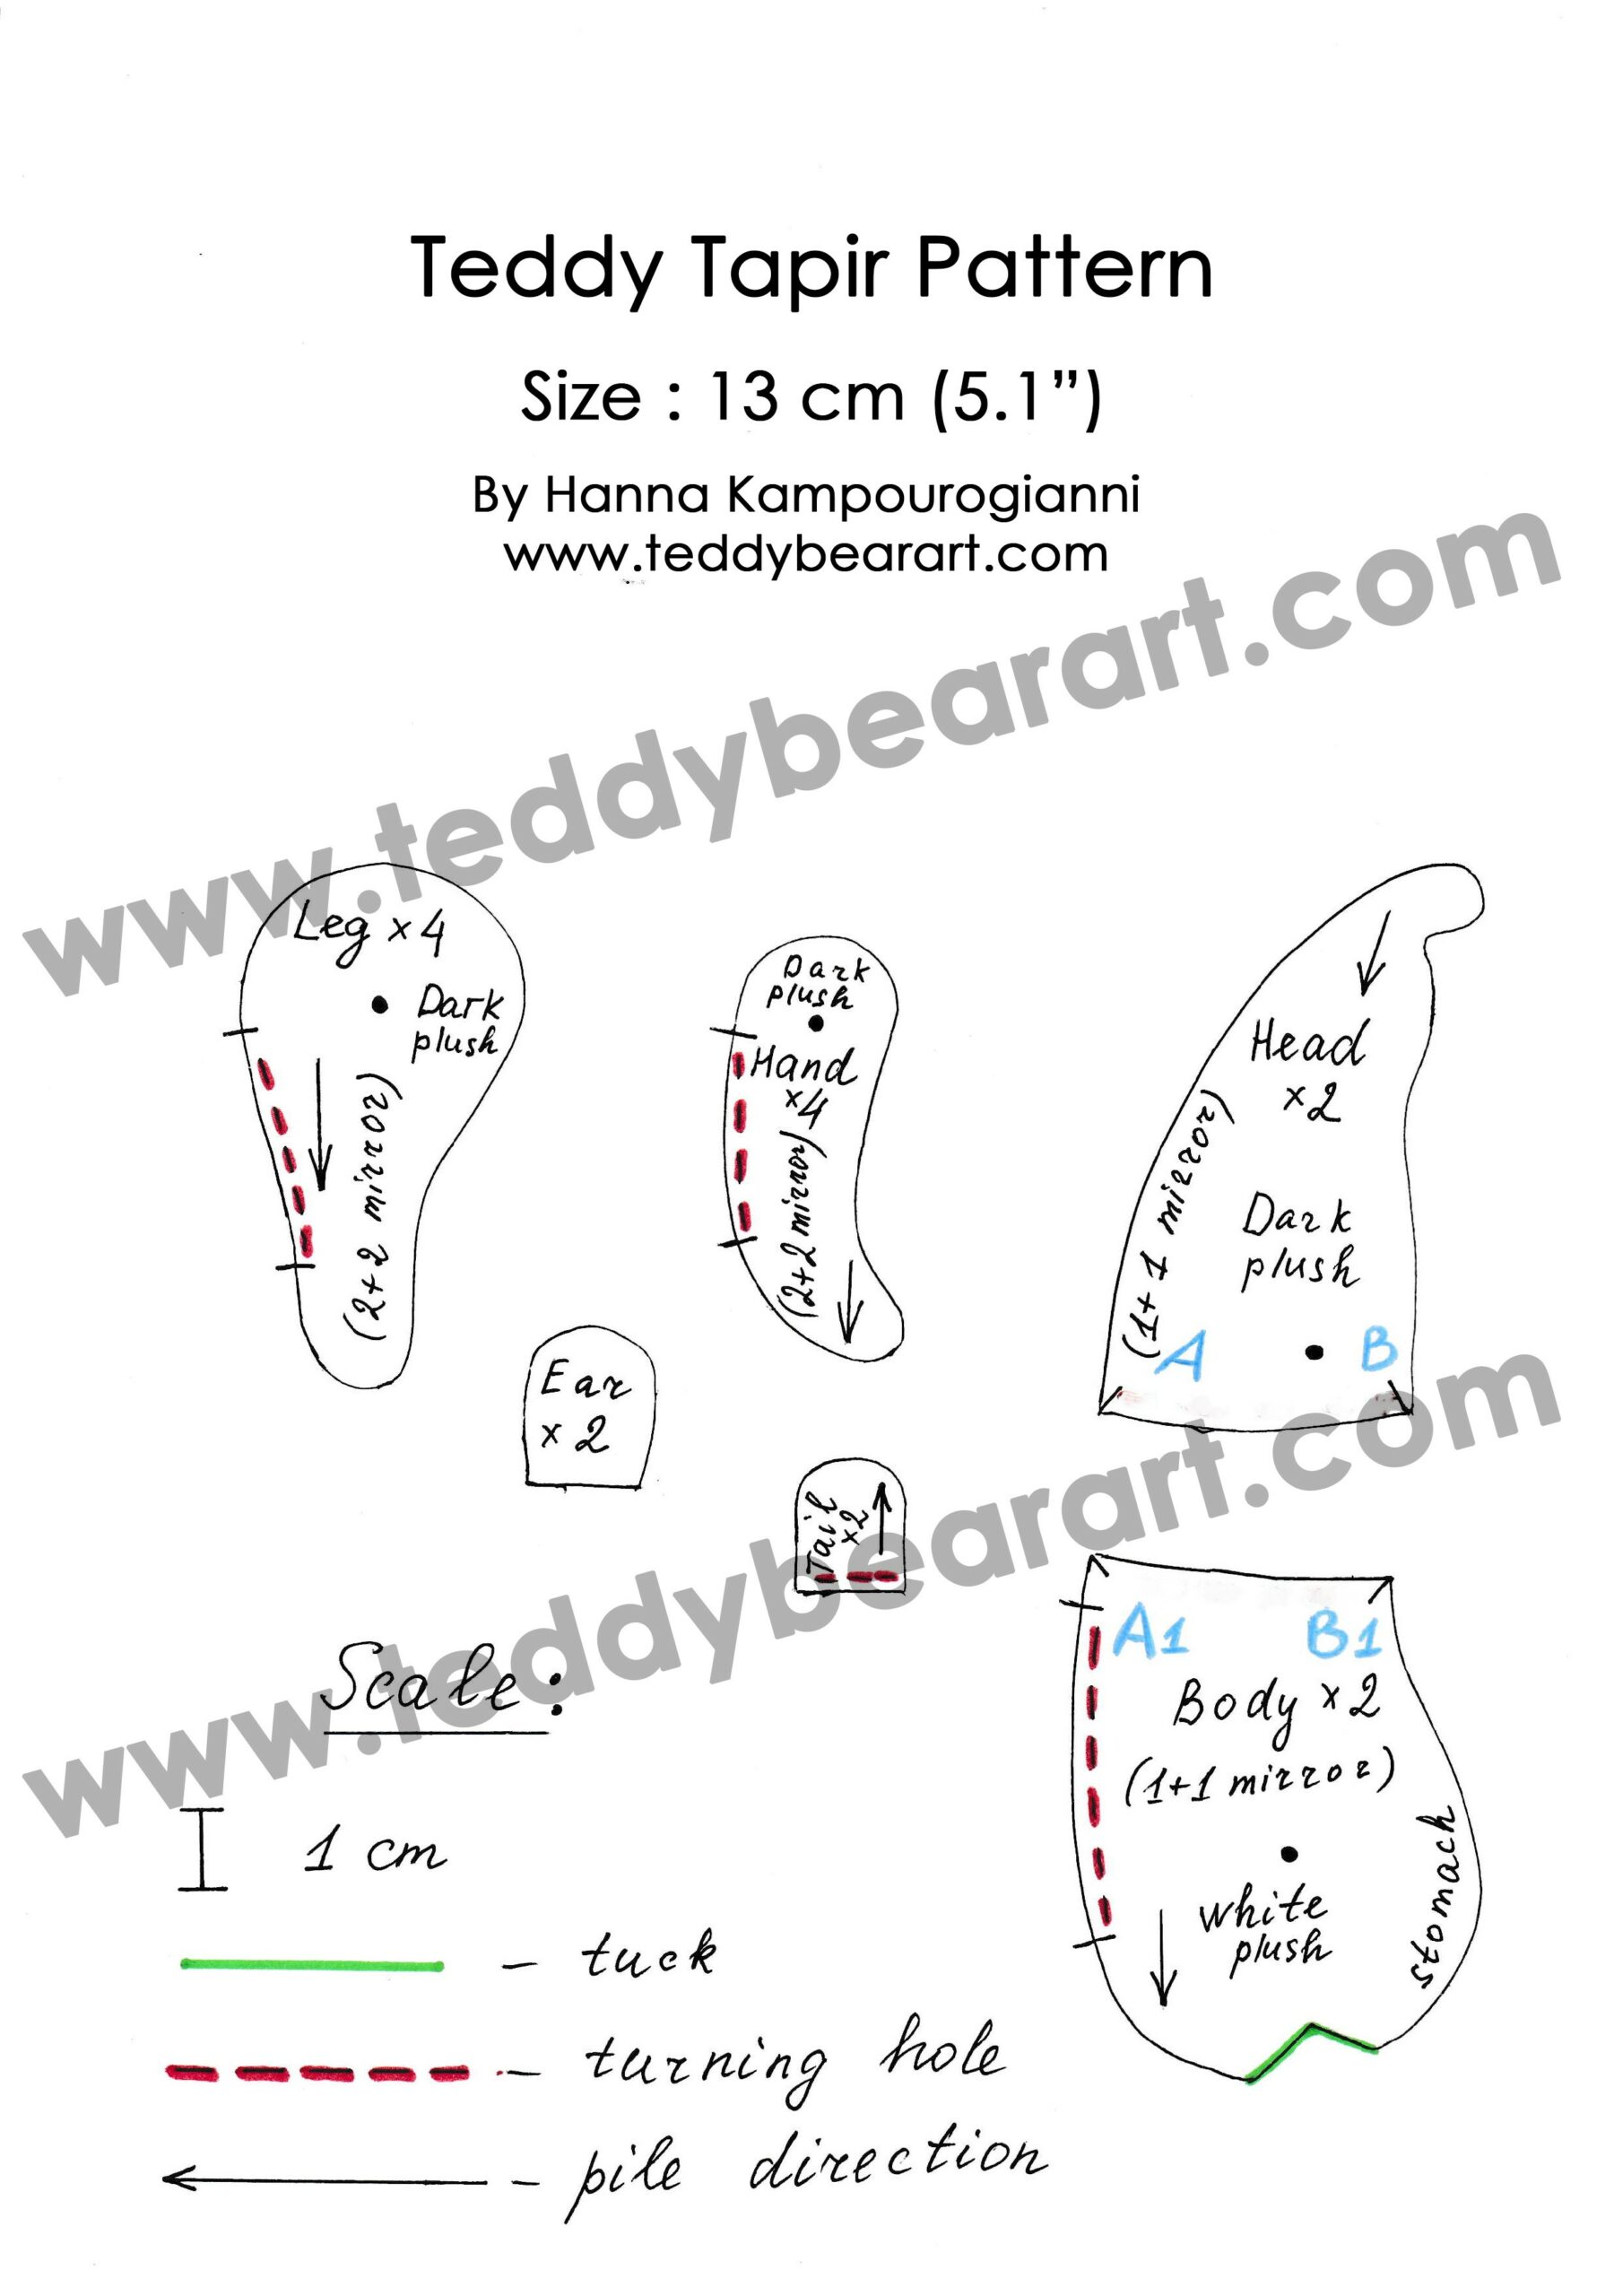
The instructions on making this teddy tapir are on this page.
FAQs and Troubleshooting
As you embark on your Teddy Tapir sewing adventure, you might encounter a few questions or face some challenges along the way. Don’t worry; we’re here to provide answers and solutions to make your crafting experience smooth and enjoyable.
- What if I don’t have all the recommended materials? No worries! You can always get creative with what you have on hand. Feel free to experiment with different fabrics and embellishments to give your tapir a unique character.
- I’m new to sewing. Is this project suitable for beginners? Absolutely! We’ve designed the Teddy Tapir pattern with crafters of all levels in mind. Take your time, and don’t hesitate to reach out if you need assistance.
- How do I attach safety eyes securely? We’ll provide step-by-step instructions in the sewing process section to ensure a safe and secure attachment.
Troubleshooting:
- My sewing machine is acting up. What should I do? Check your machine’s manual for troubleshooting tips, and if all else fails, hand-sewing is a great alternative.
- My tapir doesn’t look quite right. Any suggestions? It’s okay; even experienced crafters encounter this. Review the pattern carefully, and if needed, consider seam ripping and making adjustments.
Remember, crafting is all about learning and having fun. If you have more questions or face unique challenges, don’t hesitate to reach out to our crafting community. We’re here to support you on your Teddy Tapir journey!
Conclusion
It’s time to turn your inspiration into reality! Download the Teddy Tapir Sewing Pattern right away and kickstart your crafting adventure. Whether you’re a seasoned crafter or a beginner, this project offers endless possibilities for creativity.
Crafting brings joy, and by inviting friends and family to join you, you’re spreading that joy even further. So, grab your pattern, gather your materials, and let the magic of crafting begin. Together, we’ll continue to celebrate the art of handmade treasures. Happy sewing, and let’s create memories, one Teddy Tapir at a time!
Additional Resources
We’re thrilled that you’ve embraced the Teddy Tapir crafting journey, and to support your creativity even further, we’ve curated a list of additional resources and blog posts to enhance your experience:
- Beginner’s Guide to Teddy Bear Making: If you’re new to the world of teddy bear crafting, this comprehensive guide will walk you through the basics, from choosing materials to stitching techniques. Here is the second part of this guide.
- Caring for Your Handmade Plushies: Once your Teddy Tapir is complete, learn how to keep it looking its best with tips on cleaning, storage, and preservation.
- Join Our Crafting Community on Facebook: Connect with fellow teddy bear makers and share your crafting journey on our dedicated social media groups and forums. It’s a great way to seek advice, share your progress, and make new friends who share your passion.
- Exclusive Teddy Bear Patterns: Keep an eye out for exclusive teddy bear patterns and projects, available only to our crafting community members. These special patterns will add even more excitement to your crafting repertoire.
- Selling Handmade Teddy Bears Online: The journey doesn’t end with a completed teddy bear; it begins when you decide to share your creations with the world. Let’s embark on an insightful exploration of the two pivotal pillars of online teddy bear sales: choosing the right platforms and nailing your pricing strategy. We’ll navigate the colorful array of online marketplaces, from Etsy to niche platforms, and unveil the art of pricing that not only covers costs but also appeals to collectors. Start selling your creations.
We’re committed to being your go-to resource for all things teddy bears and plush crafting. Stay tuned for more inspiring content and projects, and let’s continue to explore the world of handmade treasures together!
Get Free Patterns & Be the First to Know!
Want free teddy bear patterns, exclusive tutorials, and a chance to win craft supplies?
Sign up for our newsletter using the subscribe form in the middle of this article to receive new patterns, insider tips, and the latest news on teddy bear art. You’ll also automatically be entered into our annual giveaway for a chance to win teddy bear crafting materials.
Bonus entry: Save one of our pins on Pinterest to increase your chances of winning!
Let’s create, inspire, and craft beautiful teddy bears together!
Wow, your training and your post are just simply amazing, I love the way you word this training, it is so inviting and will make your readers feel right at home as they follow what you are saying. Sewing is a great skill or can I say a work of art, the way people can make beautiful things from sewing is so great. I call sewing a work of art.
Thank you for your review to my article!
This looks really adorable! My wife is a seamstress and craft person. I am sure she would enjoy this site and making the tapir plushie. Our grandchildren, even the boys, love collecting plushies. I don’t think they have thought about making their own. Perhaps this will spark some creativity in them! Great post!
Thank you very much! Wish them to enjoy their crafting!