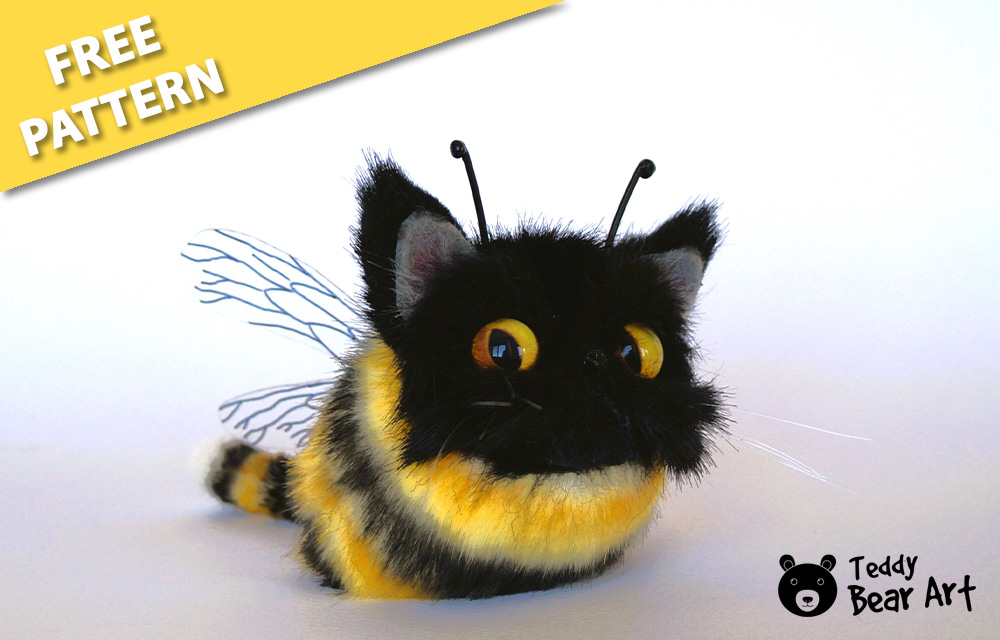
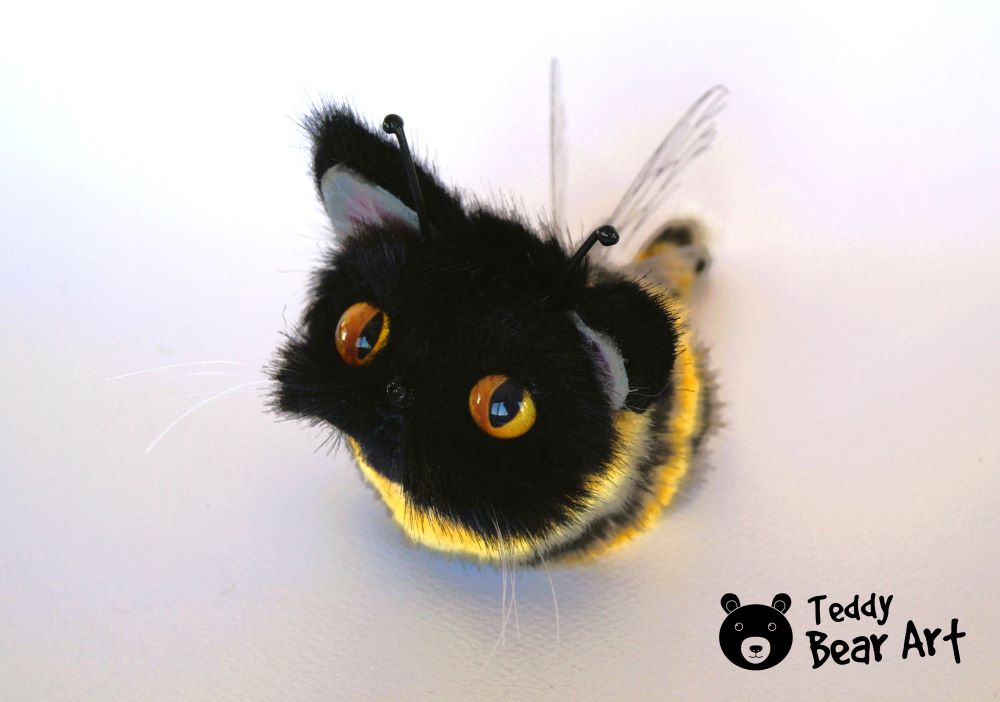
Are you excited to mix a cat’s charm with the delightful buzz of a bee? This Bee Cat Plush project is the perfect blend of creativity and fun! It’s designed with easy mixed techniques that are great for both beginners and experienced crafters.
In this tutorial, we’ll walk you through every step to make your own adorable bee cat plush, ensuring a fun and satisfying crafting experience.
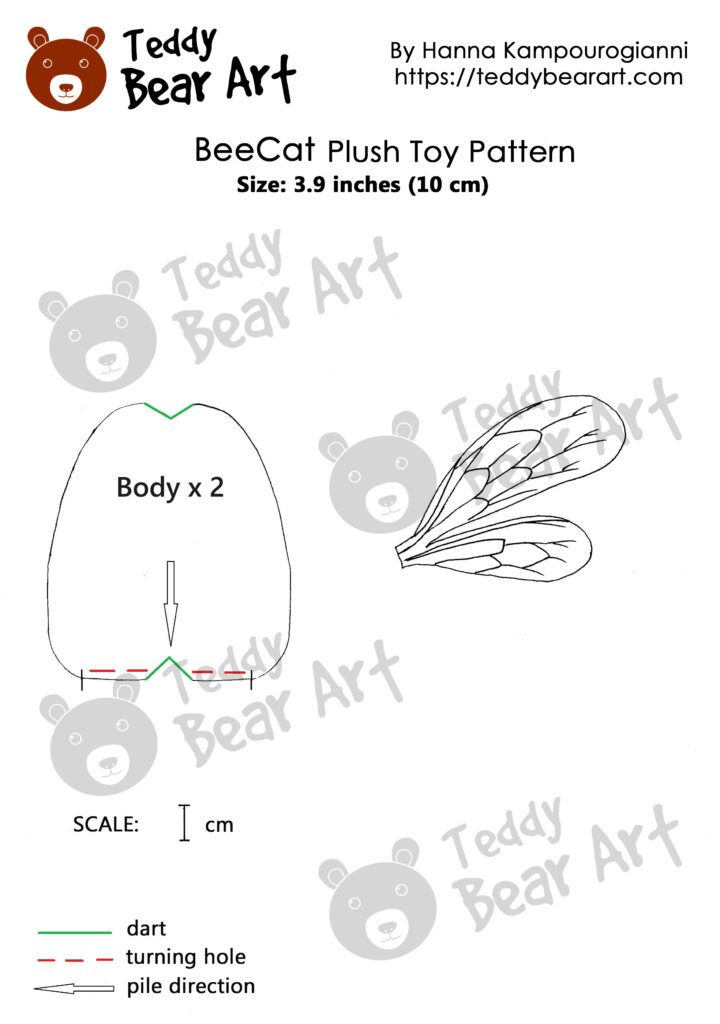
Download the Bee Cat Plush Pattern
Download the pattern following the instructions below:
- From a computer (Windows). Click on the photo of the pattern you see below. In the new tab that will open, you press the right mouse button and select the “Save image as …” option. Then you choose where you want the image to be saved on your computer.
- From a phone or a tablet (Android). There should be something similar for mobile devices with Android or iOS.
Click on the image. Save it by holding your finger on the image and selecting the “Save Image” option. Then go to your photo gallery and print it (there is an option).
Materials and Tools Needed
Before we begin, let’s gather all the materials and tools you’ll need for this project.
List of Materials:
- White faux fur fabric with a pile length of 2 cm
- White short-pile faux fur for the tail
- Black artificial fur scraps for facial features
- Merino black sheep wool
- Glass eyes in diameter of 14 mm
- Sheep’s wool stuffing
- Weight material (e.g., metal pellets)
- Oil paints (yellow, orange, brown, and black)
- Transparent plastic for wings
- Strong glue
- Sculpting material for the nose
- Black rubber cord or wire
- Fishing line
List of Tools:
- Needle and thread
- Felting needles
- Scissors
- Paintbrushes
- CD/DVD/BD Black Marker
Creating the Body
Cutting and Sewing the Body
Start by cutting the white faux fur into the desired body pattern. Stitch all the marked tucks (darts). Sew the pieces together, leaving an opening for stuffing. This will form the basic shape of your bee cat plush.
Stuffing and Weighting the Body
Stuff the body with sheep’s wool until it’s firm and evenly filled. Add some weight material, such as plastic pellets, to give the plush a nice heft.
Painting the Body
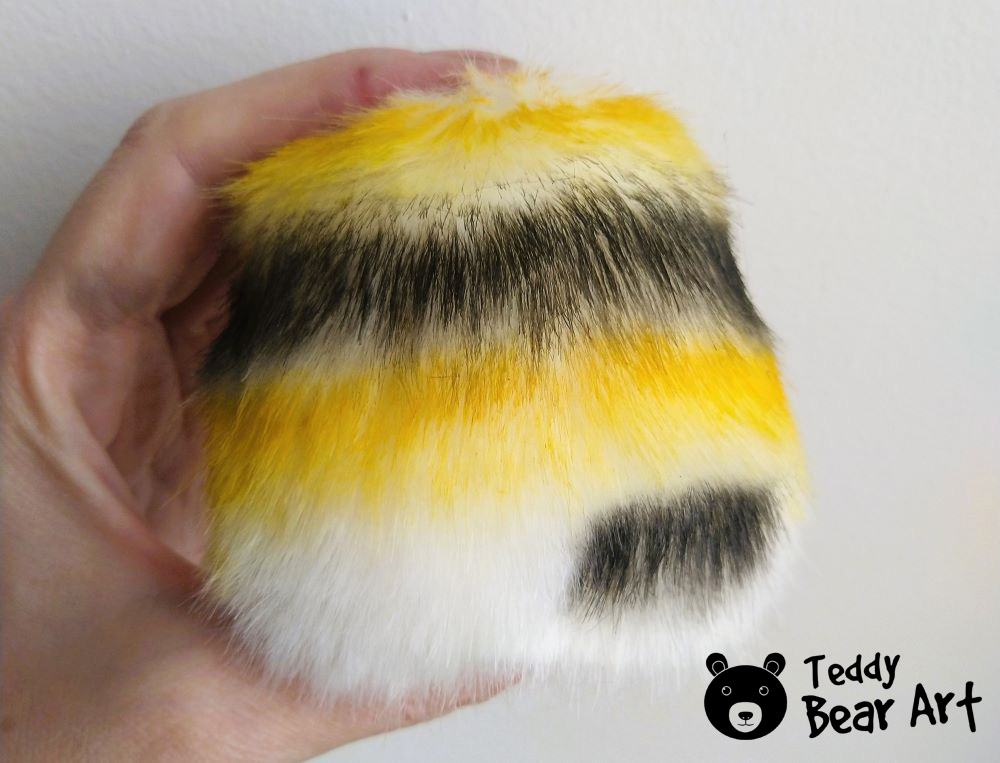
Using yellow, orange, brow, and black oil paints, create bee-like stripes on the body. Be sure to allow the paint to dry completely before moving on to the next steps. Follow this technique to make the perfect stripes.
Crafting the Face
Felting the Face
For the face, felt the black sheep wool into an oval shape with indentations for the eyes. This creates a cute and expressive base for the bee cat plush’s face. Attach the felted face to the body using felting needles.
Inserting the Eyes
Insert the craft eyes into the indentations and secure them firmly. This adds a lifelike sparkle to your bee cat plush. Follow this technique to attach the eyes.
In addition, explore these five techniques to attach different kinds of toy eyes.
Adding Facial Features
Cut small pieces of black artificial fur and glue them onto the face to form the nose, mouth, and other facial features. This method is quick and avoids the need for intricate sewing.
Making the Ears and Nose
Creating the Ears
Glue faux fur to pieces of felt and cut out ear shapes. Attach these to the head, ensuring they are symmetrical and securely fastened.
Sculpting and Attaching the Nose
Sculpt a small nose from your chosen material. Once shaped and dried, please attach it to the face using a strong adhesive.
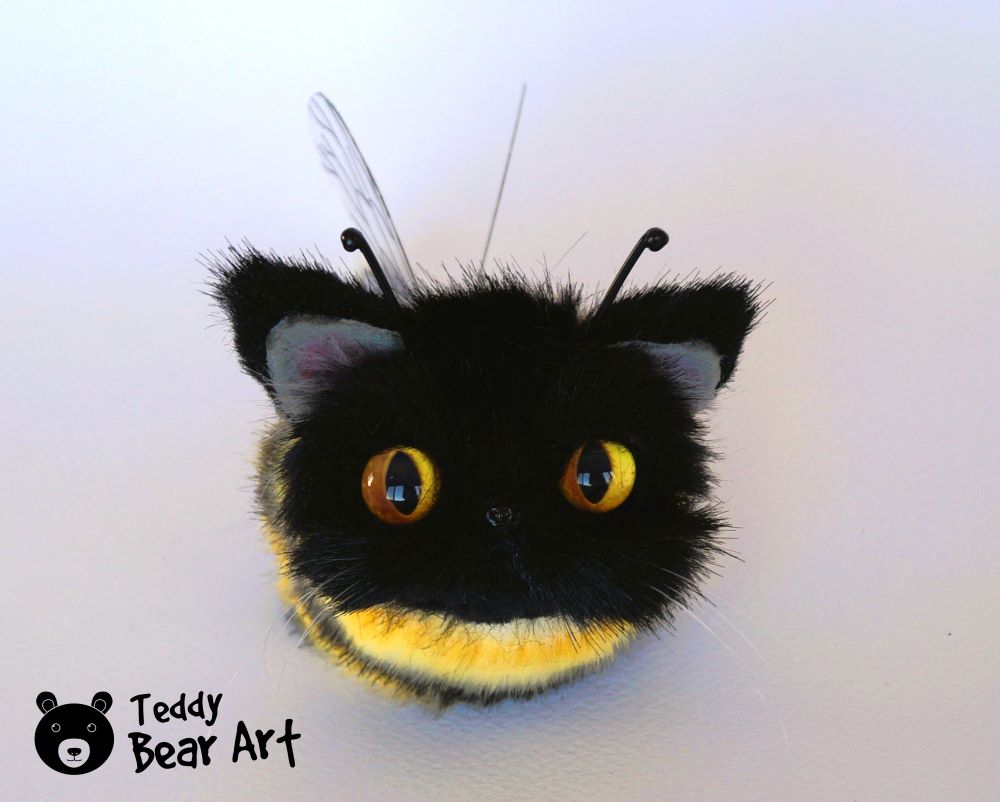
Constructing the Wings and Tail
Making the Wings
Fold the transparent plastic in half and cut out double wings. Paint them with bee-like patterns and allow them to dry. Attach the wings to the back of the body, ensuring they are evenly placed.
Sewing the Tail
Create the tail using white short-pile faux fur, and paint it. Sew it to the body, completing the bee cat plush’s look.

Final Touches and Customization
Adding Final Details
Create the antennas made from black rubber cord or wire. Explore how to attach them to the body following this short guide.
Add mustaches made from a fishing line.
Inspect your bee cat plush for any finishing touches or adjustments needed. Ensure all parts are securely attached and that the plush looks cohesive.
Customization Ideas
Consider adding unique touches to your bee cat plush to make it truly one-of-a-kind. Experiment with different colored stripes for a whimsical look, or add tiny accessories like a bow tie or a small flower crown.
Personalized embroidery can be a wonderful way to add names, dates, or special messages. You could also use glitter fabric paint for extra sparkle or attach small bells to the tail for a playful touch. Let your creativity shine!
Conclusion
Creating your own DIY bee cat plush using these easy-mixed techniques is a fun and rewarding project. By following these steps, you’ll craft a unique and charming plush toy that combines the best of both worlds. Don’t forget to share your creations on social media.
Now, gather your materials and get started on your bee cat plush adventure!

More Goodies
Explore more exciting projects and tips to enhance your plush toy crafting skills!
- Bumblebee Plush Toy Pattern: Tips and Tricks for a Flawless Finish
Discover expert advice and insider secrets to perfect your bumblebee plush toy. This guide is packed with essential tips and tricks to help you achieve a professional and polished look. - Cute Bee Stuffed Animal Pattern: A Delightful Project for Crafters
Dive into this delightful bee stuffed animal project that’s perfect for all crafters. Follow the easy-to-understand pattern and create a charming bee plush that will bring joy to anyone who sees it. - Bee Plushie Sewing Pattern: A Fun Project for All Levels of Crafters
Whether you’re a beginner or an experienced crafter, this bee plushie sewing pattern offers a fun and engaging project. Learn new techniques and create an adorable bee plushie that’s sure to impress.
Get Free Patterns & Be the First to Know!
Want free teddy bear patterns, exclusive tutorials, and a chance to win craft supplies?
Sign up for our newsletter using the subscribe form in the middle of this article to receive new patterns, insider tips, and the latest news on teddy bear art. You’ll also automatically be entered into our annual giveaway for a chance to win teddy bear crafting materials.
Bonus entry: Save one of our pins on Pinterest to increase your chances of winning!
Let’s create, inspire, and craft beautiful teddy bears together!
This Bee Cat plush tutorial is absolutely adorable! I love the combination of a cat’s charm and a bee’s delightful buzz. The mixed techniques seem easy to follow, even for beginners like me.
I’m excited to try this out and personalize it with some unique touches. Maybe I’ll add some sparkle with glitter fabric paint or even try my hand at embroidery. I’ll definitely be sharing my finished creation on social media!
Thanks for the inspiration! 😊
Thank you so much for your sweet comment! I’m thrilled to hear that you love the Bee Cat plush tutorial. The combination of a cat’s charm and a bee’s buzz is indeed delightful, and it’s wonderful to know that the techniques seem beginner-friendly to you.
Adding your unique touches like glitter fabric paint or embroidery sounds fantastic! I can’t wait to see how your personalized Bee Cat turns out. Don’t forget to share your finished creation on social media and tag us so we can see your beautiful work.
Happy crafting, and thanks again for the kind words!✨
Wow what a cute plush toy and it’s easy to make. I love how it’s a combination of 2 animals, such a fun idea. I made teddy bears out of my father’s old shirts after he passed away for his grand children. They turned out really well but weee time consuming as the arms and legs were stuffed and attached separately. How many different patterns do you have.
Thank you so much! I’m glad you liked the plush toy idea. Making teddy bears out of your father’s old shirts sounds incredibly meaningful and special. It must have been a touching way to create something memorable for his grandchildren. As for patterns, I have a variety available on my website, ranging from different styles of teddy bears to other animals and plush toys. If you’d like to explore more, just let me know!