
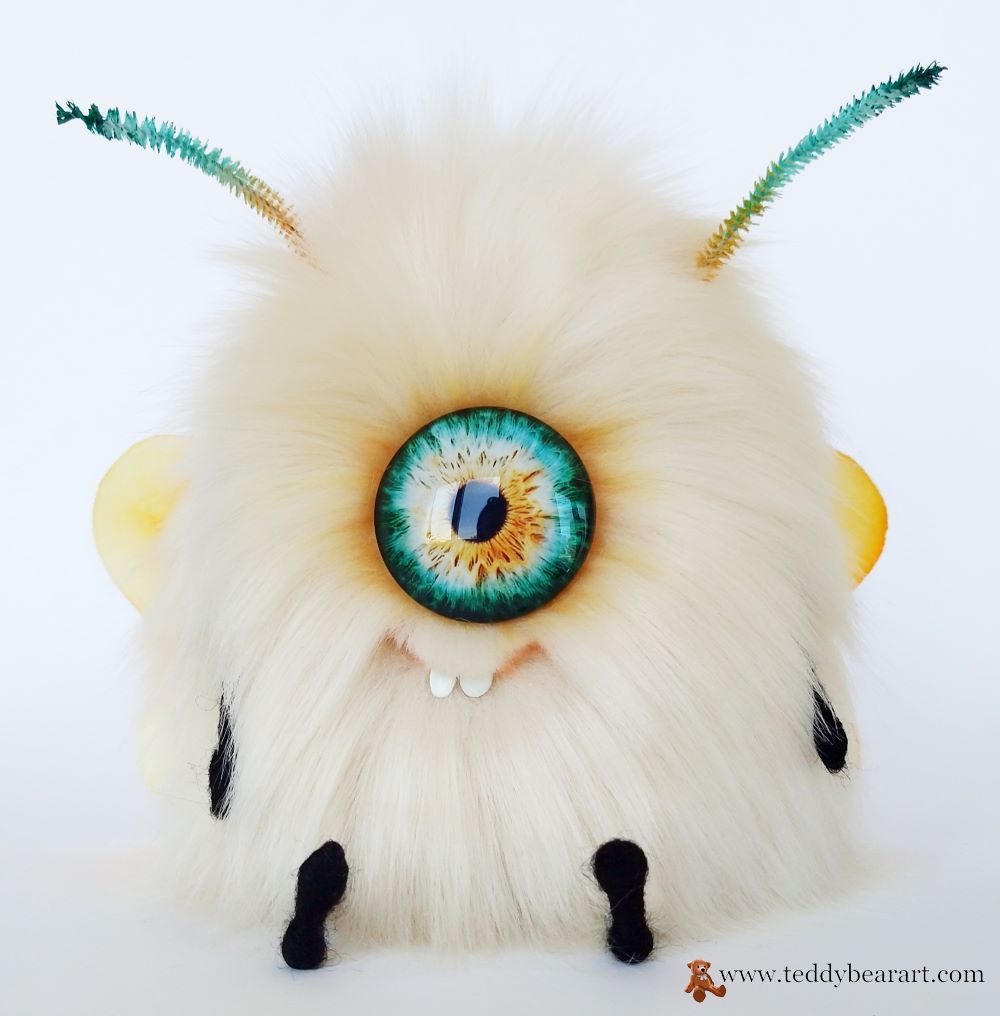
Download a free plush monster sewing pattern, which is very easy to use, and a free tutorial on how to make such a fluffy cutie. Here you can find a list of materials and step-by-step photos of making this one-eyed monster.
If you are a beginner in sewing and crafting niches, I would recommend reading my post about basic sewing before starting your work.
Download the Pattern
- From a computer (Windows).
Click on the photo of the pattern, and select the “Save image as …” option. - From a phone or a tablet (Android). There should be something similar for the iPad.
Click on the image. Save it by holding your finger on the image and selecting the “Save As” option. Then go to your photo gallery and print it (there is an option).

The List of Materials
1. A piece of faux fur (20×20 cm will be enough) with a pile of length 4-5 cm.
2. Strong threads, the same color as your fur, and a needle for hand sewing.
3. Scissors.
4. A glass eye on a metal loop – 4 cm in diameter.
5. Waxed thread.
6. An awl.
7. Synthetic filler.
8. Metal or glass pellets for the weight (small diameter).
9. A piece of fabric to put inside metal pellets for weight.
10. Oil paints
11. Acrylic paints.
12. Brushes.
13. Pins.
14. Wire.
15. Black floss threads.
16. Black Merino wool.
17. Pliers.
18. A piece of white felt for the wings.
18. Strong glue UHU.
19. Сhenille wire for antennae.
20. A long needle (10 cm – 15 cm) for setting the eye.
21. Modeling clay.
22. Optionally – varnish for acrylic paints.
Body And Face Making Tutorial
Print the pattern, paying attention to the scale (indicated in the figure). If you have no opportunity to print then transfer it from a screen to baking paper.
Arrange the pattern pieces on the fabric so that the direction of the pile matches the arrows.
Leave approximately 1 cm for seam allowances. My faux fur has a very thick pile and dense base so I left even more than 1 cm for seam allowances.
Trace the details of the pattern with a pen or pencil.
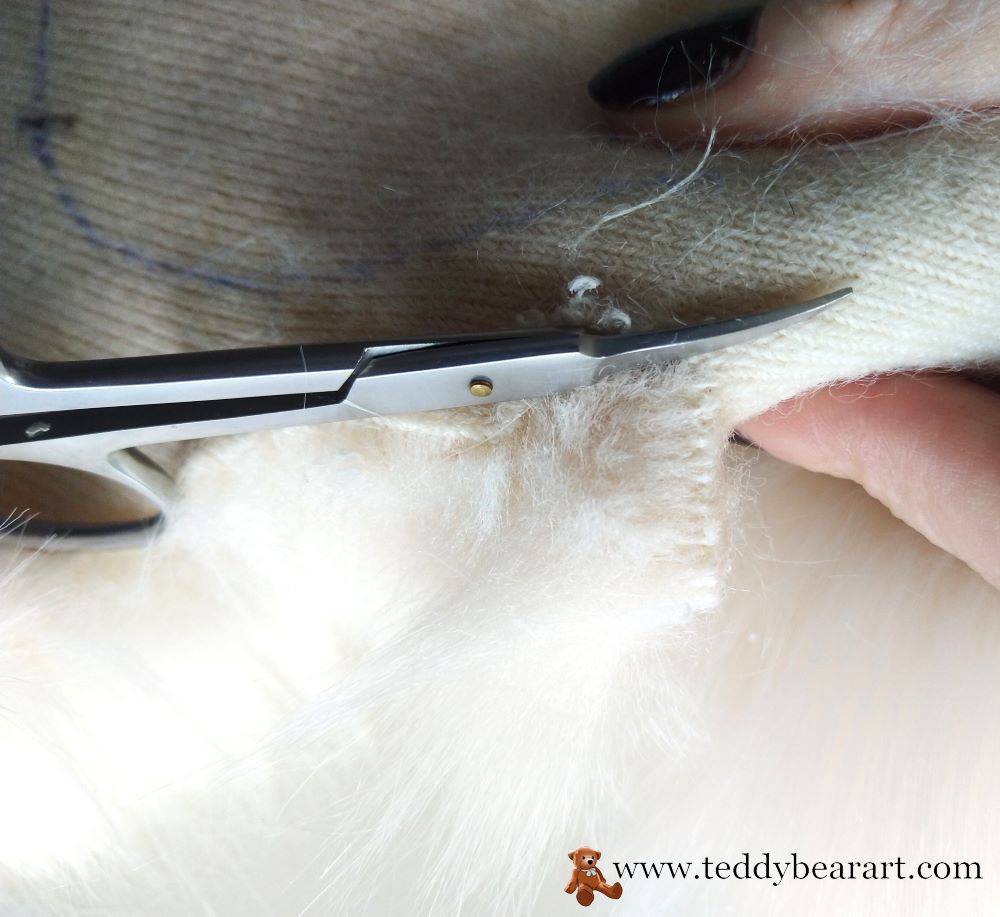
Next, cut off a little pile from the edges, then after stitching the details, the pile will lie more evenly. But if you are a beginner and are afraid to cut off more than you need, then do not do it your first time.
Sew up all the tucks (marked in green).
Sew the two sides of the body and turn it out.
Fill it with synthetic filler and add some metal pellets for weight. Place them in a small bag first.
Sew up the body.
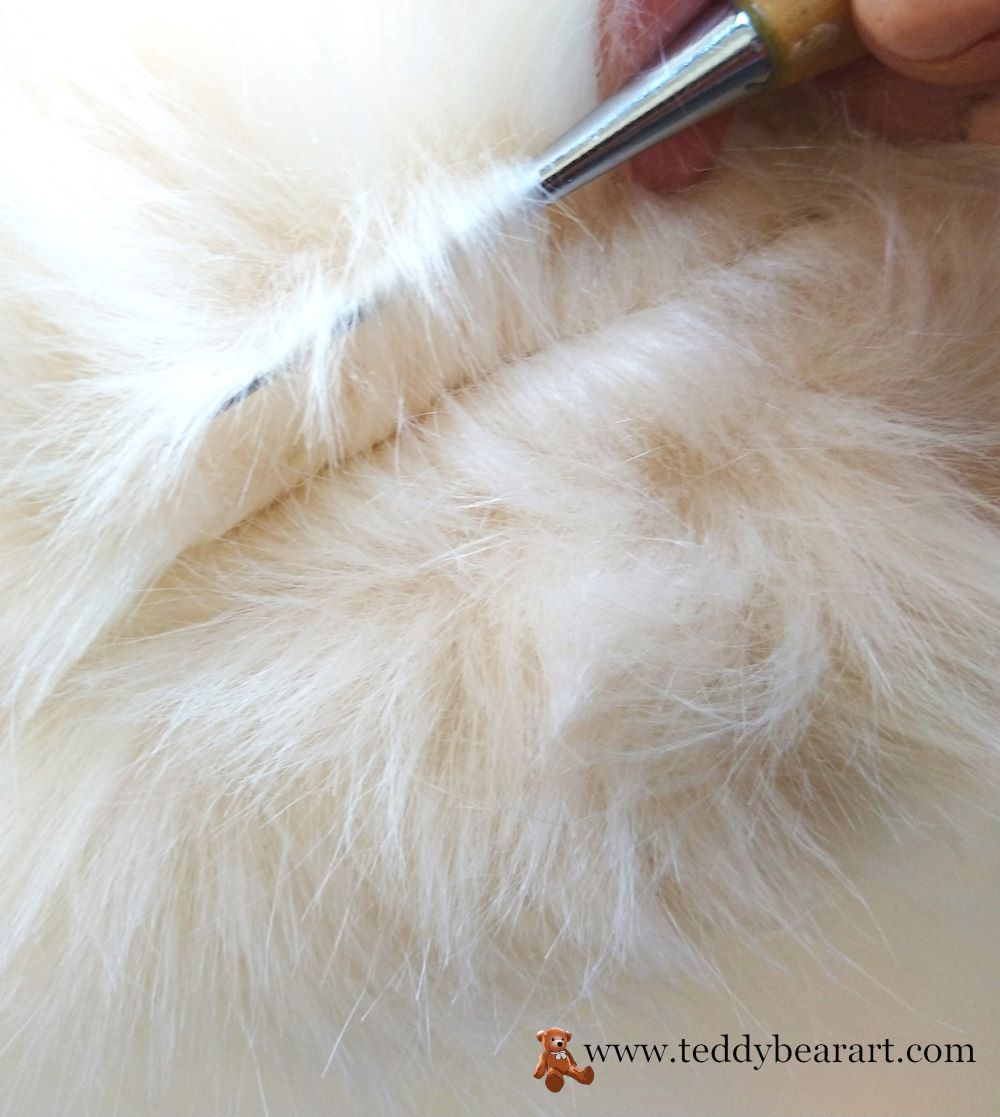
Now take an awl and carefully remove the pile from the seams. After that, comb it in different directions.
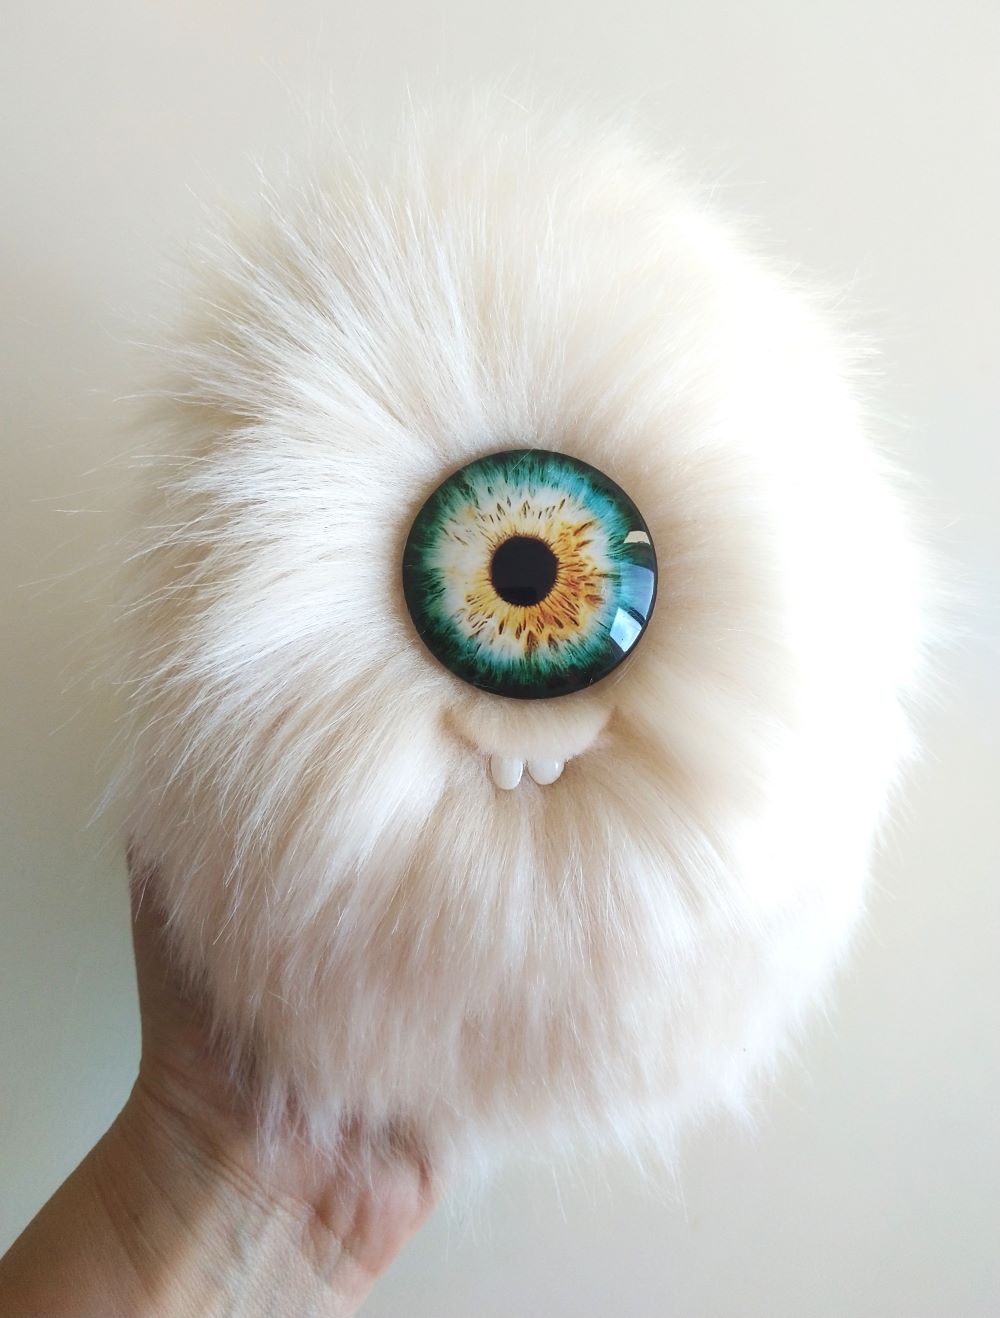
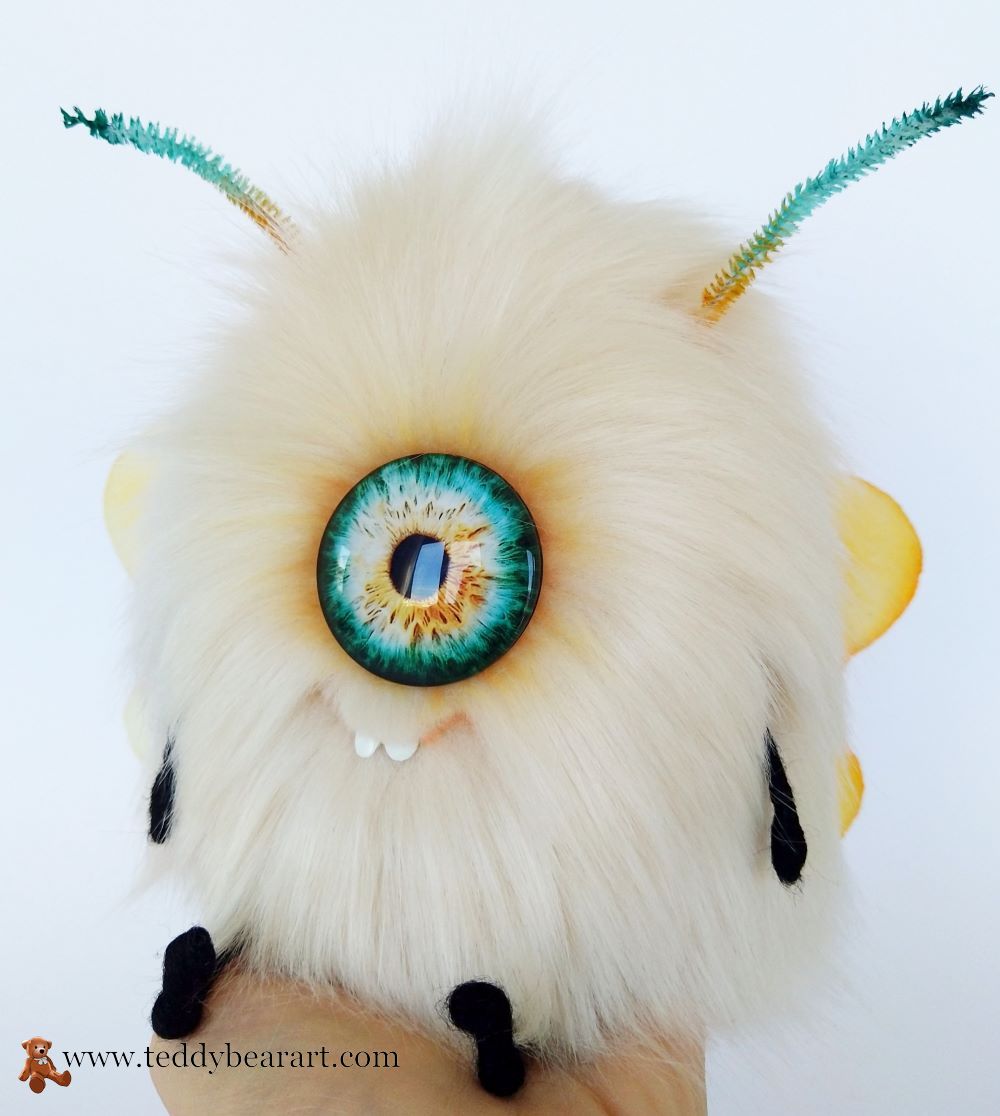
Using a pin, determine the place where you will install the eye. Cut off the pile in this place and make a hole with an awl, gently straightening the warp threads.

Then thread the thread through the metal loop and use a long needle to set the eye. Bring the needle to the bottom of the monster’s torso and secure the thread by hiding its ends inside the torso.
Since the glass eye is quite large and heavy, I made one more thing to be sure. Before inserting it, I smeared it with glue.
After the glue has dried, start working on the mouth of this monster.
You need to cut the pile in a semicircle to make a smiling mouth. I use special dog clippers bought at the pet store. But you can get by with other scissors.
Now the main thing is not to rush and not cut everything at once. Cut little by little until you see a beautiful result.
As for the teeth, I molded them from Milliput White self-hardening clay. Then I painted it with white acrylic paint and covered it with a glossy varnish for acrylic paints.
You can also sculpt teeth in fired clay, such as Fimo.
I glued the teeth with the glue UHU.
Limbs, Antennae, And Wings Making Tutorial
You will need a wire of medium hardness, sheep’s wool, and floss to match the color of this wool.
Take the wire and bend it in half.

Then tie and wrap the floss with threads. Fix the ends of the threads.

Take a skein of wool and carefully separate a thin tourniquet from it, the thinner the better.
Slowly wind the wool around the threads. At the same time, we wind it several times in the same place so that the foot and heel become thicker. Wool adheres well to threads. If necessary, you can additionally fix the wool with a felting needle.

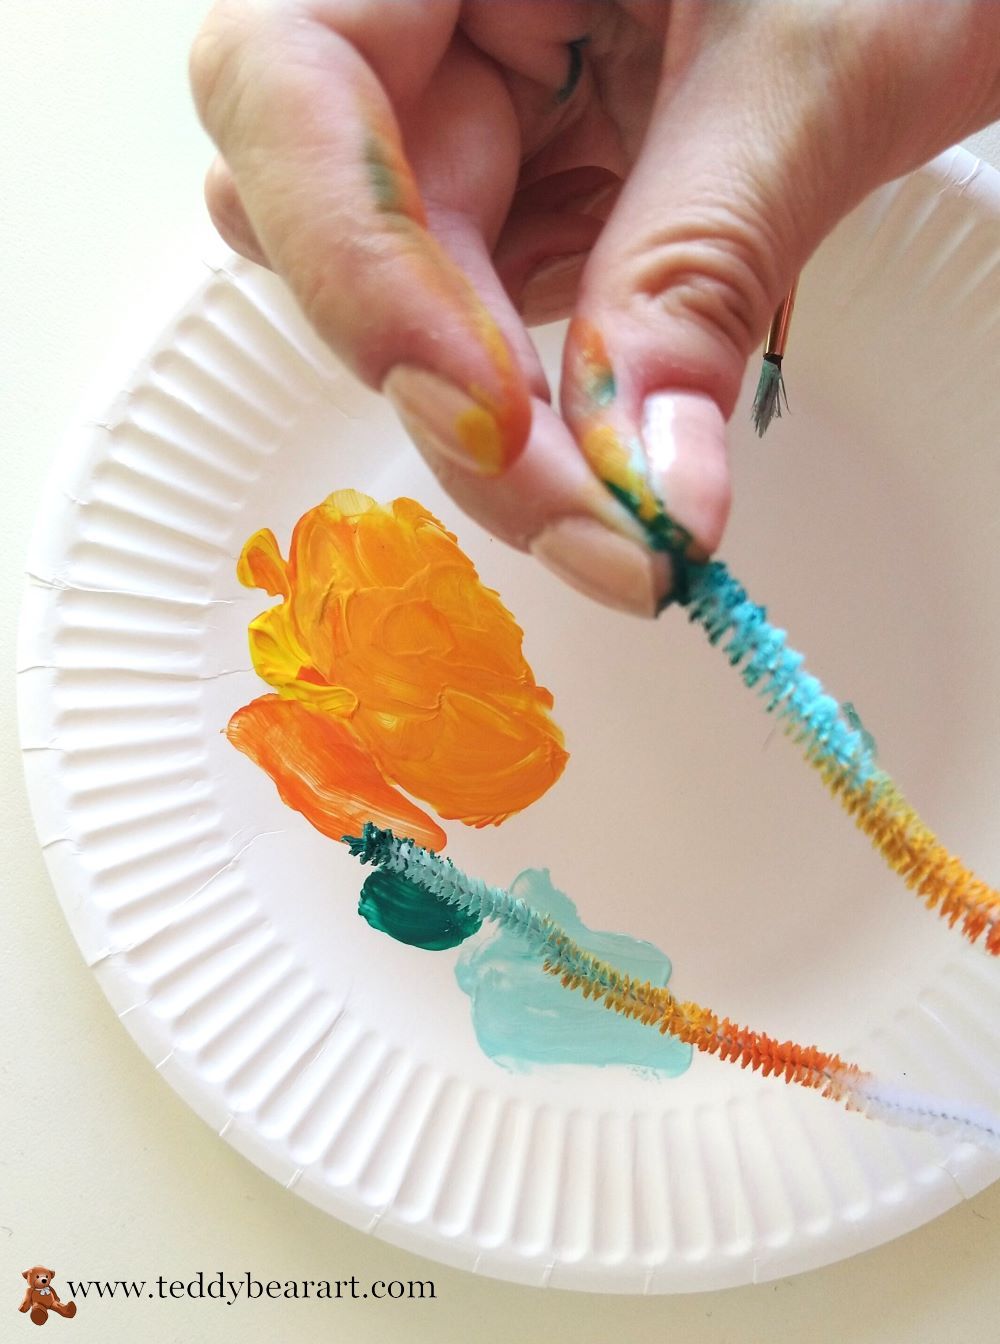
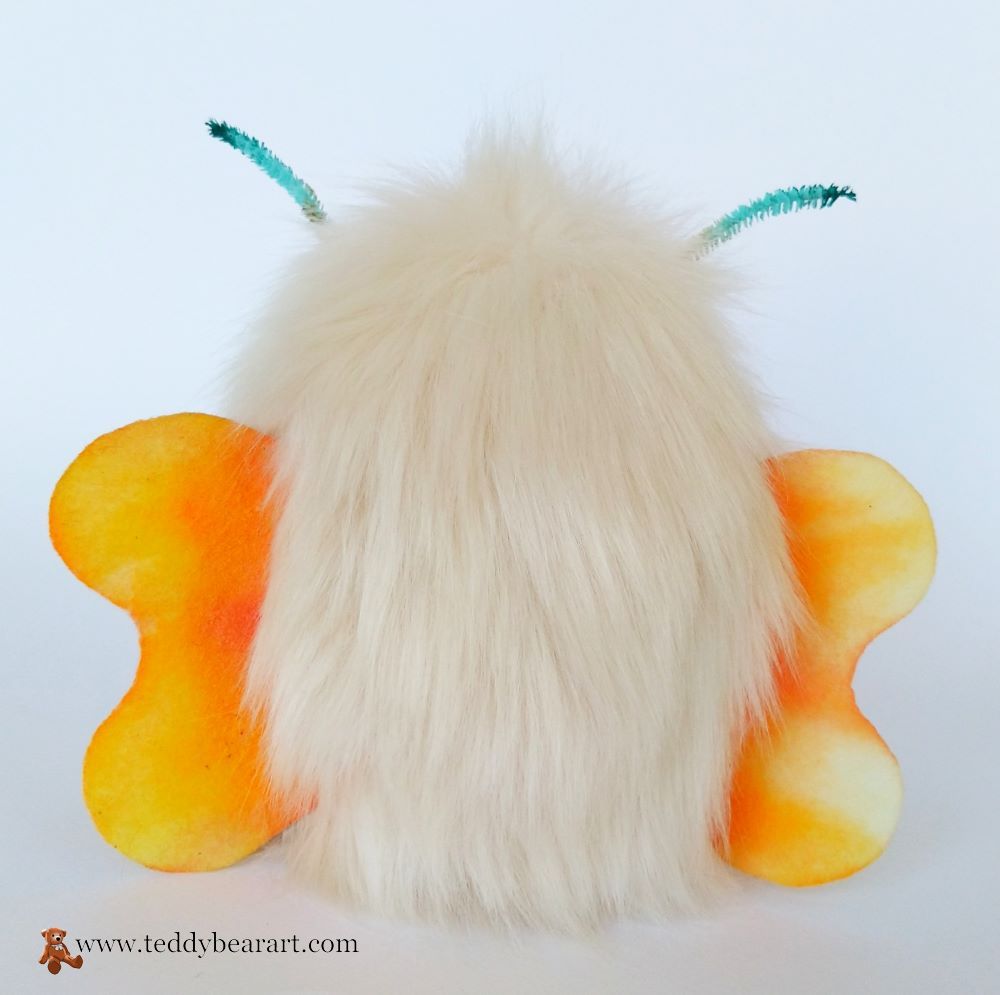
To create the antennas, you will need chenille wire and acrylic paints. It’s even easier than with the limbs. Paint the wire any color you want and let it dry.
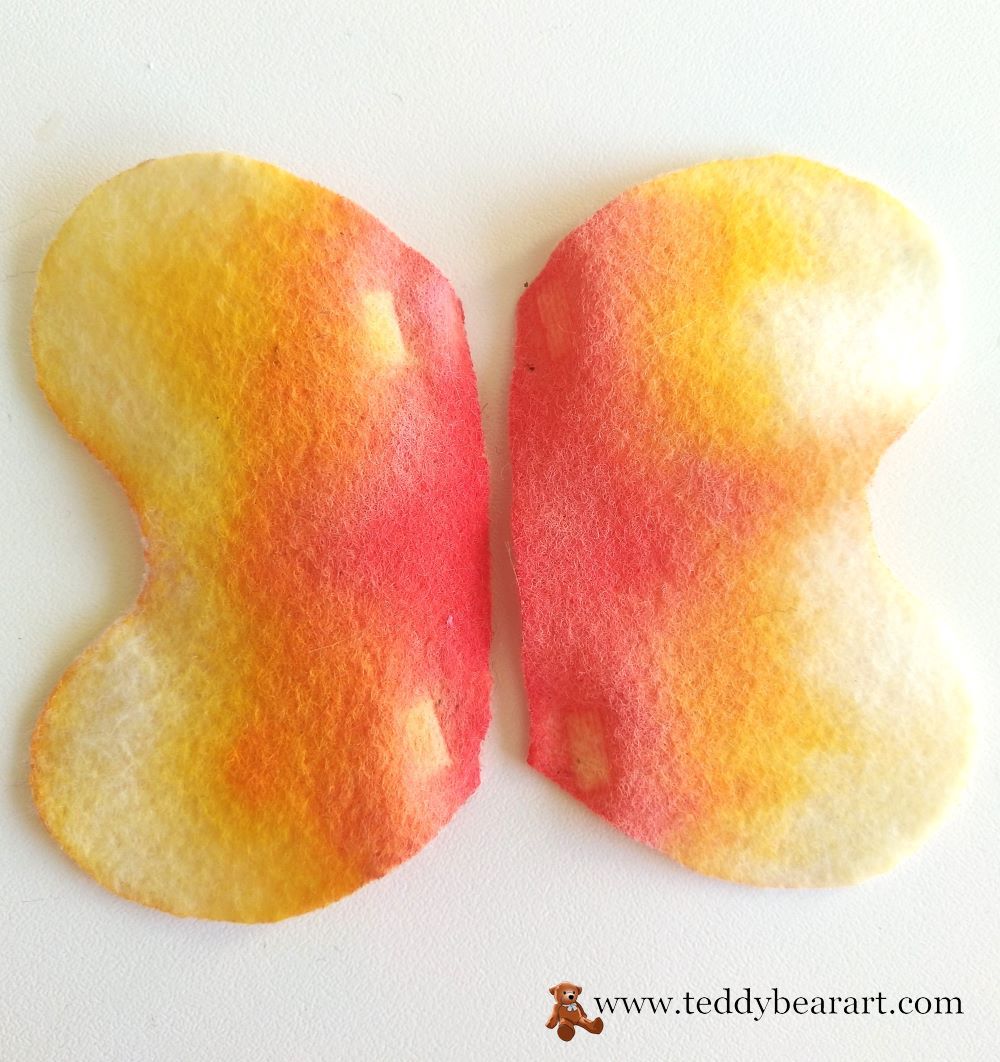
Now let’s move on to the wings. There are different ways to create wings, but for this monster, I took a piece of white felt and painted it with acrylic paint.
How To Attach Limbs, Antennas, And Wings To The Body?
Use pins to mark where you want to attach the limbs and antennae.
Take an awl and carefully make a hole in the body of the monster, as if pushing the threads apart. My pile is so thick, and the base is so dense that I had to use scissors in addition to the awl.
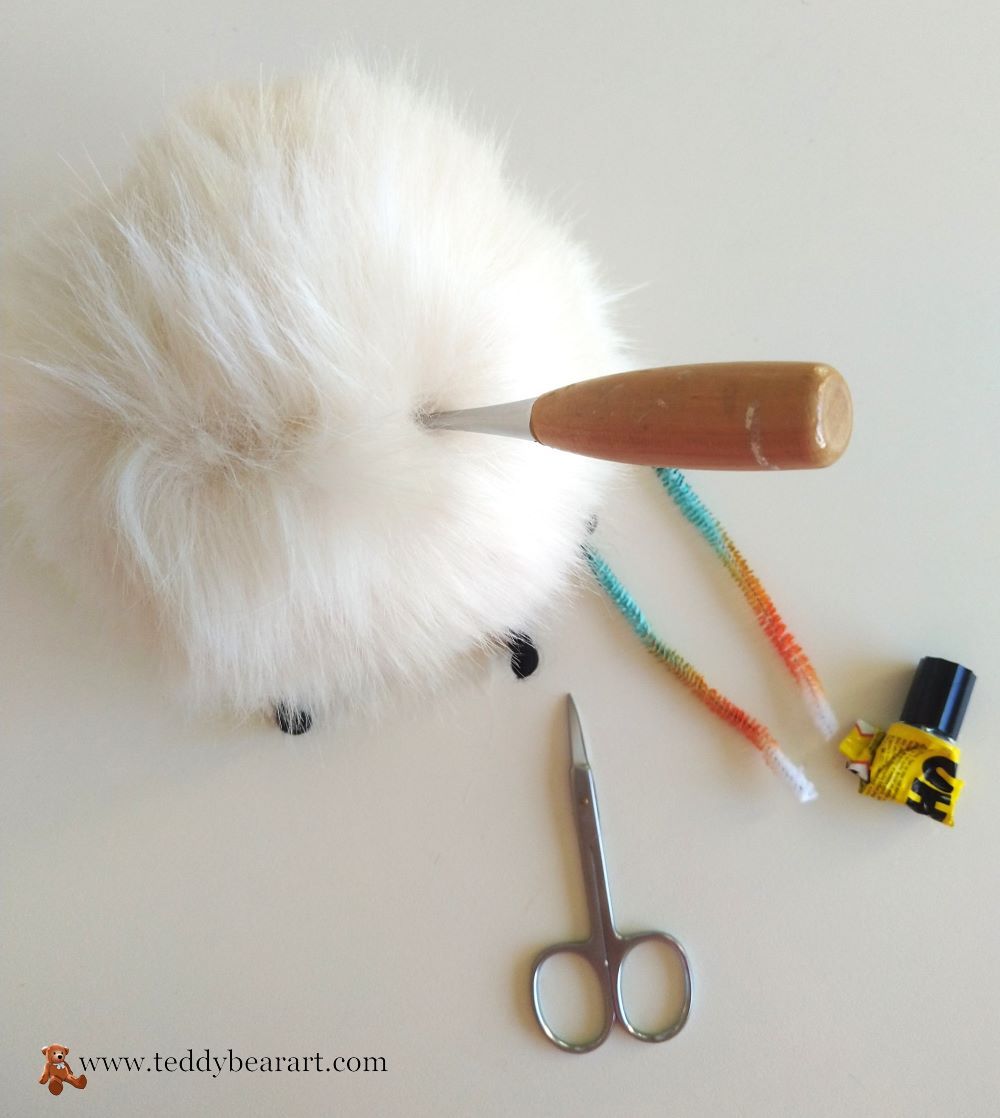
I carefully cut out the hole. Don’t be afraid to mess things up.
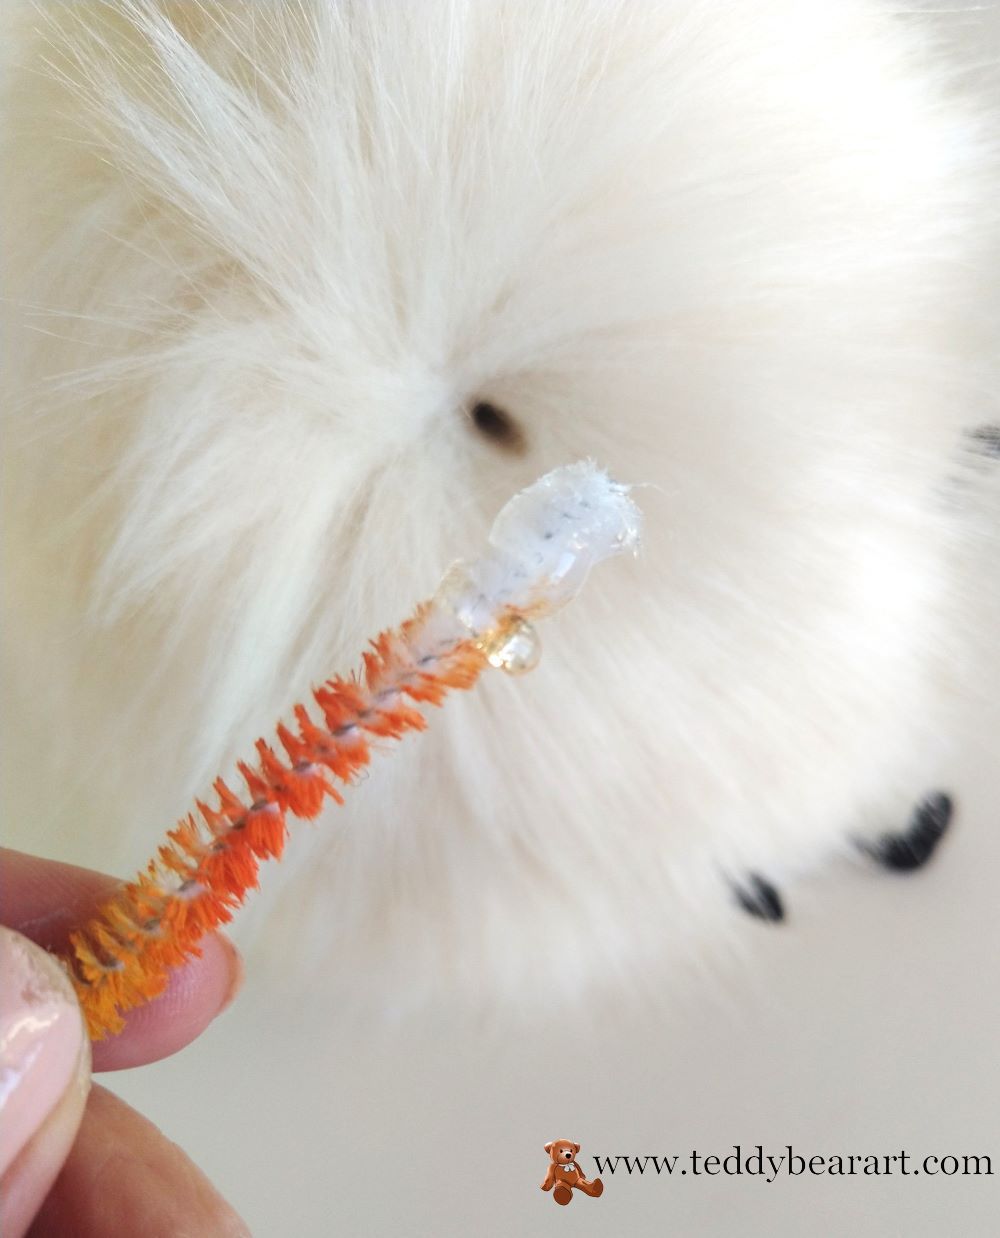
Then apply enough UHU glue to the limbs and antennae and insert them into the hole. The glue will not only stick to the monster’s foot but also help to ensure that the threads do not diverge.
Well, the limbs and antennae are ready; now it remains only to sew on the wings and hide the ends of the threads inside of the body.
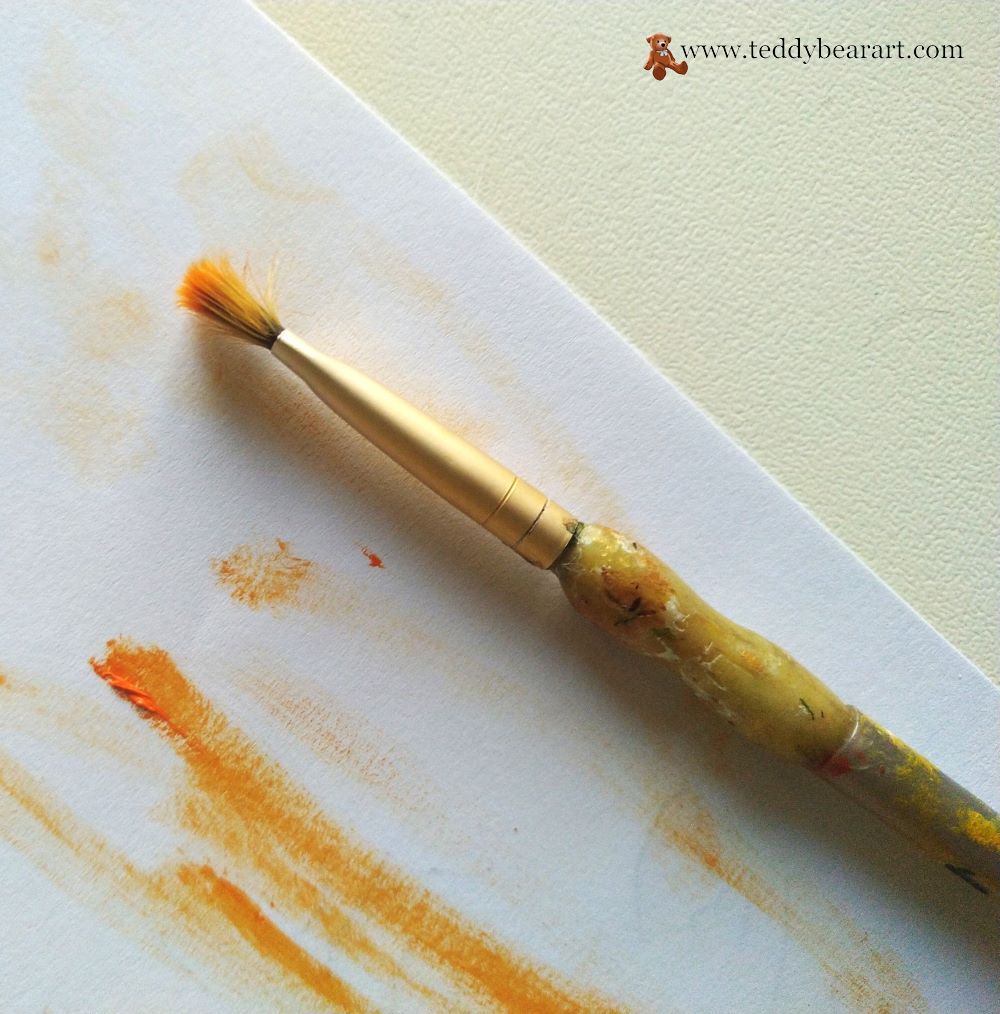
So, the last step remains – this is tinting.
Take a sheet of white paper, orange oil paint, and a brush. Put some paint on the brush, and then gently rub it on the paper.
Wipe the brush until you see only a faint, barely noticeable yellowish tint on the sheet of paper.
Now shade the area around the eye.
Do the same with the brown color. Apply as close to the eyes as possible for a brown-to-yellow transition.
The mouth is tinted in the same way. First, a little yellow, then a little brown at the corners of the mouth to accentuate the smile.
The oil paint needs some time to dry. Leave your creation for a few days and then take a photo shooting.
Life hack number 1: if you go too far with paint, immediately wipe it off with a damp baby wipe.
Life hack number 2: brushes after oil paint can be easily washed by placing them in laundry detergent for a while, and then rinsing them with some running water. You do not need to buy a special brush cleaner.
Life hack number 3: If you need to stop working for a while, wrap the brushes tightly with cling film to prevent air from getting in. Or put them in a glass of vegetable oil. This way, you won’t ruin your brushes.
Conclusion
Congratulations! Now you have all the necessities to make your own cute one-eyed monster. You have the pattern and the list of materials. You know how to make a body and a face, how to make the limbs, antennas, and wings, and how to attach them. Also, you know some life hacks, and you have my support!
I hope you enjoy making this monster.
Feel free to sell it if you wish; it will be very pleasant for me if you indicate my name or this website.
If you ever need a hand or have any questions, feel free to leave them in the comments below, and I will be more than happy to help you out.
Get Free Patterns & Be the First to Know!
Want free teddy bear patterns, exclusive tutorials, and a chance to win craft supplies?
Sign up for our newsletter using the subscribe form in the middle of this article to receive new patterns, insider tips, and the latest news on teddy bear art. You’ll also automatically be entered into our annual giveaway for a chance to win teddy bear crafting materials.
Bonus entry: Save one of our pins on Pinterest to increase your chances of winning!
Let’s create, inspire, and craft beautiful teddy bears together!