Welcome to the world of DIY crafting, where creativity knows no bounds. If you’re an intermediate crafter ready to elevate your skills, our “DIY: Teddy Guinea Pig Sewing Pattern” is just the project to embark on. The joy of bringing a plush teddy guinea pig to life with your own hands is unmatched, and this intermediate-level pattern is the perfect challenge for those seeking a bit more complexity in their crafting journey.
This article provides not only a free pattern but a step-by-step guide to sewing and personalizing a guinea pig. Additionally, we covered troubleshooting questions and provided tips for success.
The Charm of Teddy Guinea Pigs
Teddy guinea pigs possess a unique charm that makes them irresistible. Their cuddly nature and endearing features make them a delightful addition to any collection. When you craft one yourself, you infuse it with a personal touch that mass-produced toys simply can’t match.
Overview of the Sewing Pattern
Our intermediate-level sewing pattern is carefully designed to offer a challenge without overwhelming crafters. This pattern introduces techniques that go beyond the basics, allowing you to create a teddy guinea pig that reflects your growing skill set. Let’s dive into the details of this enchanting project.
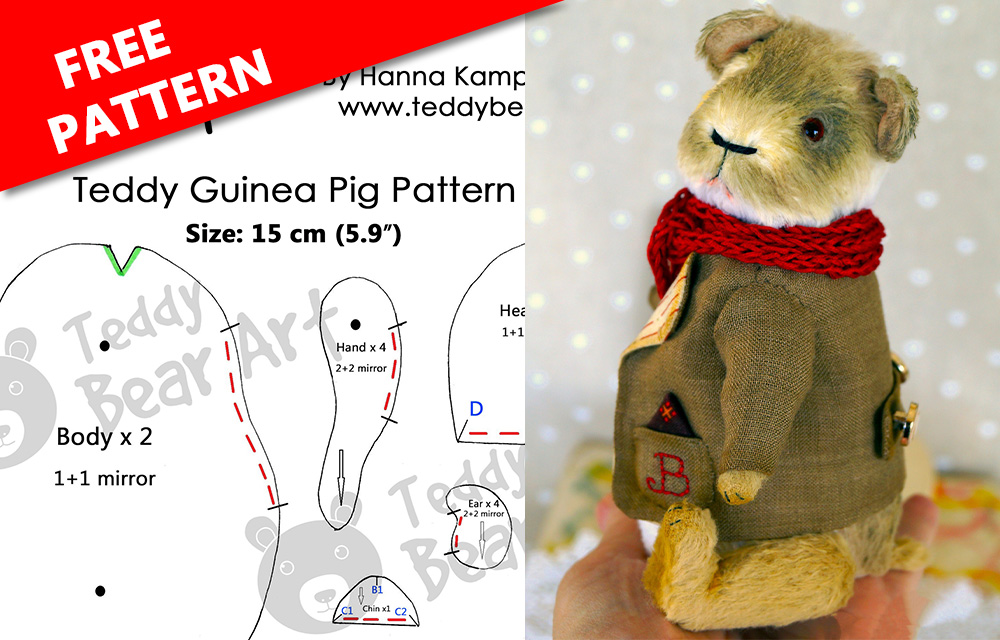
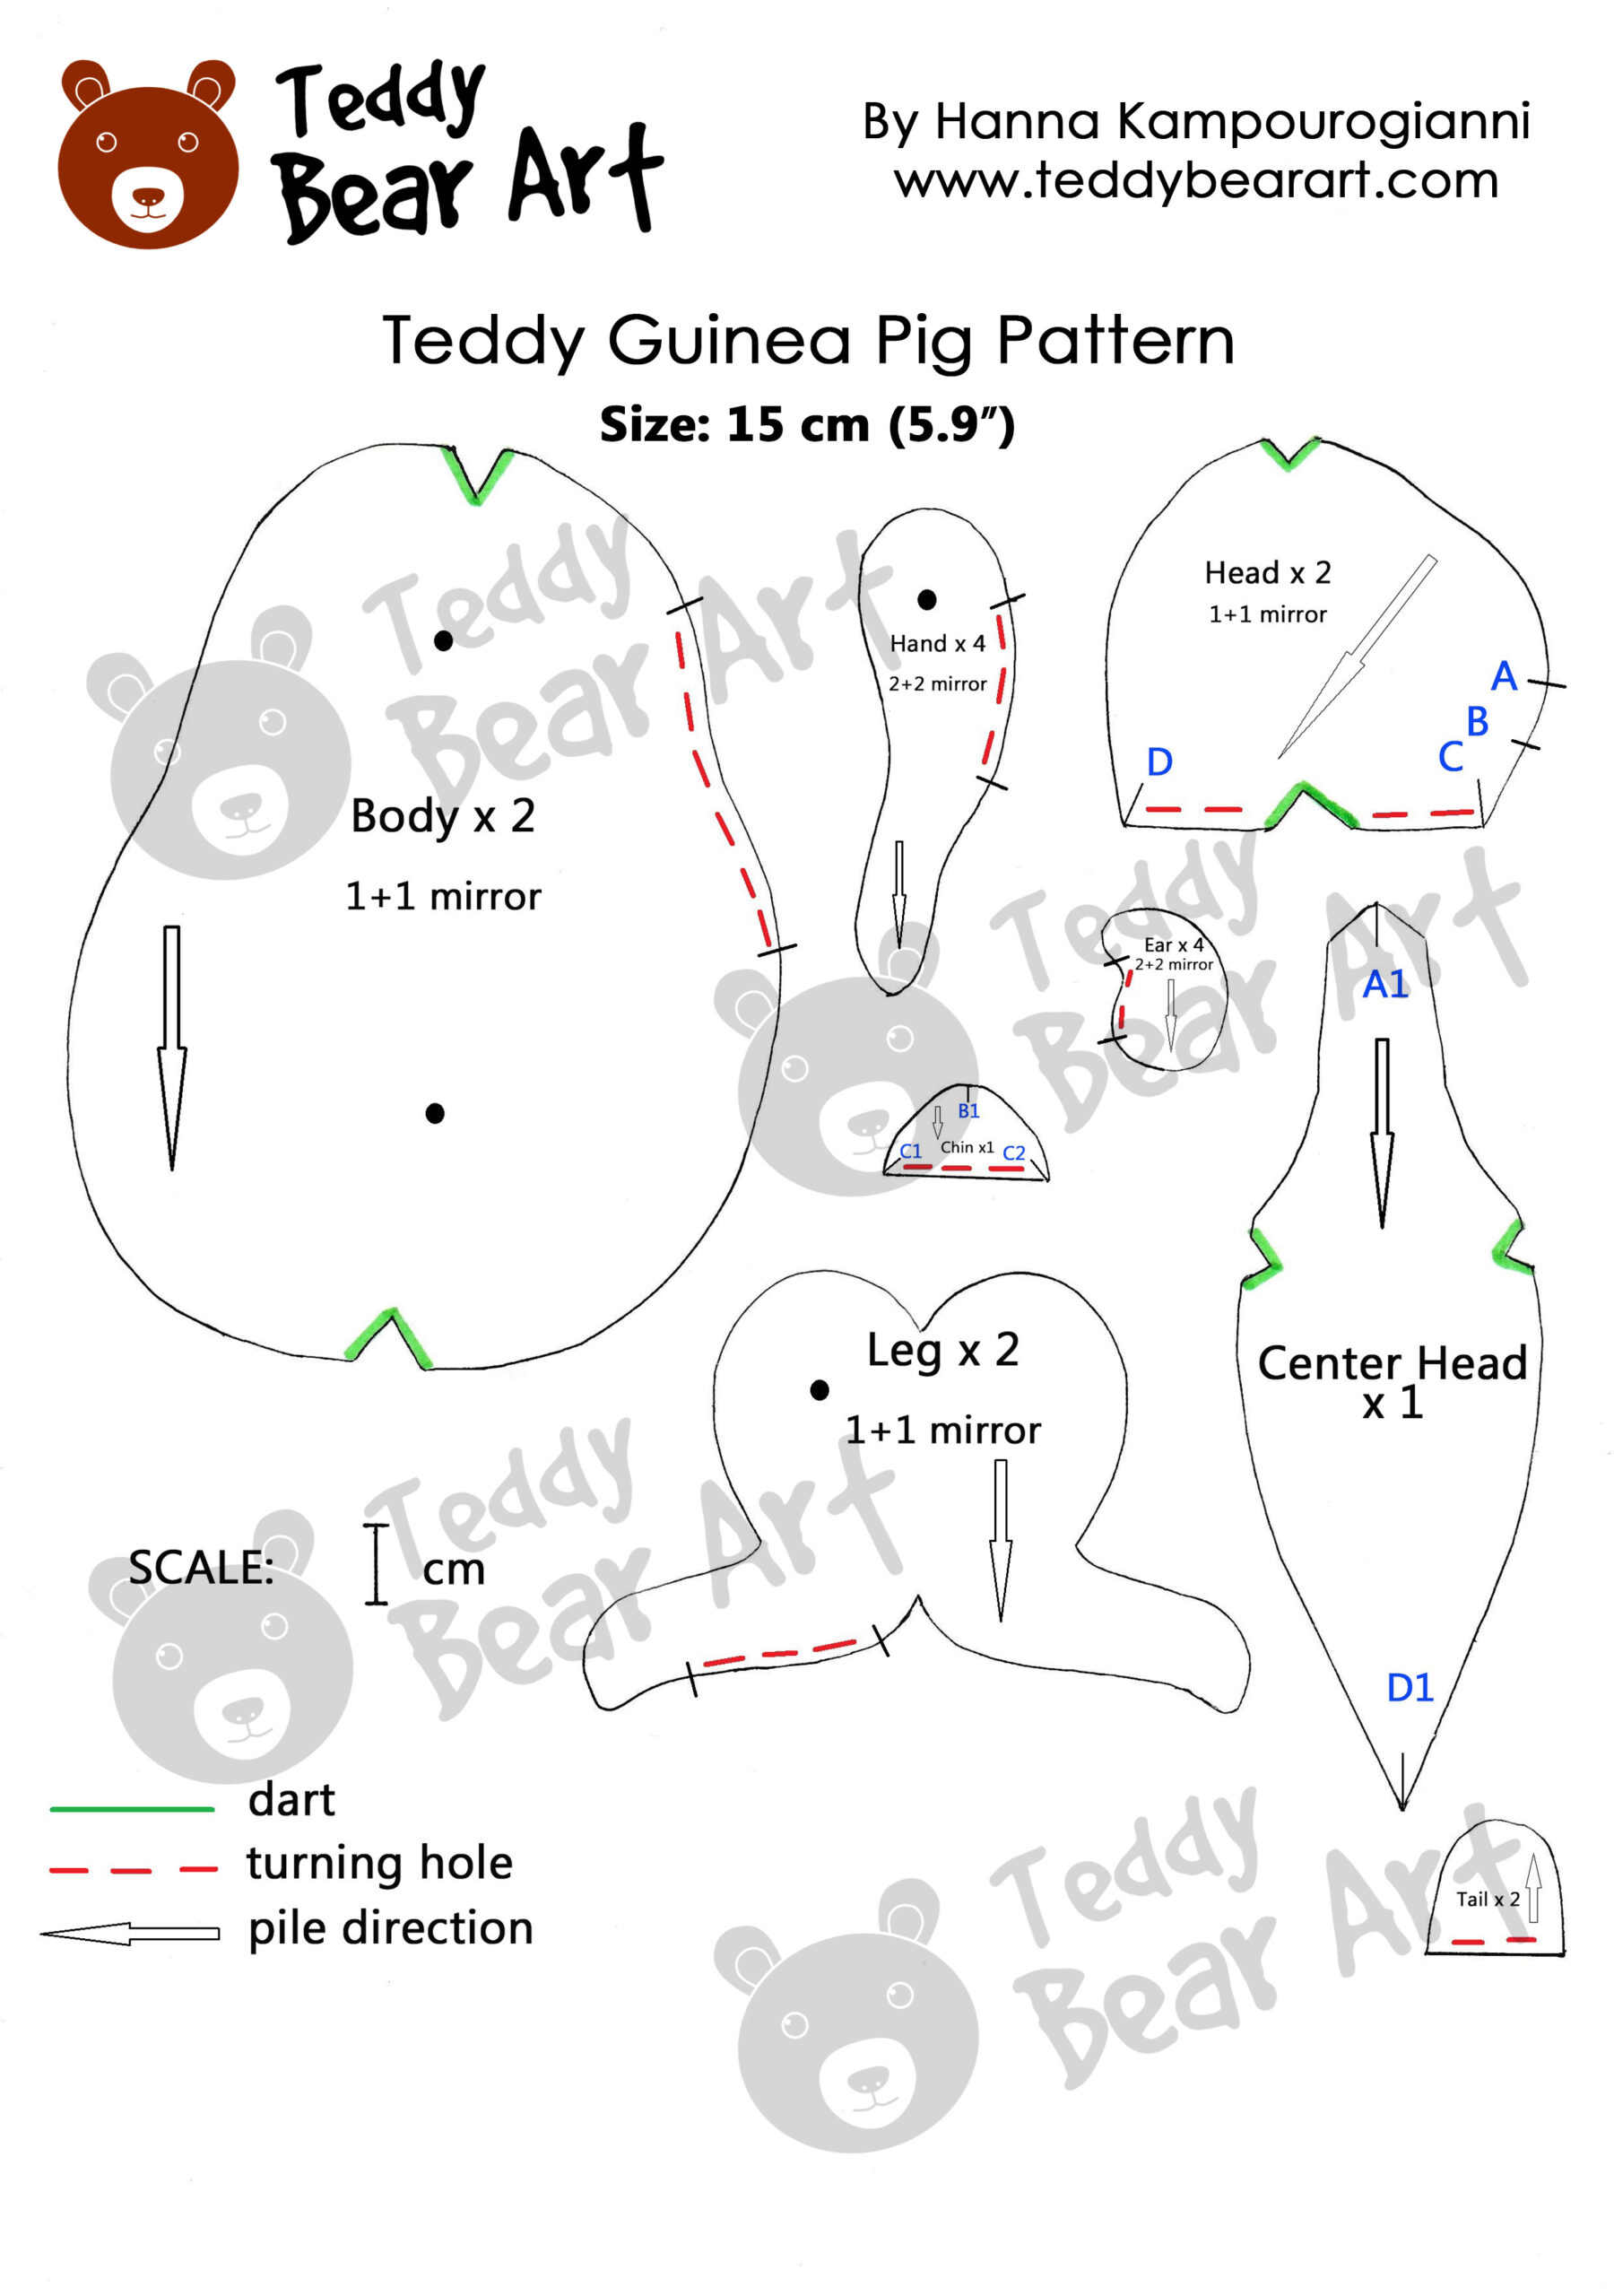
Downloading the Guinea Pig Pattern
- From a computer (Windows).
Click on the photo of the pattern you see below. In the new tab that will open, you press the right mouse button and select the “Save image as …” option. Then you choose where you want the image to be saved on your computer. - From a phone or a tablet (Android). There should be something similar for mobile devices with Android or iOS.
Click on the image. Save it by holding your finger on the image and selecting the “Save Image” option. Then go to your photo gallery and print it (there is an option).
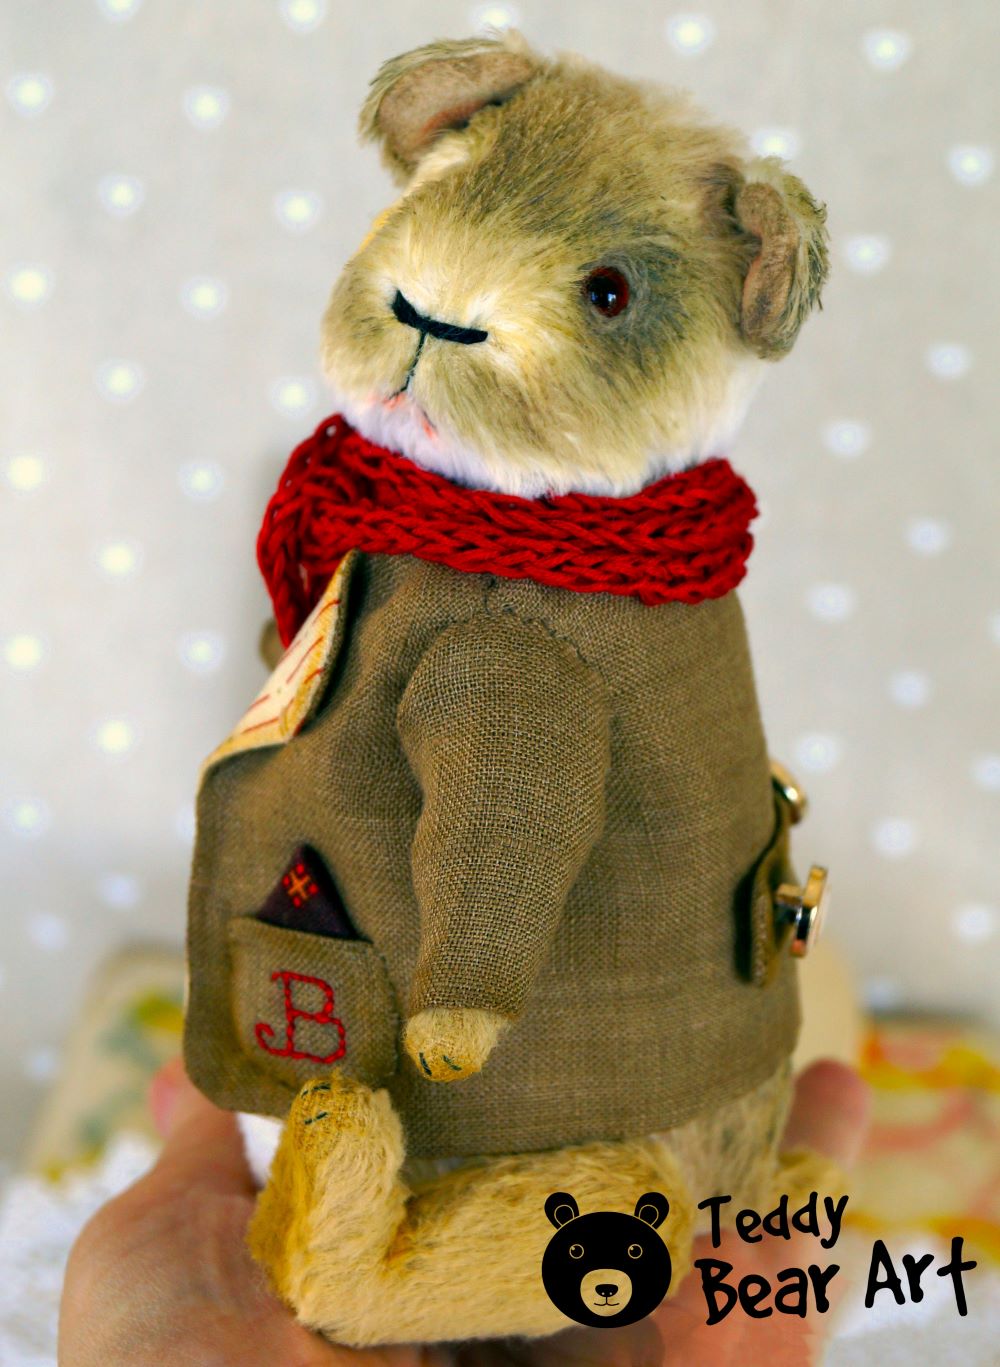
Download a free pattern on sewing a blazer for this guinea pig and read a step-by-step guide on making it.
Materials Needed
Before you start stitching, gather the following materials for a seamless crafting experience:
- High-quality plush fabric
- Sturdy sewing thread in matching colors
- Scissors
- Sewing machine or needles for hand-sewing
- Soft stuffing material for the perfect huggable finish
Now, let’s explore the detailed list of materials:
- A piece of white viscose Steiff Schulte with a pile length of 6 mm for the head and the body and a piece of the same brand viscose of the other color you like.
- Strong threads and a needle for hand sewing.
- A pair of brown glass eyes on a metal loop approx. 6-8 mm in diameter.
- Waxed thread.
- Metal pellets or glass pellets for weight.
- Long needle.
- Scissors.
- Sheep wool and needles for felting.
- Floss threads.
- A piece of thin stretch fabric for the inner parts of the ears.
- Discs: 12 mm in diameter – 6 pieces for the head and the hands, 18 mm – 4 pieces for the legs.
- Washers: 12 mm in diameter – 10 pieces.
- T-shaped cotter pins 2,0×20 – 3 pieces, 1.6×20 – 2 pieces.
- Synthetic filler.
- Oil paint and paintbrushes.
- Pliers.
- An awl.
Step-by-Step Sewing Instructions
Embark on the enchanting journey of bringing your teddy guinea pig to life with our intermediate-level sewing pattern. Follow these step-by-step instructions for a crafting experience that blends precision with creativity.
Step 1: Preparing the Pattern
- Begin by carefully cutting out the pattern pieces from the provided template. Leave 5-7 mm around the edges. Attention to detail at this stage ensures a snug fit for your teddy guinea pig.
Step 2: Sewing the Pieces Together
- Sew all the darts (highlighted in green).
- Sew the two mirror parts of the head along points from A to B.
- Sew the center head along points A-A1 to D-D1.
- Sew the chin along points B-B1 to C-C1 and C-C2.
- Sew the body.
- Sew the limbs.
- Sew the tail.
- Sew the ears.
Step 3: Stuffing
- Gently stuff the head of your Guinea Pig with the hypoallergenic filling until it reaches your desired level of cuddliness. It is recommended to stuff the head tightly enough, but so that the eye sockets can be tightened.
- Insert discs and joins inside of the limbs and the head, stuff them, and sew up the holes.
- Take out all the piles from the seams.
Step 4: Adding Facial Features
- Sculpt the guinea pig’s face by tying the eye sockets with waxed thread.
- Insert the eyes.
- Create the needle-felted eyelids.
- Embroider the nose and mouth with floss threads.
- Trim off some pile to shape the limbs.
- Tint the guinea pig’s face, ears, limbs, and the back of the body. leave the belly to be white.
- Leave all the body parts to dry.
- Embroider the fingers.
Step 5: Jointing Your Guinea Pig
- Sew up the ears to the head.
- Attach the head to the body.
- Attach the limbs.
- Add weight, stuff the body, and carefully hand-sew the opening shut using a ladder stitch. This will create an invisible seam for a polished look.
- Sew up the tail.
As you navigate through each step, take your time to appreciate the evolving charm of your handmade creation. The journey of crafting a teddy guinea pig is not just about the destination but the joy found in every stitch.
Additional Customization Ideas
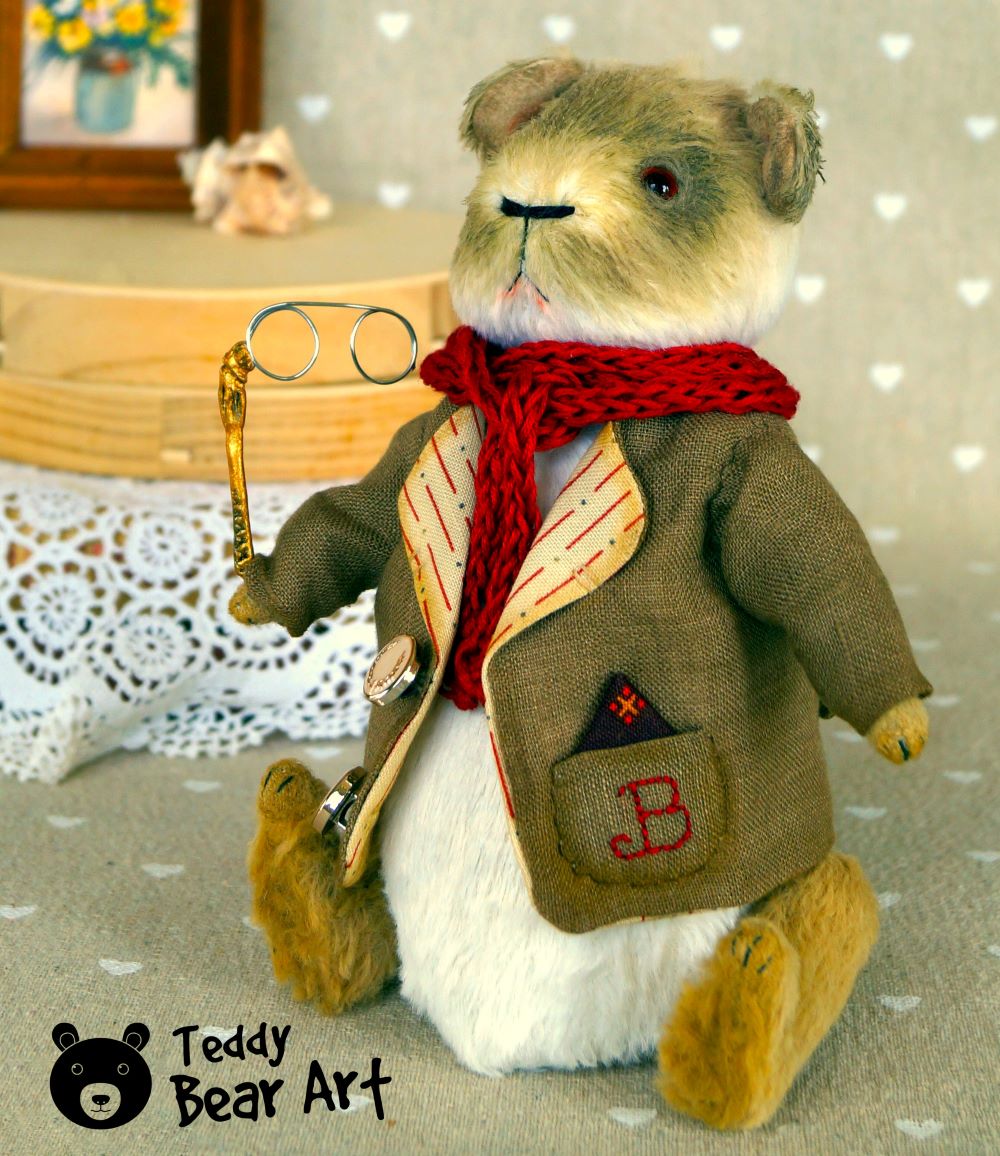
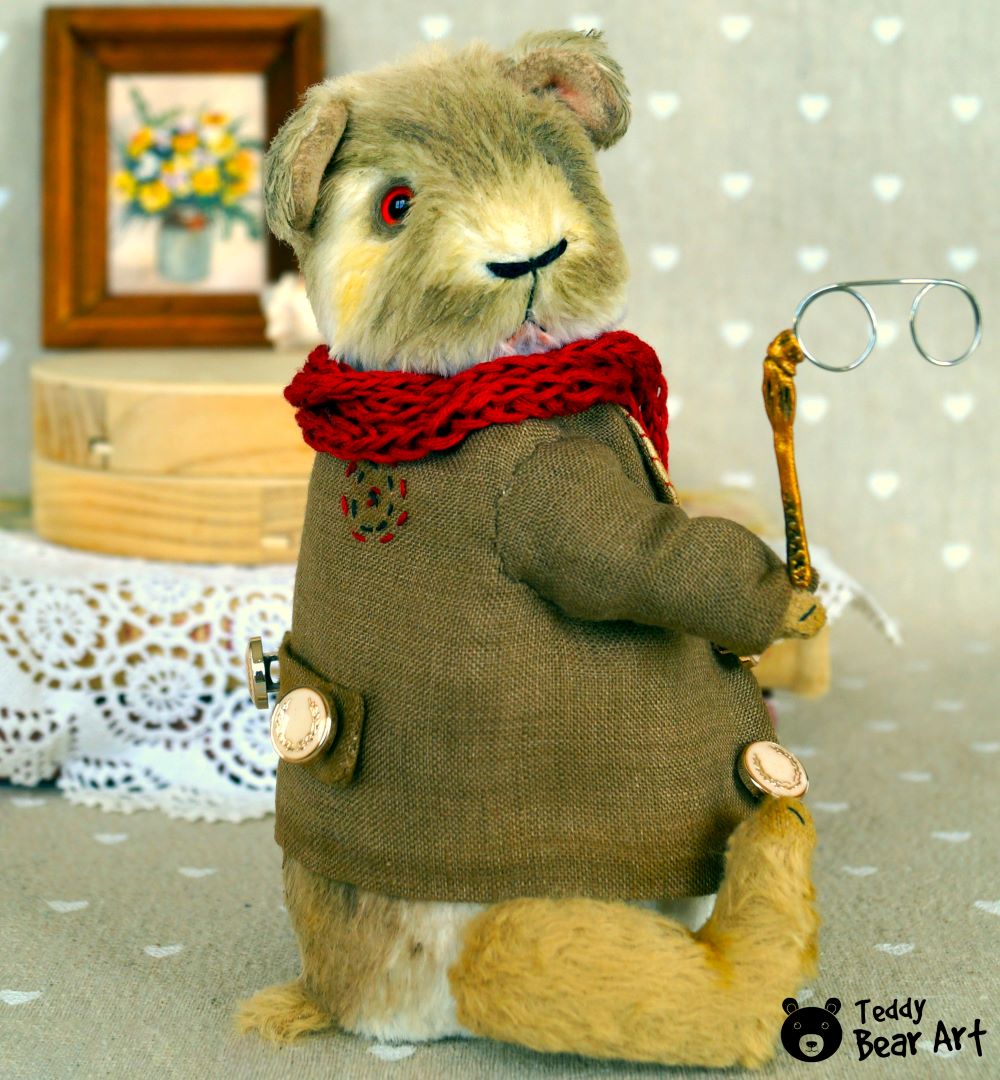
Elevate your teddy guinea pig crafting experience with these delightful customization ideas. Beyond the basic pattern, personalize your creation to make it uniquely yours. Experiment with a palette of vibrant colors, turning your guinea pig into a lively and expressive companion.
Take it a step further by crafting tiny accessories—think miniature crochet scarves or bowties—to add character and charm. Sew the outfit for your teddy guinea pig.
The beauty of handmade creations lies in the ability to infuse your personality into every stitch. Explore these customization options, and watch as your teddy guinea pig becomes a one-of-a-kind masterpiece, capturing the essence of your creative spirit.
Troubleshooting and Tips for Success
- Choose realistic shades of viscose to create a realistic guinea pig.
- If this is your first time tinting with oil paints, practice first. Remember that before tinting, the paint should be wiped off as thoroughly as possible. The brush must be completely dry. When testing, a barely visible trace of paint should remain on a white sheet of paper.
- If you don’t have wool or don’t know the felting technique, then the eyelids can be made from pieces of felt fabric, carefully gluing them.
- The ear pattern is very small, so it is difficult to turn the ears out. If you don’t have thin stretch fabric for the inner parts of the ears, then simply change the ear pattern, making it a different shape so that the ear can be turned out.
- When you sew the ears to the head, and they are not yet adjacent to the head, sew them additionally from the bottom.
- The size of the holes in the discs may vary among different manufacturers. Therefore, if the cotter pin does not fit, the disc hole can be widened using an awl or small scissors.
- When shading your guinea pig’s legs, be sure to add shadow where the leg is bent, not just the paws.
Before You Go
In this article, we have provided you with a free guinea pig teddy pattern, a step-by-step guide to sewing and personalizing your guinea pig. We’ve also covered troubleshooting questions and provided tips for success.
Embarking on an intermediate-level crafting project is a rewarding endeavor, and our “DIY: Teddy Guinea Pig Sewing Pattern” is designed to guide you through each step. The sense of achievement that comes with creating a personalized, handmade teddy guinea pig is unparalleled. So, gather your materials, embrace the challenge, and let your creativity flourish.
Additional Resources
- Explore Lifelike Stuffed Guinea Pig Pattern: In this comprehensive guide, we’ll explore every step of the process, from selecting the perfect materials to adding those charming guinea pig features. By the end of this article, you’ll be well-equipped to craft your own adorable guinea pig companion.
- Crafting Tips and Tutorials: Explore our blog for a plethora of crafting tips, tutorials, and inspiration to fuel your creative spirit.
Whether you’re in search of diverse crafting patterns, a welcoming community, troubleshooting tips, or top-notch supplies, we’ve got you sorted with these supplementary resources. Brace yourself for an even more thrilling and fulfilling crafting journey ahead!
If you ever need a hand or have any questions, feel free to leave them in the comments below, and I will be more than happy to help you out.
Get Free Patterns & Be the First to Know!
Want free teddy bear patterns, exclusive tutorials, and a chance to win craft supplies?
Sign up for our newsletter using the subscribe form in the middle of this article to receive new patterns, insider tips, and the latest news on teddy bear art. You’ll also automatically be entered into our annual giveaway for a chance to win teddy bear crafting materials.
Bonus entry: Save one of our pins on Pinterest to increase your chances of winning!
Let’s create, inspire, and craft beautiful teddy bears together!
What a fun website you have. It really is laid out perfectly for the DIY craft niche. I absolutely love crafting, and your instructions are clear and easy to follow. I fell in love with this guinea pig and decided to make it. I love the number of images you have as I learn better with images instead of just reading alone. The process is very step-by-step which is great, and I love the troubleshooting section because problems always seem to arise and it’s nice to know I won’t have to look for a solution elsewhere! Great post!
Hey there! Thanks a bunch for your awesome comment! 🐻✨ I’m thrilled to hear you enjoyed the guinea pig tutorial and found the layout user-friendly. Crafting should be fun and stress-free, right? 😊 If you ever need more patterns or run into any hiccups, I’m here to help. Happy crafting! 🧵
Hey, thank you for this post!
It was certainly interesting reading this post despite my not knowing how to construct such a masterpiece. Since I do sometimes have a bunch of spare time at hand where I am not sure what to do I guess I can try giving this a go but of course with the helping hand of my neighbor who I shall tell you is an expert at crafts!
She will certainly enjoy reading this!
Thanks again and have a great day!
Hey there! 🐻 Thanks a bunch for your kind words! I’m thrilled to hear that you found the post interesting. It’s awesome that you’re considering giving it a shot and having your crafty neighbor onboard sounds like a fantastic plan! Teamwork makes the teddy dream work, right? 😄 Wishing you and your neighbor lots of fun on this creative adventure. If you ever have questions or need tips, feel free to reach out. Have a fantastic day filled with teddy bear magic!