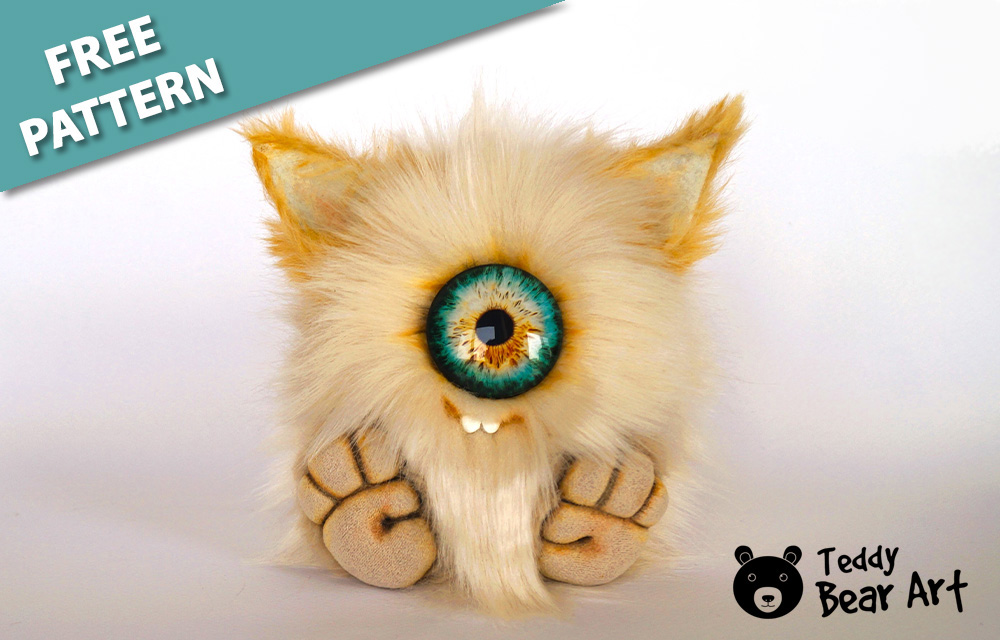
If you’re an experienced toy maker, you’re in for a treat! In this post, we’re excited to share a free cute Cyclops sewing pattern to help you craft a unique and charming plush toy. This pattern is designed specifically for masters who create collectible toys, offering a delightful addition to any plush toy collection. Follow along as we guide you through creating this adorable Cyclops plush toy.
About the Free Cute Cyclops Sewing Pattern
Our free cute cyclops sewing pattern is designed to be charming and accessible, making it a fun project for toy makers with medium-level skills. While the pattern is easy to follow, it does require some extra materials to ensure the best results.
The detailed instructions and additional materials list will help you create a unique and delightful Cyclops plush toy that is perfect for any collection.
Download the Free Cute Cyclops Sewing Pattern
- From a computer (Windows). Click on the photo of the pattern you see below. In the new tab that will open, you press the right mouse button and select the “Save image as …” option. Then you choose where you want the image to be saved on your computer.
- From a phone or a tablet (Android). There should be something similar for mobile devices with Android or iOS.
Click on the image. Save it by holding your finger on the image and selecting the “Save Image” option. Then go to your photo gallery and print it (there is an option).
Materials Needed
To ensure your Cyclops plush toy turns out perfectly, gather the following materials:
- A piece of faux fur 20×20 with a pile of length 5.5 cm for the body
- A small piece of faux fur fabric for the ears and the tail with a pile of length 1.5 cm
- A small piece of faux fur fabric for the paws with a pile of length 1 cm
- A piece of felt fabric
- A piece of thin, highly stretchable fabric
- A glass eye – 4 cm in diameter
- Strong threads, the same color as your fur, and a needle for hand-sewing
- A long needle (10 cm – 15 cm) for setting the eye
- Waxed thread or extra strong threads
- Scissors
- An awl
- Synthetic filler
- Metal or glass pellets for the weight
- Oil paints (orange, brown, black, pink)
- Strong glue UHU
- Modeling clay
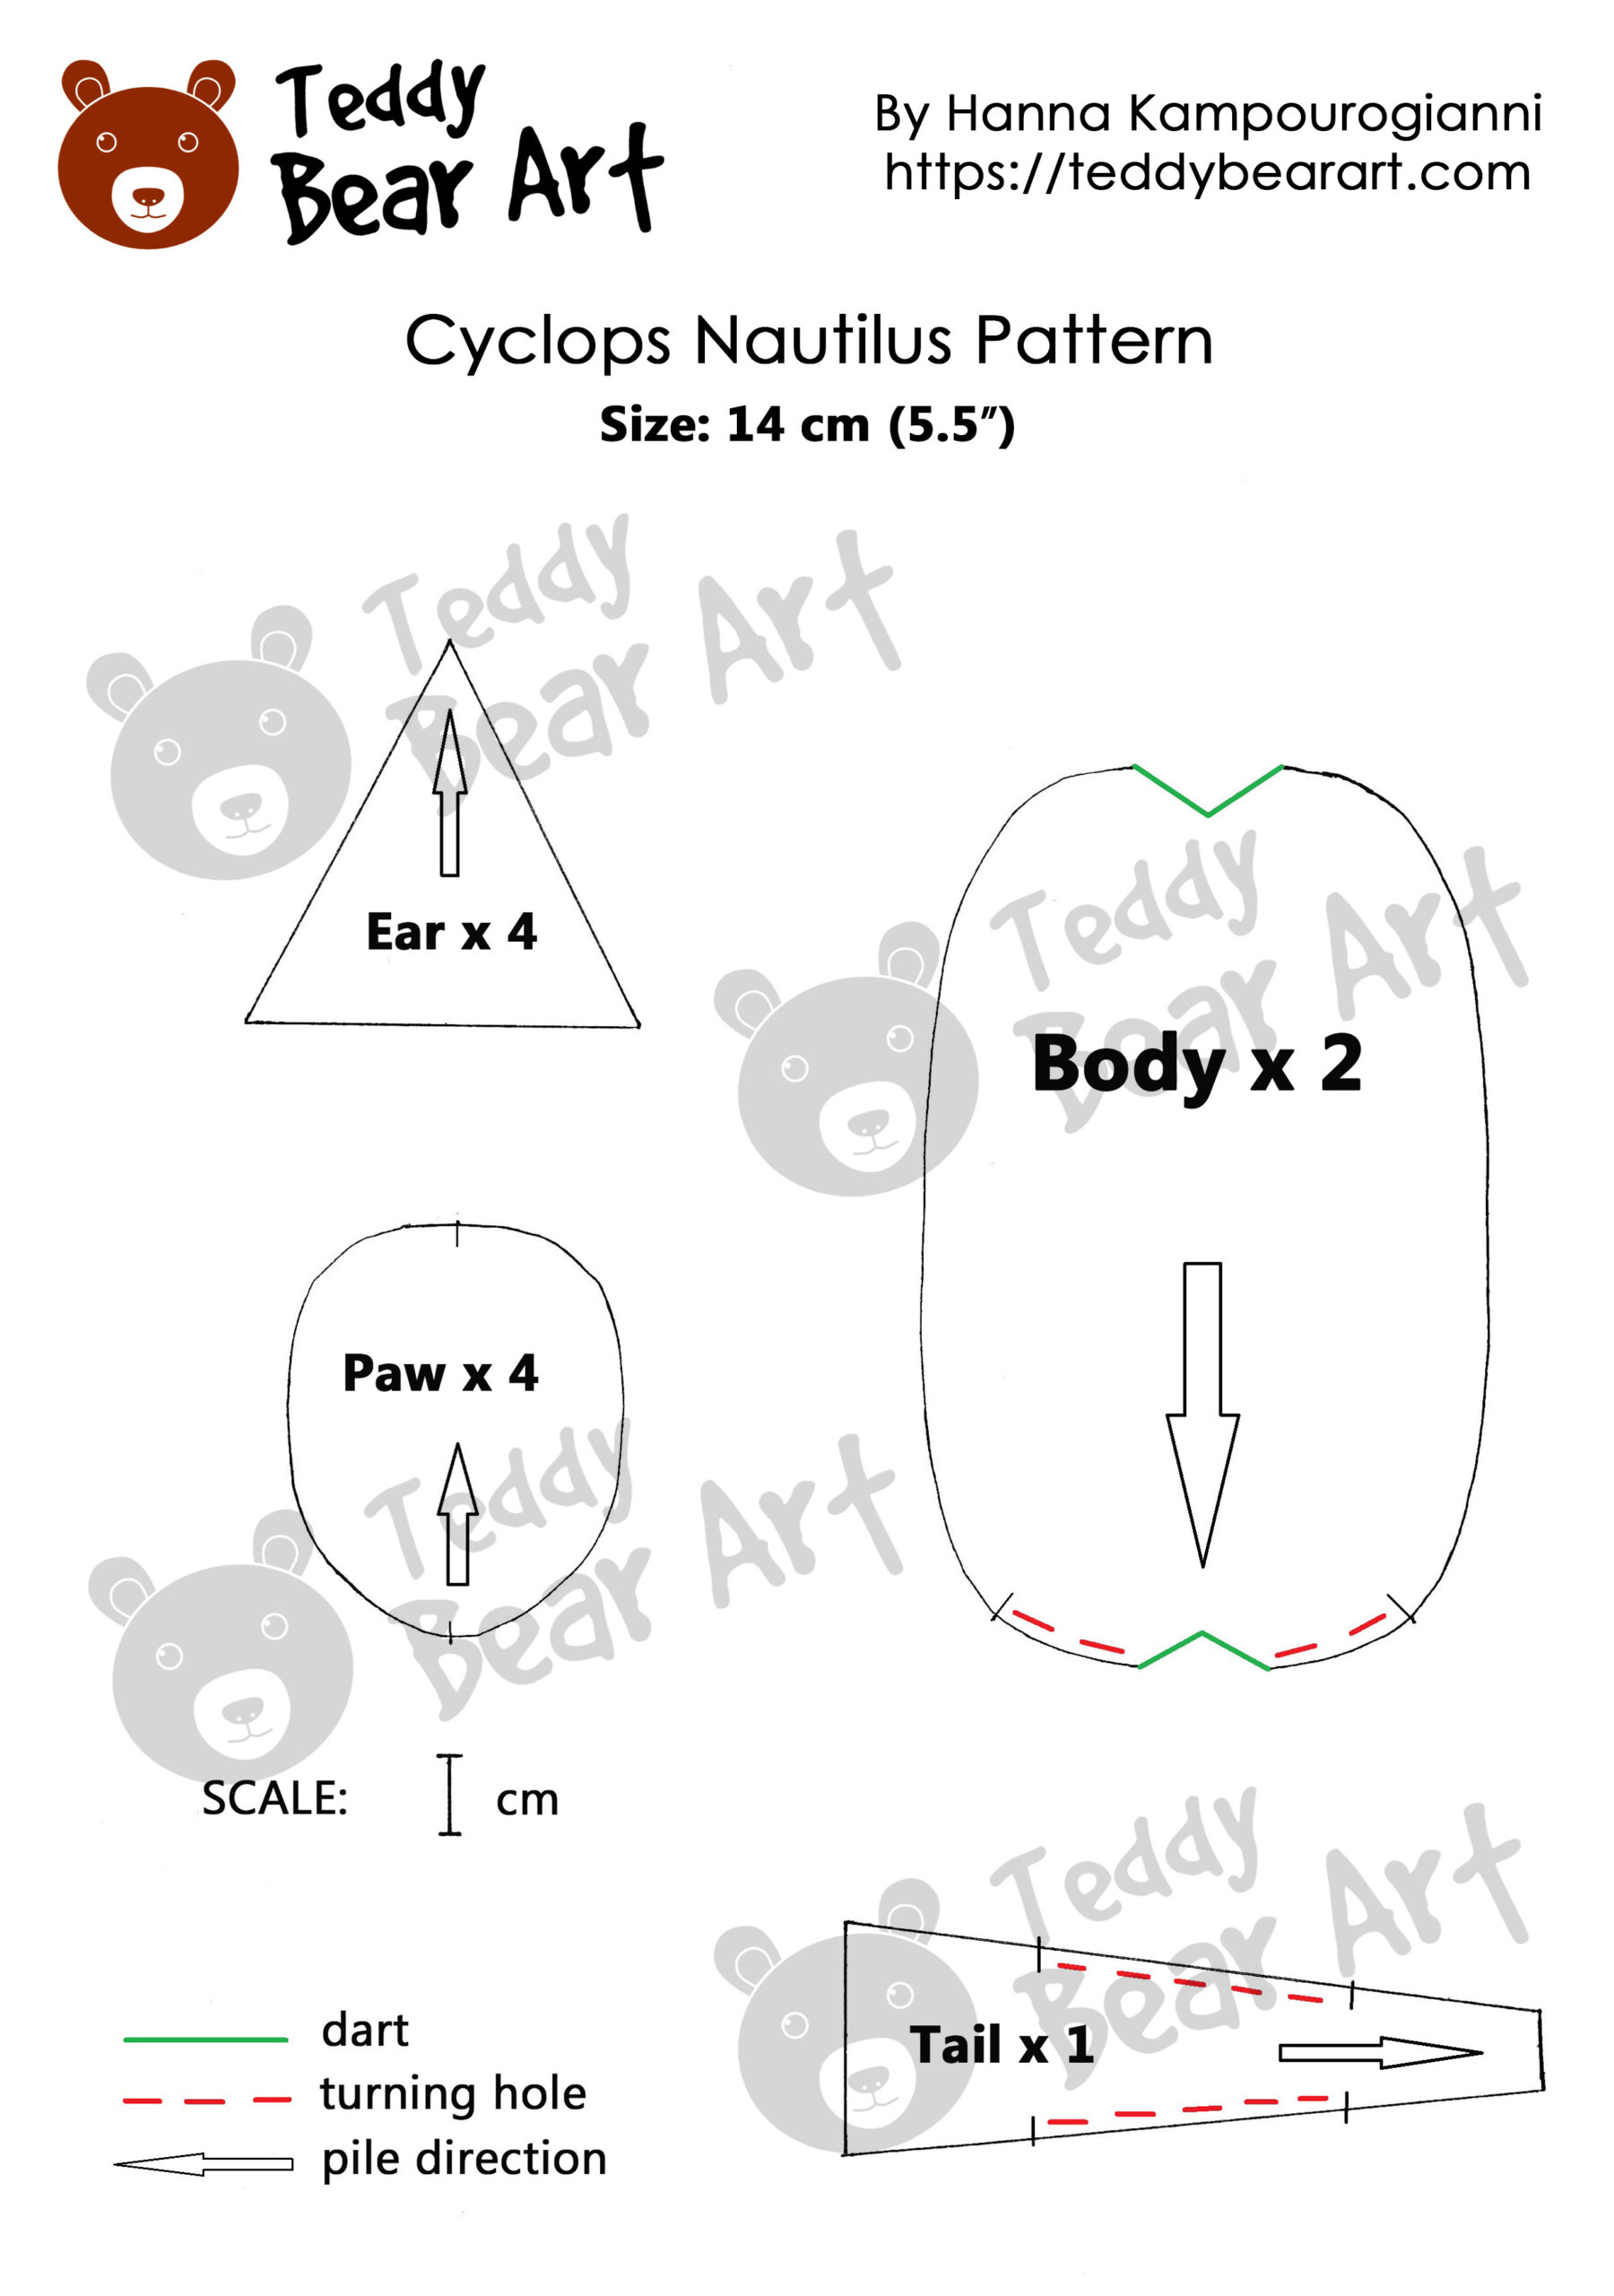
Step-by-Step Sewing Instructions
When working with this pattern, make sure to include seam allowances when cutting out the pieces.
Sewing the Body Pieces Together
- Pin and Sew: Align the body pieces with the right sides facing each other. Pin them together and sew around the edges, leaving an opening for stuffing.
- Turn and Stuff: Turn the body right side out through the opening. Use a stuffing tool to fill the body evenly with polyester fiberfill. Add some weighting material.
Sewing the Paws
- Cut and Sew: Cut the paw pieces from a short pile of faux fur and stretchy fabric. Pin the pieces together with the right sides facing each other.
- Sew and Turn: Sew around the edges, leaving a small opening. Turn the paws right side out through the opening.
- Fill and Embroider: Fill the paws with synthetic filler. Use embroidery floss to embroider the fingers, tightening and giving the paws a detailed, lifelike look.
Sewing the Tail
- Cut: Cut the tail piece from your chosen fabric.
- Sew and Turn: Sew around the edges, leaving a small opening. Turn the tail right side out through the opening.
Making the Ears
- Cut the Pieces: Cut two pieces from faux fur and two pieces from felt fabric for each ear.
- Attach Felt to Faux Fur: Glue the felt pieces to the corresponding faux fur pieces, ensuring they are securely attached.
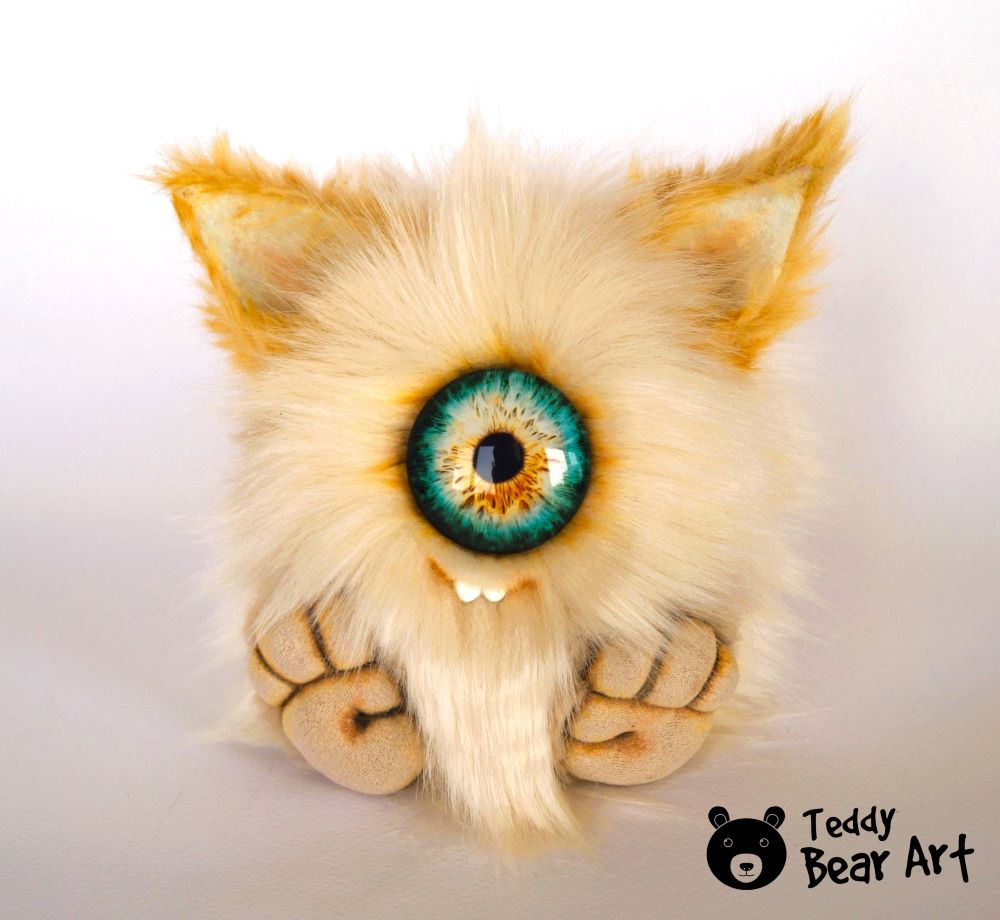
Making the Face
- Attach the Eye: Begin by securely attaching the eye to the center of the cyclops’s face. Since the eye might be heavy, use glue to ensure it stays in place.
- Trim the Pile for a Smile: Carefully trim the fur pile around the mouth area to create a smiling expression. Use small, precise scissors to achieve a clean and defined shape.
- Mold and Attach the Teeth: Create the teeth using white felt or polymer clay. Mold the teeth into the desired shapes and sizes, then use glue to attach them inside the mouth. Make sure they are securely fastened and evenly spaced to give your cyclops a cheerful and characterful look.
Assembling the Ears, Paws, and Tail
Attaching the Ears
- Position the Ears: Determine the desired placement of the ears on the Cyclops’s head. Consider the character’s expression and symmetry.
- Fold and Sew: Fold the edges of each ear slightly inward to create a clean edge. Then, using a needle and thread, sew the ears securely to the head of the Cyclops. Ensure that the stitches are hidden within the fur for a neat appearance.
- Reinforce the Attachment: After sewing, gently tug on each ear to ensure it is securely attached. Make any necessary adjustments to the stitching to reinforce the connection.
Attaching the Paws
- Position the Paws: Decide on the paws’ placement on the Cyclops’ body. Consider symmetry and balance when choosing their positions.
- Sew the Paws: Using an invisible stitch, sew the paws securely to the body. Ensure the stitches are hidden within the fur pile for a seamless finish.
- Reinforce the Attachment: Double-check the security of the stitches to prevent the paws from coming loose during handling. Test the strength of the attachment by gently tugging on each paw.
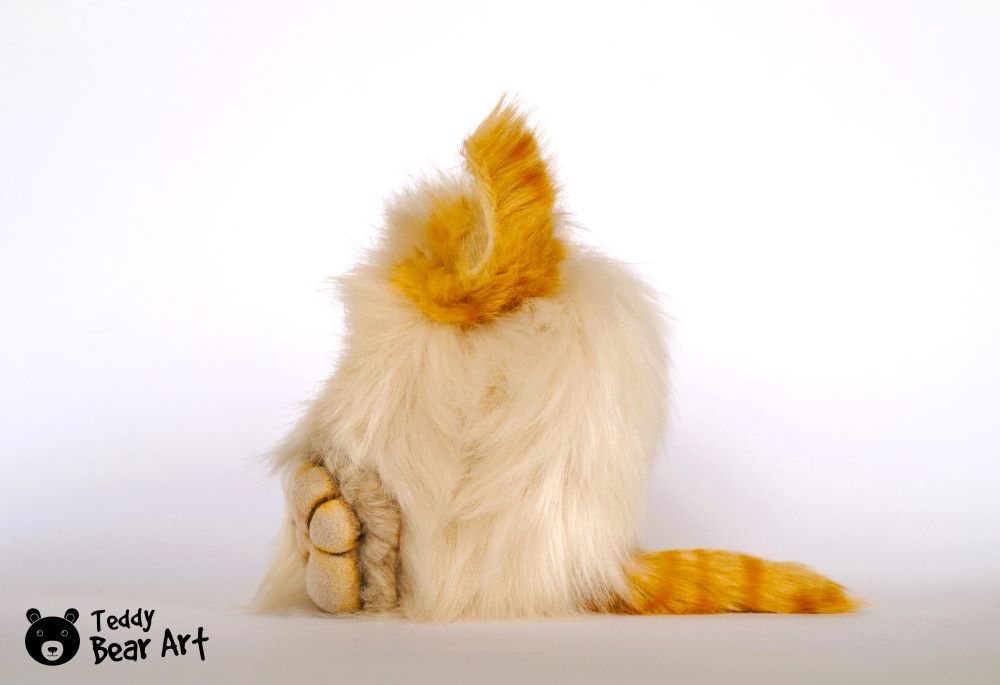
Attaching the Tail
- Position the Tail: Decide on the placement of the tail on the back of the Cyclops. Consider the balance and overall aesthetic of the plush toy.
- Secure the Tail: Using a needle and thread that matches the color of the tail and body, carefully sew the tail to the back of the Cyclops. Ensure that the stitches are discreet and hidden within the fur.
- Reinforce the Attachment: After sewing, gently tug on the tail to test its security. Make any necessary adjustments to the stitching to ensure that the tail is firmly attached.
Customizing Your Cyclops Plush Toy
- Toning: Start by adding toning to enhance the realism of your Cyclops plush toy. Use oil paints to tone the area around the eyes with shades of orange and brown. Add some shades to the smile. Add orange, brown, and finally black paint to the paws. For the ears, tone the inside with pink paint and glue in wool for added texture.
- Additional Accessories: Once the toning is complete, add accessories to further personalize your Cyclops plush toy. You can embellish it with tiny hats to give it a unique and charming character. Let your creativity shine as you customize your Cyclops plush toy to reflect your personality and style.
Displaying Your Finished Cyclops Plush Toy
Now that your Cyclops plush toy is complete, it’s time to showcase it:
- Display Suggestions: Place your Cyclops on a shelf or in a glass display case to keep it dust-free.
- Care Tips: Keep your plush toy in a cool, dry place. Avoid direct sunlight to prevent fabric fading.
- Showcase Your Work: Share photos of your creation on social media or at collector’s events.

Conclusion
Crafting a unique collector’s plush toy with our free cute Cyclops sewing pattern is a rewarding experience that showcases your skills and creativity. We hope you enjoyed making your Cyclops plush toy and that it has become a cherished piece in your collection.
Don’t forget to share your finished projects and explore more patterns and tutorials on our website.
More Goodies
- Monstrously Cute: 5 Free Sewing Monster Patterns You Need to Try
- Discover a collection of five adorable and free sewing patterns for creating your own monster plush toys. These patterns are perfect for adding a whimsical touch to your collection and expanding your sewing skills.
- Peering into Celebrities and Their Beloved Teddy Bear Collections and Connections
- Explore the fascinating world of celebrities and their cherished teddy bear collections. Learn about the connections and stories behind these beloved plush companions and the famous faces who adore them.
Get Free Patterns & Be the First to Know!
Want free teddy bear patterns, exclusive tutorials, and a chance to win craft supplies?
Sign up for our newsletter using the subscribe form in the middle of this article to receive new patterns, insider tips, and the latest news on teddy bear art. You’ll also automatically be entered into our annual giveaway for a chance to win teddy bear crafting materials.
Bonus entry: Save one of our pins on Pinterest to increase your chances of winning!
Let’s create, inspire, and craft beautiful teddy bears together!
This sewing pattern is absolutely adorable! I love how detailed the instructions are, making it accessible for toy makers with varying levels of experience. The step-by-step guide ensures a delightful outcome, and the customization options are a fun way to add personality to the finished plush toy. Can’t wait to try this out and share my creation!
Thank you so much for your lovely comment! I’m thrilled to hear that you found the sewing pattern and instructions detailed and accessible. I can’t wait to see your finished creation—feel free to share it with us! Happy sewing and enjoy adding your unique touch to the plush toy!
Wow, this cyclops plush toy is absolutely adorable! I don’t have any sewing experience myself, but the detailed instructions and pattern make me want to give it a try. The end result looks so huggable and unique. Even though it seems a bit challenging for a total beginner like me, having such a cute cyclops as the final product might just be worth the effort.
What level of sewing experience would you recommend for someone to successfully complete this project? The instructions seem very detailed, but I’m worried it might be too advanced for a complete sewing novice. I’d hate to get in over my head and end up with a cyclops plush that looks more scary than cute!
Thank you for sharing this creative pattern – I’m really tempted to take up sewing just to make this little guy!
Thank you so much for your lovely comment! I’m thrilled to hear that you find the Cyclops plush toy adorable and are tempted to give it a try. 😊
For this project, I’d recommend having some basic sewing skills, such as understanding how to thread a needle and follow simple patterns. However, don’t let that discourage you! The detailed instructions are designed to be beginner-friendly, and many people have successfully created their first plush toy with this pattern.
To help you get started, here are a few tips:
1. Start with Simple Stitches: Familiarize yourself with basic stitches like the running stitch and whip stitch. There are plenty of tutorials online to guide you.
2. Practice on Scrap Fabric: Before working on the actual plush, practice sewing on some scrap fabric to build your confidence.
3. Take Your Time: Don’t rush the process. Take it step-by-step and enjoy the journey of creating something unique and huggable.
Remember, crafting is all about learning and having fun. Even if your Cyclops doesn’t turn out perfect, it will still be a special creation made by you. Plus, practice makes perfect!
Feel free to reach out if you have any questions or need further guidance. Happy sewing and I can’t wait to see your adorable Cyclops plush!
Warm regards,
Hanna