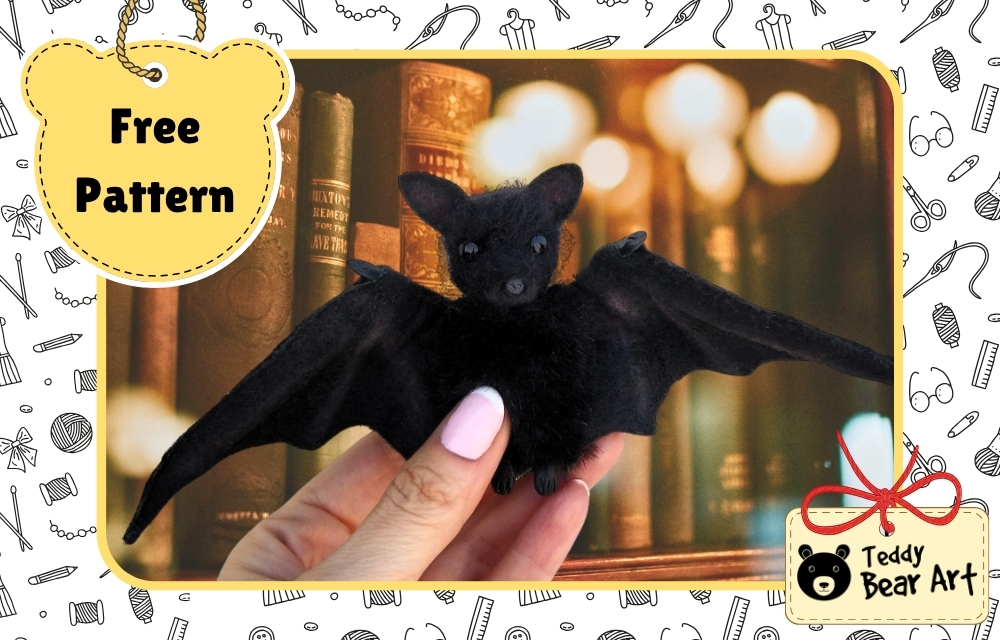
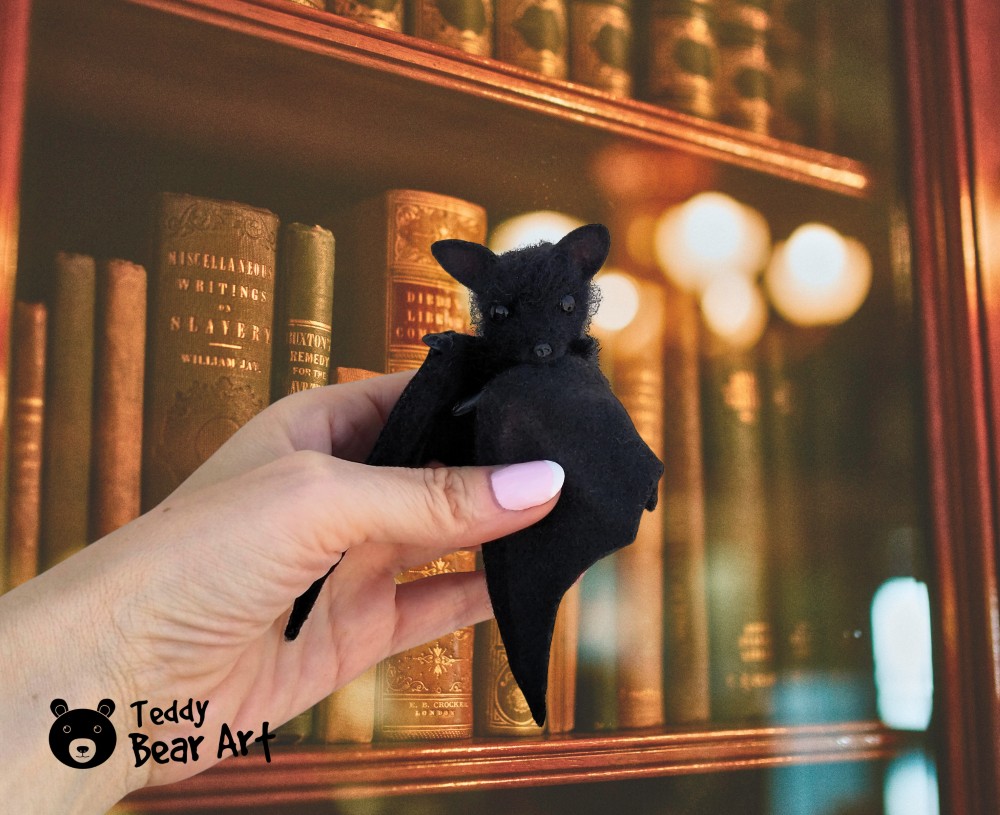
Looking for Halloween crafts for adults that go beyond the usual pumpkin carving and classic ghost decorations? This plush bat project is perfect for those who want to create something cozy, creative, and a little mysterious. At the beginning of the article, you’ll find a free pattern, and during the project, you can choose to make the bat’s head either by needle felting wool or sewing it from fabric.
Why Choose Plush Bats for Halloween Crafts?
Bats have long been iconic symbols of Halloween, striking a balance between eerie and endearing. Crafting a soft plush bat lets you embrace the spooky spirit while making something tactile and inviting, a perfect twist for adult crafters who want their Halloween decorations to reflect skill and personality. This project fits nicely into the growing trend of Halloween crafts for adults, which focus on more sophisticated, hands-on creations.
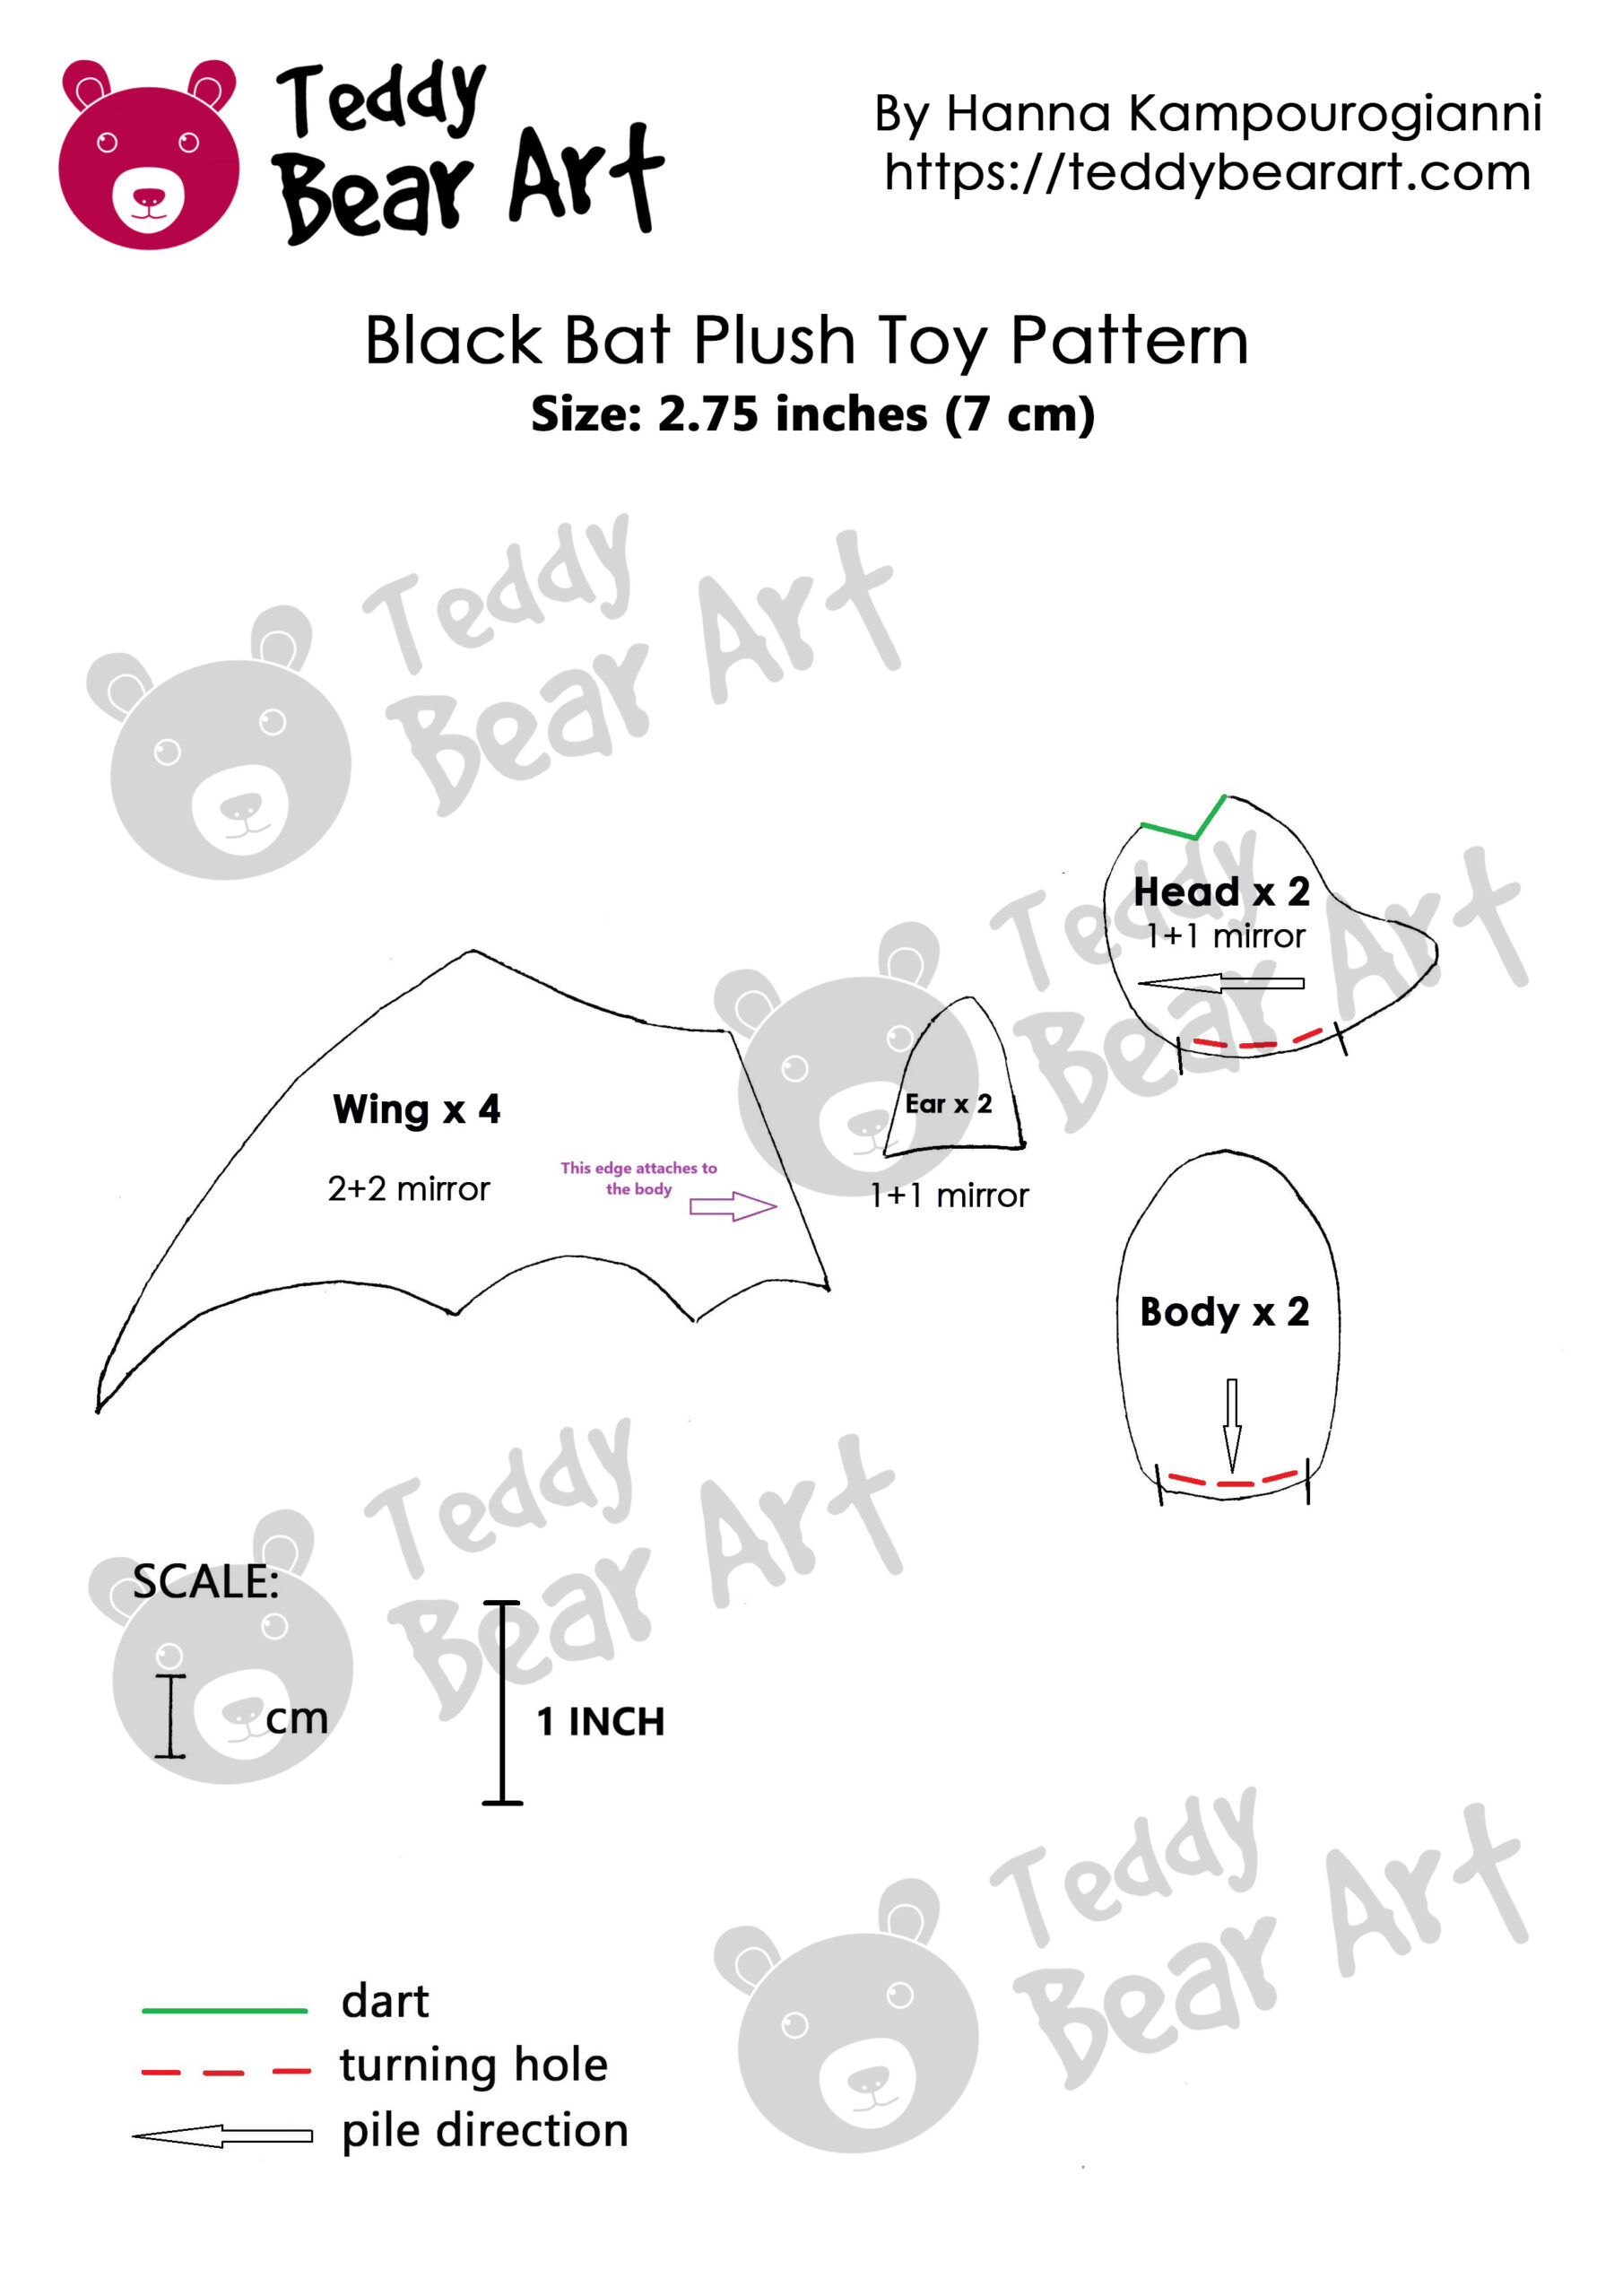
Download Free Plush Bat Pattern
To download the pattern, follow the instructions below:
From a phone or tablet: There should be a similar option for mobile devices with Android or iOS. Click on the image. Save it by holding your finger on the image and selecting the “Save Image” option. Then, go to your photo gallery and print it (an option available).
From a computer: Click on the photo of the pattern you see below. In the new tab that will open, you press the right mouse button and select the “Save image as …” option. Then, you choose where the image will be saved on your computer.
Materials and Tools Needed
- Black merino wool for needle felting the head (if you choose this method)
- Felting needles and a felting pad
- Black or brown plush fabric with short pile (5–7 mm)
- Black felt
- Chenille wire
- Black beads for eyes or glass eyes on a metal loop 6 mm in diameter
- Discs in diameter approximately 6 mm – 2 pieces
- Cotter pin 1.6×20 size
- Instant UHU glue
- Matching thread and sewing needles
- Polymer clay for small details
- Synthetic or other stuffing
- Chalks for shading
- Extras (optional, for a rotating head): an awl and pliers. This is not necessary — you can sew the head to the body.
Step-by-Step Crafting Instructions
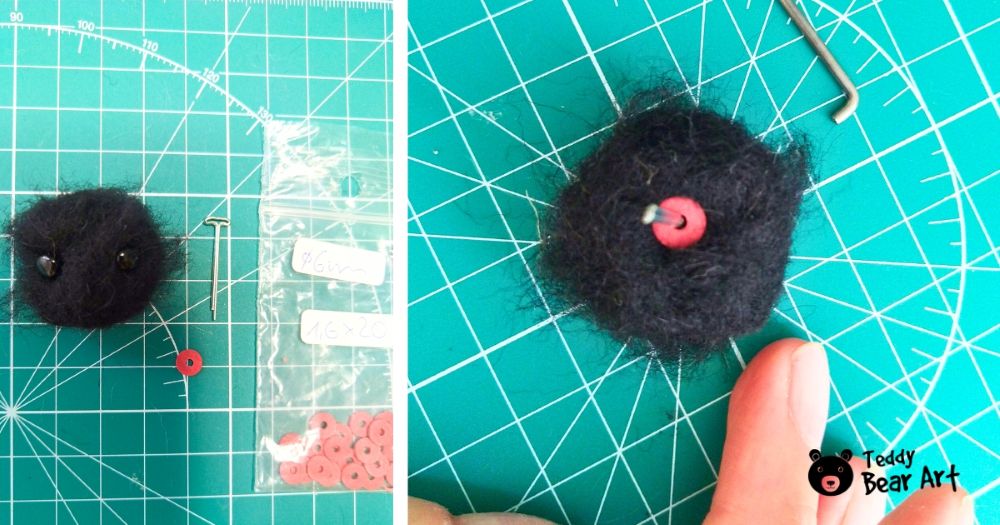
Start with the head. If you’re using the needle felting method, begin by shaping a firm ball of black merino wool. Then felt a small cone onto the front of the ball to create a long, bat-like snout.
Insert glass eyes with wire loops (check out this tutorial for a detailed guide), or sew on small black beads for a simpler option. If you want the head to turn, insert a cotter pin and a small disc at the base—add a drop of glue for extra hold—and felt over the joint to secure and hide it.
Cut two ears from black felt and sew them to the head. Glue on a tiny polymer clay nose and felt a bit more wool around it to blend it naturally into the face. Lightly brush the head to lift some fibers, then trim any loose fluff to neaten everything up.
Sewn Head Option
If you’re going with the sewn version, cut two mirrored head pieces from plush fabric. Start by sewing the darts to shape the face, then sew the two halves together and turn the head right side out. Stuff it firmly. No fiberfill? No problem—use cotton balls, yarn scraps, fabric leftovers.
Close the opening and insert the cotter pin into the head (see the instructions in this blog post).
Trim the pile on the muzzle, especially where the nose will be attached.
Sewing the Body
Sew the body using the free pattern and turn it right side out. Attach the head with your preferred method. If you’re using the jointed version, now’s the time to secure it (check this post on our blog for more on that).
Unless you sew it to the body, which would be the easiest way.
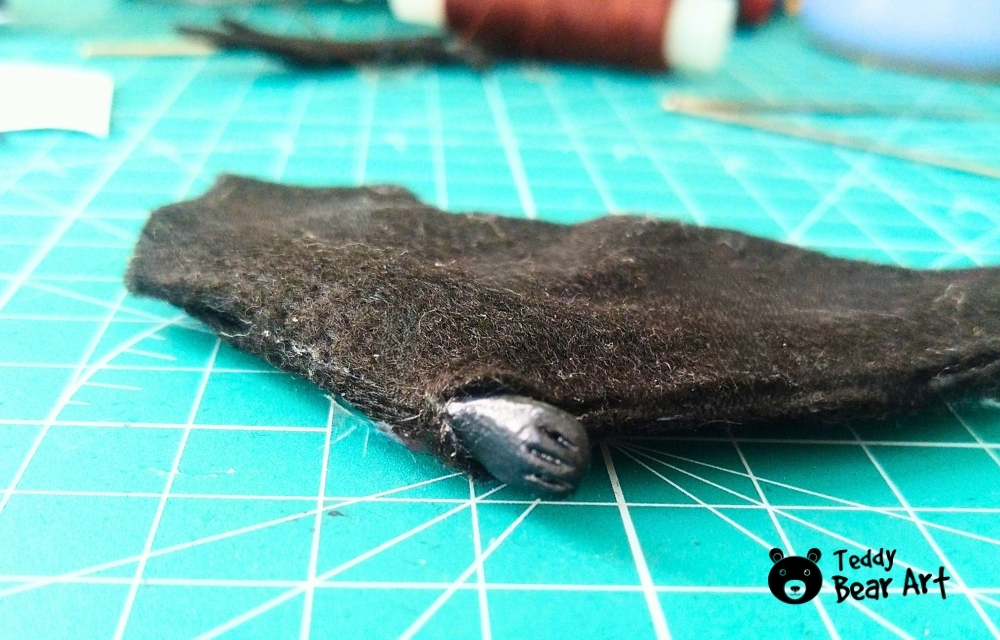
Stuff the body and sew the bottom closed. Then, glue in the polymer clay feet for a clean, finished look.
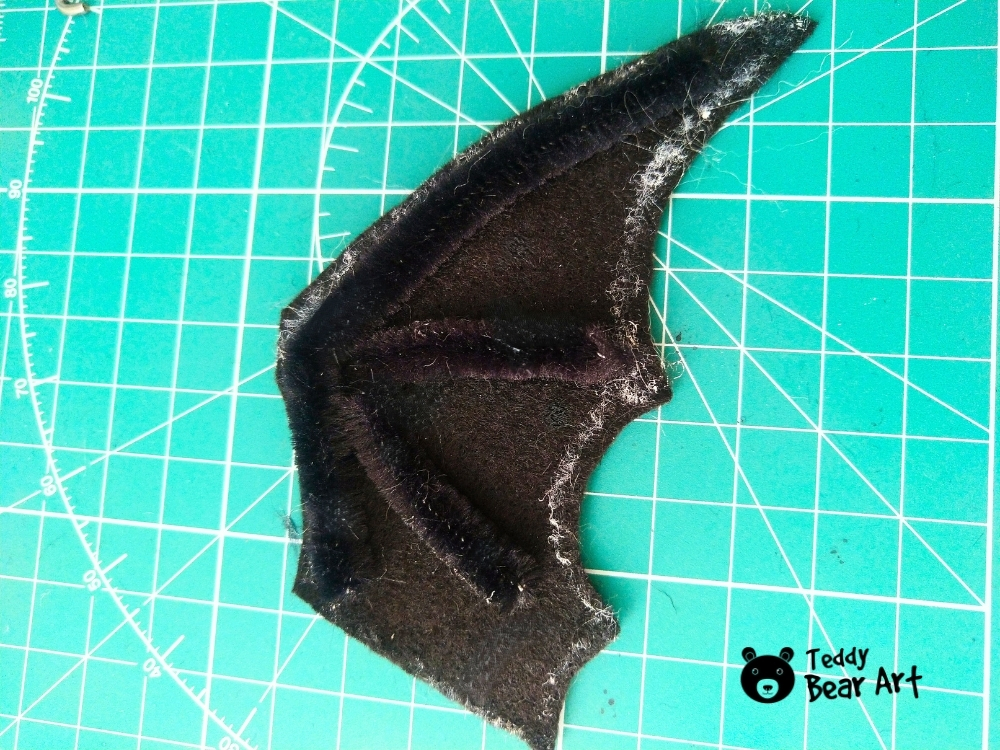
Making the Wings
Cut four wing shapes from black felt—two regular, two mirrored. Use white tailor’s chalk or a fabric-safe marker to trace your pattern.
Glue chenille stems to two of the wings to create the bat’s “bones.” Once dry, place the other felt layers on top and glue them together to sandwich the wire inside. Add a small sculpted clay hand at the base if you like, then glue everything securely.
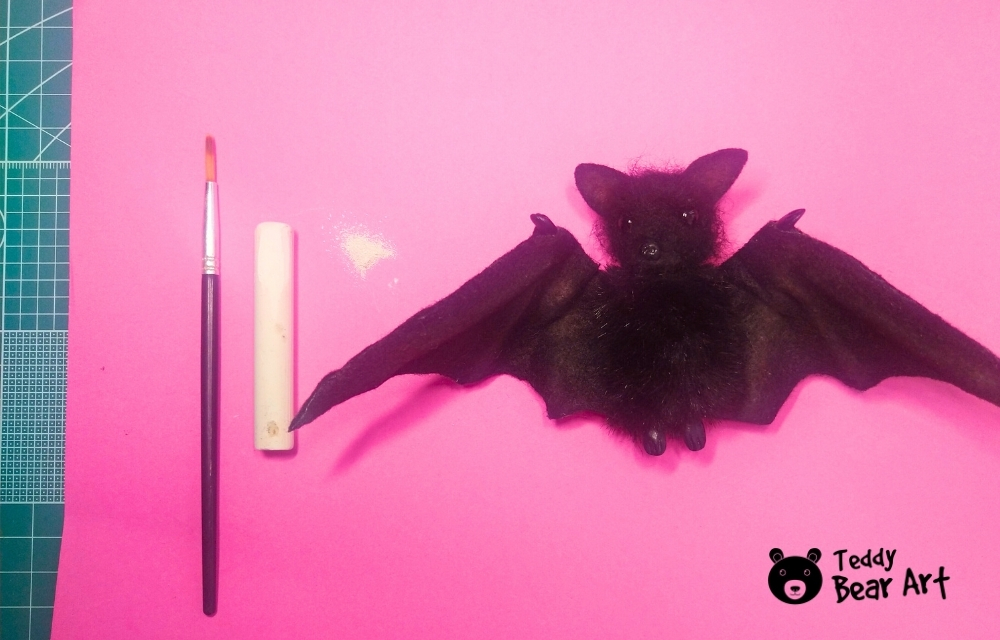
Shading and Details
Use ordinary children’s chalk for soft shading. Scrape a bit of chalk into powder and apply it gently with a dry brush. Start with white for highlights, then add layers of red or reddish-brown to give the wings, snout, and ears a warm, slightly spooky tone. A touch of white on the face helps bring it to life.
Final Assembly
Sew the wings to the body—angle them however you like, either wrapped around the bat for a cozy look or spread open in flight. And just like that, your plush Halloween bat is ready to make mischief!

FAQ: Common Questions About Making a Plush Bat for Halloween
Can I use different colors or materials for my bat?
Absolutely! While black is the classic choice, rich purples, soft grays, or even patterned fabrics can give your bat a unique personality. Try mixing felt with plush, or adding texture with embroidery, fabric paint, or a touch of glitter for a magical vibe. Check out this cute bat pattern to get an idea!
I’m new to needle felting — is this project beginner-friendly?
Yes! This plush bat is a great introduction to combining techniques. Just go slowly with the felting needle, especially around small details like the nose. Keep your movements light and controlled to avoid breaking fibers or needles.
What if I don’t have stuffing or all the materials?
You can get creative! For stuffing, you can use cotton balls, yarn scraps, fabric bits, or even the filling from an old pillow. If you don’t have polymer clay, try sewing small felt shapes for details like the nose and hands.
How can I turn my bat into a decoration or accessory?
It’s easy to add a loop for hanging or a pin backing to turn your bat into a brooch, ornament, or keychain. Small changes like those make great gifts or party favors, too!
Can the wings move?
Yes, but only slightly. The glue inside limits flexibility, but you can still shape the wings a bit — for example, give them a slightly open or curved look to add expression.
How long does this project take?
It really depends on your crafting style and the techniques you choose. Some people finish it in a few hours, while others take longer — especially if they enjoy working slowly and carefully on small details. If you skip sculpting the paws and nose, and instead felt a light-colored wool nose, it will save time. Not adding the rotating head joint also makes the process quicker. Still, keep in mind: working with tiny parts always takes patience, so give yourself time to enjoy it.
Final Words
In closing, making your own plush bat is a wonderfully different way to celebrate Halloween as an adult. It’s a crafty journey full of texture, creativity, and festive spirit. Share your creations with friends or in crafting groups, and don’t hesitate to leave a comment below with your own tips or questions. Ready to start? Download the free pattern, gather your tools, and let your crafty bat take flight this Halloween!
Get Free Patterns & Be the First to Know!
Want free teddy bear patterns, exclusive tutorials, and a chance to win craft supplies?
Sign up for our newsletter using the subscribe form in the middle of this article to receive new patterns, insider tips, and the latest news on teddy bear art. You’ll also automatically be entered into our annual giveaway for a chance to win teddy bear crafting materials.
Bonus entry: Save one of our pins on Pinterest to increase your chances of winning!
Let’s create, inspire, and craft beautiful teddy bears together!
OK,I clicked on the image and saved it. I am glad to find another of your articles. I showed my wife your first article I read and she IS going to create a plush doll or creature with the info there. I especially hope she will do this one for me because I love anything halloween and I love plushes too. I have a collection of TY Beanies. I have a TY bat too but I am sure he would like a companion.
Anyway, I think my wife should do THIS project first, in time for Halloween but it is up to her because she already has the materials for the first project and those creature plushies also would be good for halloween. Well, thank you for this article also. It is time to get my wife busy before halloween arrives. MAC.
Hi MAC!
Thank you so much for your heartfelt comment! I’m really happy you found my articles and even shared them with your wife — that’s just wonderful! I’m sure she’ll create an amazing plush character, whether she chooses the first project or this Halloween one. And your TY bat will definitely be glad to have a new little friend — such a perfect idea for the holiday!
I hope this creative project brings joy and coziness to both of you. And yes, it’s definitely time to get ready for Halloween before it sneaks up on us! 🙂
Warm wishes to you and your wife,
Hanna
What a delightfully creative take on Halloween crafting! I love how this plush bat project blends whimsy with skill—there’s something so satisfying about working with texture and detail, especially when the final result is both spooky and huggable.
I’m already imagining a whole little colony of bats in different colors and personalities—maybe even with tiny themed accessories like witch hats or scarves!
Curious—have you tried turning any of your plush creations into wearable art or home decor? I could totally see one of these bats perched on a fall wreath or tucked into a Halloween centerpiece.
Thank you so much for your lovely words!
I absolutely love your idea of a whole little bat colony — especially with tiny witch hats or scarves, how adorable would that be?! Now I kind of want to make a few more in different colors too…
And yes, I have been thinking about turning plush creations into home decor! A bat on a Halloween wreath or nestled into a centerpiece sounds perfect — spooky, soft, and full of character. I haven’t tried wearable art yet, but now you’ve got me inspired. Maybe a little bat brooch or shoulder buddy?
Thank you again for your thoughtful comment — you just sparked a bunch of new ideas!