Welcome to teddybearart.com/, where we celebrate the wonderful world of teddy bears and stuffed animals. If you’re a teddy bear enthusiast or a crafter looking to personalize your teddy bear, you’re in the right place. In this guide, we’re going to explore the art of making an adorable hat for your beloved teddy bear using Build-A-Bear accessories. A hat is more than just an accessory; it’s a statement of style and personality for your cuddly companion.
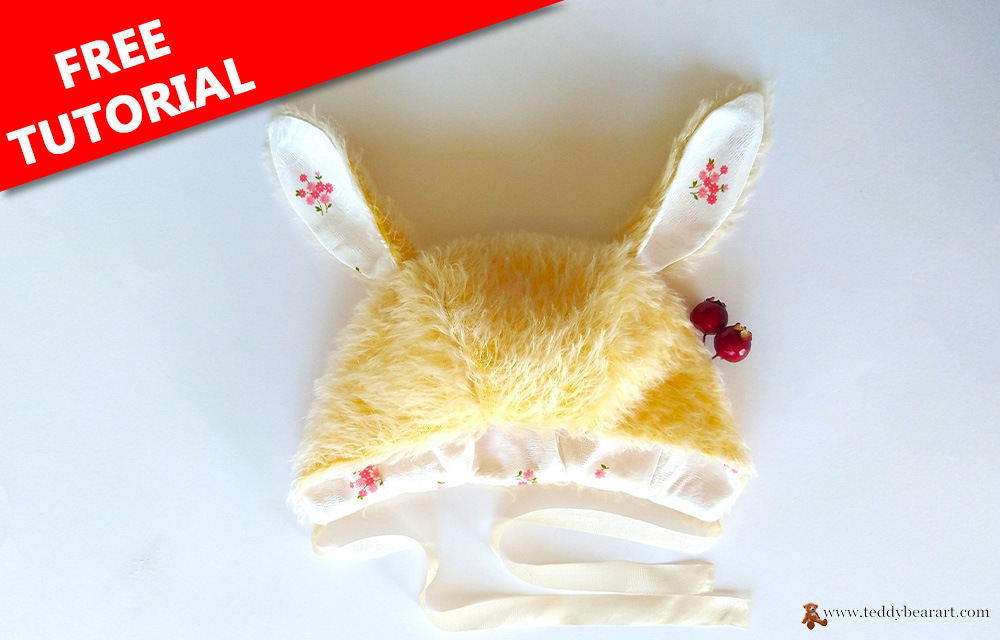
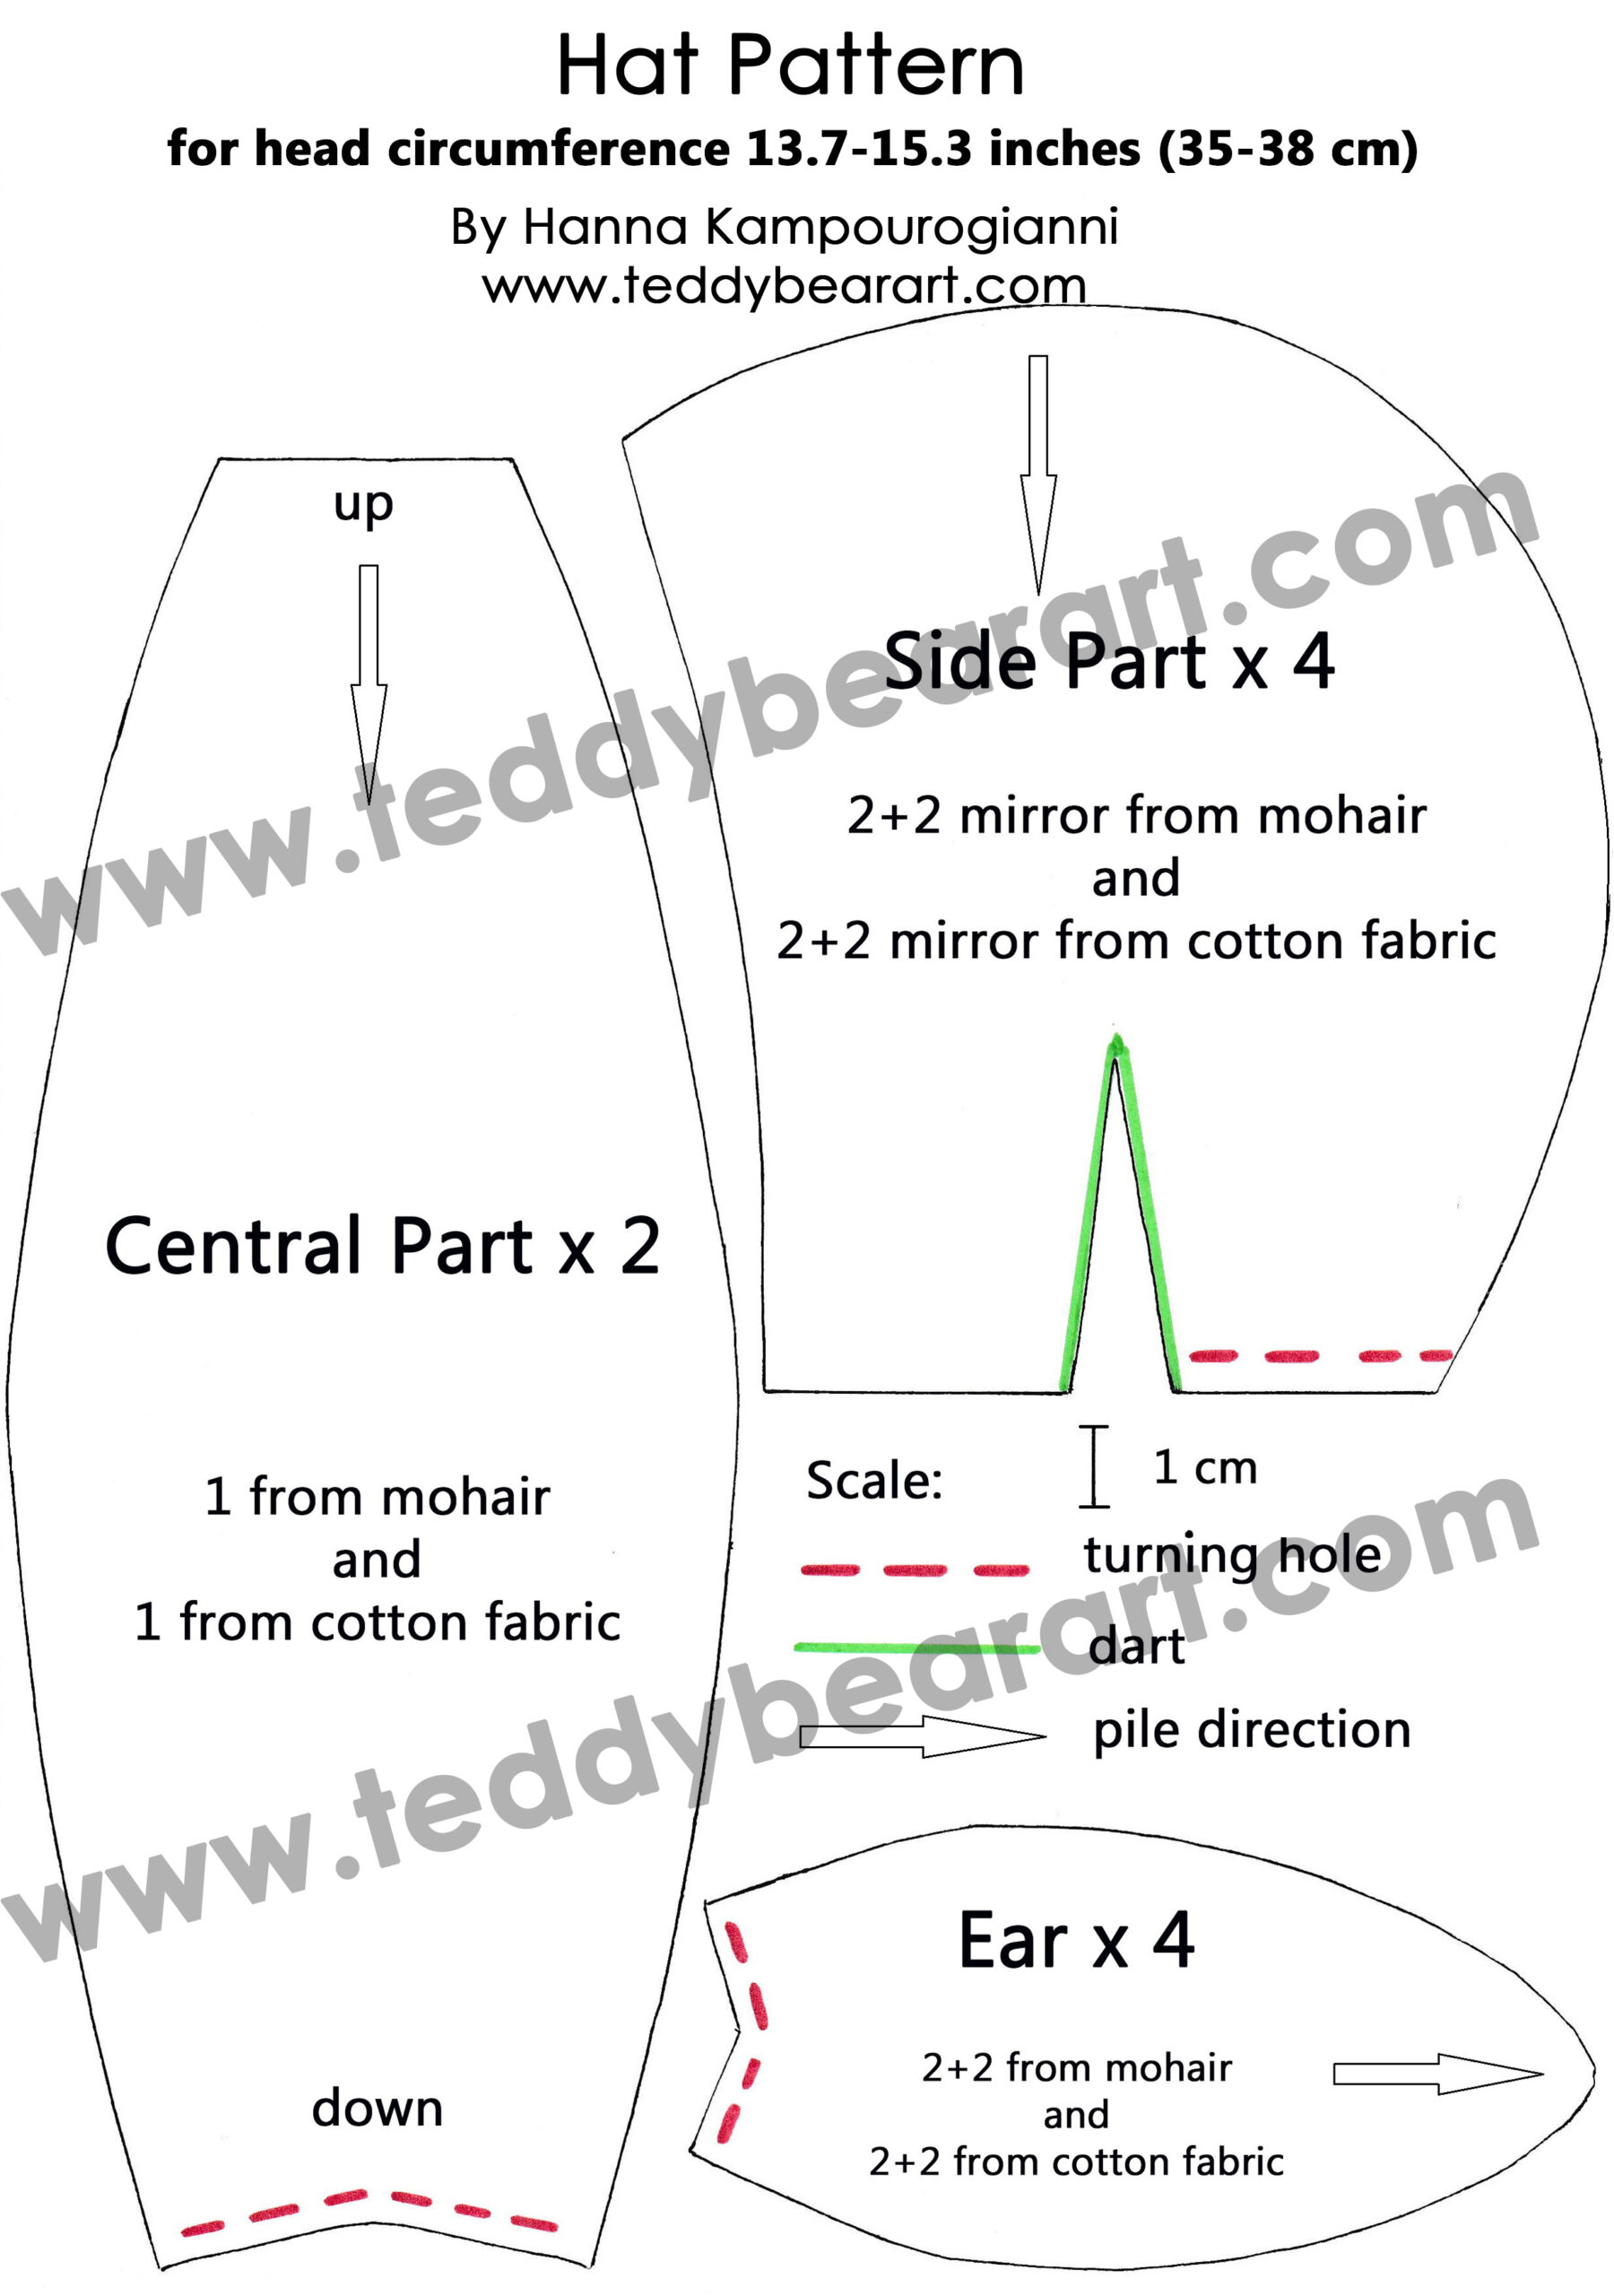
Our free hat pattern will fit teddy bears and dolls with a head circumference of approximately 13.7-15.3 inches (35-38 cm).
By modifying it, you can sew hats in smaller sizes.
Why Teddy Bear Hats Matter
Teddy bear hats may seem like a small detail, but they add a world of charm to your bear’s appearance. Much like how we choose our hats to match our mood and outfit, teddy bear hats can reflect the personality of the bear and the sentiment of the moment.
When you add a hat to your teddy bear’s wardrobe, you’re giving it a unique identity. It can become a stylish little friend for your bear, be it a fancy top hat for formal occasions, a cozy beanie for chilly days, or a whimsical cap for a playful look.
Selecting the Right Hat Design

Now, let’s dive into the fun part: selecting the right hat design for your teddy bear. Just like with human fashion, choosing the perfect hat design can be an enjoyable, creative process.
For a formal teddy bear, a classic bowler hat, or a miniature top hat adds a touch of sophistication.
If you have a playful bear, opt for a colorful beanie with a pompom on top or a whimsical sun hat for those sunny adventures.
For a bear that loves the outdoors, a sporty cap or a cozy winter hat is a must-have.
Remember, the key is to match the hat’s style to your bear’s personality and the occasion. And here’s the exciting part – you can make these hats yourself!
Downloading a Free Hat Pattern
This pattern is designed with simplicity in mind, making it perfect for both beginners and experienced crafters.
- From a computer (Windows).
Click on the photo of the pattern, and select the “Save image as …” option. - From a phone or a tablet (Android). There should be something similar for the iPad.
Click on the image. Save it by holding your finger on the image and selecting the “Save Image” option. Then go to your photo gallery and print it (there is an option).
Materials You’ll Need
Before you jump into crafting, let’s gather the materials you’ll need:
- Mohair fabric.
- Cotton fabric in the color of your choice.
- Needle and thread or a sewing machine.
- Scissors.
- Awl.
- Long needle.
- Small decorative items like buttons or ribbons.
- And, of course, your teddy bear.
Step-by-Step Hat Making Guide
Now, let’s get down to crafting your teddy bear’s hat. Here’s a step-by-step guide to help you create a stylish hat for your beloved bear:
- Cut the Pattern: Begin by downloading the free pattern and laying it out on your mohair fabric, paying attention to the direction of the pile. Carefully cut out the mohair and cotton fabric pieces following the pattern’s shape, leaving about 5-7 mm of fabric around the edges.
- Sew the Edges: First, sew all the darts (highlighted in green). Then sew the side pieces to the center piece of mohair fabric together using small even stitches to create a neat seam. Do the same process for the cotton pieces. You have two hat pieces – one made of mohair, the second made of cotton.
- Join the Hats: Place the two resulting hat pieces together with their right sides facing each other and sew along the wrong side, leaving the bottom edge open.
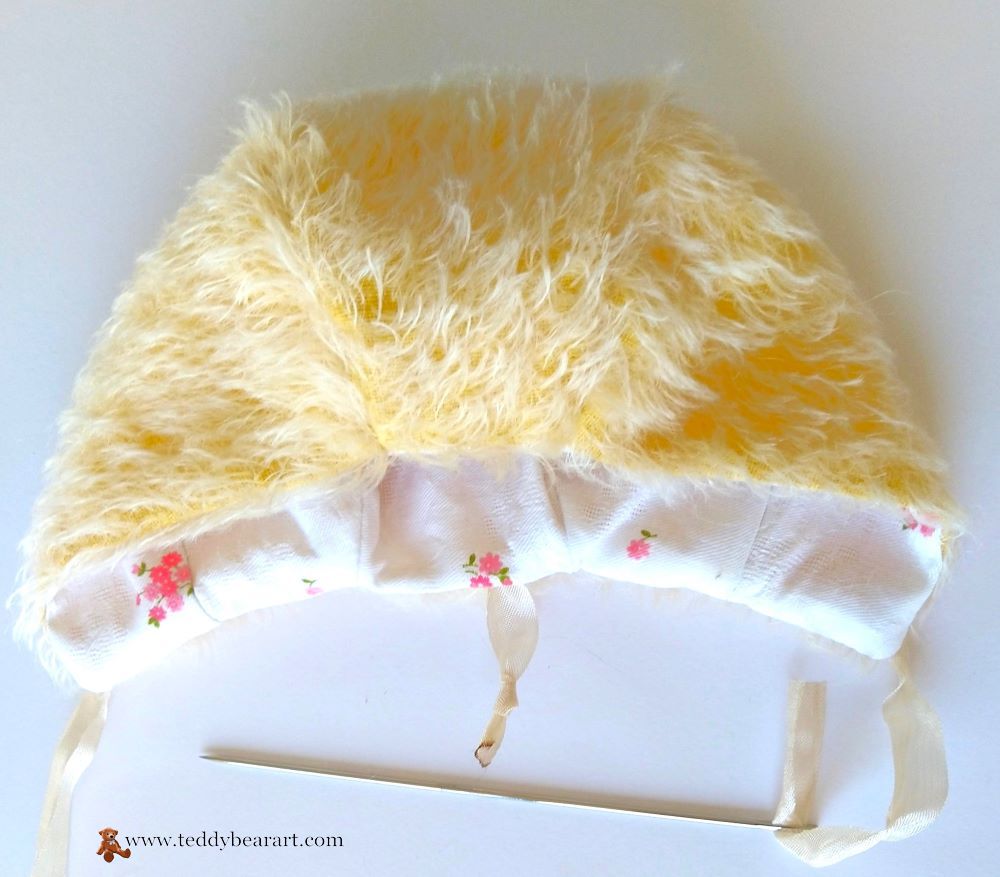
- Turn It Inside Out: Turn the hat inside out through this opening. Don’t sew it shut just yet; we’ll need it later!
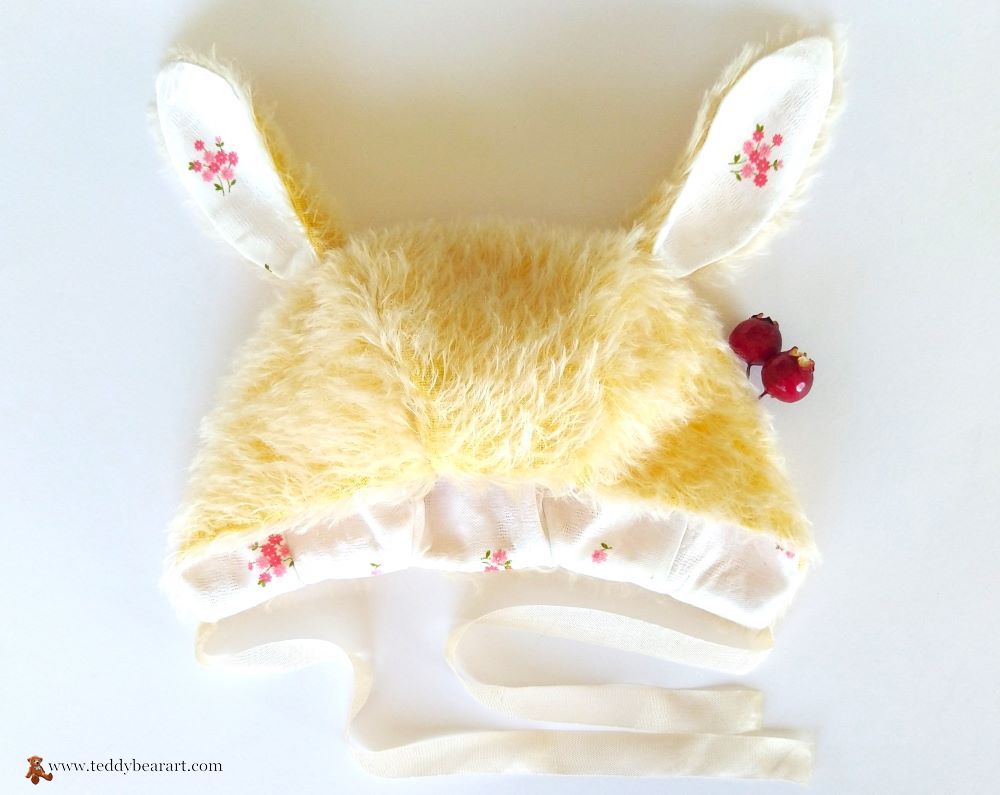
- Shape the Ears: Carefully sew, turn, and close up the opening for the ears.
- Add the Finishing Touch: Use an awl to remove any lint from the seams and gently comb out the fur. On low heat, iron the ears along the cotton side.
- Inserting the ribbons: Cut two ribbons of equal length and tie knots at one end. Thread the other end of each ribbon through the eye of a long needle. With the help of the awl, create small holes in the bottom corner of the hat. Insert the needle and ribbon through the turning hole and out through the hole you made.
This will keep the ribbon in place, and the knot ensures it won’t slip out. Finally, sew up the opening, and attach the ears. - Fit It on Your Bear: Once the hat is complete, gently place it on your teddy bear’s head. Adjust it for a perfect fit.
Creating your teddy bear’s hat is an enjoyable, creative process. It’s an opportunity to add a personal touch to your bear’s wardrobe, making it even more special.
Personalization and Customization
Beyond the basic steps, personalization is where the real magic happens. You have the creative freedom to make each teddy bear hat a unique masterpiece. Experiment with different colors, fabrics, and embellishments to add a distinctive touch.

Consider tiny bows, miniature flowers, or even small teddy bear-sized emblems to make your creation stand out. The beauty of crafting these hats is that each one can tell a different story, matching your bear’s character or suiting various occasions.
Whether it’s a touch of elegance, playfulness, or coziness, personalization allows you to breathe life and character into your teddy bear’s wardrobe.
Tips
Creating teddy bear hats can be a fun and rewarding experience. To ensure your crafting process goes smoothly, here are some tips to keep in mind:
How to Fix the Edges of the Ribbon
If you’re using ribbon as a decorative element on your teddy bear’s hat, you’ll want to ensure that the edges of the ribbon look clean and tidy. To prevent fraying, you can try the following methods:
- Heat Sealing: Use a heat source like a lighter or a candle flame to gently heat the cut edges of the ribbon. Be very careful not to touch the flame to the ribbon, as it can quickly melt. Instead, hold the ribbon just above the flame, and the heat will seal the edges, preventing fraying.
- Fray Check or Glue: You can apply a small amount of fray check or clear-drying fabric glue to the edges of the ribbon. This will create a seal and stop the ribbon from fraying. Make sure to allow it to dry completely before using the ribbon in your project.
By following these steps, you can maintain the neat appearance of the ribbon on your teddy bear’s hat, giving it that polished, finished look.
Practice Makes Perfect
For those who are new to sewing or crafting, it’s essential to remember that perfection doesn’t come instantly. Early mistakes are part of the learning process, and they should be embraced rather than discouraged.
Crafting, like any skill, improves with practice. Your initial teddy bear hats might not be flawless, but they mark the beginning of a beautiful creative journey.
As you continue to experiment, your techniques will become more refined, and your creations will become more polished.
So, don’t be disheartened by early hiccups; they are stepping stones on your path to mastering the art of crafting teddy bear hats. Keep trying, keep learning, and your hats will undoubtedly get better over time.
If you’re looking to expand your teddy bear’s wardrobe with a variety of clothing and accessory patterns, you’re in the right place. Check out our collection of free teddy bear clothing and accessory patterns on our website.
We offer a wide selection of patterns and tutorials, including the trendy bucket hat pattern, allowing you to craft an assortment of outfits and accessories to suit your teddy bear’s unique style. Explore our patterns and start creating a fabulous wardrobe for your beloved teddy bear today.
Conclusion
In the world of teddy bears, every little detail counts. Adding a hat is not just about fashion; it’s about expressing your bear’s unique personality. With the free hat pattern and this guide, you have all the tools to get started on your creative journey. Craft, personalize, and share the joy of teddy bear hat-making. Hats off to your creativity!
Get Free Patterns & Be the First to Know!
Want free teddy bear patterns, exclusive tutorials, and a chance to win craft supplies?
Sign up for our newsletter using the subscribe form in the middle of this article to receive new patterns, insider tips, and the latest news on teddy bear art. You’ll also automatically be entered into our annual giveaway for a chance to win teddy bear crafting materials.
Bonus entry: Save one of our pins on Pinterest to increase your chances of winning!
Let’s create, inspire, and craft beautiful teddy bears together!
What a delightful guide! Teddy bear hats truly add that extra touch of personality and style to our cuddly friends. The provided hat pattern is a fantastic resource, ensuring both beginners and experienced crafters can create charming hats for their beloved bears. Here’s to the art of hat-making, enhancing the charm of our teddy bear companions
I’m so glad you enjoyed the guide on making teddy bear hats! 🐻🎩 Adding that touch of personality and style to our cuddly friends with unique hats is such a rewarding part of teddy bear making. Cheers to the art of hat-making and enhancing the charm of our teddy bear companions! If you have any more questions or if there’s anything specific you’d like to see on the website, feel free to let me know. Happy crafting!
Hi there, what an adorable guide to crafting teddy bear hats! The step-by-step instructions and free hat pattern make it easy for crafters of all levels. I love the emphasis on personalization, matching hats to a bear’s personality.
The tips, especially on fixing ribbon edges, show great attention to detail. The encouragement to embrace mistakes as part of the learning journey is motivating. Excited to try making hats for my bears and share them in the Teddy Bear Making Group on Facebook!
Kind Regards,
Herman
Hi Herman,
Thanks for your kind words and enthusiasm! I’m thrilled that you enjoyed the guide to crafting teddy bear hats on TeddyBearArt.com. It’s all about making the process fun and accessible for crafters of all levels, so I’m delighted to hear that the step-by-step instructions and free pattern were helpful.
Personalizing your bear’s hat to match their unique personality is such a rewarding part of the process, and I’m glad you appreciate that. Embracing mistakes is all part of the creative journey, and it’s great to see you’re motivated to give it a try. Have a blast making those hats, and I’m sure they’ll look fantastic on your bears!
Feel free to share your creations with the Teddy Bear Making Group on Facebook. I’m sure others will be inspired by your work. If you ever have more questions or need further guidance, don’t hesitate to reach out. Happy crafting!
Warm regards,
Hanna