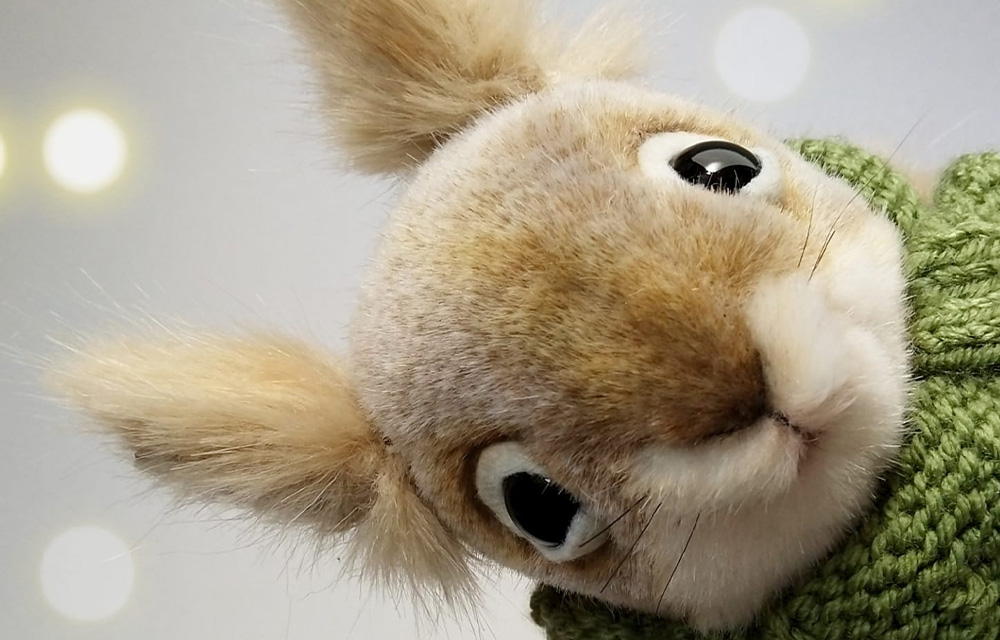
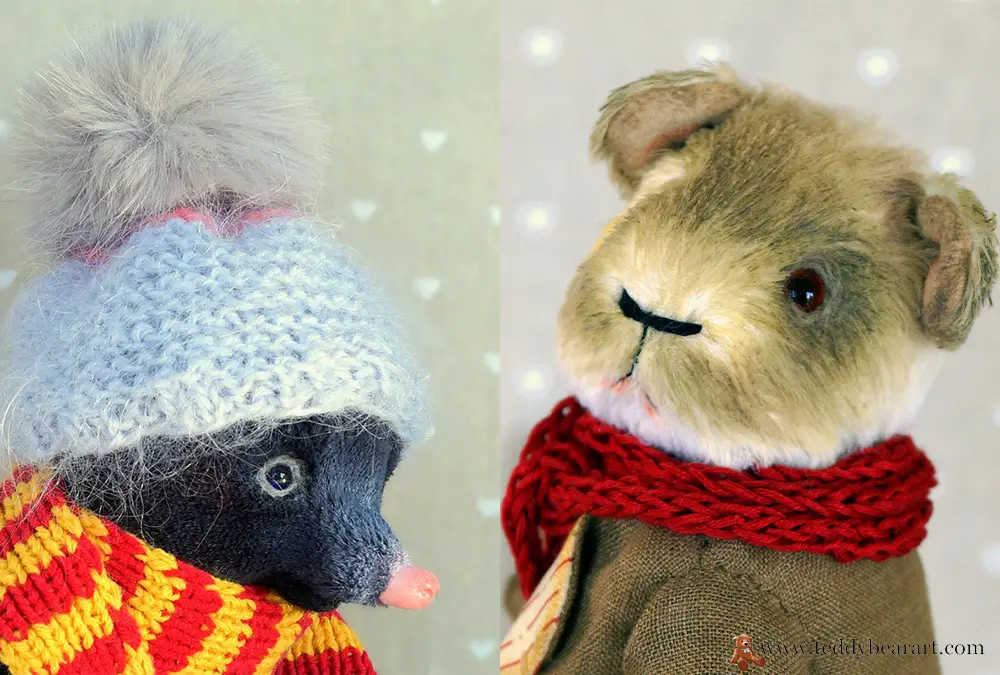
When it comes to creating endearing teddy bears and stuffed animals, one often overlooked detail can make all the difference: their eyes. The eyes are the windows to a teddy bear’s soul, and mastering the art of creating lifelike teddy bear eyelids can take your creations to a whole new level.
These advanced techniques will be your secret sauce to infuse your bears with personality, charm, and a touch of magic.
Method 1: Ready-Made Plastic Eyelids
The Convenience of Plastic Eyelids
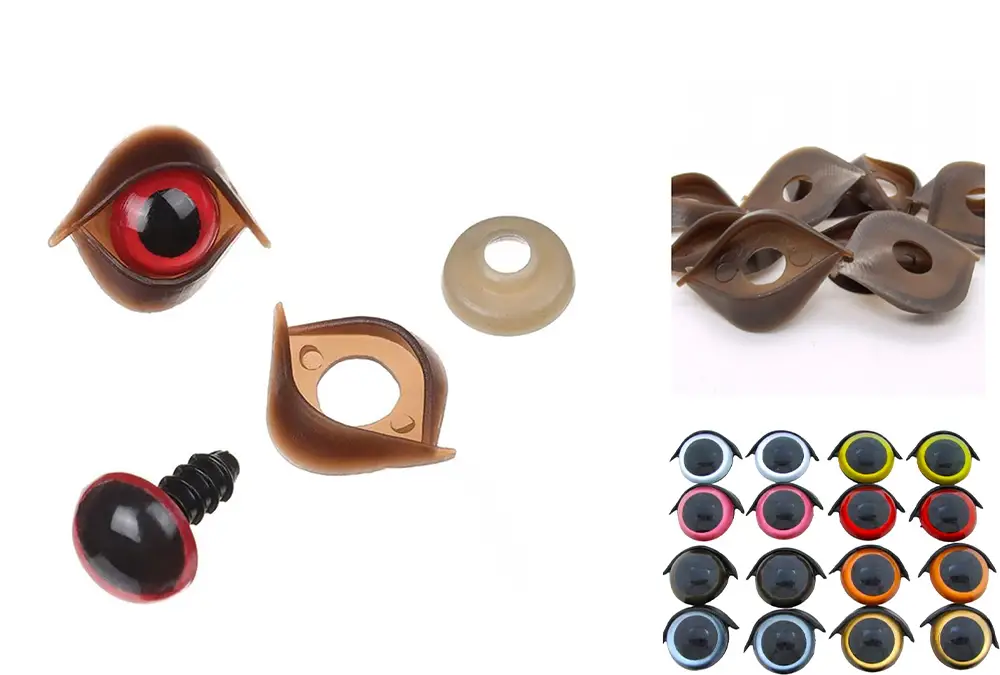
For teddy bear artists seeking a convenient and hassle-free way to add expressive eyes to their creations, ready-made plastic eyelids for safety eyes are a valuable choice. These eyelids come in a variety of shapes and sizes, allowing you to select the perfect fit for your teddy bear’s character.
Attaching Ready-Made Plastic Eyelids
The process of attaching ready-made plastic eyelids is straightforward and can be broken down into these essential steps:
- Selecting the Right Eyelids: Before you begin, ensure that you’ve chosen plastic eyelids that match the size and style you envision for your teddy bear. The eyelids should reflect the personality you want your bear to exude.
- Positioning the Eyelids: Position the plastic eyelids to achieve the desired expression for your teddy bear. A slight tilt or variation in placement can convey different emotions. Make sure both eyelids are symmetrical and level.
- Preparing the Bear’s Head: Begin by gently creating a small hole in the bear’s head where you want to place the eyelids. You can use an awl for this purpose, but be careful not to make the hole too large or too small.
- Attaching the Eyelids: Plastic eyelids attach to the back of your safety eyes to give your teddy bears, plush animals, fantasy characters, and monsters personality.
Pros:
- Convenient and Time-Saving: One of the primary advantages of using ready-made plastic eyelids is the sheer convenience they offer. Crafted with precision and consistency, they eliminate the need for time-consuming manual labor, making them a go-to option for teddy bear artists looking to streamline the process.
- Consistent Quality and Shape: Plastic eyelids are manufactured with precision, ensuring that each pair is identical in shape and size. This consistency guarantees a uniform appearance in your teddy bear’s eyes, creating a polished and professional finish.
- Suitable for Beginners: If you’re new to teddy bear making or crafting in general, plastic eyelids can be a perfect starting point. Their straightforward attachment process requires minimal specialized skills, making them accessible to artists of all experience levels.
Cons:
- Limited Customization: While plastic eyelids offer ease and consistency, they may not cater to artists looking for highly customized or unique eyelid shapes. If your teddy bear project demands distinctive eyelid designs, other methods may be more suitable.
- May Not Match Unique Style: Depending on your bear’s style, the predefined shapes and sizes of plastic eyelids may not align with your vision. Artists who favor a more handmade or one-of-a-kind look may find this method limiting.
- Some Artists Prefer a More Handmade Look: Teddy bear crafting often centers around the charm of handcrafted details. For artists who enjoy creating every element from scratch, plastic eyelids might not align with the overall philosophy of their work.
Tips:
- When choosing plastic eyelids, select a size and shape that complements your teddy bear’s personality and expression.
- Ensure a secure attachment by using a plastic washer.
Ready-made plastic eyelids provide a hassle-free and accessible way to give your teddy bears expressive and polished eyes. Their convenience and consistency make them a suitable choice, particularly for artists looking to create charming and cuddly bears with ease.
However, for those who seek maximum customization or a more handmade aesthetic, exploring other methods may be the preferred route.
Method 2: Sculpted Eyelids
Crafting Individuality with Sculpted Eyelids
For teddy bear artists with a passion for creating unique and individualized characters, sculpted eyelids offer a canvas for your artistic expression. This method allows you to sculpt and mold eyelids from various materials, giving your teddy bears a distinct and personalized gaze.
Making and Attaching Sculpted Eyelids
The process of attaching sculpted eyelids involves the following steps:
- Creating the Eyelids: Begin by sculpting the eyelids from your chosen material. Ensure that you match the size and shape you want for your teddy bear’s character.
- Positioning the Eyelids: First, mold the lower eyelid and apply it to the eye. Then mold the upper eyelid and position it so that it slightly overlaps the lower eyelid at the corners of the eye.
- Securing the Eyelids: Depending on the modeling material you choose, follow the instructions. If necessary, leave the eye and eyelid to air dry, and if necessary, bake it.
Pros:
- Unlimited Customization: Sculpted eyelids provide unparalleled customization options. As an artist, you have complete creative control over the shape, size, and expression of the eyelids. This means that you can craft eyelids that perfectly match your teddy bear’s personality and character.
- Artistic Freedom: For those who enjoy the artistic process, sculpted eyelids offer an opportunity for self-expression. You can experiment with various materials and techniques to create eyelids that are truly one-of-a-kind.
- Unique and Individual Teddy Bears: Teddy bears with sculpted eyelids stand out as unique and individual creations. This can be particularly appealing for artists who want their bears to have a distinctive and handcrafted look.
Cons:
- Time-Consuming: Sculpting eyelids from scratch is a time-consuming process. It requires patience and precision, and artists may need to invest more time in perfecting this technique.
- Requires Artistic Skill: Sculpted eyelids demand a certain level of artistic skill and experience. Beginners may find this method challenging, and it might take some practice to achieve the desired results.
- Variability: While sculpted eyelids offer limitless customization, achieving consistency in shape and size can be challenging. Each pair of sculpted eyelids may be slightly different, which can be a con if uniformity is important for your project.
Tips:
- Experiment with different materials for sculpting, such as polymer clay, epoxy putty, or air-dry clay, to find the one that suits your artistic vision and bears the best.
- Practice sculpting on a small scale before working on your teddy bear to refine your technique and achieve the desired level of detail.
- Pay attention to symmetry when sculpting, as even slight differences in the eyelids can significantly affect the teddy bear’s expression.
- Eyelids made of polymer clay can be tinted before and after baking using acrylic paint and pastels.
- With some self-curing clays, such as Milliput White two-part epoxy, it is possible to add acrylic paint directly to the clay as you knead it. Thus, after drying, you no longer need to paint your eyelids.
- If you plan to paint your eyelids with acrylic paint after sculpting, then choose a white clay color. After the clay has dried, let the acrylic paint dry, and then coat it once or twice with a special coating for acrylic paints (they come in matte, glossy, and medium).
- If you need to interrupt the modeling process, to prevent Mulliput White from drying out, wrap it tightly in cling film and place it in the freezer of the refrigerator for no more than 1 hour. During this time, you will have time to defrost and knead it again to complete the sculpting process.
Sculpted eyelids open up a world of artistic possibilities, allowing teddy bear artists to create bears that are truly one-of-a-kind. While this method may require more time and skill, the results are exceptional, making your teddy bears stand out with their personalized and handcrafted appearance.
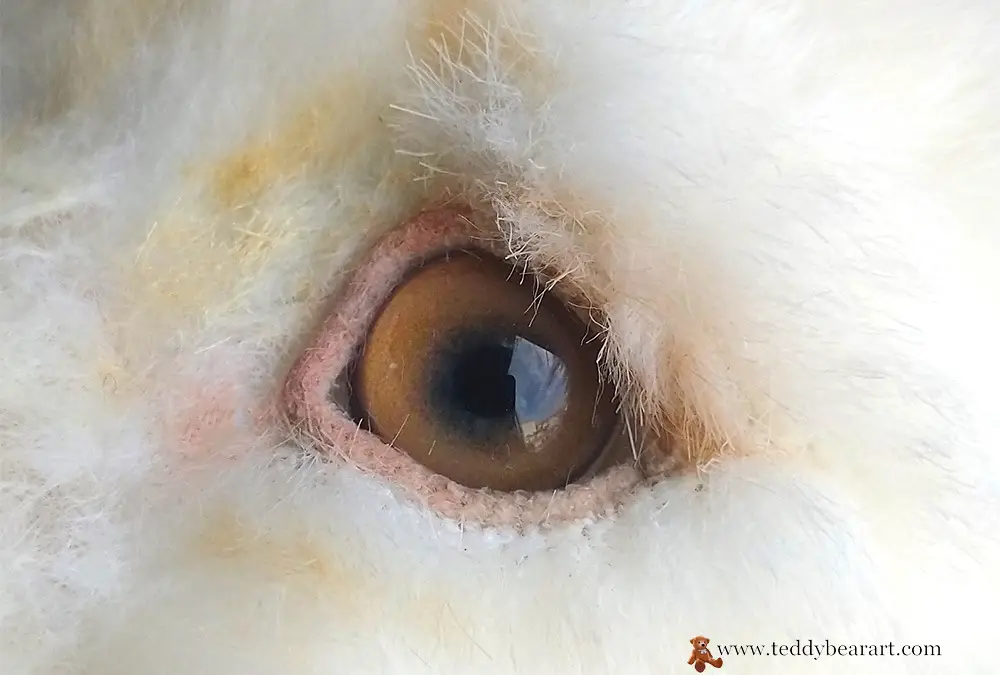
Method 3: Felted Eyelids Without Needle Felting
Crafting Cozy and Soft Eyelids
For teddy bear artists who aim to infuse their creations with warmth and softness, felted eyelids offer a delightful option. This method involves using felt, a textile known for its cozy and tactile qualities, to create eyelids that add a gentle and inviting look to your teddy bears.
Attaching Felted Eyelids
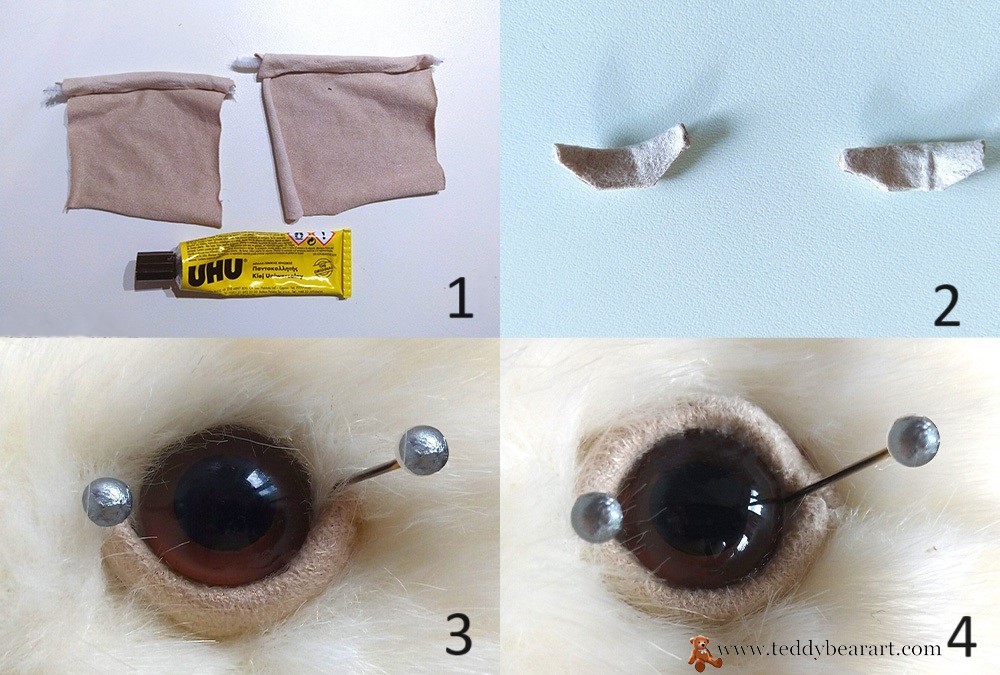
The process of attaching felted eyelids involves the following steps:
- Creating the Eyelids: Begin by cutting out eyelid shapes from felt that match the size and style you desire for your teddy bear. You can use various felt colors to achieve the look you want.
- Positioning the Eyelids: Once the felted eyelids are ready, carefully position them on the bear’s eyes where you want them. Make sure they are symmetrical and even.
- Securing the Eyelids: Use a strong adhesive suitable for fabric, such as fabric glue or strong UHU glue. Apply glue to the back of each eyelid and gently press it onto the bear’s face. First glue the lower eyelid, and then the upper one. Make sure they are securely fastened and aligned.
Pros:
- Soft and Comfortable: Felted eyelids provide a soft and comforting appearance to teddy bear eyes. The plush texture of felt adds a cozy and inviting quality to the bears, making them more huggable and endearing.
- Handmade Charm: Crafting felted eyelids allows for the charm of handmade details. You can create eyelids that match your vision precisely, giving your teddy bears a personalized and unique look.
- Suitable for Various Styles: Felted eyelids can complement a wide range of teddy bear styles, from traditional bears to modern and whimsical designs. The versatility of felt makes it a suitable choice for various projects.
- Easy to Paint and Tint with Any Type of Dye: oil, acrylic, pastels, markers, and special paints for fabrics.
- Easy to Remove: In case something goes wrong, you can peel off the felt and clean the glass eye of glue.
Cons:
- Limited to Soft Appearance: Felted eyelids are best suited for teddy bears that aim for a soft and cozy appearance. If your project demands a more polished or lifelike look, other methods may be more appropriate.
- Requires Precision: Achieving the desired shape and symmetry in felted eyelids can be challenging and may require practice and attention to detail. It’s essential to create eyelids that match the character of your bear.
- Not Suitable for Plastic Eyes: If glue gets on plastic, it will damage the eye, and cleaning is impossible.
Tips:
- Experiment with different colors and textures of felt to achieve the desired look for your teddy bear’s eyelids.
- When attaching felted eyelids, be patient and allow the adhesive to dry thoroughly for a secure bond.
- Make eyelid patterns from paper so that everything is accurate.
- You can glue the felt eyelids before putting them in the eyes, or after.
Felted eyelids offer a warm and inviting quality to teddy bears, making them even more huggable and charming. This method is particularly suitable for artists who want to create bears with a soft and cozy appearance, and it complements a wide range of teddy bear styles. However, for those aiming for a more lifelike or polished look, exploring alternative methods may be necessary.
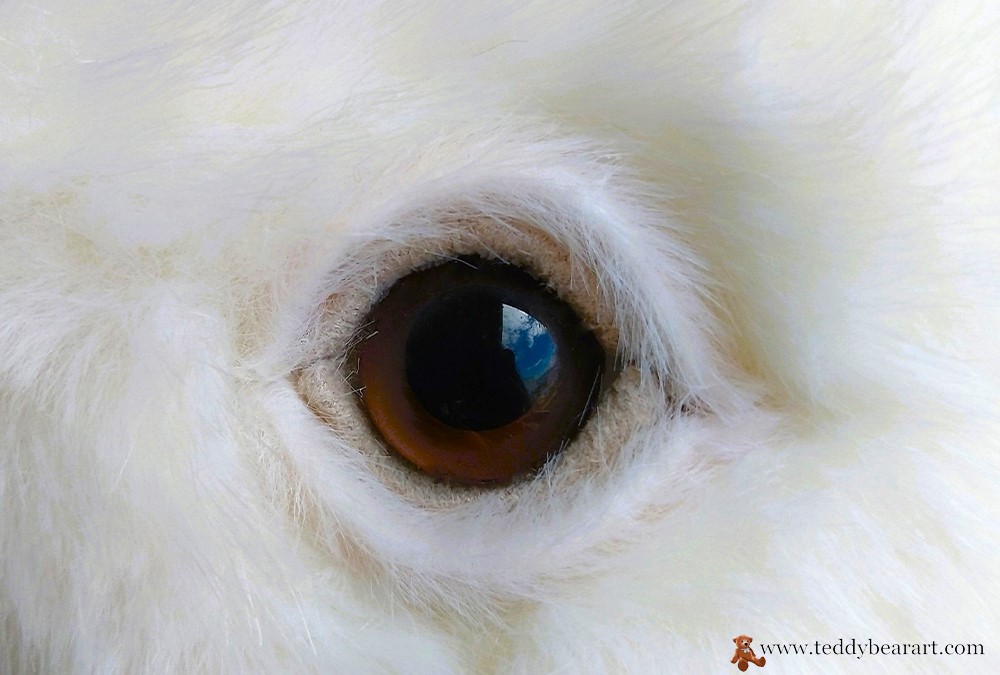
Method 4: Leather and Suede Eyelids
Adding Texture and Realism

For teddy bear artists seeking to infuse their creations with a touch of realism and texture, leather eyelids, suede, or faux suede fabrics offer an enticing option. This method can be particularly captivating for bears designed to have a lifelike appearance or collectors’ bears. Here’s a detailed look at how to implement leather eyelids or thin fabric for your teddy bears.
The Process:
- Material Selection: Choose a piece of leather or thin fabric that complements the bear’s fur color and style. Ensure that the material harmonizes with the overall look you aim to achieve.
- Design and Cutting: Create templates for the eyelids based on your bear’s eye shape. Use sharp scissors to cut the leather or fabric precisely, ensuring symmetrical shapes for both eyes.
- Attaching the Eyelids: After you insert the eyes, carefully secure the eyelids to the teddy bear’s face. You can use a strong adhesive designed for crafting or, if you prefer, stitch the eyelids in place. Using a matching thread, start sewing one eyelid to the teddy bear. You can use a simple whip stitch or a ladder stitch to attach the eyelid. Be sure to leave a small opening between the fabric and the teddy bear’s eye to give the appearance of eyelids. Be mindful of alignment to maintain symmetry.
- Finishing Touches: Ensure that the eyelids are securely attached and provide the desired textural and lifelike effect.
Pros:
- Adds Texture and Realism: The choice of leather or thin fabric provides a tactile dimension to your teddy bear’s face, enhancing its overall lifelike quality. This approach is ideal for artists who want to create teddy bears that are as close to nature as possible.
- Suitable for Lifelike Bears: If your goal is to craft bears that mirror the appearance of real animals, leather eyelids or thin fabric can make a significant difference. These materials lend a sense of authenticity to the bear’s eyes, capturing the subtle nuances found in nature.
- Enhances Collector’s Bears: For teddy bears designed to be coveted by collectors, the use of leather eyelids or suede fabric can be a distinguishing feature. The attention to detail and commitment to realism can make your bears stand out as cherished works of art.
Cons:
- Requires Sewing and Crafting Skills: Working with leather or suede fabric requires a certain level of expertise in sewing and crafting. Precise cutting, stitching, and alignment are necessary to achieve the desired effect.
- May Not Be Suitable for Soft and Cuddly Bears: While leather eyelids or thin fabric can add a layer of realism, they may not be the best choice for teddy bears with a soft and cuddly aesthetic. The materials can create a stiffer texture that might not suit the intended comfort of the bear.
- Challenging with Thicker Materials: Depending on the thickness of the chosen leather or fabric, working with these materials can be more challenging. Thicker materials may require additional effort to shape and attach securely.
Tips:
- Choose Complementary Material: Select leather or fabric that complements the bear’s fur color and style. The material should harmonize with the overall look you aim to achieve.
- A Good Choice: Thin, reversible suede can be a good choice, available in a wide range of shades and available at craft and fabric stores.
- Secure Eyelids Carefully: Precise attachment is crucial. Use a strong, reliable adhesive or stitching technique to ensure the eyelids stay in place, even with frequent handling.
- Help Achieve Symmetry: Use pins or put marks with a disappearing marker at the inner and outer corners of the eyes to glue or sew the eyelids symmetrically on both eyes.
Adding leather eyelids or thin fabric to your teddy bears can elevate their visual appeal and create a sense of realism that resonates with collectors and enthusiasts alike.
Remember that the choice of materials and the precision of your crafting skills play a pivotal role in achieving the desired effect. Explore this method to bring a new dimension of texture and authenticity to your bear-making artistry.
Method 5: Needle-Felted Eyelids
Embracing Softness and Tradition
Needle-felted eyelids offer a soft and traditional appearance, making them a perfect choice for classic teddy bears. This method adds a timeless touch that complements vintage-style bears, and it’s also beginner-friendly. Here’s a comprehensive look at how to create and attach felted eyelids to your teddy bear.
Materials you’ll need:
- Felting needle
- Felting mat or foam pad
- Wool roving in the desired eyelid color
- Small scissors
- Your teddy bear with the eyes in place
Steps:
- Prepare the Wool Roving: Start by selecting the color of wool roving you want for the eyelids. Pull off a small amount and roll it into a thin, elongated shape. You’ll need two of these for each eyelid.
- Position the Teddy Bear: Have your teddy bear in front of you, and make sure the eyes are securely in place.
- Attach the First Eyelid: Take one of the rolled pieces of roving and position it where you want the first eyelid to be. Use your felting needle to gently pierce the roving and attach it to the bear’s face. Be cautious not to poke too deep or close to the eyes.
- Shape the Eyelid: Continue to felt the wool roving, shaping it into the desired eyelid shape. You can use the tip of the felting needle to sculpt and refine the eyelid’s shape.
- Repeat for the Second Eyelid: Once you’re satisfied with the first eyelid, repeat the same process for the second eyelid, making sure they match in size and shape.
- Trim Excess Roving: If there’s any excess roving, you can carefully trim it with small scissors to achieve a neat and even look.
- Final Touches: Gently felt the eyelids once more to secure them in place and ensure they blend with the bear’s face seamlessly.
- Inspect and Adjust: Take a step back and inspect your teddy bear’s new eyelids. If you need to make any adjustments or refine the shape further, go ahead and do so.
Pros:
- Customization: Needle felting allows for a high degree of customization. You can create eyelids in any color and shape you desire to match your teddy bear’s unique character.
- Detail and Realism: This method enables you to add intricate details to your teddy bear’s face, enhancing its overall realism. The fine texture of needle-felted eyelids can make your bear more expressive.
- Durability: Once properly felted and secured, these eyelids can be quite durable and long-lasting. They won’t easily come off or wear out with normal handling.
- Artistic Freedom: Needle felting offers artistic freedom, allowing you to experiment with various eyelid shapes and styles to achieve the perfect look for your teddy bear.
- Minimal Materials: You don’t need many materials for needle felting eyelids, making it a cost-effective method. A felting needle, some wool roving, and a felting mat are the primary requirements.
- Skill Development: Needle felting is a creative skill that can be learned and improved over time. As an experienced teddy bear artist, it adds another dimension to your craft and skill set.
- Crafting Satisfaction: Creating eyelids through needle felting can be a satisfying and enjoyable part of the teddy bear-making process. It’s a great way to add a personal touch to your creations.
- Blend with Existing Features: Needle-felted eyelids can seamlessly blend with your teddy bear’s facial features, giving them a natural and harmonious appearance.
- Overall, needle felting eyelids is a versatile and rewarding technique for teddy bear artists, allowing you to add fine details that enhance the overall charm of your creations.
- Easy for Beginners: If you’re new to teddy bear making, felted eyelids are a great starting point. They are relatively simple to create and attach, providing an excellent introduction to the art.
Cons:
- Risk of Poking the Bear: There’s a risk of accidentally poking the teddy bear itself while needle felting. This can damage the bear’s face or eyes, so extreme caution is necessary.
- Time-Consuming: Needle felting is a time-consuming process. Creating detailed eyelids can be a lengthy endeavor, which might not be ideal if you’re looking for a quick solution.
- Not Suitable for All Teddy Bears: Needle-felted eyelids may not be suitable for all types of teddy bears. For some bears with different fabrics or designs, this technique might not work as effectively.
Tips:
- Practice First: If you’re new to needle felting, it’s a good idea to practice on a small piece of fabric or spare wool roving before working on your teddy bear’s face. This will help you get a feel for the process and the level of pressure required.
- Use a Felting Mat: Always work on a felting mat or foam pad to protect your work surface and prevent the needle from breaking.
- Start Small: Begin with small amounts of wool roving for the eyelids. It’s easier to add more if needed than to remove excess roving.
- Work Slowly and Gently: Needle felting requires a delicate touch. Use light, controlled motions with the felting needle, especially when working near the eyes.
- Match the Eyelids: Take your time to ensure that both eyelids are of equal size and shape. Consistency is key for a balanced and realistic appearance.
- Build Up Gradually: Add wool roving in layers to build up the eyelids gradually. This allows for more control and precision.
- Pay Attention to Proportions: Consider the size and positioning of the eyelids relative to the bear’s eyes. Be mindful of the overall proportions to achieve a natural look.
- Use Fine-Grade Needles: Finer gauge felting needles are often better for detailed work, such as eyelids. They allow for greater control and precision.
- Inspect Frequently: Step back and inspect your work regularly to ensure that the eyelids are shaping as desired. Make adjustments as needed.
- Secure the Eyelids Well: Once you’re satisfied with the shape and appearance of the eyelids, ensure they are securely felted in place to prevent them from coming loose.
- Practice Safety: Always exercise caution when using felting needles, especially around the eyes. Keep your fingers out of the needle’s path to avoid accidental pricks.
- Explore Different Colors: Experiment with various colors of wool roving to create eyelids that complement your teddy bear’s overall look and personality.
- For Better Grip: Stuff the bear’s head with sheep’s wool.
Needle felting eyelids for teddy bears is a creative and rewarding technique that allows you to add personalized and detailed features to your bear’s face. While it offers numerous benefits, such as customization and durability, it’s essential to keep in mind the level of skill and patience required.
Remember that needle felting is a skill that improves with practice, so don’t be discouraged if your first attempts aren’t perfect. With time and experience, you’ll become more proficient at creating beautiful eyelids for your teddy bears.
Method 6: Wire-Based Eyelids
Creating Artistic and Expressive Eyelids
Wire-based eyelids offer a unique and creative opportunity to add artistic and expressive elements to your teddy bears. This method is ideal for bear artists looking to push the boundaries of traditional teddy bear design.
With wire-based eyelids, you can make your bears stand out as true works of art. Here’s a detailed look at how to implement wire-based eyelids for your teddy bears:
Materials you’ll need:
- Thin wire (such as floral wire, jewelry-making wire, chenille wire, copper craft wire).
- Suede or thin fabric for the eyelids
- Needle and thread
- Glue (fabric glue or a strong adhesive)
- Pins
- Your teddy bear with the eyes in place
Steps:
- Be sure that the eyes are inserted.
- Cut a piece of thin wire of the required length for the eyelid. Make sure it is slightly longer than the eye you are attaching it to.
- Cut long rectangles from two pieces of suede or fabric.
- Cover the wire with fabric. Press the fabric together, making sure the wire is secure. Let it dry completely.
- When the glue has dried, trim off the excess tissue to make the eyelid neat and even.
- Repeat the procedure for the other eyelid.
- Attach eyelids to the teddy bear’s eyes. You can do this by sewing them in place or using strong glue. Use pins for symmetry. You can even sew on the eyelid with craft wire 0.4 mm in diameter if you leave long ends!
This wire-based method can give your teddy bear a unique look and expression. Remember to be patient and precise when working on these details. If you have any more questions or need further assistance, feel free to ask!
Pros:
- Realistic Look: Wire-based eyelids can provide a more realistic appearance to the teddy bear’s and stuffed animal’s eyes, enhancing the overall look and expression.
- Durable: They are often more durable than purely fabric eyelids, ensuring that the eyes stay securely in place.
- Customizable: You can easily shape the wire to create various eyelid shapes and expressions to suit your teddy bear’s character.
- Strength and Stability: The wire provides stability to the eyelids, preventing them from sagging or losing their shape over time.
- Secure Attachment: Wire-based eyelids can be attached securely using sewing or glue, ensuring they stay in place.
- Unique Design: This method allows for more creative possibilities, as you can experiment with different wire shapes and sizes for unique eye designs.
Cons:
- Complexity: Creating wire-based eyelids can be more complex and time-consuming compared to using simpler fabric eyelids. It may require additional skills and tools.
- Safety Concerns: Ensure that the wire ends are properly secured and covered to prevent any sharp edges or points that could pose a safety risk, especially if the teddy bear is intended for children.
Tips:
- Choose the Right Wire: Select a wire that is thin and flexible but sturdy enough to hold the desired shape for the eyelids. Copper or aluminum craft wire is often a good choice. Consider the gauge (thickness) of the wire to achieve the right level of flexibility.
- Measure Carefully: When cutting the wire for the eyelids, measure precisely to ensure both eyelids are of the same size. Consistency is important for achieving a balanced look.
- Secure the Ends: After folding the fabric over the wire and gluing it, make sure to secure the ends properly. This prevents the fabric from unraveling or coming loose.
- Trim Excess Fabric: Once the glue has dried, trim any excess fabric neatly to create clean and tidy eyelids.
- Position Eyelids Correctly: Before attaching the eyelids to the teddy bear’s eyes, ensure they are properly positioned for the desired expression. You can use pins or temporary adhesive to hold them in place while you work.
- Sew or Glue Carefully: When attaching the eyelids to the teddy bear’s eyes, be cautious and precise. Use a strong adhesive or secure them with neat, even stitches to ensure they stay in place.
- Practice: If you’re new to this method, it’s a good idea to practice on some scrap fabric and wire to get a feel for how to work with these materials effectively.
- Safety: Be mindful of any sharp wire ends. Ensure they are properly covered or bent to avoid any safety hazards, especially if the teddy bear is intended for children.
- Experiment: Don’t be afraid to experiment with different wire shapes and fabric types to achieve unique looks for your teddy bear’s eyes.
Incorporating wire-based eyelids into your teddy bear-making can be a creative and rewarding technique that adds realism and character to your bears. While it may have some challenges, with practice and attention to detail, you can achieve charming and expressive results.
Conclusion
Mastering the art of creating lifelike teddy bear eyelids is a journey worth embarking on for any teddy bear artist.
Whether you choose ready-made plastic eyelids for convenience, sculpted eyelids for uniqueness, felted eyelids for a cozy touch, leather or thin suede fabric for texture and realism, or wire-based eyelids for artistic expression, each method offers its own set of advantages and challenges.
Remember that your choice of eyelid method should align with the style and character of your teddy bear project. Whether you aim for a soft and cuddly bear, a lifelike collector’s item, or an artistic masterpiece, there’s a method to suit your vision.
As you explore these advanced techniques and put your creativity to work, your teddy bears will come to life with expressive, enchanting eyes that capture the hearts of all who behold them.
Your journey into the world of teddy bear artistry continues to evolve, and with each new creation, you’ll bring joy and wonder to those who embrace your bears. Happy bear-making!
Read Also
- 5 Ways to Attach Teddy Bear Eyes and Bring Them to Life: Discover five different methods for attaching teddy bear eyes and infusing your creations with that spark of personality.
- 25 Teddy Bear Making Tips: Uncover crucial knowledge and techniques that will enhance your skills in crafting teddy bears. These tips encompass a range of topics, from selecting the ideal materials to mastering stitching methods, all geared toward helping you create endearing and cuddly teddy bears.
Get Free Patterns & Be the First to Know!
Want free teddy bear patterns, exclusive tutorials, and a chance to win craft supplies?
Sign up for our newsletter using the subscribe form in the middle of this article to receive new patterns, insider tips, and the latest news on teddy bear art. You’ll also automatically be entered into our annual giveaway for a chance to win teddy bear crafting materials.
Bonus entry: Save one of our pins on Pinterest to increase your chances of winning!
Let’s create, inspire, and craft beautiful teddy bears together!
Your article about teddy bear’s eyelids is amazing! I like the way you describe the different possibilities to create eyelids for teddy bears and stuffed animals. And it’s true that eyelids are the window of the soul! Your teddy animals have so deep and warm look!
When I saw that you described the different techniques, I found that the sculpted eyelids are realistic and you can think the teddy bear is real!
Thank you so much for your sweet words! I’m thrilled you enjoyed the article about teddy bear eyelids. It’s fascinating how little details like eyelids can bring so much personality to these fluffy friends. If you have any specific techniques you’d like more info on or if there’s another topic you’re curious about, feel free to let me know!
Aww! Teddybear eyelids…what an endearing topic!
Though I don’t own a teddy bear now, I used to and I loved it to bits. Crafting teddy bears and their characteristic eyelids is truly an art and I admire you for taking on such a narrow niche. Handmade bears are the whole art and very hard work!
I really did enjoy reading this article. I felt to be involved in the bear world. Thanks for sharing!
Hey there! 🐻 Thanks a bunch for your sweet words! It warms my heart to hear that you enjoyed the article. Crafting teddy bears is indeed a labor of love, and those little details like eyelids can make them extra special. Even if you don’t have a teddy bear now, it’s awesome that you have fond memories of one. If you ever decide to dive back into the bear world, you know where to find some great tips and patterns! 😊🧸