Are you ready to embark on a magical crafting journey? If you’re a fan of stuffed animals and enjoy the art of sewing, then our “Stuffed Mole Sewing Pattern” is just what you need to add a touch of enchantment to your creative endeavors. In this guide, we’ll explore how this pattern can help you craft your very own mole plushie, brimming with charm and personality.
This pattern is more suitable for experienced artists because the process of creating a mole uses various techniques, such as dry felting and sculpting.
But since we provide step-by-step manufacturing instructions, craftsmen of any level can try to make this mole.
The stuffed mole sewing pattern is more than just a set of instructions; it’s a gateway to a world of crafting magic. Designed with meticulous care, this pattern captures the essence of these adorable underground dwellers and allows you to bring them to life through your sewing skills. Crafters around the world have fallen in love with this unique design, and now it’s your turn to discover its charm.
Gathering Your Materials
Before you dive into the enchanting world of crafting your very own mole plushie using the stuffed mole sewing pattern, it’s essential to ensure you have all the necessary materials and tools at your fingertips.
Gathering your supplies not only makes the sewing process smoother but also ensures that your finished mole will be of the highest quality. Here’s a closer look at what you’ll need:
1. Fabric:
Selecting the right fabric is crucial to creating a mole plushie that’s both huggable and visually appealing. Opt for soft, plush materials in mole-like colors, typically various shades of black, brown, or gray. The texture of the fabric should be comfortable to the touch, making your mole irresistibly cuddly.
2. Stuffing:
The stuffing you choose will determine the plumpness and squishiness of your mole. High-quality stuffing, such as polyester fiberfill, ensures that your mole maintains its shape and remains huggable for years to come. Make sure you have enough on hand to fill your mole plushie generously.
3. Needles and Thread:
Invest in a set of durable sewing needles suitable for your chosen fabric. Different parts of your mole may require different types of needles, so having a variety on hand can be helpful. Matching thread colors ensures a seamless finish, so stock up on spools of thread that complement your chosen fabric.
4. Scissors:
Sharp scissors are your best friend when it comes to cutting fabric accurately. A pair of fabric scissors or shears will make the job easier and prevent fraying or uneven edges.
5. Glass Eyes and Modeling Clay for His Nose:
To give your mole a lifelike appearance, consider using glass eyes designed for stuffed animals. These come in various sizes and styles, allowing you to customize your mole’s facial features.
6. Discs and Cotter Pins: These components allow you to attach the limbs securely while maintaining a cute, poseable quality in your mole.
- Discs: Discs are small, flat, circular pieces often made of hardboard or plastic. They are used as joints to connect the mole’s limbs to its body. These discs provide stability and mobility to your mole’s arms and legs, allowing them to move freely. Make sure to choose the right size of discs for your project, ensuring they fit snugly within your mole’s limbs.
- Cotter Pins: Cotter pins are T-shaped or O-shaped pins made of metal, typically brass or steel. They work in conjunction with the discs to create movable joints. Cotter pins secure the limbs in place and allow you to adjust their positioning as desired. When attaching cotter pins, be sure to follow the instructions provided with your sewing pattern carefully.
7. Optional Accessories:
While not essential, adding accessories to your mole plushie can make it even more charming. Think about tiny scarves, hats, miniature glasses, or other accessories that reflect your mole’s personality.
Detailed list of materials and tools:
- A piece of short-pile faux fur, approx. 46×25 cm.
- Strong threads, the same color as your plush fabric, and a needle for hand sewing.
- Pink floss threads for embroidering paws.
- Scissors.
- A pair of small black glass eyes on a metal loop.
- A long needle (10-15 cm) for inserting the eyes.
- Discs: for the head and the hands, 18 mm – 6 pieces, for the legs, 20 mm – 4 pieces.
- Washers 18 mm in diameter – 10 pieces.
- T-shaped cotter pins 2.2 x 20 – 5 pieces.
- Synthetic filler.
- Metal or glass pellets for the weight.
- Liquid glue UHU.
- White oil and pink acrylic colors and paintbrushes.
- Top coat for acrylic colors.
- Pliers.
- An awl.
- Sheep wool and needles for needle felting the mouth and the eyelids.
- Molding clay for the nose.
Now that you have your materials in order, you’re all set to embark on your mole-sewing adventure. With the right supplies, you’ll be well-prepared to craft a mole plushie that’s not only delightful to look at but also incredibly snuggly. So, gather your materials and get ready to bring your mole magic to life!
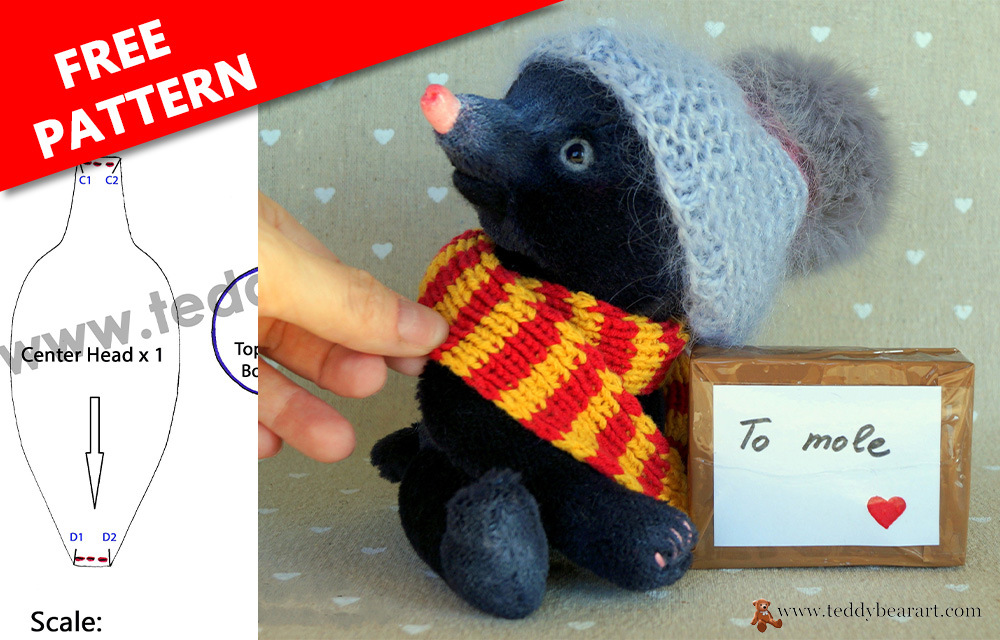
Download the Teddy Mole Pattern
- From a computer (Windows).
Click on the photo of the pattern, and select the “Save image as …” option. - From a phone or a tablet (Android). There should be something similar for the iPad.
Click on the image. Save it by holding your finger on the image and selecting the “Save Image” option. Then go to your photo gallery and print it (there is an option).
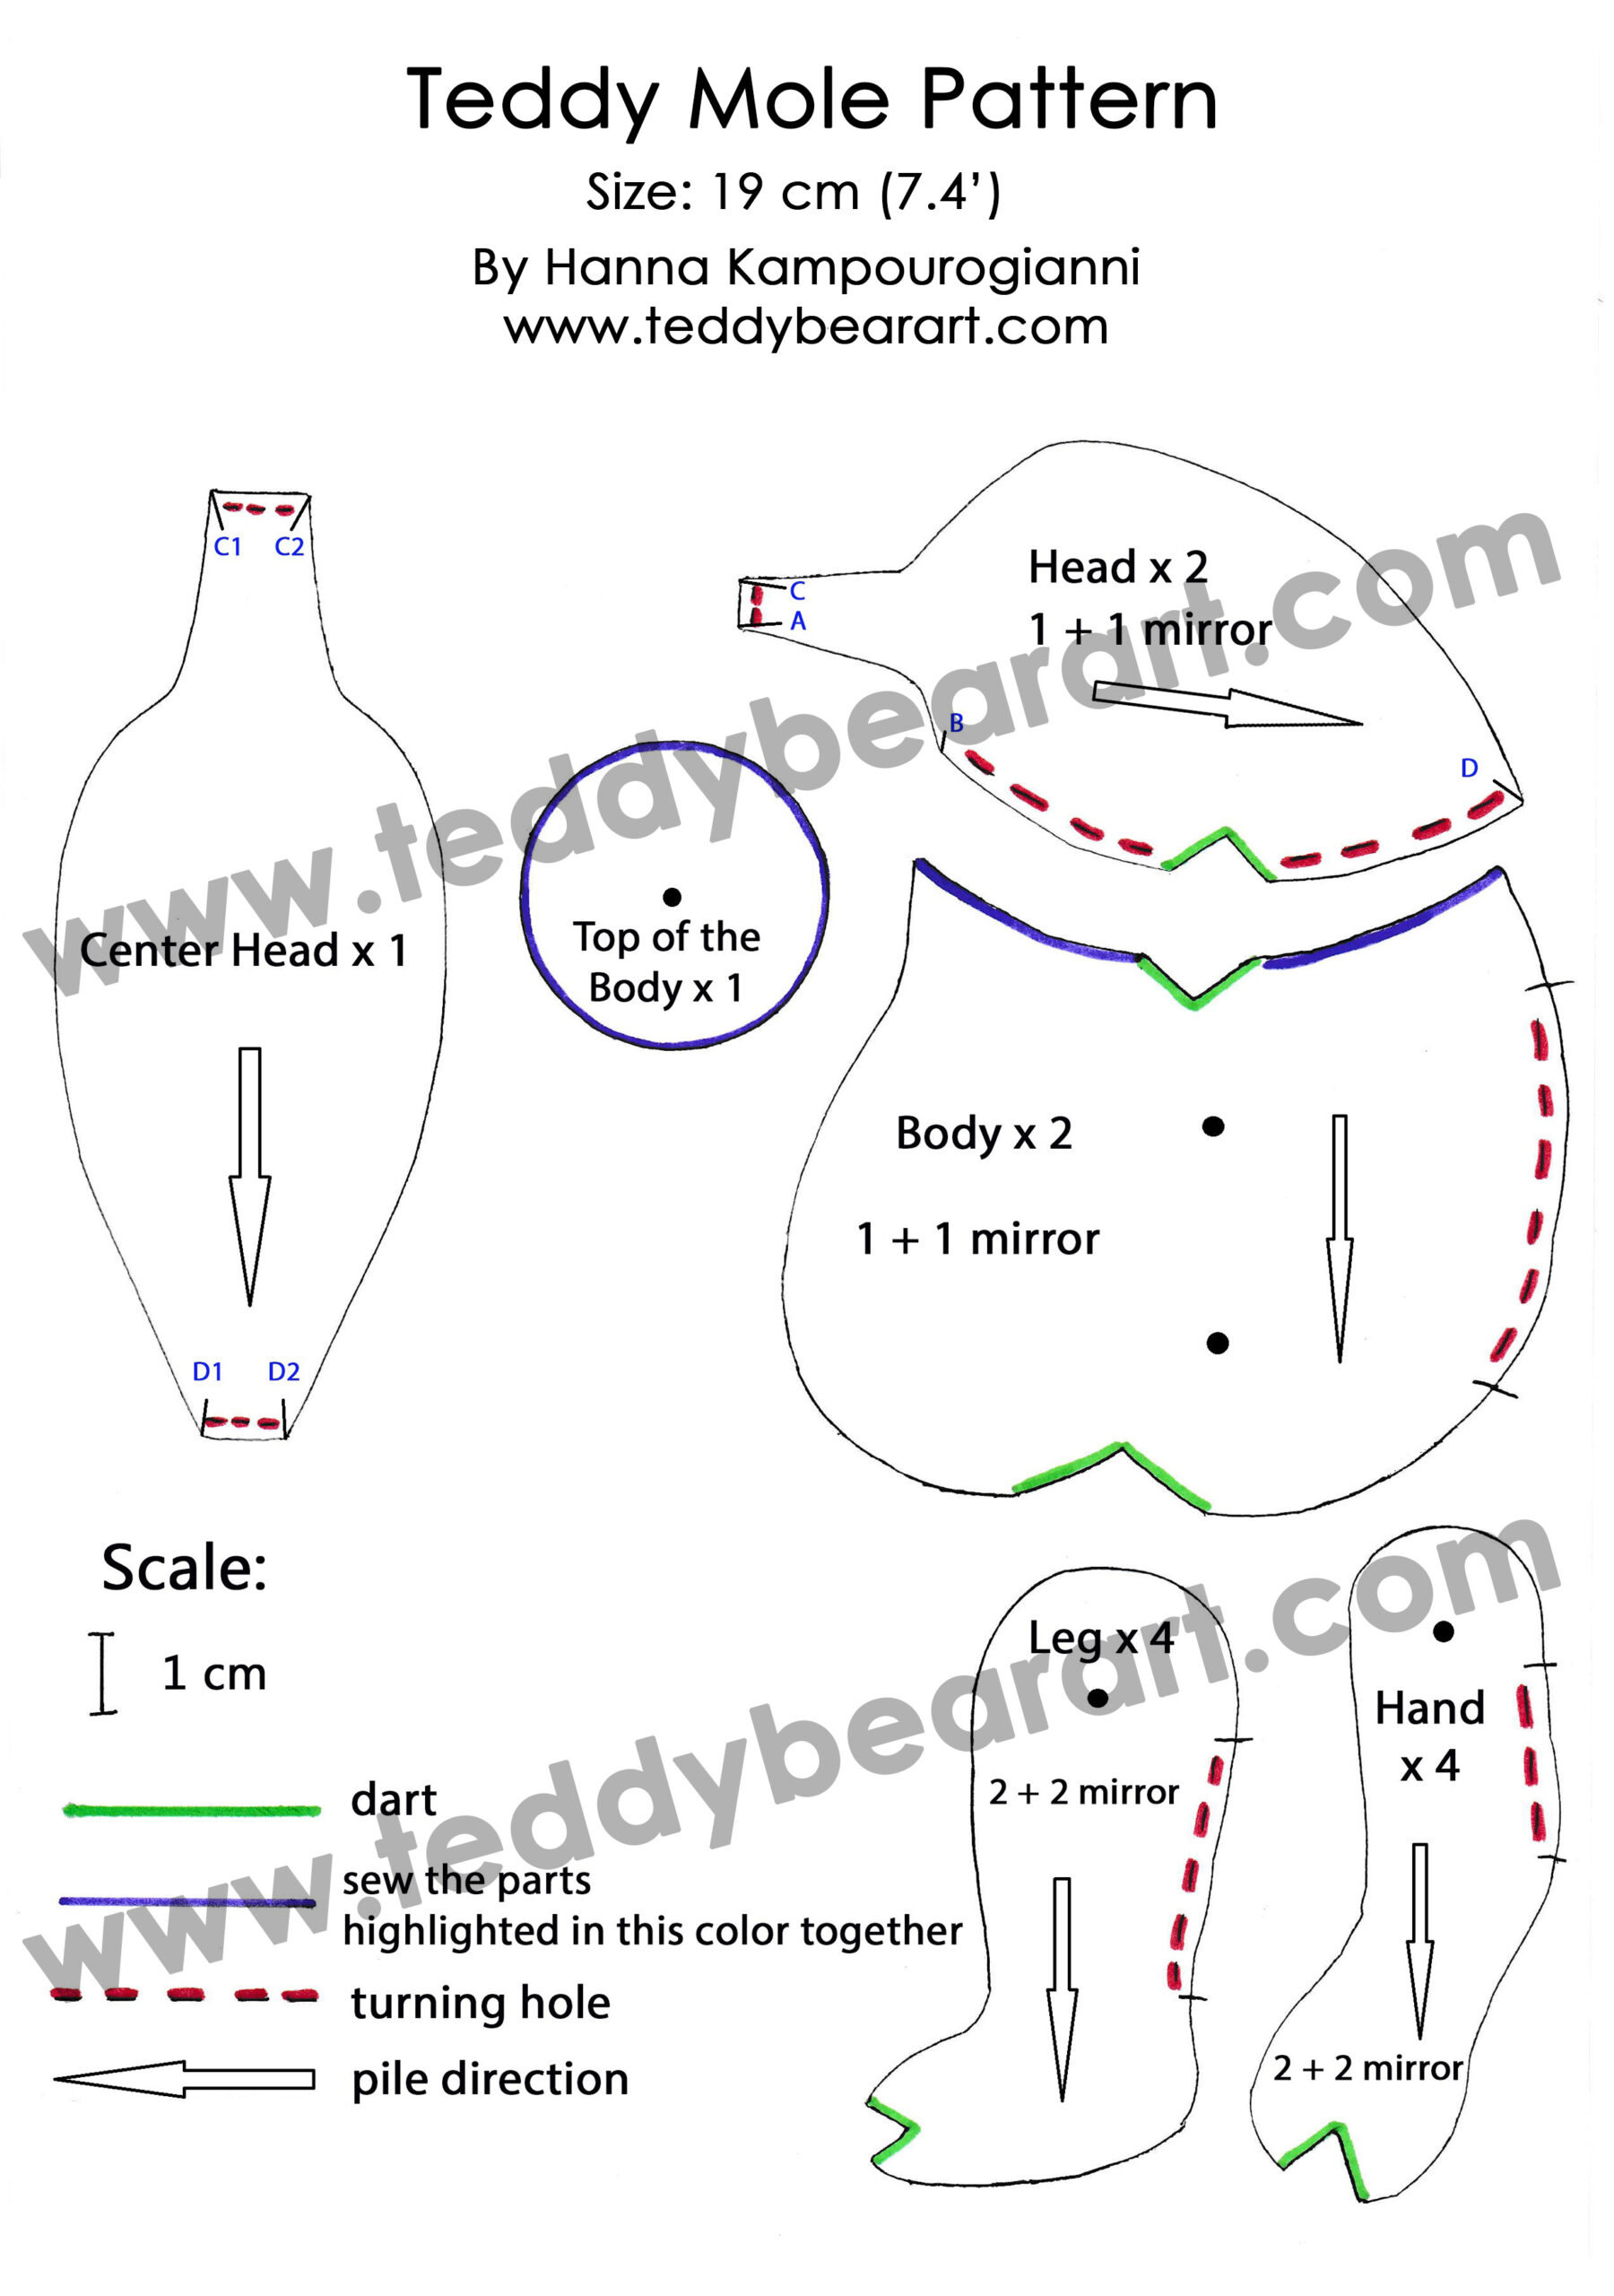
Pattern Guide
Step 1: Sew all the darts (highlighted in green).
Step 2: Sew the head along points from A to B. Then from C-C1 to D-D1 and from C-C1 to D-D2.
Step 3: Sew the body: Sew the two mirror parts together. Sew the round piece on top (highlighted in purple).
Step 5: Sew the limbs.
Step 6: Sew the tail.
Now, let’s get to the fun part—creating your mole! Follow these step-by-step instructions to bring your mole plushie to life:
- Cut Out Your Pattern Pieces: Use the provided templates to cut out your mole’s body, limbs, and other components.
- Sew and Stuff the Head. Leave the hole for inserting the nose.
- Add the Eyes, the Nose, and The Mouth: Insert the eyes. Make his eyelids out of wool. Mold, paint, and insert the nose (with a little bit of glue) according to the pattern’s guidelines. Make a mouth out of wool.
- Sew the Body.
- Attach the Head to The Body.
- Sew, Stuff, and Attach the Limbs.
- Stuff Your Mole: Fill your mole plushie with stuffing until it’s delightfully plump. Do not forget to add some weighting.
- Close the Opening: Sew up the opening, ensuring your mole is securely sealed.
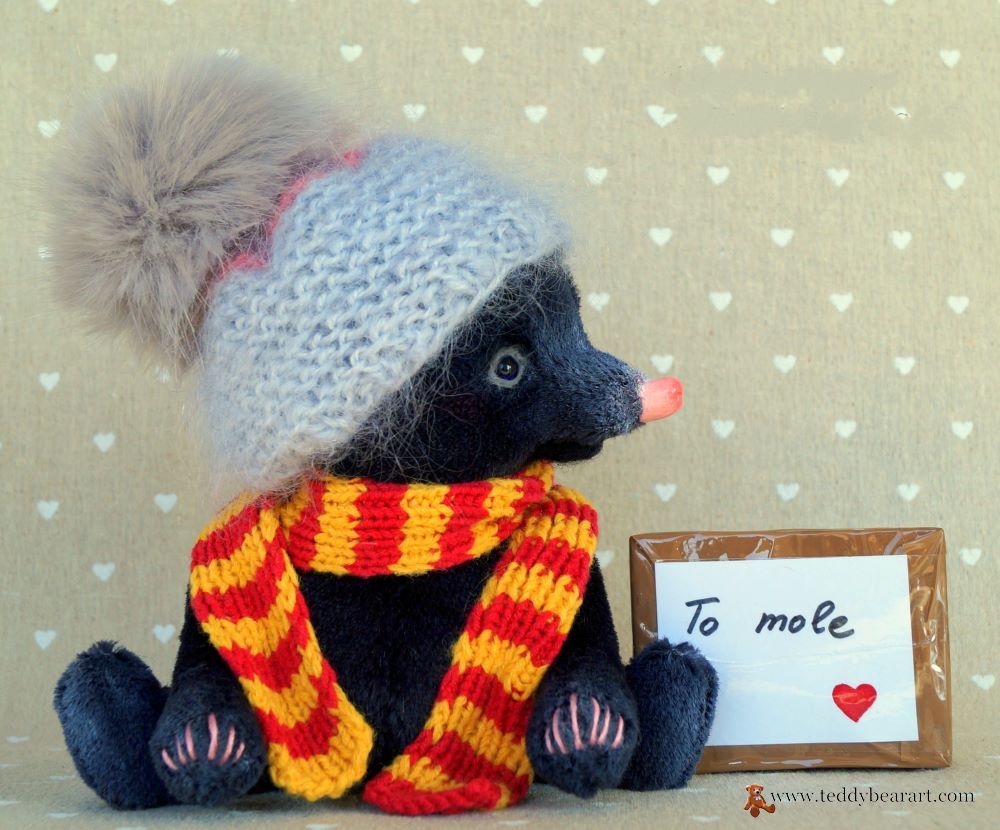
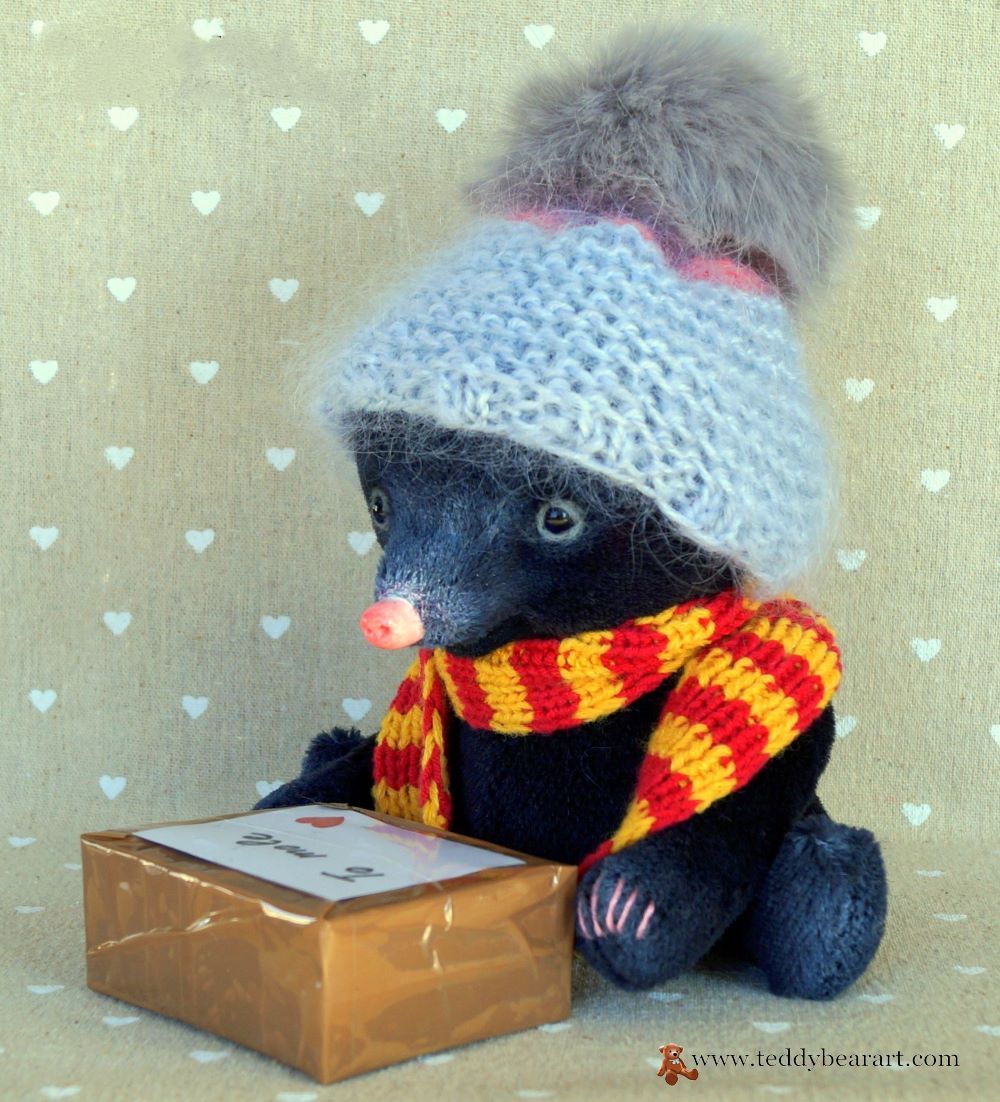
- Tinting: Trim off some pile from the nose area. Tint the area of the mole’s nose and paws with white oil paint. Embroider his fingers.
- Personalize Your Mole: Get creative! Add any accessories or customizations you desire.
The magic truly happens as you see your mole take shape with each step. Don’t forget to take your time and enjoy the crafting process.
Adding Your Personal Touch
One of the joys of crafting with the stuffed mole sewing pattern is the opportunity to add your personal touch to your creation. Whether it’s giving your mole a distinctive scarf, a tiny book, or even a miniature shovel, customization allows you to infuse your mole with your unique style and personality. Your mole will be a one-of-a-kind creation that reflects your creativity and imagination.
We bring to your attention a simple guide to knitting a wonderful striped scarf for a mole.
The Magic of Mole Plushies
Mole plushies have a special kind of magic. They’re not just stuffed animals; they’re companions filled with charm and warmth. These whimsical creatures have a way of bringing smiles and joy to both crafters and those lucky enough to receive them as gifts.
Whether you’re crafting moles for yourself or to share with others, the process is a magical journey filled with creativity and wonder. Each mole you create becomes a unique work of art, and the joy you experience along the way is a truly enchanting reward.
Additional Resources
As you embark on your mole plushie crafting adventure, don’t forget to explore the wealth of resources available right here on teddybearart.com/. Our website is a treasure trove of inspiration, patterns, and guides tailored to teddy bear makers and stuffed animal enthusiasts like you.
- Pattern Library: Dive into our extensive pattern library, where you’ll find a wide range of patterns, including not only the beloved stuffed mole sewing pattern but also patterns for teddy bears, other animals, and accessories. Browse through and discover your next exciting project.
- Selling Handmade Teddy Bears Online: The completion of your stuffed teddy mole marks the beginning of a new journey: sharing your creations with the world. Join us as we embark on an insightful exploration of the essential elements of successful online teddy bear sales – selecting the ideal platforms and mastering your pricing strategy. We will navigate through various online marketplaces, from well-known platforms like Etsy to specialized ones, and uncover the art of pricing that not only covers expenses but also captures the interest of collectors. It’s time to launch your journey into selling your teddy bear creations.
Get Free Patterns & Be the First to Know!
Want free teddy bear patterns, exclusive tutorials, and a chance to win craft supplies?
Sign up for our newsletter using the subscribe form in the middle of this article to receive new patterns, insider tips, and the latest news on teddy bear art. You’ll also automatically be entered into our annual giveaway for a chance to win teddy bear crafting materials.
Bonus entry: Save one of our pins on Pinterest to increase your chances of winning!
Let’s create, inspire, and craft beautiful teddy bears together!
This article is amazing! I’ve always admired people who are dedicated to their crafts like yours. Especially because I’m not a very gifted person myself! but I appreciate the talent with which you described all the steps to make a stuffed mole. And what’s more interesting is that you underline that people can personalize their stuffed mole. it’s important that their work reflects their personality!
Thank you so much for your kind words! 😊 I’m thrilled to hear that you enjoyed the article and found it inspiring. Crafting is all about expressing your creativity, and even if you don’t consider yourself gifted, you can still create something wonderful and unique. Personalizing your stuffed mole or any teddy bear is indeed a fantastic way to make your work truly reflect your personality. If you ever decide to give it a try, don’t hesitate to reach out if you have any questions or need some guidance. Happy crafting! 🧸🎨
What a cute little stuffed mole! As a sewer and crafter, I am always on the lookout for ideas to do with my grand daughter, and I can see that she will love to join me in making this mole. But how feasible is it to make with a six-year old?
Hey there! Thanks for your sweet comment! 😊 I’m delighted to hear that you and your granddaughter are interested in making the stuffed mole together. It’s definitely a wonderful bonding activity.
As for whether it’s feasible for a six-year-old, it depends on her crafting skills and attention span. The mole project can be made simpler or more complex based on her experience level. You might want to start with the basics, like cutting out the fabric pieces, simple stitching, and stuffing, which can be more manageable for a young crafter.
Additionally, you could provide guidance and supervision as needed. It’s a great opportunity to teach her some basic sewing skills and spend quality time together. Just remember to make it fun and enjoyable, and don’t worry too much about perfection. The most important thing is the experience and the joy of creating something together. Have a fantastic time crafting with your granddaughter! 🧵🧸✨
Your stuffed mole sewing pattern is adorable! I love how detailed your instructions are, making it accessible even for beginners like me. May I ask if I can use baking polymer clay to make his nose? And what material is better air drying clay or baking one?
Thank you in advance.
Hello! Thank you very much for your nice words about the pattern for stuffed moles! 🥰 I’m so glad to hear that you found the instructions helpful.
Of course, you can easily use baked polymer clay for the nose. This is a fantastic choice to give your mole a cute and long-lasting look. The difference is that self-hardening clay needs to be painted and covered with varnish after drying, while baked clay already has color.
Give it a try and see who you like working with better!
Happy creativity! If you have any further questions, please contact us. 🐻✨