Crafting jointed stuffed animal sewing patterns from digital drawings opens up a world of creativity and precision in the realm of handmade plush toys. In this guide, we’ll explore expert tips and techniques for harnessing the power of digital drawings to create intricate and dynamic patterns.
Whether you’re a seasoned pattern designer or a novice enthusiast, mastering this process can elevate your craftsmanship to new heights.
Understanding Digital Drawings for Pattern Crafting
Digital drawings serve as the cornerstone for creating intricate sewing patterns for jointed stuffed animals. Unlike traditional sketches or photographs, digital drawings offer a level of precision and flexibility that is invaluable in pattern design.
Whether you’re working with hand-drawn illustrations or digitally created artwork, the process begins with selecting or creating the right digital drawing for your project.
When choosing a digital drawing for pattern crafting, clarity and resolution are paramount. Look for images with crisp lines and well-defined details, as these will translate more accurately into sewing patterns.
High-resolution drawings provide a solid foundation for pattern creation, allowing you to zoom in and capture even the smallest nuances of the design.
Choose the simplest, most primitive 2D images because they are the easiest to work with.
Once you have selected a suitable digital drawing, it’s time to prepare it for pattern adaptation. This involves adjusting the scale and proportions of the drawing to match the desired size of the finished stuffed animal.
Whether you’re enlarging or reducing the drawing, maintaining accurate proportions is essential for ensuring that the final pattern fits together seamlessly.
Cleaning up the digital drawing is the next step in the process. Remove any extraneous elements or unnecessary details that may clutter the pattern and detract from its clarity.
Focus on preserving the essential features of the design while simplifying complex areas to make them more manageable for pattern tracing.
Depending on your preferences and workflow, you may choose to work directly with the digital drawing in a software program like Adobe Illustrator or CorelDRAW, or you may opt to print it out and trace it onto pattern paper by hand.
Whichever method you choose, the goal is to create a clean and precise outline of the drawing that will serve as the basis for your sewing pattern.
By understanding the importance of digital drawings in pattern crafting and following these initial steps for preparation, you can set yourself up for success in creating high-quality sewing patterns for jointed stuffed animals.
With a clear and well-defined digital drawing as your starting point, you’ll be ready to embark on the journey of bringing your plush toy creations to life.
Preparing Digital Drawings for Pattern Creation
Once you have chosen a digital drawing, adjust the scale and proportions to match the desired size of the finished stuffed animal. This step is essential for ensuring that the pattern will result in a properly sized and proportioned toy.
Whether you’re enlarging or reducing the drawing, maintaining accurate proportions is key to achieving a realistic and visually appealing result.
Techniques for Translating Digital Drawings into Sewing Patterns
Translating digital drawings into sewing patterns for jointed stuffed animals requires a combination of precision and creativity. Here are some key techniques to consider:
- Tracing (art), copying an object or drawing, especially with the use of translucent tracing paper: Use the digital drawing as a reference to trace the outlines onto pattern paper or directly into digital pattern software. Pay close attention to capturing the details and contours of the drawing accurately. This initial tracing serves as the foundation for creating the pattern templates.
Alternatively, for those seeking another method, consider exploring our comprehensive blog post on using Teddy Bear Template and Teddy Bear Pattern Template for your designs. This resource offers valuable insights and tips, presenting an alternative approach to enhance your pattern crafting process. - Adding Seam Allowances and Jointing Points: Once the basic outlines are traced, it’s essential to add seam allowances and jointing points to the pattern design. Seam allowances provide the necessary extra fabric for sewing the pieces together while jointing points ensure proper articulation and movement in the finished stuffed animal. Be mindful of the size and placement of seam allowances and jointing points to maintain the integrity of the design.
- Incorporating Movement and Flexibility Considerations: Jointed stuffed animals require additional considerations for movement and flexibility in the pattern design. Ensure that the placement of joints and the shape of the pattern pieces allow for natural movement in the limbs and body of the stuffed animal. Experiment with different jointing techniques and positions to achieve the desired range of motion.
- Symmetry and Balance: Pay attention to symmetry and balance in the pattern layout to ensure a harmonious design. Check for symmetry along the central axis of the stuffed animal, as well as balance in the distribution of pattern pieces. Adjust as needed to achieve a visually pleasing and structurally sound result.
By applying these techniques, you can effectively translate digital drawings into high-quality sewing patterns for jointed stuffed animals. Experiment with different approaches and refine your skills to create patterns that bring your digital designs to life in tangible and huggable form.
Practical Application: Step-by-Step Pattern Creation Process
Creating sewing patterns for jointed stuffed animals involves a meticulous process that combines artistic vision with technical precision. Here’s a comprehensive step-by-step guide that integrates the provided information with the previously outlined steps:
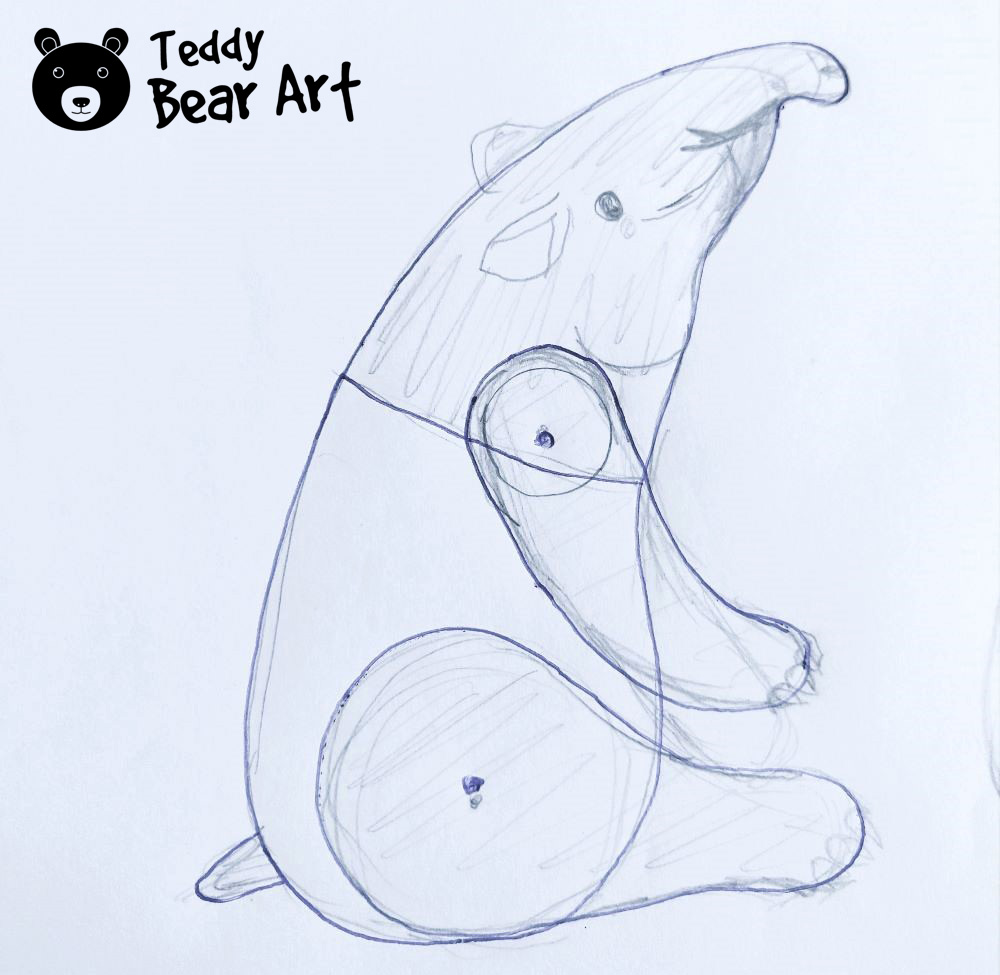
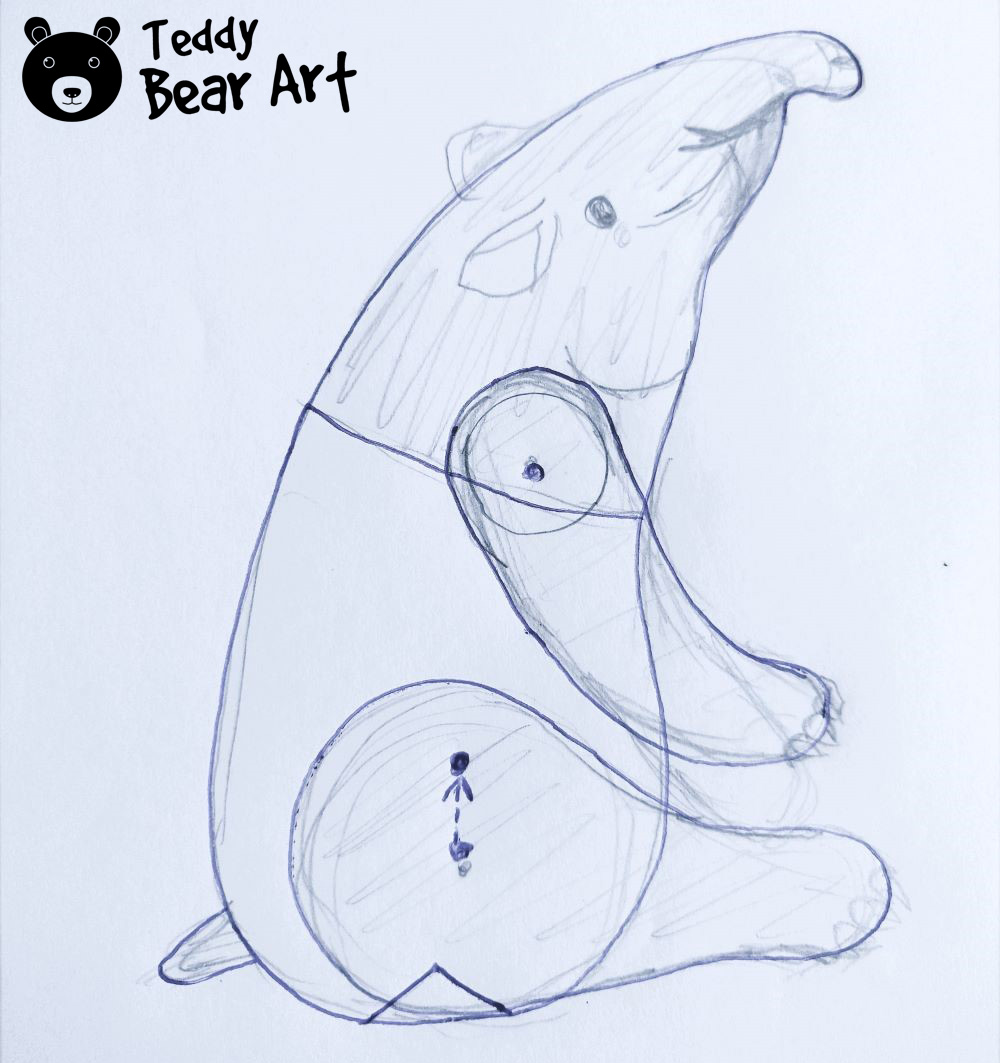
- Transferring the Drawing: Begin by transferring the digital drawing onto a white sheet of paper. This can be done by either copying it directly from the screen of a device or printing it out. Place a transparent sheet of paper (such as tracing paper) over the drawing and trace it meticulously to ensure accuracy.
- Adding Missing Details: Once the drawing is transferred, assess if any additional details are needed, such as the top or bottom of limbs. Use appropriately sized circular objects (like a disk) to outline missing parts, ensuring symmetry and proportionality.
- Defining Body Sections: Determine the boundaries between the head, torso, and limbs. Sketch each section separately, paying attention to anatomical proportions and joint placement.
- Incorporating Shaping Details: Add shaping details where necessary to create a more realistic and three-dimensional appearance. This may include darts for curvature, particularly around the neck, torso, and head. Experience and practice will guide the placement and size of these shaping elements.
- Scaling Considerations: Consider the scale of the stuffed animal when adding shaping details. Smaller toys may require fewer darts and less intricate shaping to maintain a cohesive design. Experimentation and observation will inform decisions regarding scale and complexity.
- Linking Resources: Refer to internal resources for additional guidance and inspiration. For example, learn more about pattern drafting techniques through relevant blog posts.
- Practical Application: Apply the pattern creation process outlined above to your specific project. Start with small-scale experiments to refine your skills before tackling larger projects. Consider factors like leg placement for stability and sitting posture, referencing relevant resources for guidance.

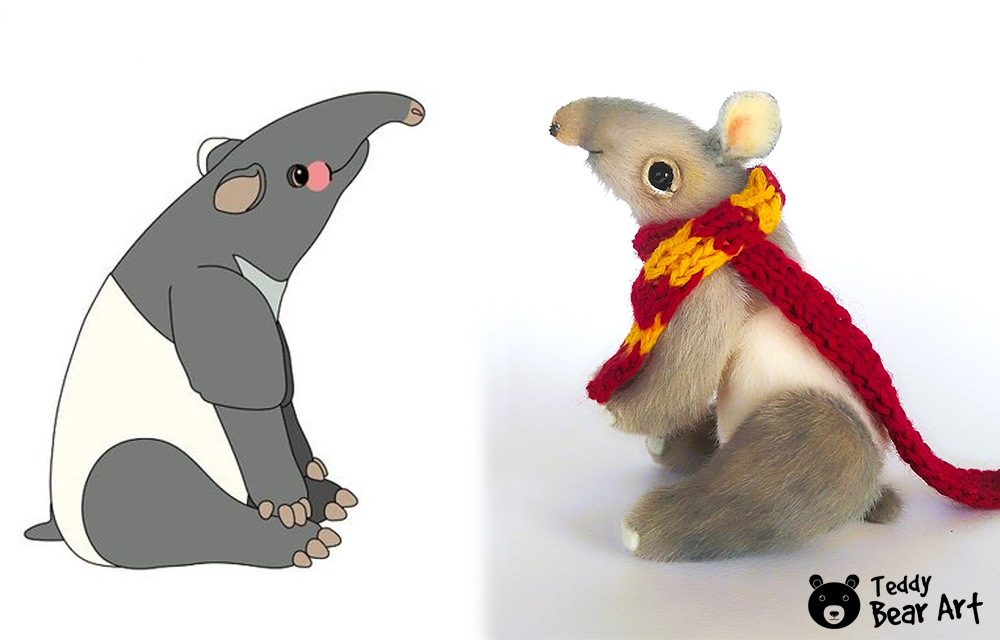
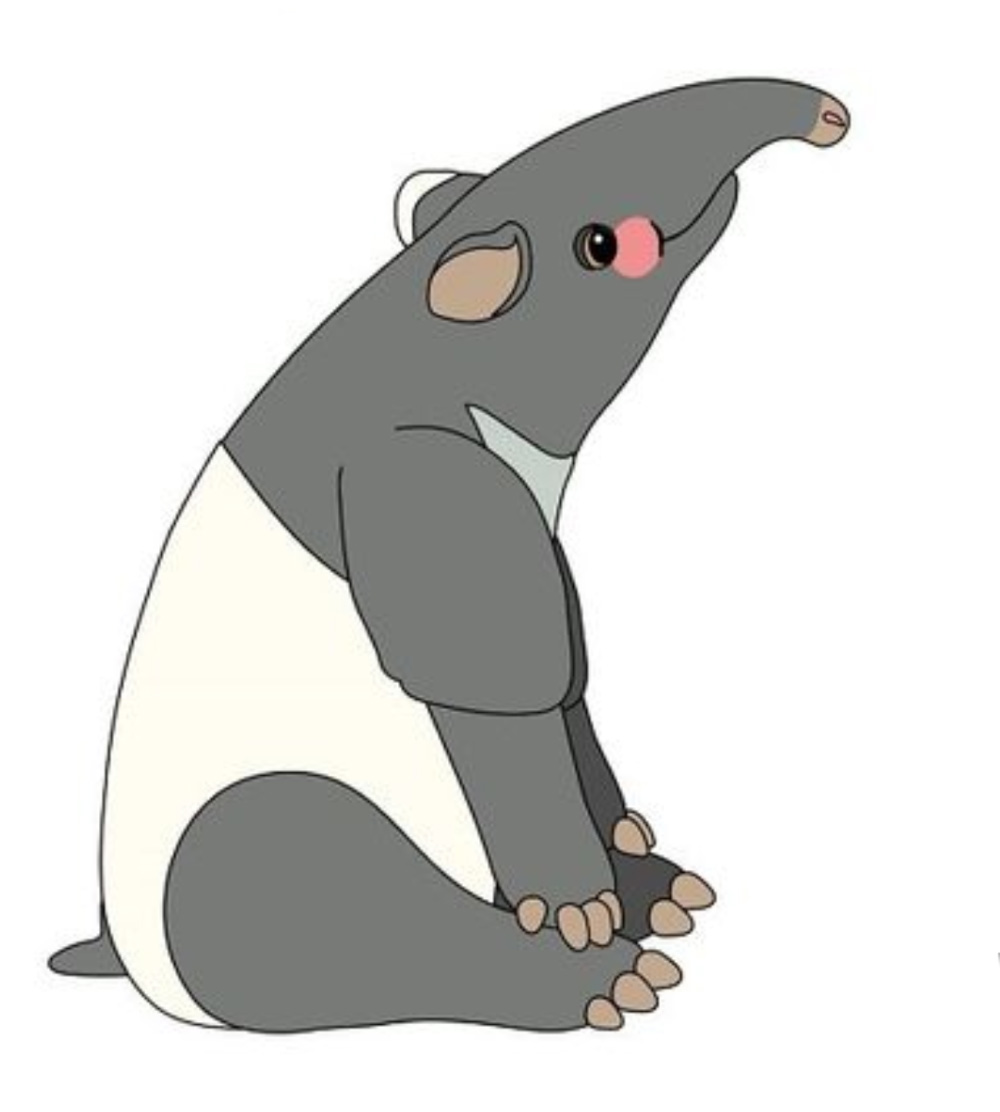
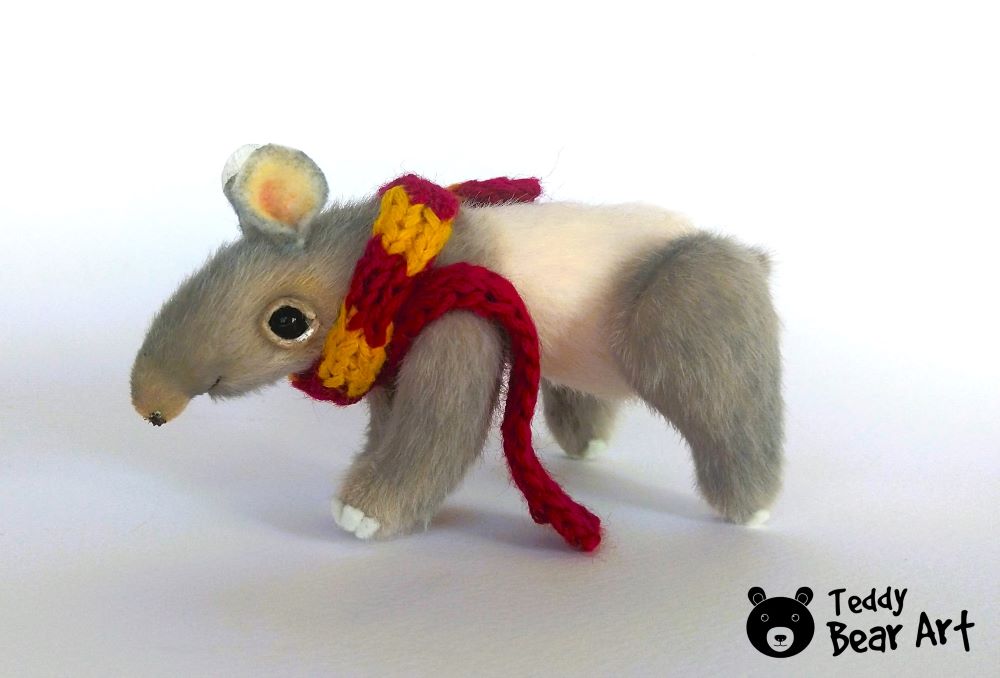
The pattern for this tapir is designed in such a way that the head and torso do not have joints. Additionally, there is no central seam or dart for the head. There is only one dart at the bottom of the torso.
The finished tapir measures 13 cm (5.1 inches), making it an ideal example for beginner crafters.
Tip: In small-scale patterns like these, fewer details are better. You can add detailing to the toy later, after sewing it.
Pay close attention to decorating the face, and paws, and adding accessories, and the toy will look excellent and unique.
Take a look at what the ready pattern looks like.
By following this step-by-step pattern creation process and integrating insights from external resources, you can transform digital drawings into precise and functional sewing patterns for jointed stuffed animals.
Experiment, refine, and enjoy the creative journey of bringing your designs to life.
Conclusion
In this guide, we’ve explored the art of crafting jointed stuffed animal sewing patterns from digital drawings, providing expert tips and techniques every step of the way.
Whether you’re a seasoned pattern designer or just starting, harnessing the power of digital drawings can take your plush toy creations to the next level.
Get Free Patterns & Be the First to Know!
Want free teddy bear patterns, exclusive tutorials, and a chance to win craft supplies?
Sign up for our newsletter using the subscribe form in the middle of this article to receive new patterns, insider tips, and the latest news on teddy bear art. You’ll also automatically be entered into our annual giveaway for a chance to win teddy bear crafting materials.
Bonus entry: Save one of our pins on Pinterest to increase your chances of winning!
Let’s create, inspire, and craft beautiful teddy bears together!
Thank you so much for this wonderful detailed information. I will certainly be trying one of these methods in the future as I continue to learn and experiment with new techniques.
Karen
Enlightening article! I can see how these patterns can be easily customized from almost any drawing – there’s really no limit to the possibilities.
Wouldn’t it be the coolest to have a favorite children’s book character come to life for story time? What a memory to be cherished for years to come, all from the steps you’ve provided here.
Thanks Hanna!
Hey there! I’m thrilled you enjoyed the article! 🌟 Absolutely, the beauty of these patterns lies in their versatility. Bringing favorite children’s book characters to life for story time sounds like such a heartwarming idea! 📚✨ Memories like that are pure magic. If you ever give it a try, I’d love to hear how it turns out. Happy crafting! 🧸💖
This is a wonderful article. It’s so creative and so clear- a great combination.
I am a sewer, so I can appreciate your guidance. I had itchy fingers while reading the instructions for the Tapir. It’s a great choice of exotic animals – a very unusual choice. The fabrics you use look wonderful.
I think this is a great idea because there are still so many people who enjoy this kind of 3-D creation and using fine motor skills/ingenuity, etc.
Very inspiring! Sewing, especially hand sewing, is so relaxing! Excellent therapy for stress, too.
Thank you so much for your lovely comment! I’m thrilled to hear that you found the article creative and clear. It’s wonderful to connect with fellow sewers like you who appreciate the craft. The Tapir is indeed an unusual choice, but I find joy in exploring unique creations. And yes, the fabrics can truly make all the difference!
I couldn’t agree more about the therapeutic benefits of sewing. It’s not just about creating something tangible; it’s also about finding solace and relaxation in the process. Here’s to more stress-free stitching sessions and endless creativity! Keep those fingers busy and happy sewing! 🧵✨