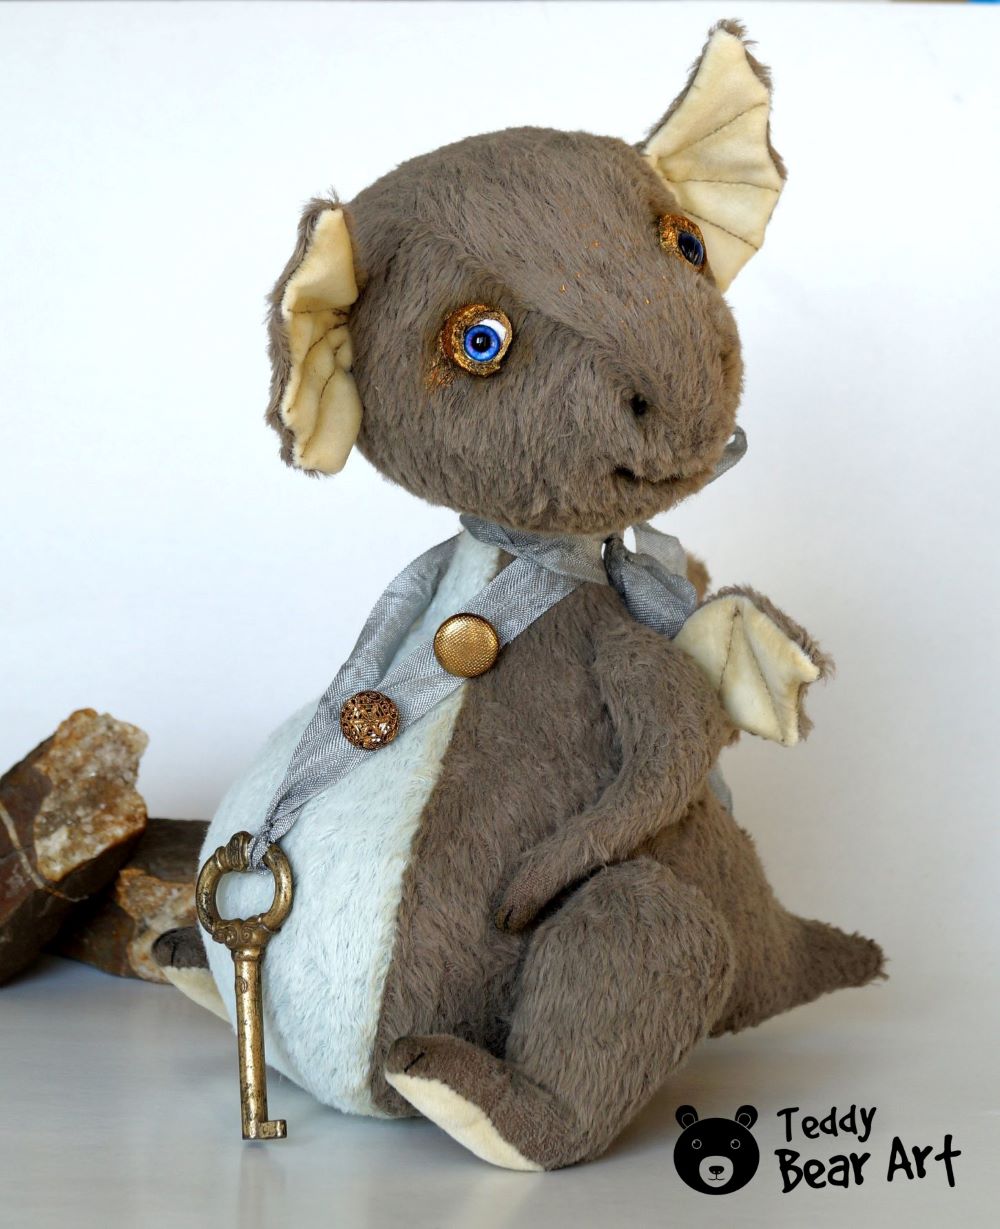
Welcome to the world of whimsy and creativity! If you’ve ever dreamed of making a stuffed dragon, you’ve come to the right place. This free baby dragon plush pattern and guide will help you create your cute companion, made in a teddy technique.
Crafting a baby dragon is not just about following steps—it’s about enjoying the process and seeing your creation come to life. Dive in, have fun, and let your creativity shine through every stitch!
Download The Pattern
To download the pattern, follow the instructions below:
From a phone or a tablet (Android): There should be something similar for mobile devices with Android or iOS. Click on the image. Save it by holding your finger on the image and selecting the “Save Image” option. Then go to your photo gallery and print it (there is an option).
From a computer (Windows): Click on the photo of the pattern you see below. In the new tab that will open, you press the right mouse button and select the “Save image as …” option. Then you choose where you want the image to be saved on your computer.
Materials You’ll Need
To make your baby dragon plush, you’ll need the following materials:
1. Viscose fabric in 2 colors with a pile length of 6 mm or short-pile fur fabric for miniature bears.
2. A pair of glass eyes with a black pupil on a metal loop – 8 mm in diameter.
3. Strong threads, the same color as your fabric, and a needle for hand sewing.
4. Scissors.
5. Waxed thread.
6. An awl.
7. Synthetic filler.
8. Metal or glass pellets for the weight.
9. Small piece of fabric for the ears, wings, and feet.
17. A small piece of felt for the eyelids.
10. Paints and brushes.
11. Pins.
12. Discs 18 mm in diameter – 2 pieces, 20 mm – 4 pieces, 40 mm – 4 pieces.
13. Washers 15 mm diameter – 6 pieces, 30 mm – 4 pieces.
14. T-shaped cotter pins 2.0×20 – 3 pieces, 2.5×28 – 2 pieces.
15. Pliers.
18. Strong glue like UHU.
Step-by-Step Guide to Sewing Your Baby Dragon Plush
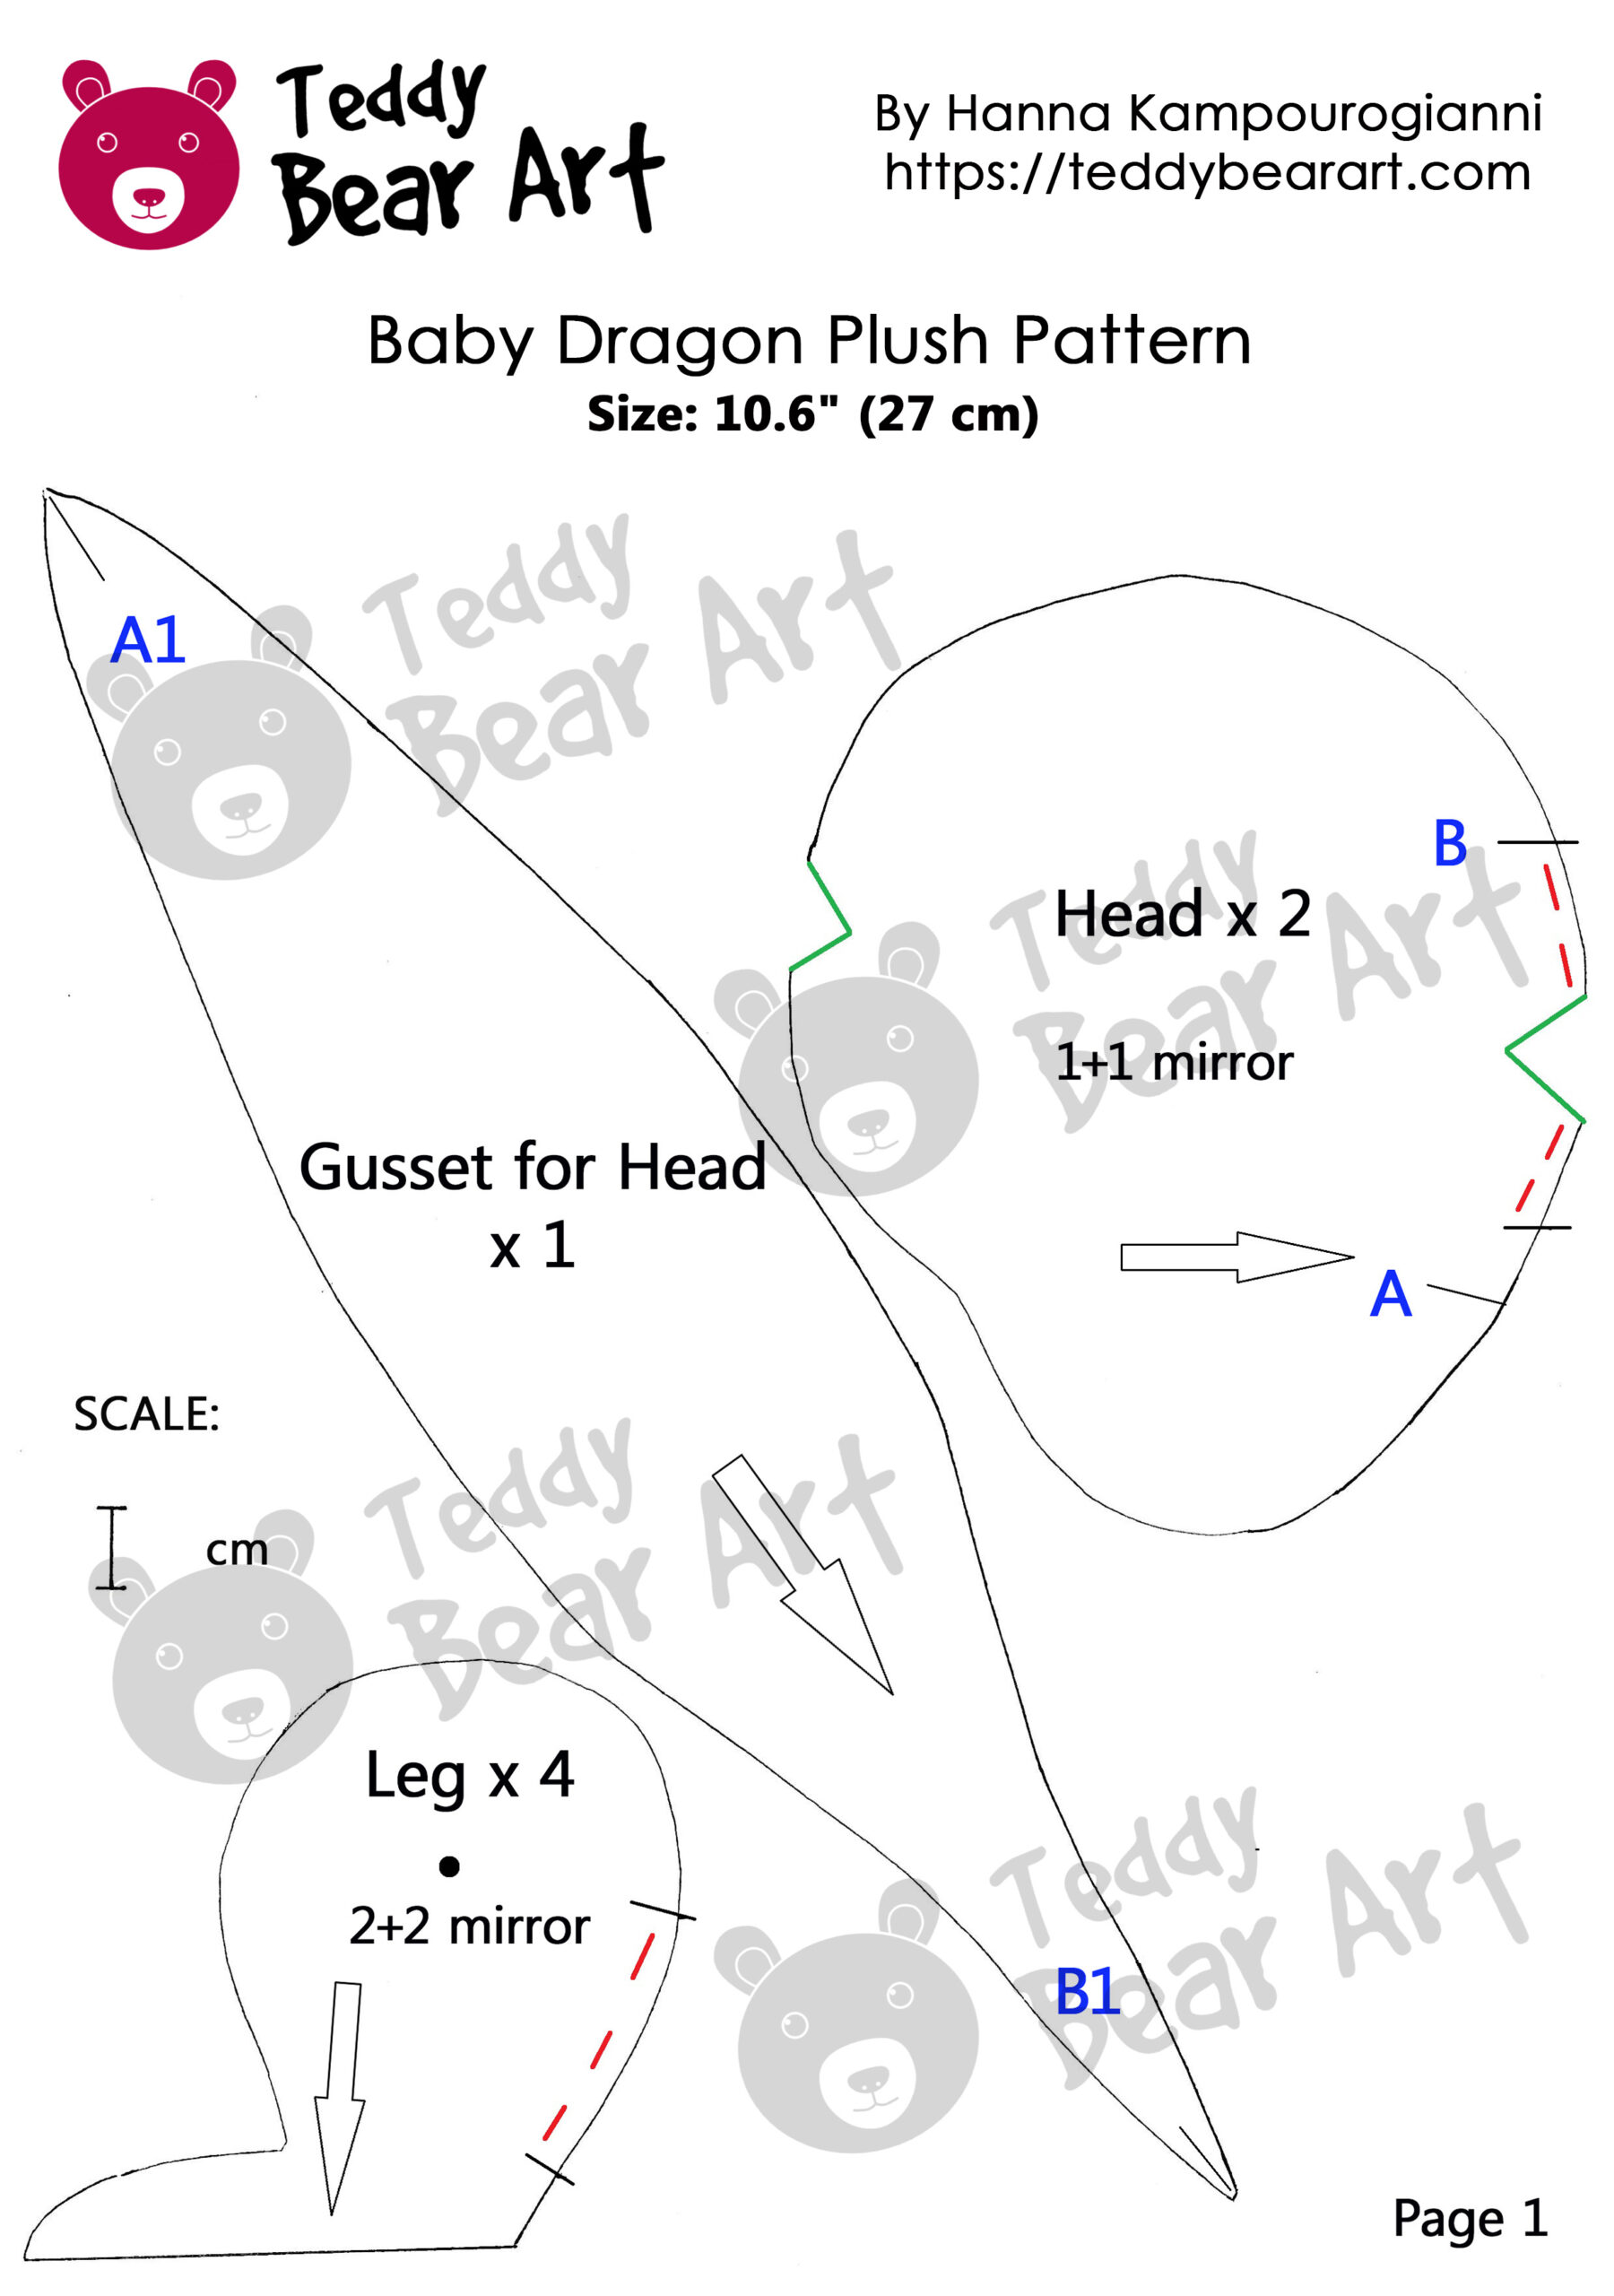
Making the Head
First, sew all the darts. Then, sew the gusset into the head, following the markings from A-A1 to B-B1. Turn the head right side out, stuff it, insert the disc with the cotter pin, and sew up the opening.
Attach the eyes by choosing one of these 5 methods.
Create the nostrils and mouth by sculpting the fabric through pulling techniques.
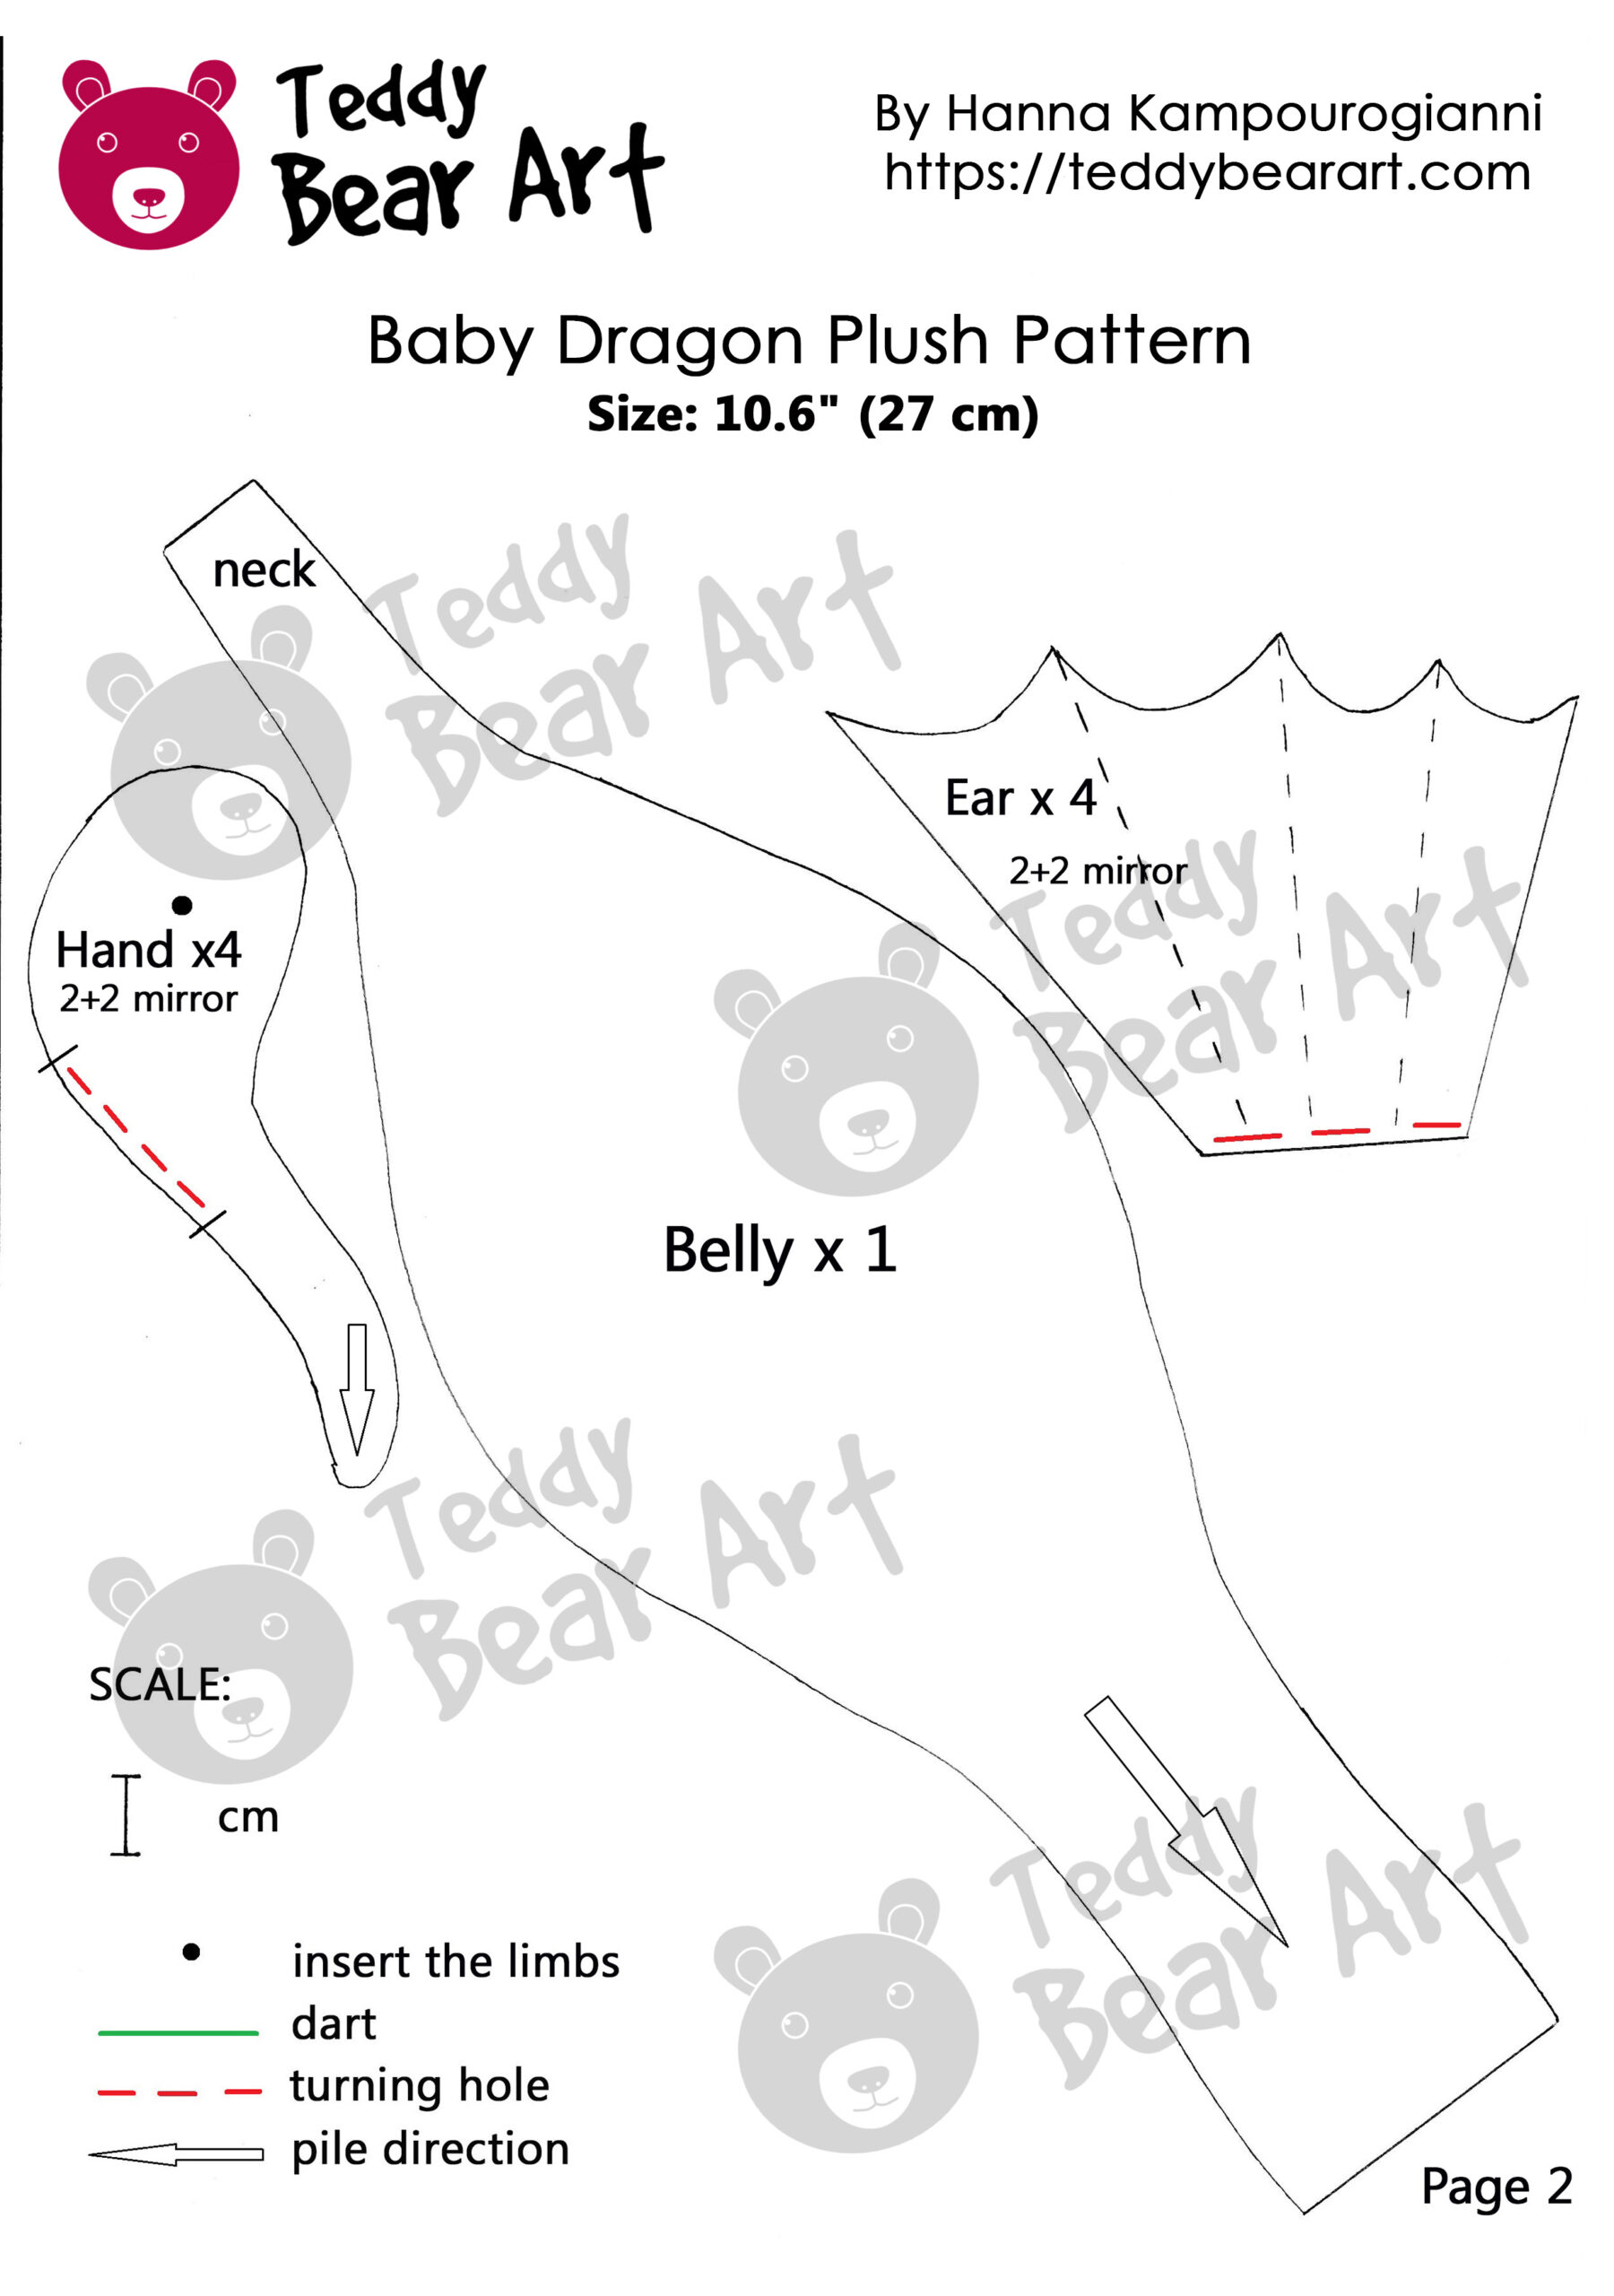
Next, sew the ears, but there’s no need to stuff them. Turn the ears on the right side out, add decorative stitches, close the turning hole, and attach the ears to the head.
Finally, craft eyelids for your little dragon, by following one of these techniques.
Creating the Body and Limbs
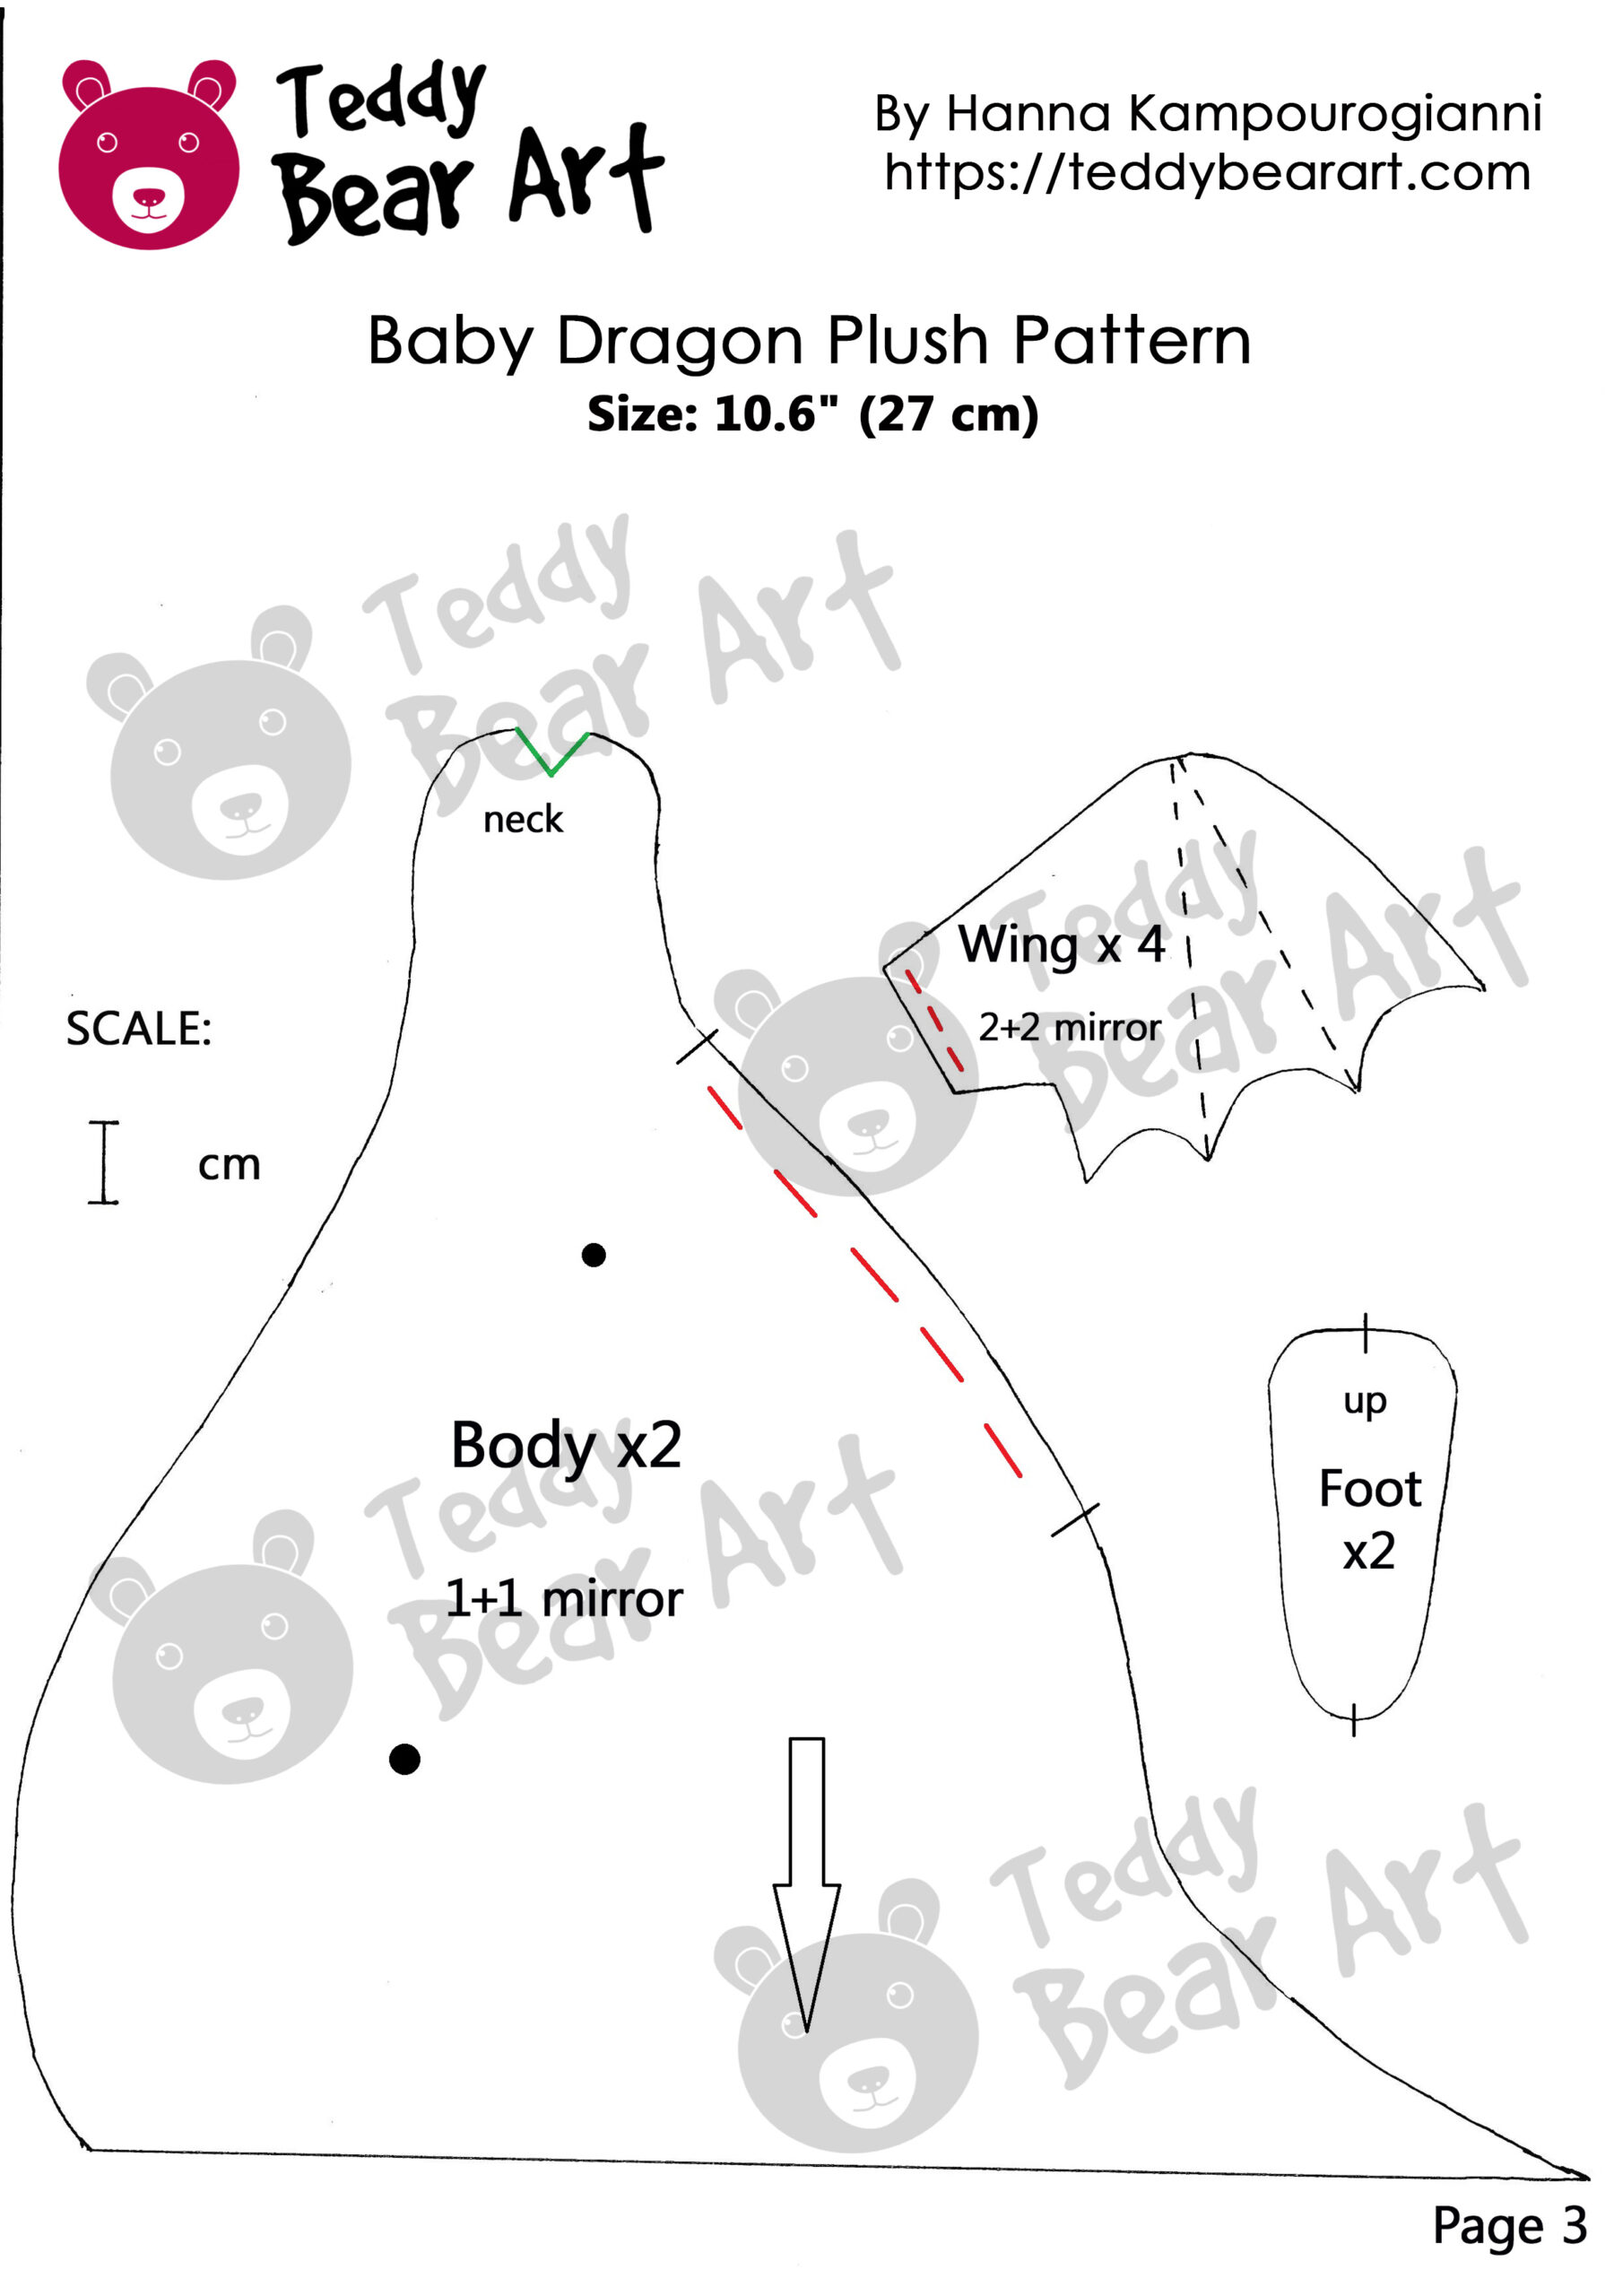
Sew all the darts, then attach the belly piece to the body pieces, leaving an opening for turning. Sew the wings, turn them right side out, and do not stuff them. Add decorative stitching and sew up the turning hole.
Next, sew the arms. Sew the legs, attaching the feet as you go. Turn the limbs right side out, insert the discs, stuff them, and close the openings.
Dragon Body Parts Assembly
First, attach the head to the body, followed by the legs, and lastly, the dragon’s arms. Stuff the body, ensuring that the neck is packed very firmly. Add a weight inside, then sew up the opening. Finally, attach the wings.
Final Touches
The final touches make all the difference. Trim some of the pile on the dragon’s hands and feet, then add shading and embroider the fingers. Also, shade its face—around the eyes, nostrils, and mouth.
Give your dragon fitting accessories, such as charms, ribbons, keys, dragon eggs, or treasures for it to guard.
Tips for Beginners
If you’re new to sewing or plush-making, here are a few tips to help you out:
- Take Your Time: Don’t rush through the steps. Enjoy the process and take it one step at a time.
- Practice: If you’re having trouble with any part of the pattern, practice on scrap fabric first.
- Ask for Help: Don’t hesitate to seek advice from fellow crafters or online communities if you run into challenges. If you have any questions, feel free to ask in the comments below this post, and I’ll be happy to help!
Before You Go
Creating a baby dragon plush is a delightful and rewarding project that you can enjoy making and sharing. We hope this guide and pattern help you bring your dragon to life and spark more creative projects in the future. For more free patterns and crafting tips, be sure to explore the rest of our website. Happy crafting!
Feel free to let me know if you need any more tweaks or additional content!
If you loved crafting this baby dragon plush, you’ll definitely want to check out some of our other adorable and unique patterns! Explore these fun projects:
- Monstrously Cute: 5 Free Sewing Monster Patterns You Need to Try – Discover a variety of quirky, lovable monsters that are perfect for your next creative project!
- Free Cute Cyclops Sewing Pattern: Craft a Unique Collector’s Plush Toy – Create a one-of-a-kind plush toy with this delightful cyclops pattern, ideal for any collector or plush enthusiast.
These free patterns are sure to inspire your next crafting adventure!
Get Free Patterns & Be the First to Know!
Want free teddy bear patterns, exclusive tutorials, and a chance to win craft supplies?
Sign up for our newsletter using the subscribe form in the middle of this article to receive new patterns, insider tips, and the latest news on teddy bear art. You’ll also automatically be entered into our annual giveaway for a chance to win teddy bear crafting materials.
Bonus entry: Save one of our pins on Pinterest to increase your chances of winning!
Let’s create, inspire, and craft beautiful teddy bears together!
I love how detailed the guide is; it makes the whole process seem way less intimidating. The step-by-step photos are a nice touch too. I’m curious, though, do you have any tips for choosing the right fabric for this project? I’m worried about finding something that’s both cute and durable. Can’t wait to try making one of these for my little niece!
Thank you for your comment! I’m glad you liked the guide. This toy isn’t unsuitable for young children as it has glass eyes. However, if you replace them with safe plastic eyes, it should be fine for younger kids.
As for fabric choice, I recommend using something soft but durable like minky or fleece. These fabrics are pleasant to the touch and strong enough for toys that will be hugged often. For additional details, you might also use cotton or felt. I hope your toy turns out wonderful for your niece! 🐉
Oh what a cute little dragon, it wants me get going straight away to make it. My granddaughter is very keen on sewing and I have been teaching her sine stitches and techniques, so I am sure she would love to create this little dragon with my help. Or do you think it will be too advanced for a seven year old?
Although your instructions are very detailed, I am just not quite sure how to attach the ears. I assume the side of the pattern with the red marking, is where you attach it to the head. So after I have closed the turning hole, do I pull the ear tight and then attach it? Thank you for clarifying.
Thank you so much for your lovely comment! It’s wonderful that you’re teaching your granddaughter to sew – such a special bond! However, I do think this pattern might be a bit too advanced for a seven-year-old. It’s designed with more experienced sewists in mind, and some of the steps could be tricky for little hands.
As for the ears, you’re correct! The side of the pattern with the red marking is where it attaches to the head. After closing the turning hole, you can sew some decorative stitches if you’d like, and then attach the ear to the head. Let me know if you have any other questions!
Hello,
What a delightful and detailed guide! I love how you have broken down the process of making a baby dragon plush into manageable steps. The whimsical nature of this project is so appealing, and I cannot wait to dive into it myself!
Your tips for beginners are especially helpful, taking my time and practicing on scrap fabric will definitely boost my confidence. I also appreciate the encouragement to share creations; it is inspiring to see what others come up with.
Thanks for providing such a fun and creative project. I am excited to bring my own little dragon to life! Happy crafting to everyone!
Thank you so much for your kind words! I’m thrilled to hear that you enjoyed the guide and found the steps easy to follow. It’s wonderful that you’re excited to make your own baby dragon plush! Taking your time and practicing on scrap fabric is a great idea—it will definitely help you feel more confident. I’d love to see your finished creation, so feel free to share it with us! Happy crafting, and have fun bringing your little dragon to life!