Updated March 2026
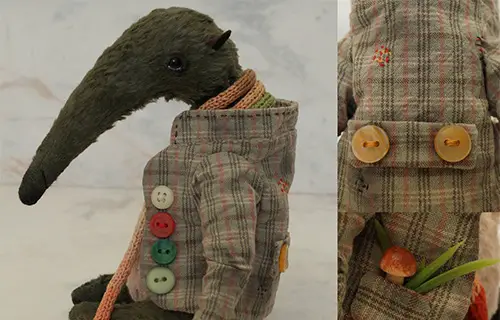
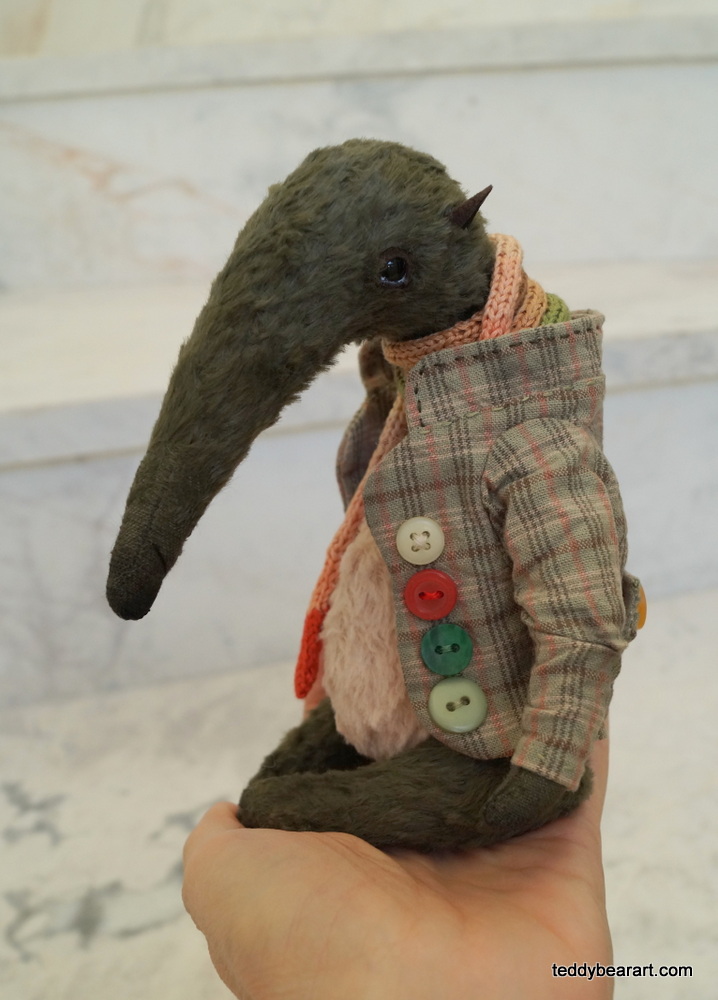
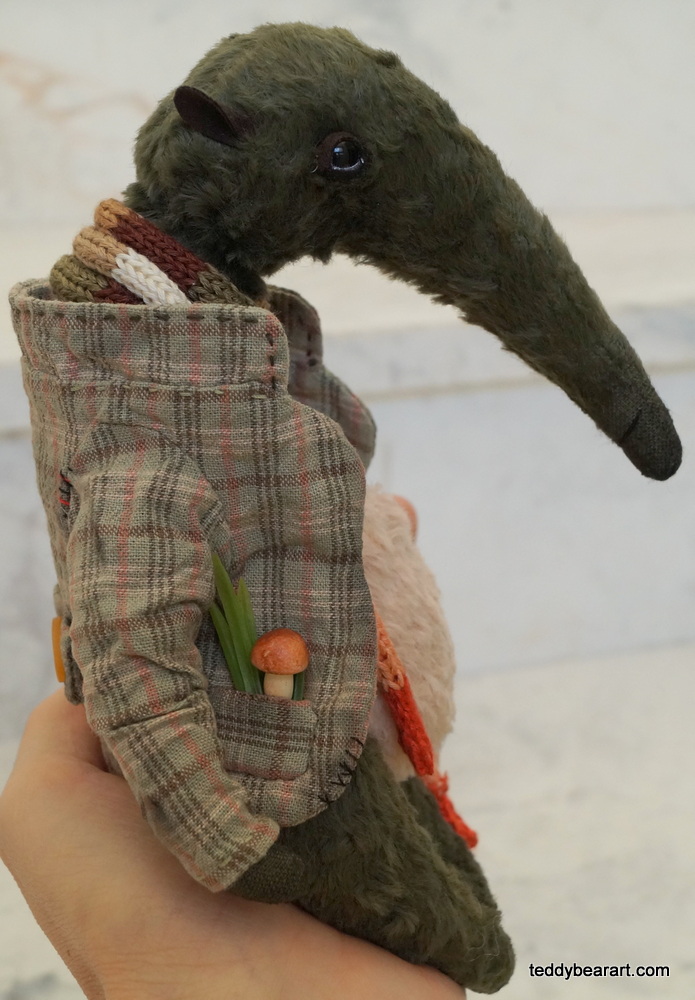
Seeking a distinctive teddy bear project? This step-by-step teddy bear pattern tutorial – Anteater in a Jacket – includes a full list of materials, detailed sewing instructions, and tips for assembling and finishing your teddy anteater. Created by us, this character has quickly become a favorite among teddy bear collectors worldwide.
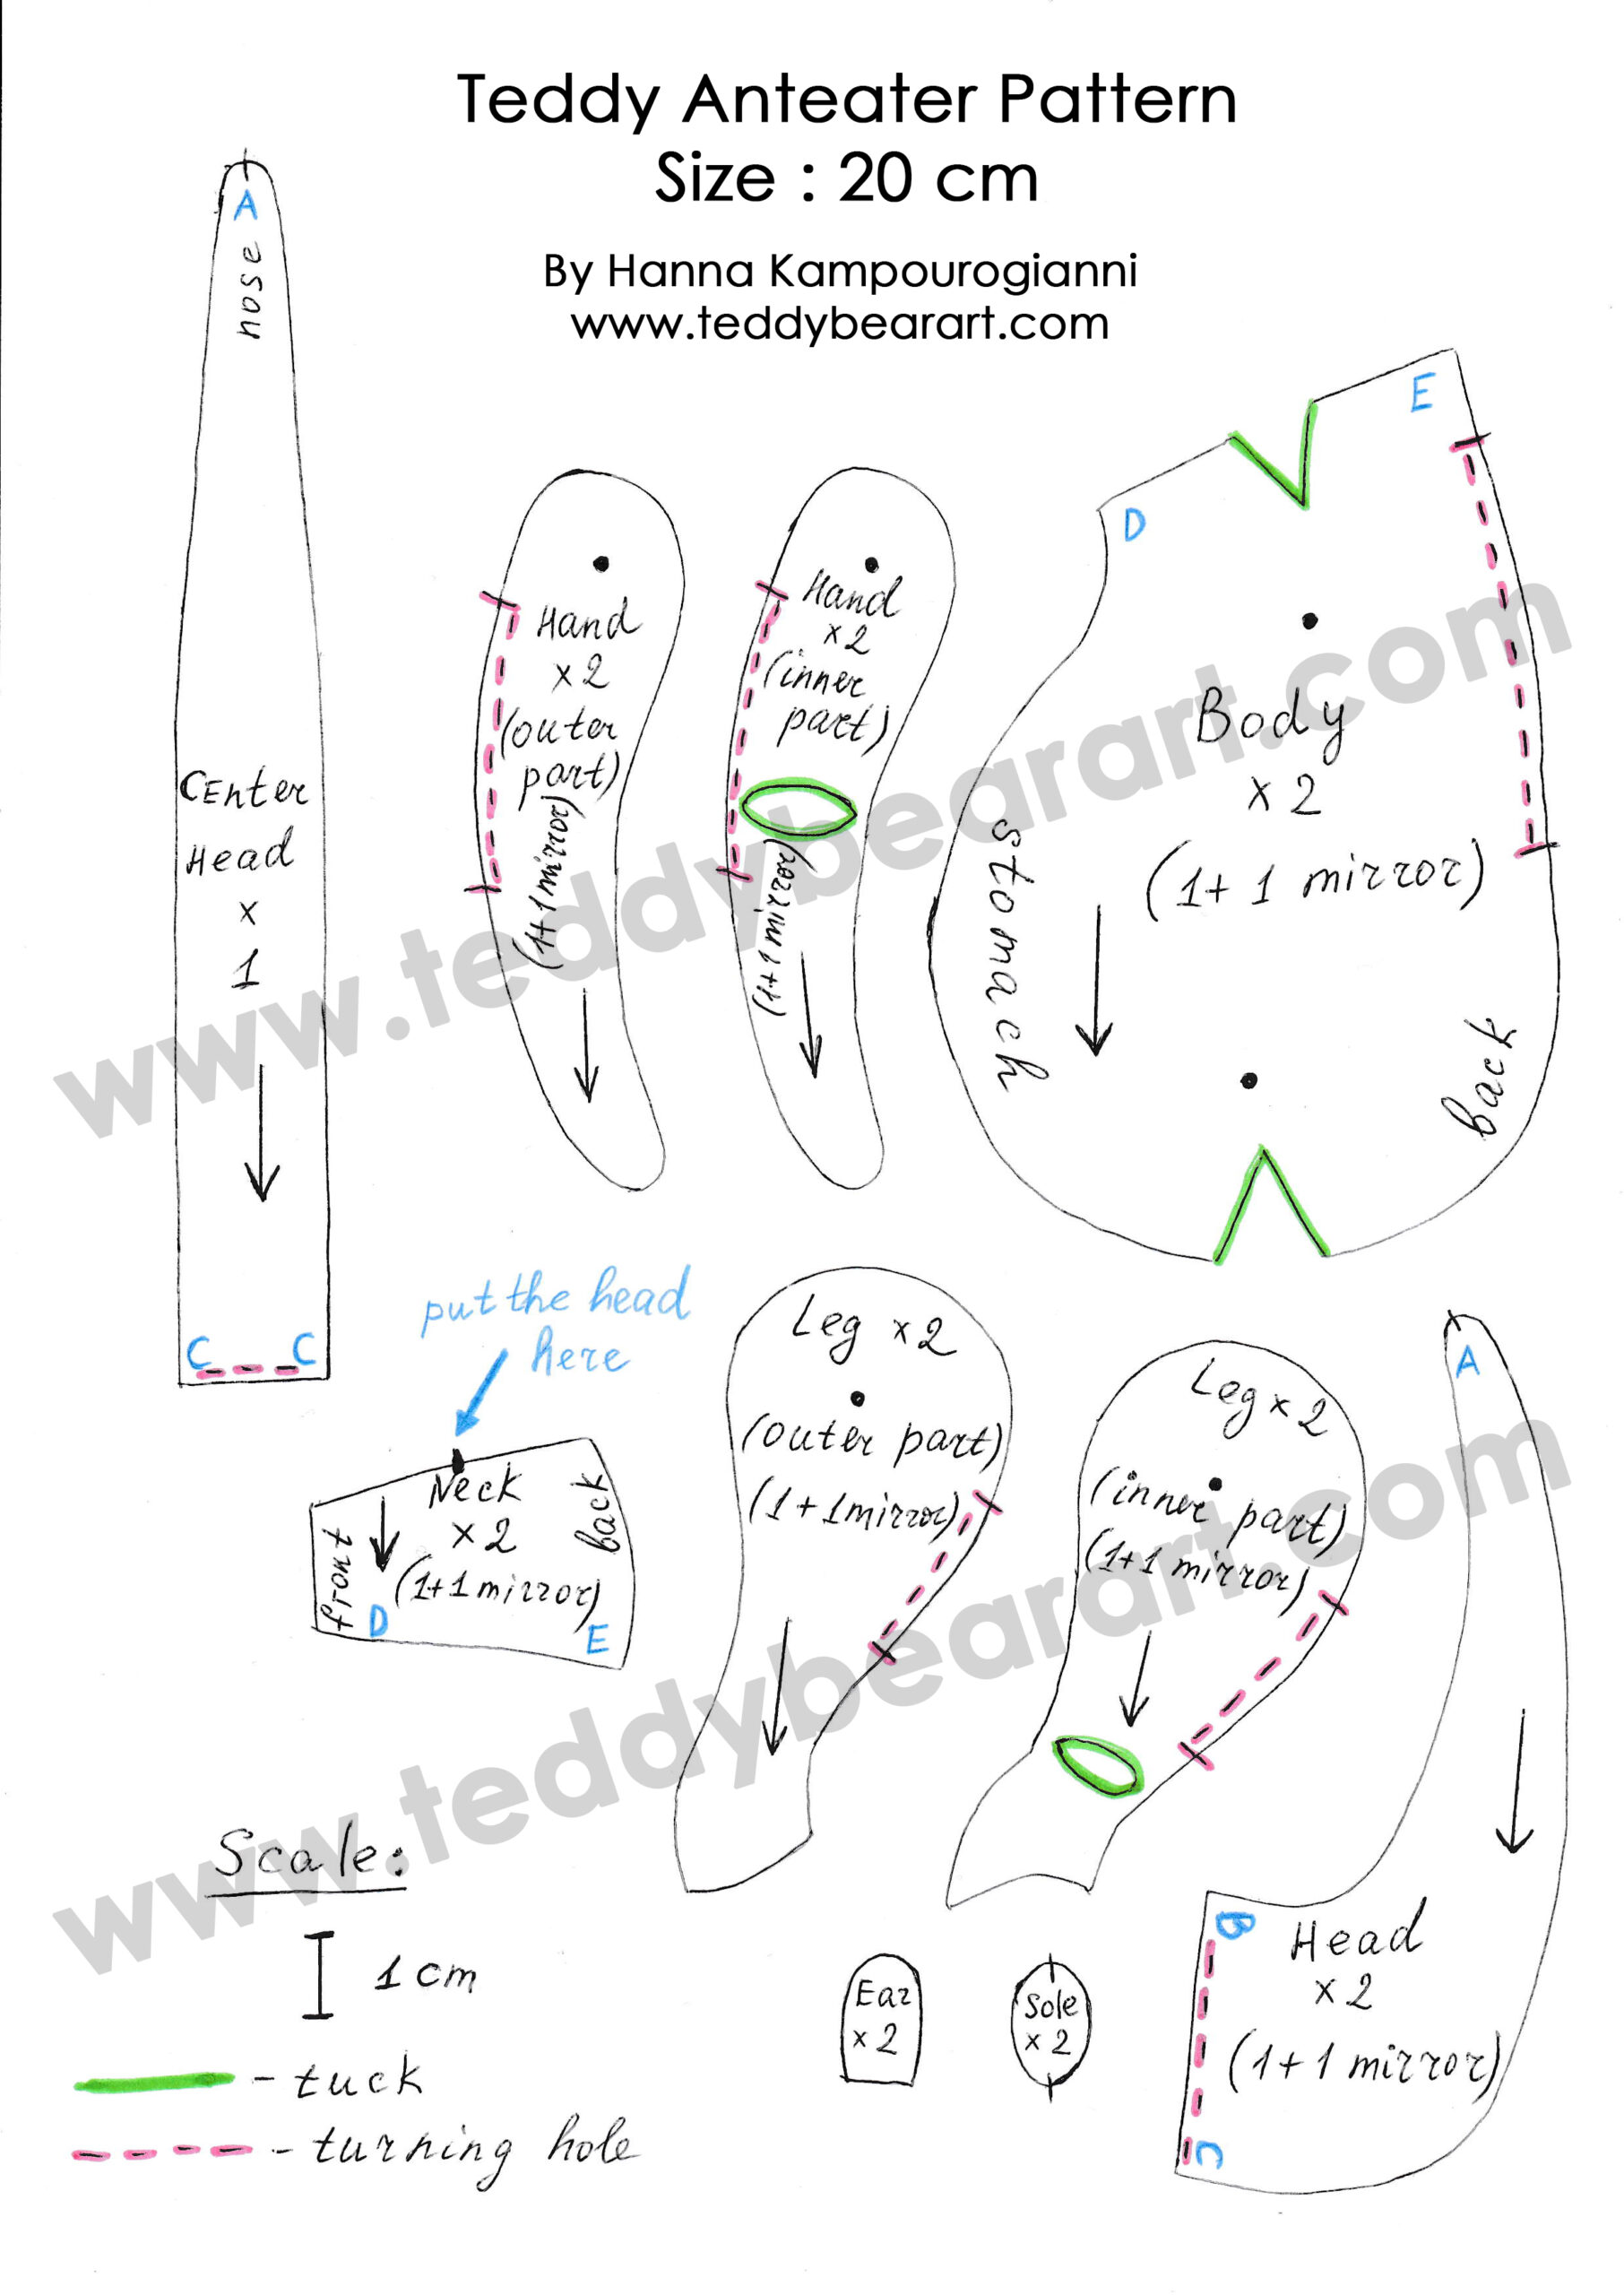
Download the Pattern
Notice that seam allowances are not included.
To download the pattern, follow the instructions below:
From a phone or tablet: There should be a similar option for mobile devices with Android or iOS. Click on the image. Save it by holding your finger on the image and selecting the “Save Image” option. Then, go to your photo gallery and print it (an option available).
From a computer: Click on the photo of the pattern you see below. In the new tab that will open, you press the right mouse button and select the “Save image as …” option. Then, you choose where the image will be saved on your computer.
If you are going to make your first teddy bear, we would recommend reading our posts about basic sewing and the step-by-step tutorial “How To Make A Teddy Bear”.
List of Required Materials
This pattern works best with short-pile fabrics such as viscose (6 mm) or mohair. Glass eyes, synthetic filler, and small accessories give realistic details. For ears, use leather, suede, or felt; for soles, cotton works well.
- 25×35 cm viscose, 6 mm pile
- Strong threads matching your fabric, hand-sewing needle
- Scissors
- Pair of black glass eyes on metal loops (6 mm)
- Waxed thread
- Awl
- Synthetic filler
- Metal or glass pellets for weight
- Fabric for ears and feet
- Oil paints and brushes
- Pins
- Discs 20 mm – 6 pcs; 15 mm – 4 pcs
- Washers 12 mm – 10 pcs
- T-shaped cotter pins 1.6×20 – 5 pcs
- Pliers
- Long needle for eyes
Discs for legs and head: 20 mm, hands: 15 mm
Step-By-Step Pattern Tutorial
Printing & Cutting: Check pattern scale. Arrange fabric pieces according to arrows, leave 5–7 mm seam allowance.
Preparation: If using viscose, pluck a little pile on the nose, sides of the head, and tips of limbs before sewing.
Step 1: Sew all darts (green markings)
Step 2: Sew the two head sides (1 + mirror) from A to B
Step 3: Attach central head wedge, leaving red-dotted opening unsewn
Step 4: Sew neck to body (D to D, E to E), repeat mirrored parts
Step 5: Join body pieces, leave red-dotted opening
Step 6: Sew outer/inner arms (1 + mirror), leave opening
Step 7: Sew outer/inner legs (1 + mirror), leave opening
Step 8: Sew feet
Assembling the Teddy Anteater
- Assemble body, add pellets for weight, stuff, sew final opening
- Turn the parts right-side out with a blunt stick
- Stuff head, insert disc with cotter pin, secure with waxed thread
- Attach glass eyes: make holes with an awl, thread waxed thread through the eye loop, pull ends through long needle, secure with pliers, hide threads
- Optional: glue felt or suede eyelids
- Sew ears
- Attach the head to the body with a cotter pin
- Insert discs into limbs, stuff, sew openings
Final Touches
- Use awl/needle to pull the pile from the seams
- Comb toy with a metal brush
- Tint nose, eyes, ears, limbs with pastels, oil, or fabric paints (light to dark)
- Let dry completely, embroider the mouth with black thread
Your teddy anteater is ready!
FAQ
Do I need a sewing machine?
No, all parts can be sewn by hand.
How long does it take?
1–2 days depending on experience.
Finished size?
About 20 cm tall (varies slightly by stuffing).
Can I use mohair?
Yes, especially short-pile mohair.
How to give a vintage look?
Tone with oil paints/pastels and add small vintage-style accessories.
Before You Go
We hope this teddy bear pattern tutorial – Anteater inspires you to create your own unique character. Making teddy bears is a wonderful hobby that combines creativity, patience, and joy.
If you have any questions or need help during the process, feel free to leave a comment below, and we will be happy to assist you.
And if you’d like to add even more charm to your anteater, try sewing a jacket for him. It’s a simple project that makes the toy look truly special.
Get Free Patterns & Be the First to Know!
Want free teddy bear patterns, exclusive tutorials, and a chance to win craft supplies?
Sign up for our newsletter using the subscribe form in the middle of this article to receive new patterns, insider tips, and the latest news on teddy bear art. You’ll also automatically be entered into our annual giveaway for a chance to win teddy bear crafting materials.
Bonus entry: Save one of our pins on Pinterest to increase your chances of winning!
Let’s create, inspire, and craft beautiful teddy bears together!