
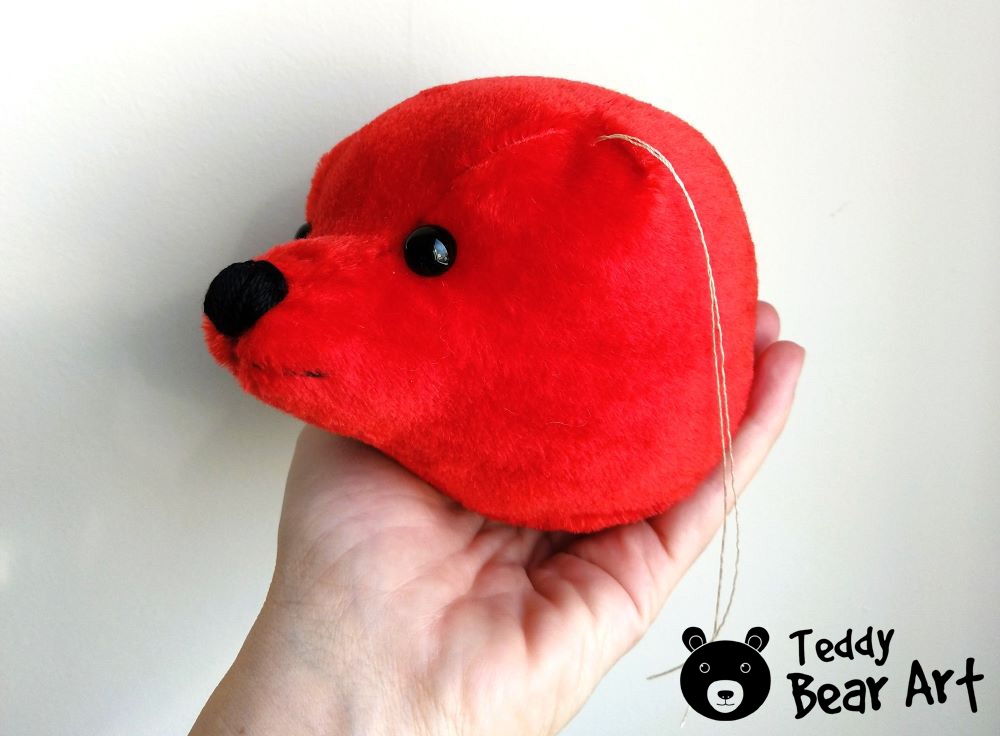
Welcome to the enchanting world of teddy bear crafting, where passion meets stitches. In this guide, we’ll dive into the delightful realm of red teddy bears, exploring the art of creating these charming companions. Whether you’re a seasoned crafter or a newcomer to the world of teddy bear making, the red teddy bear sewing pattern guide is here to inspire your creativity and guide you through the process of crafting your very own red-hued masterpiece.
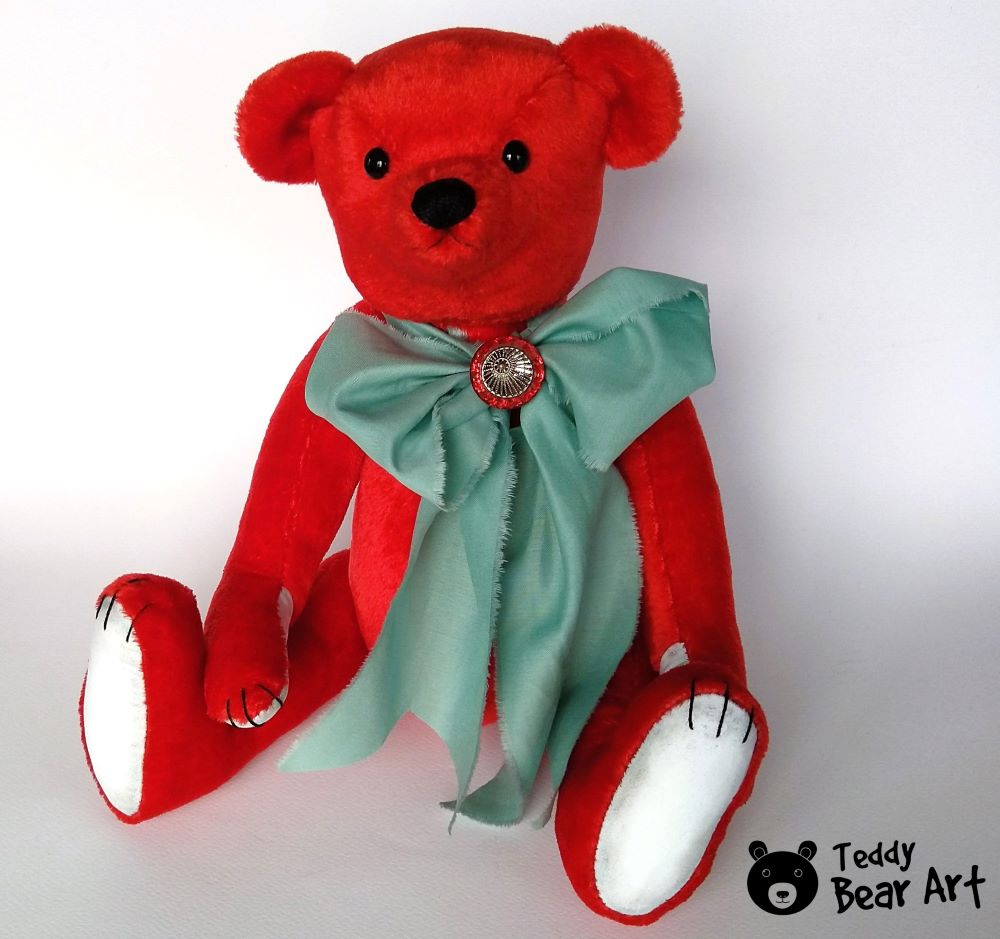
The Allure of Red Teddy Bears
Red teddy bears hold a special place in the hearts of crafting enthusiasts. The vibrant hue symbolizes love, warmth, and timeless elegance.
Crafting a red teddy bear goes beyond the stitches; it’s about infusing your creation with emotion and personality. The red teddy bear sewing pattern guide is designed to help you unlock the secrets of capturing this allure in every stitch.
Getting Started with the Red Teddy Bear Pattern
To begin your journey into crafting red teddy bears, start by downloading our exclusive red teddy bear sewing pattern. This user-friendly guide provides step-by-step instructions, ensuring that even beginners can bring their vision to life. The pattern includes detailed illustrations, material lists, and customization tips, making it a comprehensive resource for teddy bear enthusiasts.
Pattern Guide
Now that you’ve gathered your materials and downloaded the pattern, let’s delve into the step-by-step process of bringing your red teddy bear to life. Follow along, and in no time, you’ll have your own charming red teddy bear ready for hugs.
Step 1: Cut the Fabric
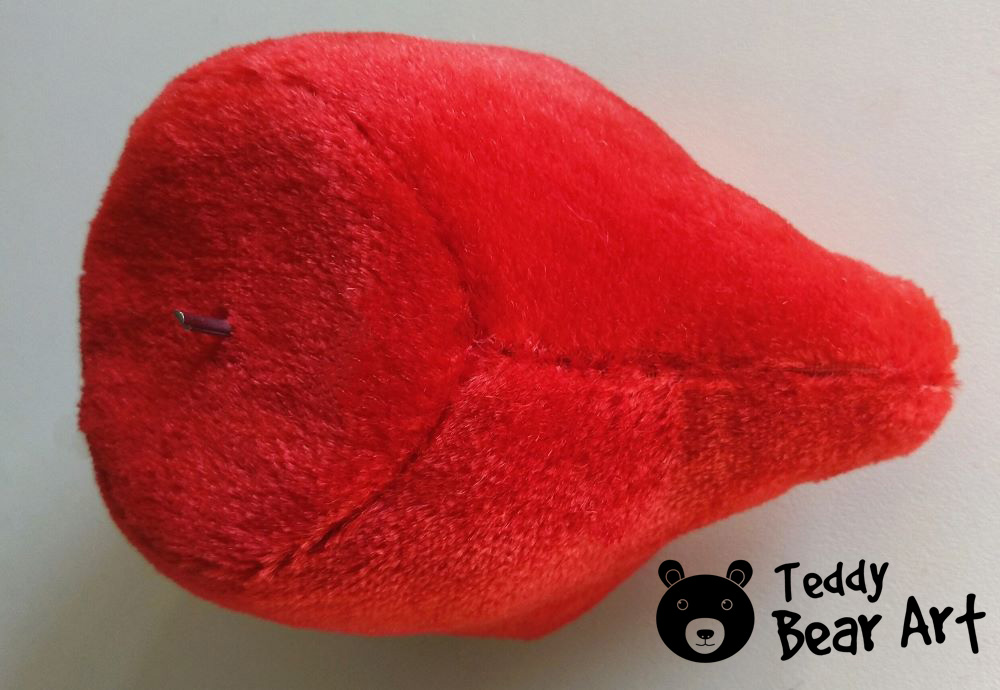
Utilizing the red teddy bear soft toy pattern, meticulously trace and cut out the necessary pieces from your selected fabric. Ensure that you cut mirrored pieces as specified in the pattern, leaving a margin of 7-10 mm at the edges.
Step 2: Sewing the Pieces Together
- Sew the darts, highlighted in green.
- Sew the two mirror parts of the head according to the marks from A to B.
- Sew the head gusset according to the marks from A-A1 to C-C1 and from A-A2 to C-C2.
- Stitch the neck gusset to the head, leaving an opening.
- Sew the ears.
- Sew the body.
- Stitch the hands: first, sew the palms to the inner hands. Then sew the outer and inner hands.
- Sew the legs and sew on the feet.
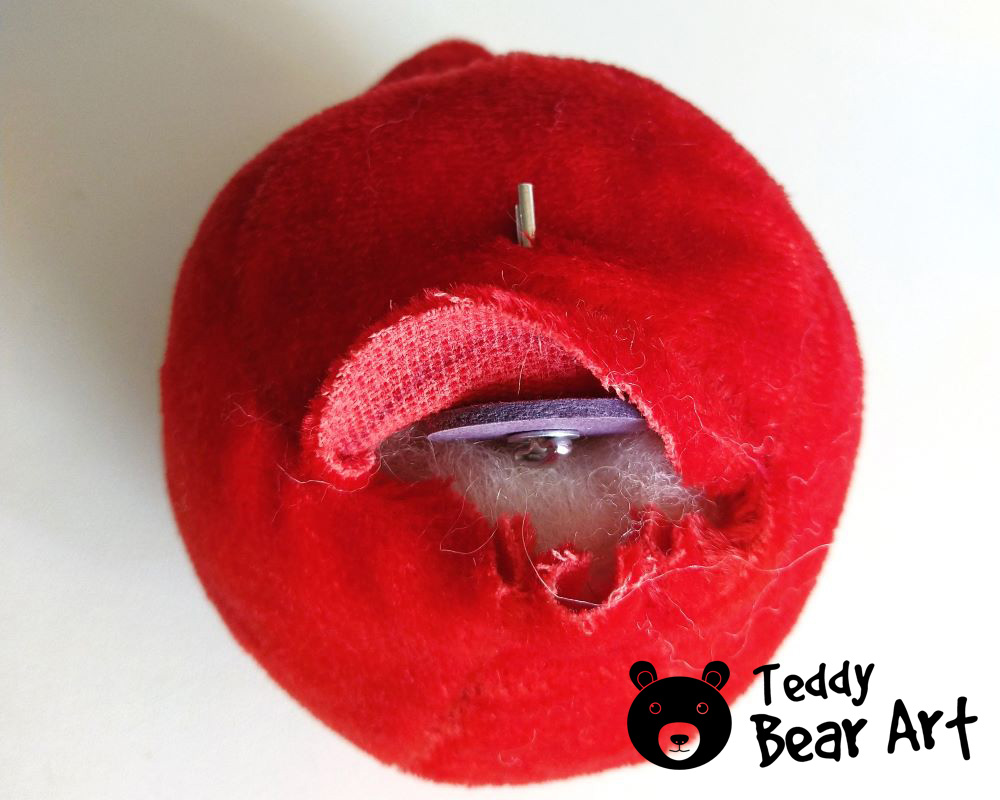
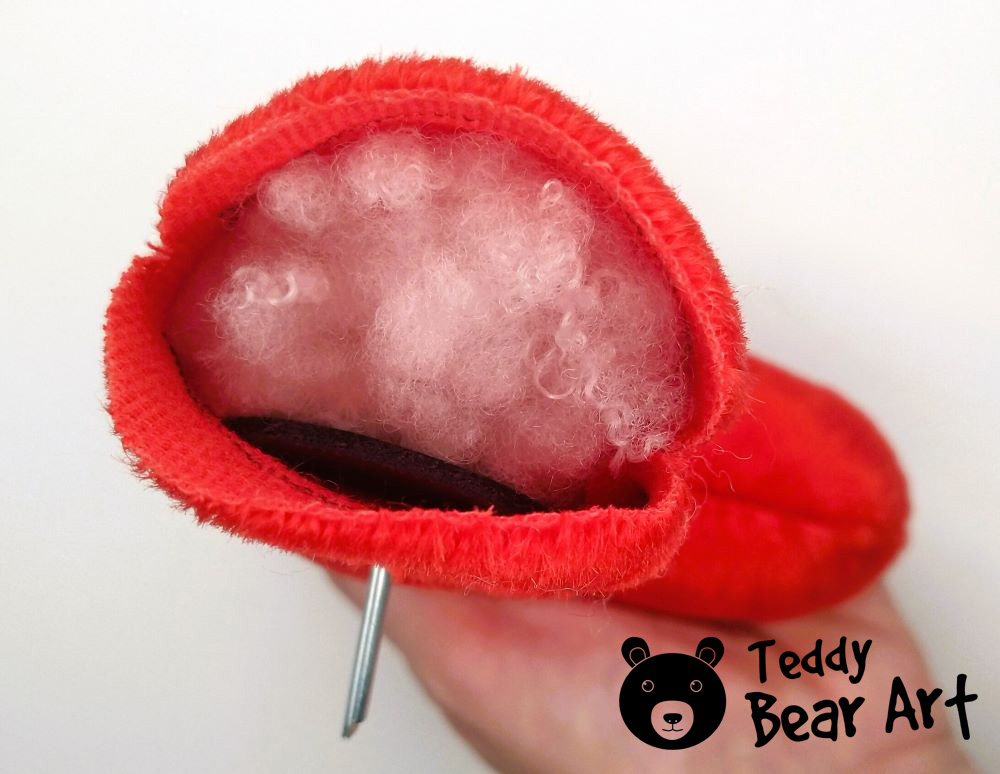
Step 3: Stuffing
Turn outside the final components using pliers and a rounded-tip wooden stick. Fill the head with sheep wool and insert the disk with the washer and a cotter pin.
Securely stitch up the opening of the head with strong thread, making sure to secure and hide the thread ends within the head.
Next, stuff the limbs with the synthetic filler by inserting the disk with the washer and cotter pin, and then sew up the opening.
Use either a needle or an awl to release the fur from the seams. Afterward, comb the fur along the seams in various directions to minimize its visibility.
Hold off on stuffing the body for now.
Step 4: Refining Facial Features
- Embroider the nose and mouth.
- Install the eyes.
- Sew the ears onto the head.
Step 5: Assembling Your Stuffed Bear
Refer to the instructions for creating joints and affixing the head and limbs to the body.
Add weight, fill the body with a blend of sheep wool and synthetic filler, and meticulously hand-sew the opening closed using a ladder stitch for a seamless and polished appearance.
Tips for a Touch of Personalization
Enhancing your red teddy bear with a personal touch not only infuses character but also makes it uniquely yours. Here are some tips to add that special flair to your creation:
- Choose Distinctive Fabrics:
Opt for fabrics that resonate with your vision for the teddy bear. Consider textured materials, vibrant patterns, or even sentimental pieces like old clothing to evoke memories. The choice of fabric can significantly influence the bear’s personality. - Embroider Personal Details:
Use embroidery to add personal touches such as initials, a special date, or a meaningful symbol. This not only makes the teddy bear unique but also turns it into a cherished keepsake. - Accessorize Creatively:
Experiment with accessories to elevate your red teddy bear’s charm. Tiny bows, miniature hats, or even a delicate necklace can add a touch of whimsy. Keep in mind the overall theme and personality you want to convey. - Customize the Eyes and Nose:
The eyes and nose are the focal points of your teddy bear’s face. Choose eye colors that resonate with you or match those of a beloved pet. Experiment with different nose shapes and materials, such as embroidered noses or even small buttons. - Play with Colors:
Introduce additional colors into your teddy bear’s design. Whether it’s a contrasting belly patch, colored paw pads, or a uniquely shaded muzzle, incorporating different hues adds visual interest and personalization. - Create a Theme:
Develop a theme for your teddy bear based on personal interests or hobbies. Whether it’s a sports-themed bear with a tiny jersey or a bookworm bear with miniature glasses, a theme adds a narrative to your creation.
By incorporating these personalized touches, your red teddy bear becomes more than just a craft; it becomes a reflection of your creativity and a truly one-of-a-kind companion.
Conclusion
As we conclude our exploration of red teddy bear crafting, remember that each stitch is an opportunity to weave love and warmth into your creation. The Red Teddy Bear Sewing Pattern Guide is more than just a set of instructions; it’s a key to unlocking your creative potential. Dive into the world of red teddy bears and let your imagination run wild.
More Goodies
Explore our collection of irresistible teddy bear patterns designed to spark your creativity and bring your unique vision to life. Here are three must-see patterns that will inspire your next crafting adventure:
- Teddy Elegance Pattern
Dive into the timeless charm of our Teddy Elegance Pattern. This pattern combines sophistication with simplicity, allowing you to create a teddy bear that exudes grace and style. Follow the step-by-step guide to fashion a companion that stands the test of time. - Whimsical Wonderland Teddy Pattern
Embark on a whimsical journey with our pattern. This enchanting design invites you to infuse playfulness and imagination into your crafting. Follow the pattern’s magical twists and turns to craft a teddy bear that transports you to a world of wonder. - Small and Simple Teddy Pattern
Explore our delightful pattern designed for a quick and charming crafting experience. Whether you’re creating a tiny winter friend, a petite springtime companion, a sunlit summer buddy, or a modest autumn bear, this pattern offers simplicity with a touch of charm.
Discover the joy of creating diverse teddy bear companions with our exclusive patterns. Each pattern is crafted with care and attention to detail, ensuring a delightful and rewarding crafting experience. Happy crafting!
Get Free Patterns & Be the First to Know!
Want free teddy bear patterns, exclusive tutorials, and a chance to win craft supplies?
Sign up for our newsletter using the subscribe form in the middle of this article to receive new patterns, insider tips, and the latest news on teddy bear art. You’ll also automatically be entered into our annual giveaway for a chance to win teddy bear crafting materials.
Bonus entry: Save one of our pins on Pinterest to increase your chances of winning!
Let’s create, inspire, and craft beautiful teddy bears together!
Hey, Hanna,
Wow, what a lovely and detailed guide on how to sew a red teddy bear! I love how you explained each step with clear instructions and photos. The finished bear looks so adorable and cuddly. 😍
I have always wanted to try sewing a teddy bear, but I was intimidated by the different fabrics and techniques involved. Your post has inspired me to give it a try and follow your pattern. I think it would make a great gift for someone special or a cute decoration for my home. 🎁
I have a few questions for you if you don’t mind. How long did it take you to complete the project? What kind of fabric did you use for the bear’s body and the contrast parts? Do you have any tips on how to work with faux fur or minky fabric? I have heard that they can be tricky to sew with. 🤔
Thank you for sharing your passion and expertise with us. I look forward to seeing more of your creations and tutorials. Keep up the good work! 👏
Marios
Hey Marios!
Thanks a bunch for your sweet words! I’m thrilled that you found the teddy bear guide helpful and that it sparked your interest in giving it a shot! Sewing a teddy bear can be such a rewarding and fun experience.
To answer your questions:
1. The time it takes to complete the project can vary, but on average, it might take around 6-8 hours, depending on your sewing speed and experience.
2. For the body, I usually go with a mohair fabric or faux fur fabric and for the contrast parts, you can experiment with a slightly different texture or color to add character. It could be faux suede, felt fabric etc. It’s all about personal preference!
3. Working with faux fur or minky can indeed be a bit tricky. My tip would be to use a walking foot on your sewing machine, as it helps prevent the fabric from shifting. Or use hand sewing for faux fur fabrics. Also, be sure to cut the fabric from the back to avoid cutting the fur. Take it slow, and you’ll get the hang of it!
I’m super excited that you’re diving into teddy bear-making! Feel free to reach out if you have any more questions. Can’t wait to see your adorable creation! 🧵✨
Happy crafting!
Hanna
Thanks you for sharing this article about the Red Teddy Bear Sewing Pattern Guide. It was an enjoyable read, and I found it to be a great resource for anyone interested in creating their own teddy bear. I appreciate the detail and the helpful images that illustrate the different steps involved in creating the teddy bear. This could be a great source of inspiration for anyone who loves sewing and crafting. It’s a wonderful way to create a unique and personalized gift for someone special.
You’re very welcome! I’m thrilled to hear that you enjoyed the Red Teddy Bear Sewing Pattern Guide. It’s fantastic to know that you found the details and images helpful for your teddy bear crafting journey. Creating unique and personalized gifts is indeed a special way to share joy. If you have any questions or if there’s anything specific you’d like to see in future guides, feel free to let me know. Happy crafting! 🧸✨