Welcome, fellow teddy bear enthusiasts and crafters! There’s something magical about creating your own teddy bears, isn’t there? The joy of bringing these lovable companions to life with your hands is unmatched. In this guide, we’re diving into the world of teddy bear sewing, specifically focusing on a free and easy-to-follow teddy bear sewing pattern that will elevate your crafting experience.
A well-crafted pattern is the foundation of any successful teddy bear sewing endeavor. It not only makes the process enjoyable but also ensures a seamless creation. This is where the significance of a free pattern shines through, making your crafting experience not only delightful but also cost-effective.
Downloading the Pattern
- From a computer (Windows).
Click on the photo of the pattern you see below. In the new tab that will open, you press the right mouse button and select the “Save image as …” option. Then you choose where you want the image to be saved on your computer. - From a phone or a tablet (Android). There should be something similar for mobile devices with Android or iOS.
Click on the image. Save it by holding your finger on the image and selecting the “Save Image” option. Then go to your photo gallery and print it (there is an option).
Materials Needed
- Thick faux fur with a pile length of 2 cm approx. 40×45 cm.
- Strong threads and a needle for hand sewing.
- A pair of transparent glass eyes with a black pupil on a metal loop 20 mm in diameter.
- Waxed thread.
- Metal pellets or glass pellets for weight.
- A piece of fabric for the paws and inner parts of the ears.
- Discs: 25 mm in diameter – 10 pieces.
- T-shaped cotter pins 2.5×28 – 5 pieces.
- Washers 20-25 mm – 10 pieces.
- Synthetic filler.
- Any materials you use for tinting fabric (oil paints, pastels, textile paints, markers, etc.) and paintbrushes.
- Long needle (10-15 cm).
- Scissors.
- Pliers.
- An awl.
- Strong glue UHU.
- Self-hardening polymer clay or baked clay.
- Steel earring base.
Navigating the Guide
Let’s delve into what this guide has to offer. Whether you’re a seasoned crafter or a beginner, this guide is tailored for you.
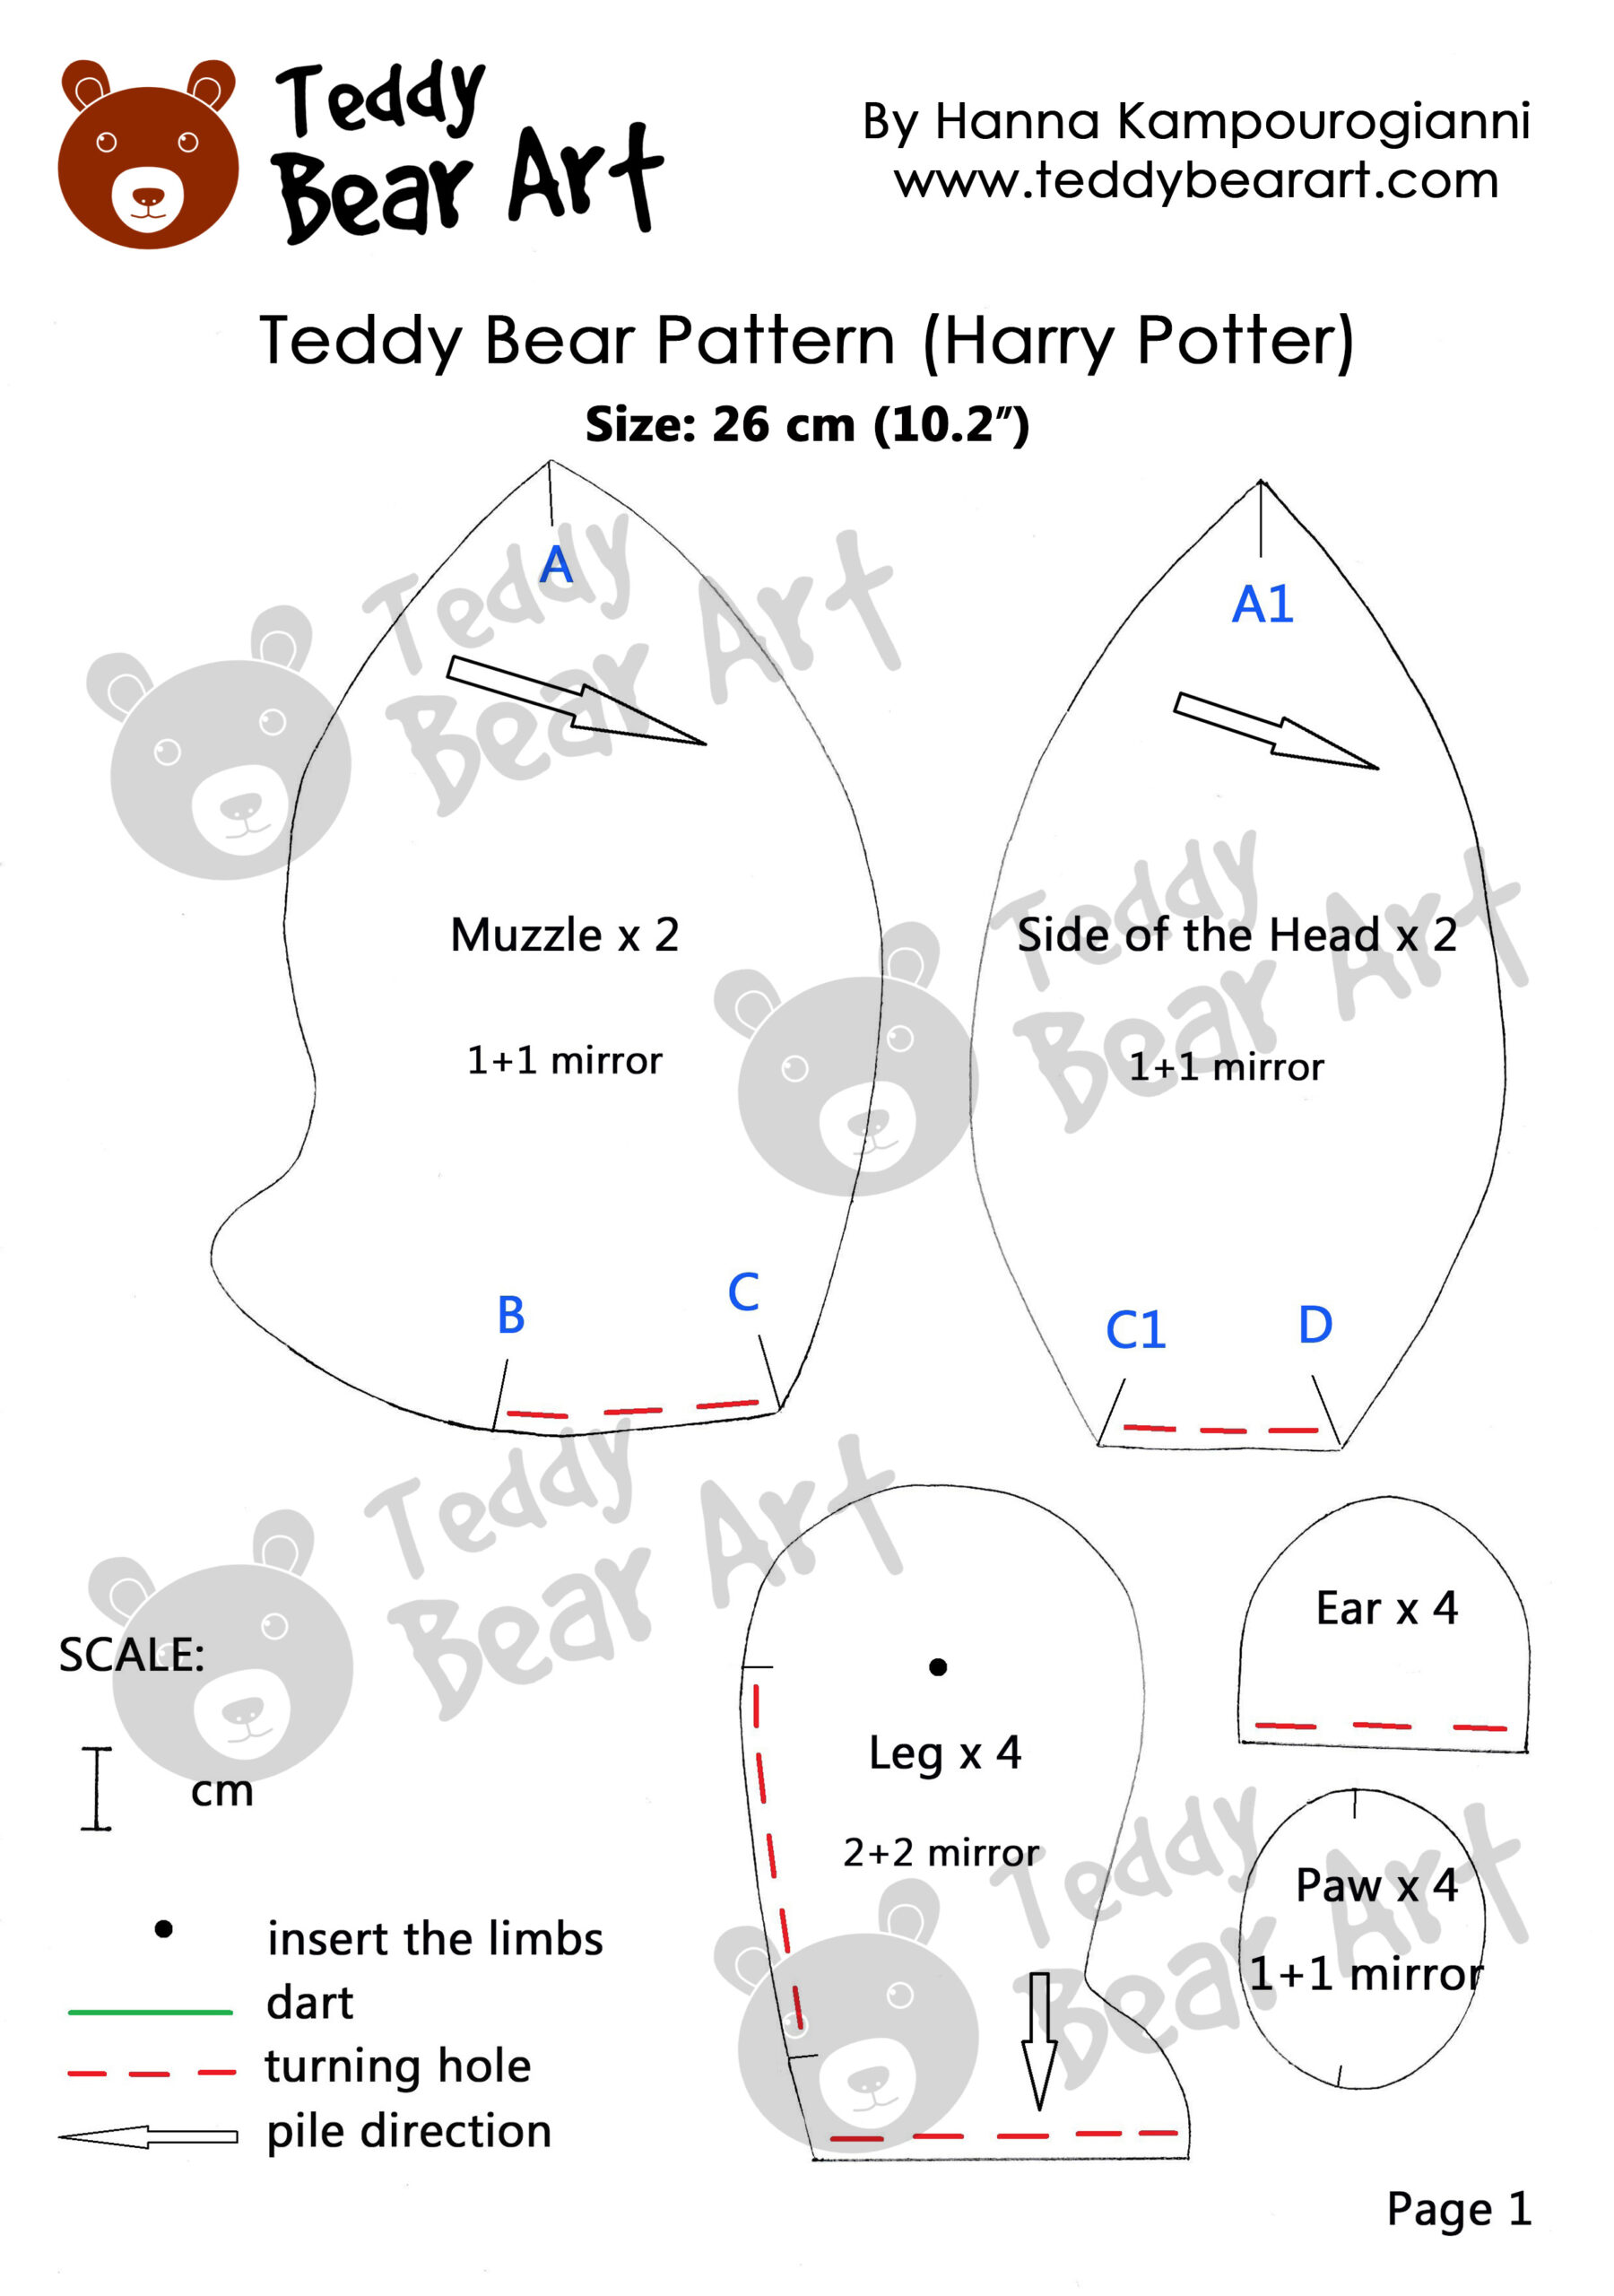
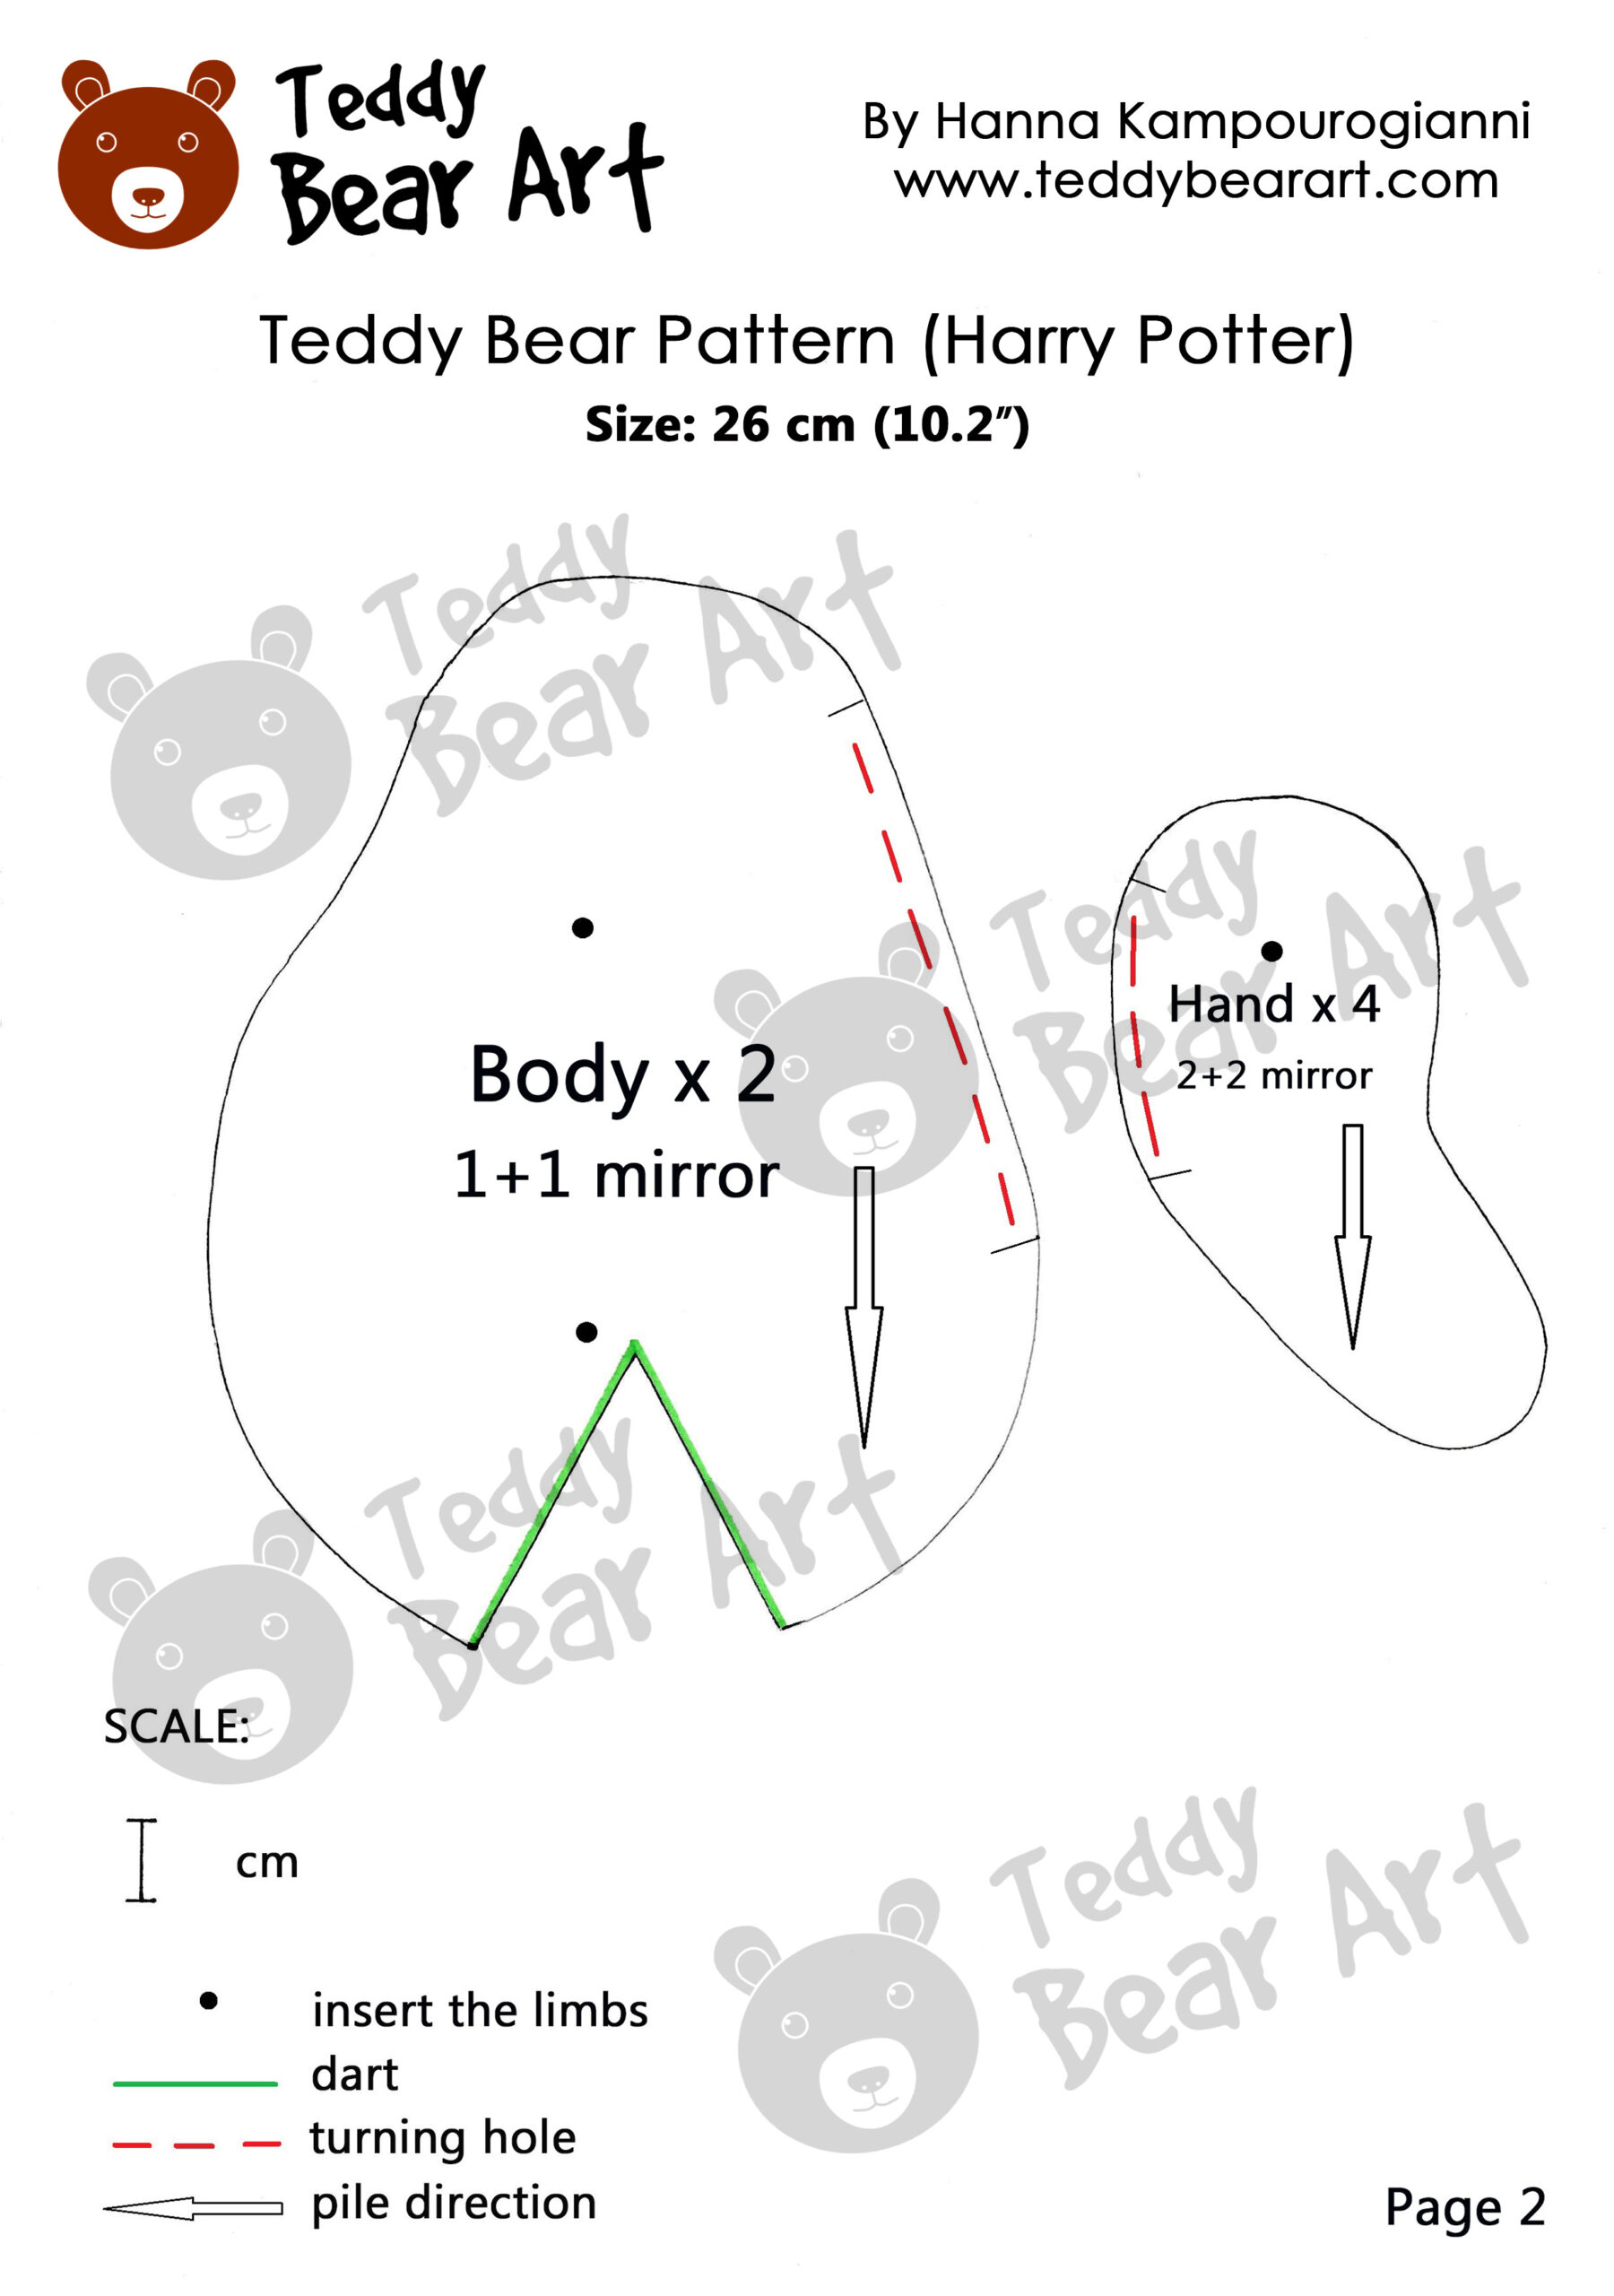
Step 1: Preparing the Pattern
Start by arranging the pattern pieces so that the arrows match the direction of the fur. Carefully cut out the pattern pieces from the supplied template, leaving a margin of 7-10 mm at the edges.
Step 2: Sewing the Pieces Together
- Stitch the darts, highlighted in green.
- Stitch the two mirror parts of the muzzle according to the marks from A to B.
- Stitch the sides of the head to the muzzle according to the marks A-A1 to C-C1.
- Stitch the back of the head according to the marks A1-D
- Sew the ears.
- Sew the body.
- Sew the hands.
- Sew the legs and sew on the paws.
For a clearer understanding of stitching the fabric components together, please refer to the following information.
Step 3: Stuffing
Create the final pieces by using pliers and a wooden stick with a rounded tip. Fill the head with synthetic stuffing, and insert the disk with the washer and a cotter pin.
Securely sew up the head’s opening with waxed thread, ensuring to fasten and conceal the thread ends within the head.
Proceed to stuff the limbs, inserting the disk with the washer and cotter pin, and then sew up the opening. Use either a needle or an awl to release the fur from the seams. Afterward, comb the fur along the seams in different directions to reduce their visibility.
Do not stuff the body yet.
Step 4: Enhancing Facial Details
- Sculpt the bear’s muzzle by carefully trimming the fur pile.
- Transform ordinary transparent eyes by painting them in a rich brown hue, then delicately insert them into place.
- Skillfully embroider the bear’s mouth, adding a touch of personality to its expression.
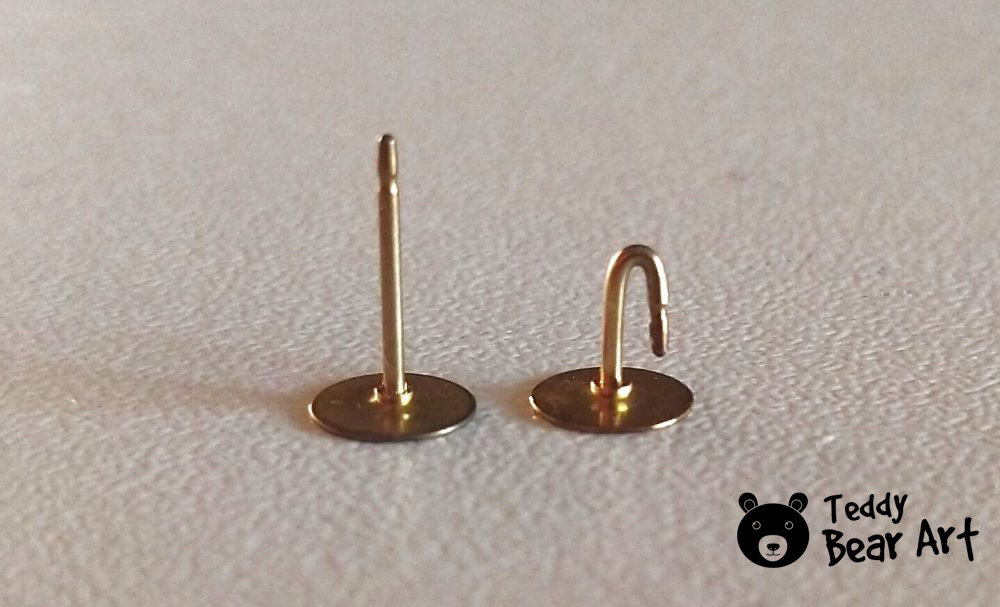
- Craft a durable metal loop for the nose using a steel earring base. Mold, paint it with acrylic, and apply varnish to create a polished nose, then securely insert it. Add some glue also.
- Add subtle shading around the bear’s eyes, nose, and inside ears, bringing depth and dimension to its features.
- Embroidery bear’s paws and add some shades.
Step 5: Joining Your Plush Bear
Read the beginner’s guide on how to make joints and attach the head and limbs to the body.
Sew up the ears to the head, attach the head to the body, and add the limbs.
Include weight, stuff the body, and carefully hand-sew the opening shut using a ladder stitch for an invisible seam and a polished look.
As you progress through each step, savor the evolving charm of your handmade creation. Crafting a plush bear is not just about the destination but the joy found in every stitch.
Personalizing Your Teddy Bear
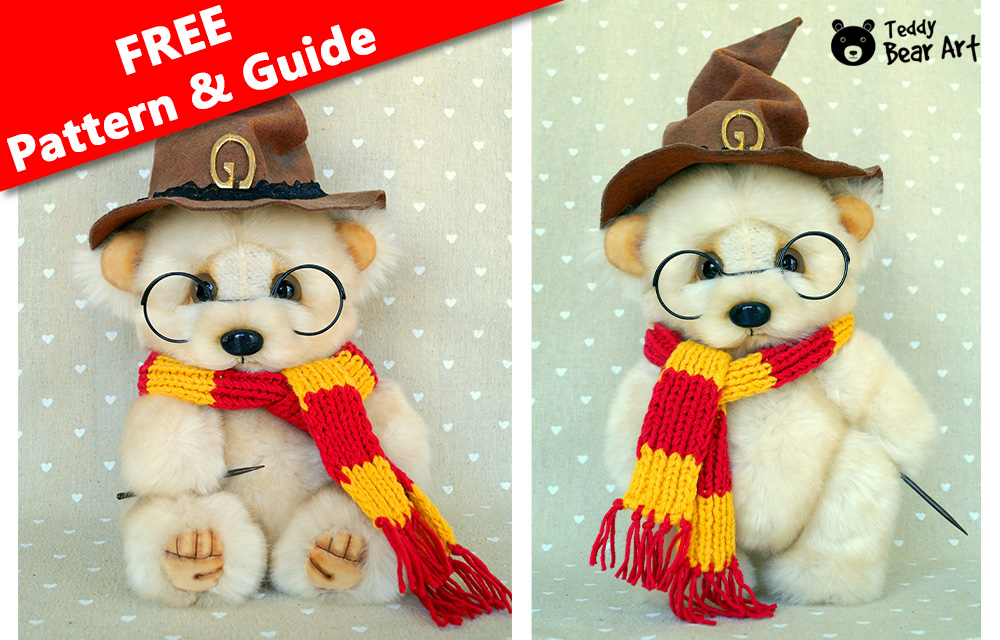
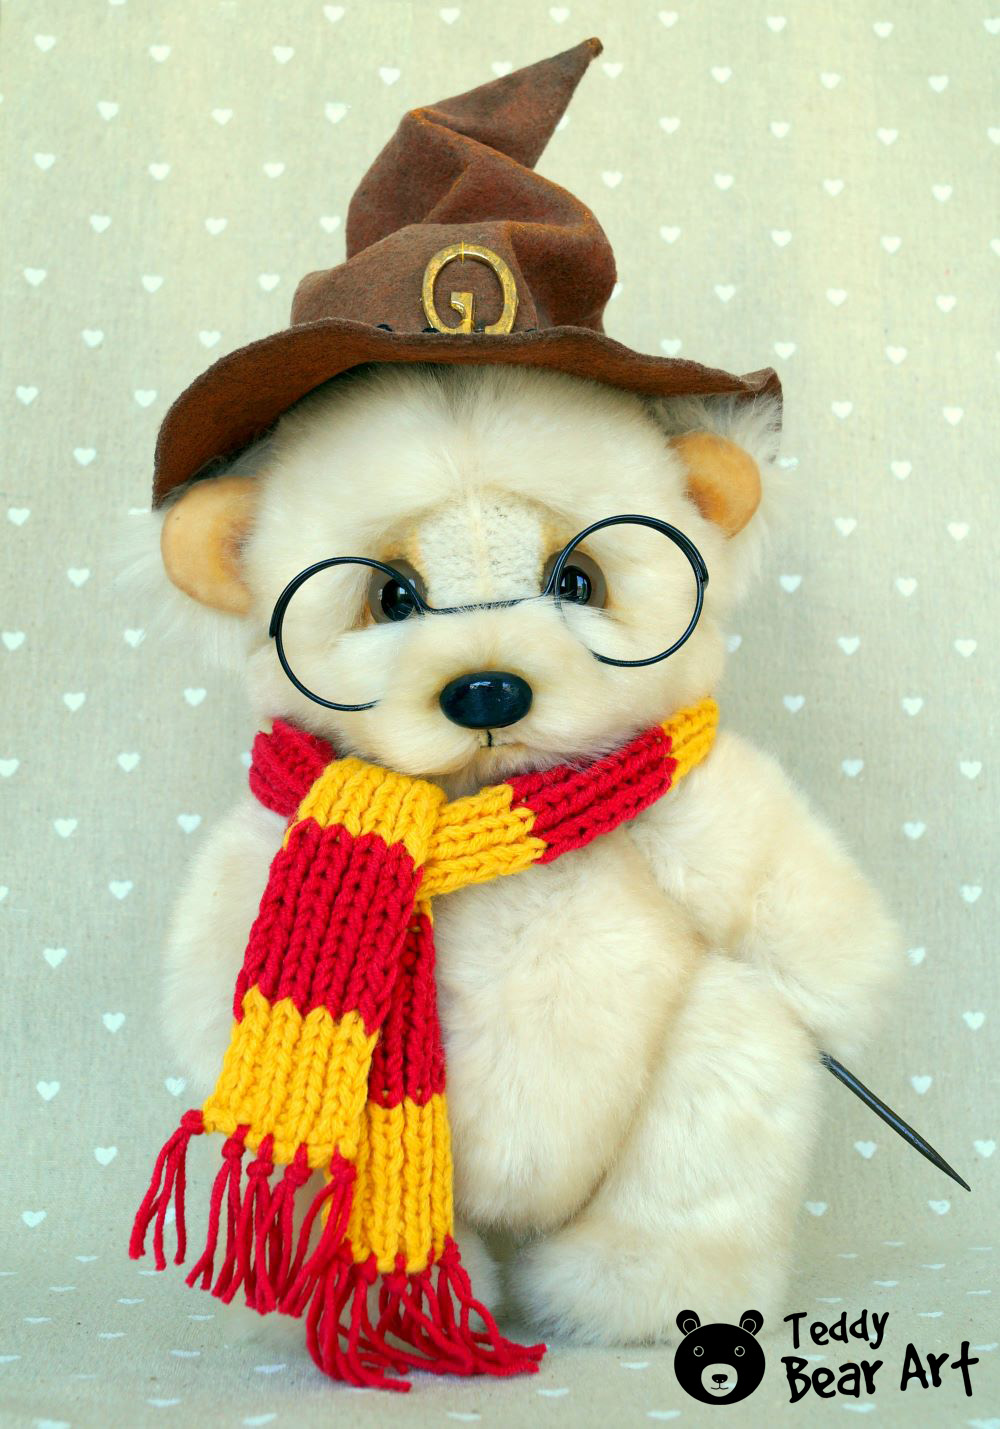
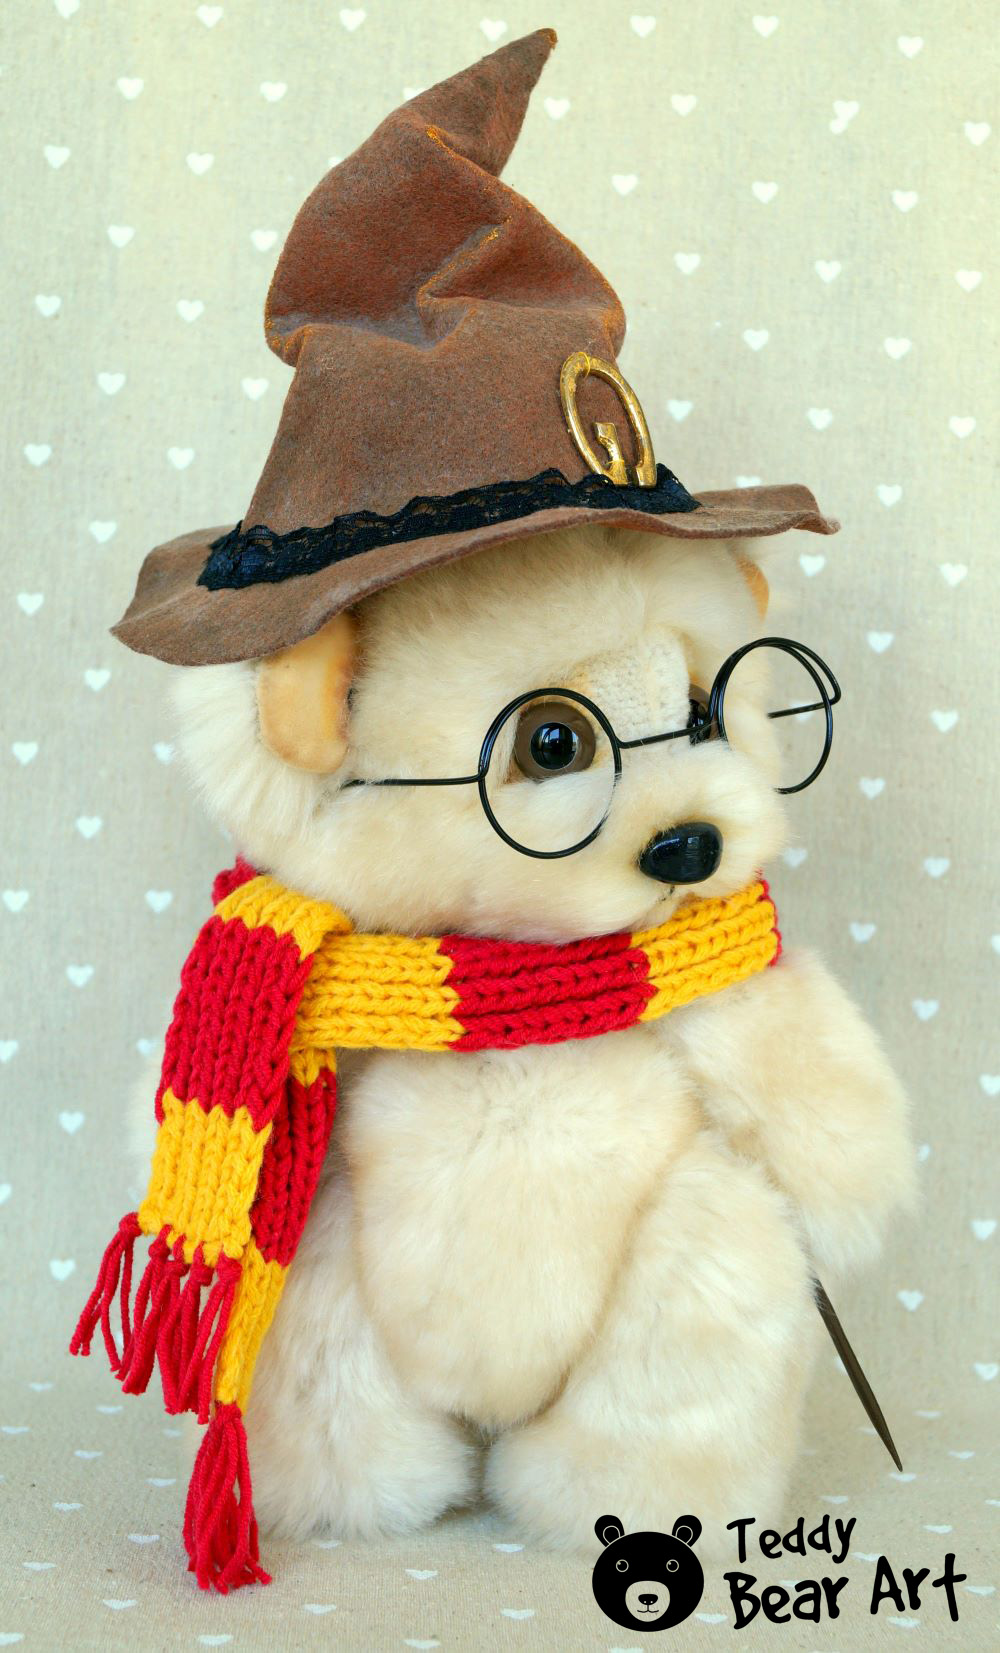
Elevate your teddy bear’s charm by infusing it with your unique touch. Imagine giving it the persona of Harry Potter with a striped scarf, glasses, and a magical hat, or let your creativity soar by adding custom accessories.
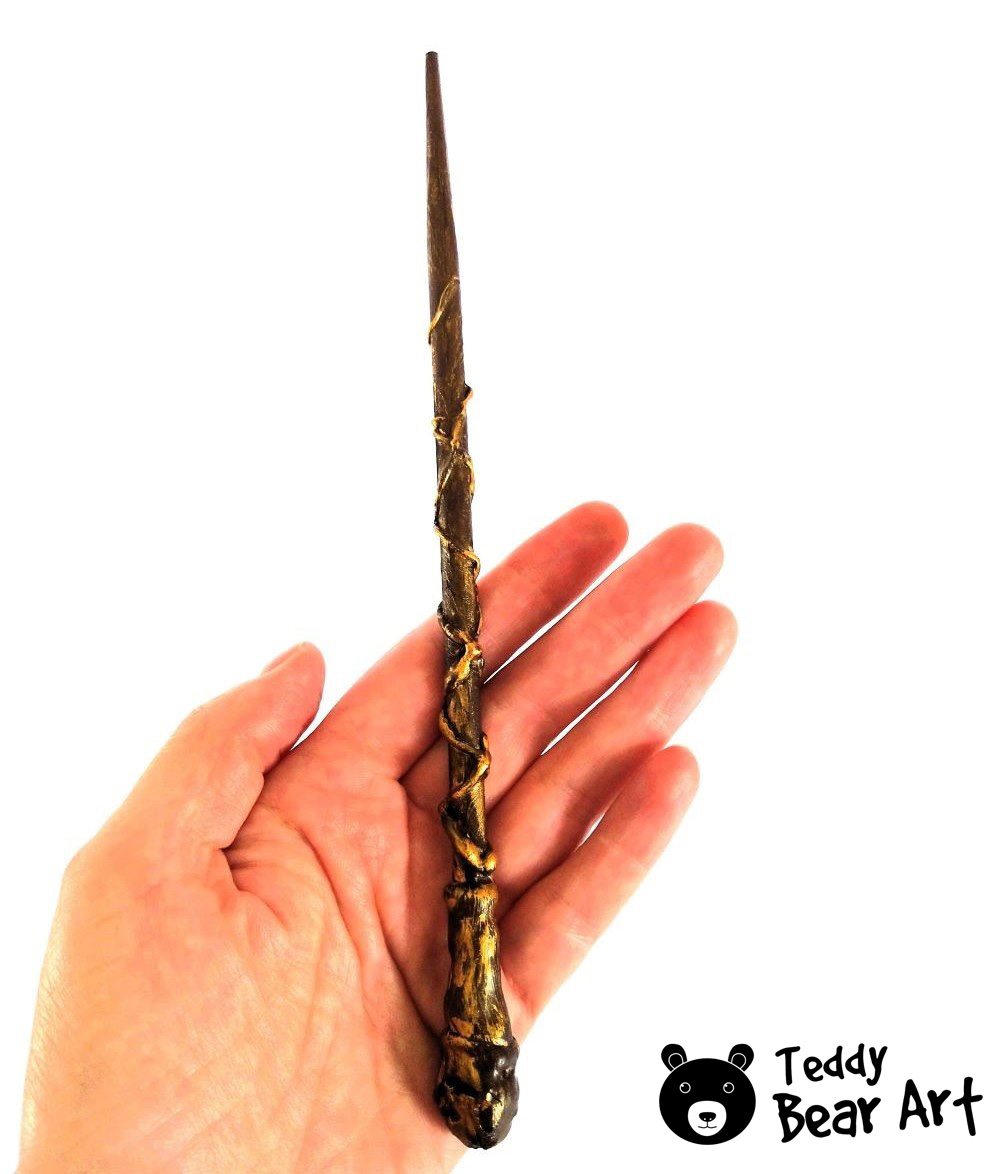
Explore how in just 15 minutes, you can create your very own Harry Potter magic wand, which can become a perfect accessory to your teddy bear.
Whether it’s a personalized theme, a mini wardrobe, or quirky accessories, the possibilities are endless. This section celebrates the joy of turning your teddy bear into a one-of-a-kind companion that reflects your imagination and style.
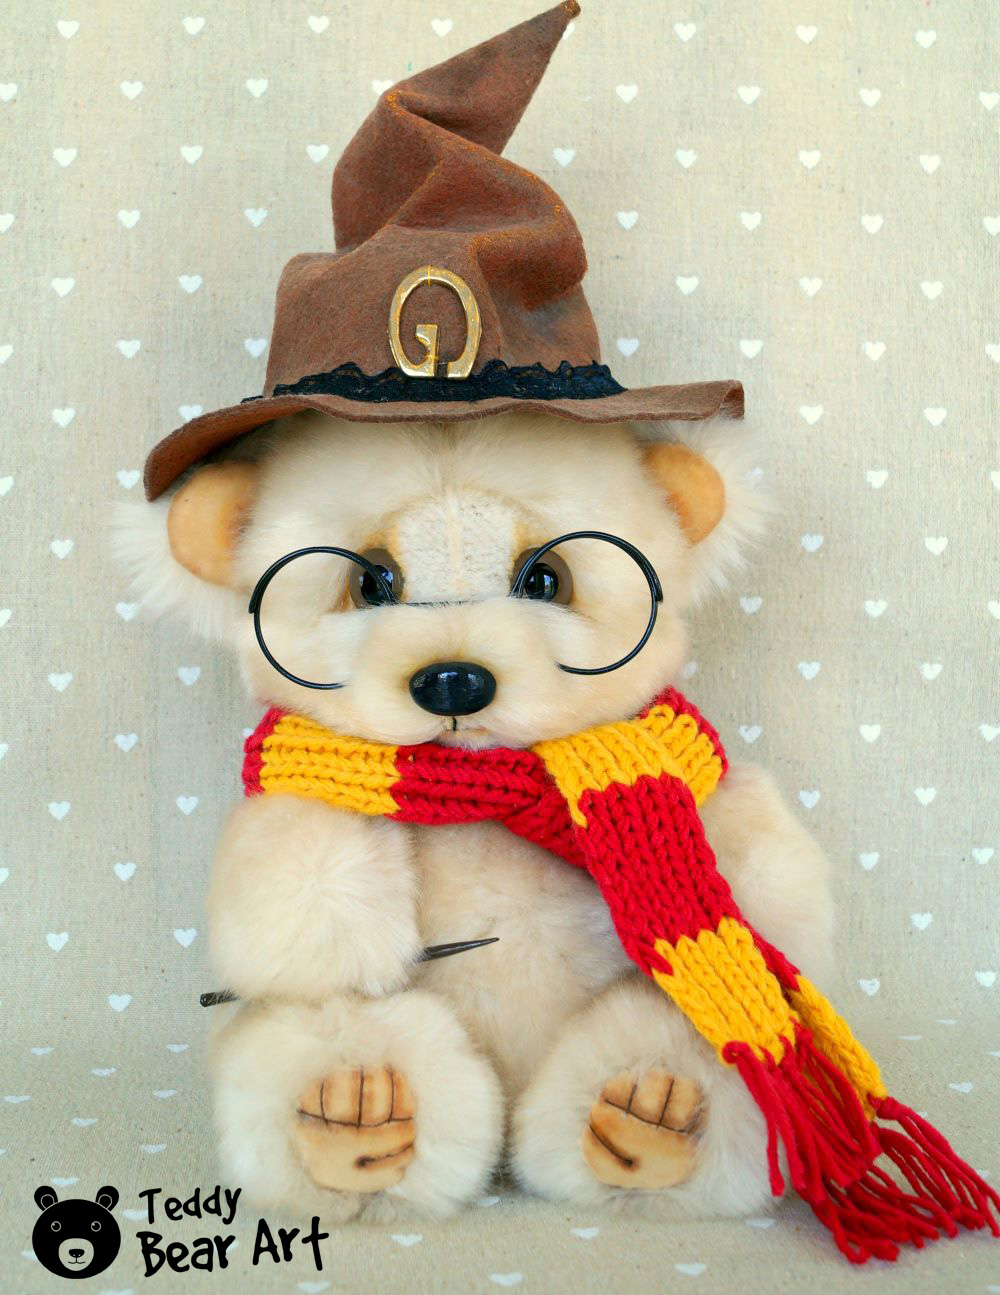
Embrace the art of personalization and watch as your plush bear becomes a cherished, individualized masterpiece. The magic lies in making it truly your own.
Tips and Tricks for Successful Teddy Bear Sewing
Embarking on a teddy bear sewing journey is an exciting venture, and mastering the craft requires a combination of skill and insight. Here are some invaluable tips to ensure a seamless and rewarding experience.
- Precision Matters: Accurate cutting and stitching are the foundations of a well-crafted teddy bear. Take your time with each step, ensuring precision to achieve a polished result.
- Choose Quality Materials: Opt for high-quality fabrics, stuffing, and accessories. Quality materials not only enhance the bear’s appearance but also contribute to its durability and huggable factor.
- Mind the Details: Small details make a big difference. Pay attention to facial features, ensuring symmetry and expression. Thoughtful details like embroidered noses and carefully placed eyes elevate the bear’s personality.
- Experiment with Fabrics: Don’t be afraid to mix and match fabrics for a diverse and textured look. Experimenting with different materials can add character and uniqueness to each bear.
- Customize with Clothing: Clothing adds a personalized touch. Create miniature outfits or accessories to reflect your bear’s individuality. A tiny hat, scarf, or dress can transform your bear into a distinctive creation.
- Embrace Imperfections: Perfection lies in the imperfections. Don’t be disheartened by minor mistakes; they often add character to your creation. Embrace the uniqueness of each bear.
Remember, teddy bear sewing is an art, and each stitch contributes to the story of your handmade companion. Enjoy the process, learn from every attempt, and relish the satisfaction of bringing a cuddly friend to life.
Conclusion
As you reach the end of this teddy bear sewing adventure, take pride in the enchanting creation that now rests in your hands. Your dedication to each stitch has transformed fabric into a lovable companion.
This isn’t just the culmination of a guide; it’s the realization of a journey filled with joy, challenges, and the fulfillment of crafting your own teddy bear.
Cherish the memories embedded in every seam, and may your newfound teddy bear bring endless smiles and warmth. The crafting journey continues, and your creativity is the thread that weaves stories into each hug.
Get Free Patterns & Be the First to Know!
Want free teddy bear patterns, exclusive tutorials, and a chance to win craft supplies?
Sign up for our newsletter using the subscribe form in the middle of this article to receive new patterns, insider tips, and the latest news on teddy bear art. You’ll also automatically be entered into our annual giveaway for a chance to win teddy bear crafting materials.
Bonus entry: Save one of our pins on Pinterest to increase your chances of winning!
Let’s create, inspire, and craft beautiful teddy bears together!
Hi, it is great to be back at this awesome site. This is actually just what I was looking for. I was a little concerned that I might not be able to do this, But your explanation is excellent. Now I can get to work and get this done finally 🙂 Have a good one.
Hey there! Welcome back! 🌟 I’m thrilled to hear that you found exactly what you were looking for and that the explanation was helpful. You’ve got this! If you ever need more guidance or have questions along the way, feel free to reach out. Happy crafting, and have a fantastic time working on your project! 😊🐻✨
Awesome! Your explanations in your article ” Free Teddy Bear Sewing Pattern Guide” are excellent and make the teddy bear sewing pattern look easier. The guided steps as you stated are easy to follow suit. The beauty of your site should make one come back again and again. What is the approximate time to a one sewing done? Thanks
Hey there! Thanks a bunch for the kind words! 😊 I’m thrilled to hear that you found the “Free Teddy Bear Sewing Pattern Guide” helpful. The time it takes to complete a teddy bear sewing project can vary based on factors like experience, the complexity of the pattern, and the size of the bear. On average, it might take a few hours to a day for a smaller bear, and larger or more intricate ones could take a bit longer. Patience is key, and enjoy the process of bringing your teddy to life! 🧸✨ If you have any specific questions or need more guidance, feel free to ask!