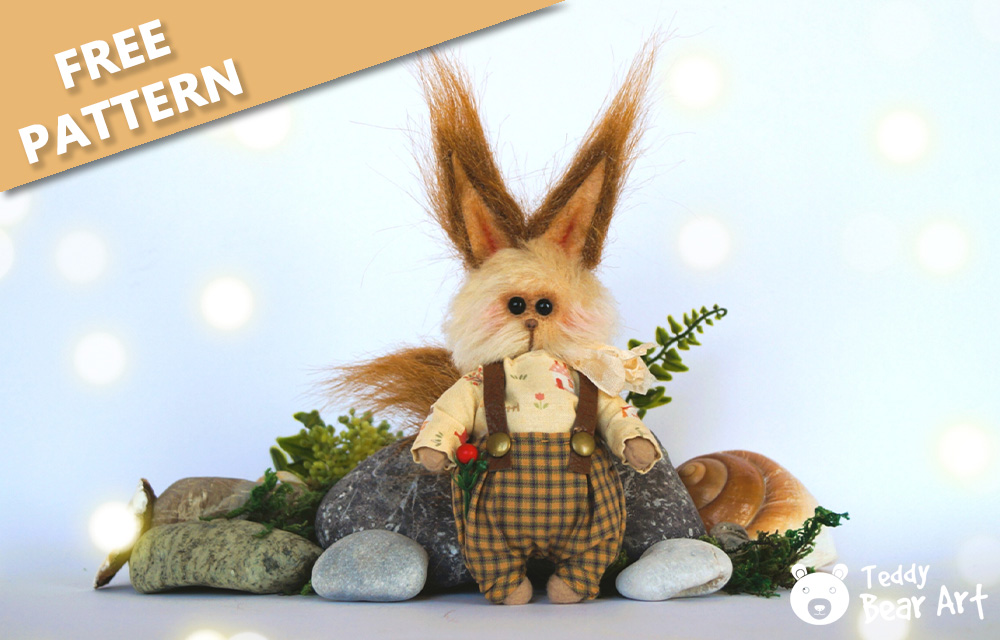
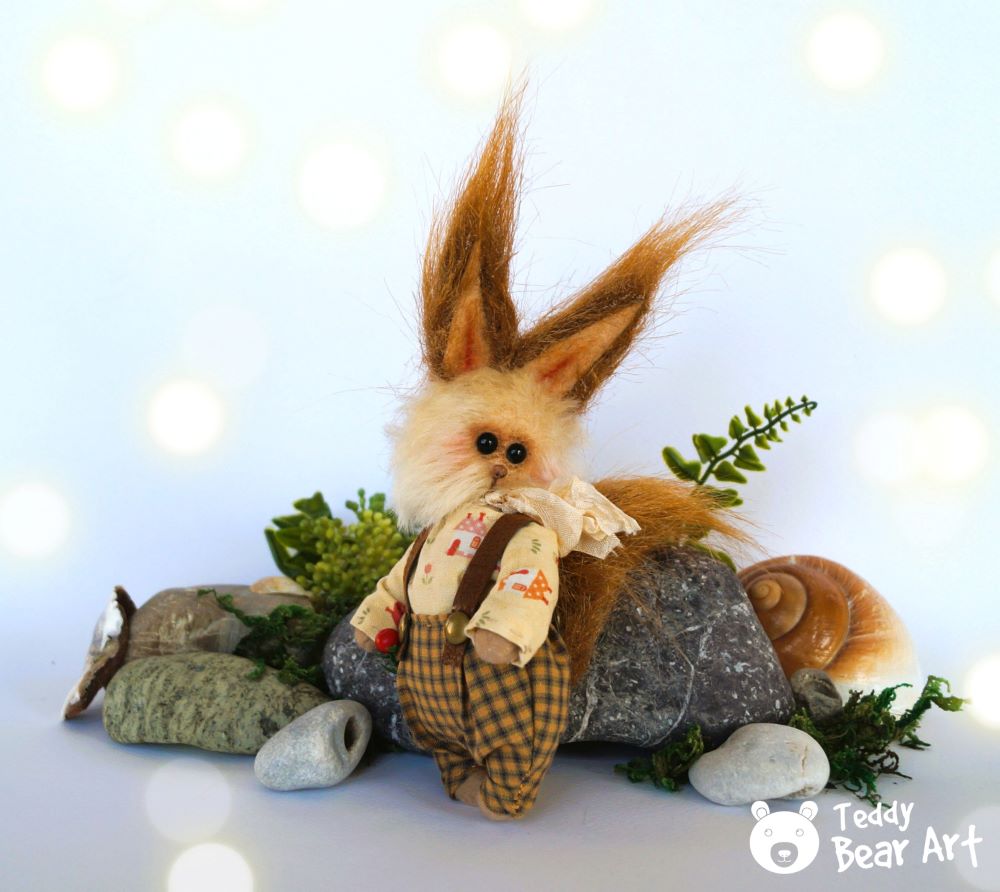
Are you ready to embark on a delightful crafting adventure? In this step-by-step guide, we’ll walk you through creating an adorable squirrel plushie complete with customizable outfits. With our free squirrel sewing pattern and outfit templates, you can bring your own unique squirrel friend to life.
Whether you’re a seasoned crafter or just starting, this project is sure to bring joy to your sewing table.
Downloading the Pattern
To get started, you’ll need to download our free squirrel sewing pattern along with the outfit patterns.
Follow the instructions below:
- From a computer (Windows).
Click on the photo of the pattern you see below. In the new tab that will open, you press the right mouse button and select the “Save image as …” option. Then you choose where you want the image to be saved on your computer. - From a phone or a tablet (Android). There should be something similar for mobile devices with Android or iOS.
Click on the image. Save it by holding your finger on the image and selecting the “Save Image” option. Then go to your photo gallery and print it (there is an option).

Gathering Materials
Before we start sewing, let’s gather all the materials we’ll need for this project. You’ll need:
- A small piece of mohair with a pile length of 1.5 cm
- A small piece of faux fur fabric with a pile length of 5.5 cm
- Thin fleece or felt fabric (1-2 mm)
- Cotton fabric
- Needle and thread
- Scissors
- A pair of black glass eyes on a metal loop, approx. 6-7 mm in diameter
- Strong thread
- Beads 6 mm in diameter – 4 piece
- Discs 6 mm in diameter – 2 pieces
- T-shaped cotter pins 1.6×20 – 3 pieces
- Molding material or a small bead
- Stuffing material (polyfill)
- Weighting material
- Paints or tint of your choice.
- Glue UHU
- Decorative elements
- Pliers
- Awl
Step-by-Step Sewing Instructions
Let’s embark on creating your adorable squirrel plushie with our step-by-step sewing guide. From cutting the fabric to assembling the limbs, we’ll provide detailed instructions for each stage of the process.
Head:
Begin by cutting two pieces of mohair fabric for the squirrel’s head, ensuring a 5 mm seam allowance. Seam them together, leaving an opening to turn them inside out. Once turned right side out, stuff the head, insert a disc with a cotter pin, and carefully sew the opening shut.
Insert glass eyes to bring your squirrel to life.
Add a character with an embroidered mouth and nose. Sculpt and glue the nose or sew on a small bead, tailoring the technique to your preference.
Cut out ears from felt and affix them to the faux fur. Once the glue has dried, trim off any excess fur fabric. Then, fold the fur inward and secure it with glue to the felt to give the ears a more natural appearance.
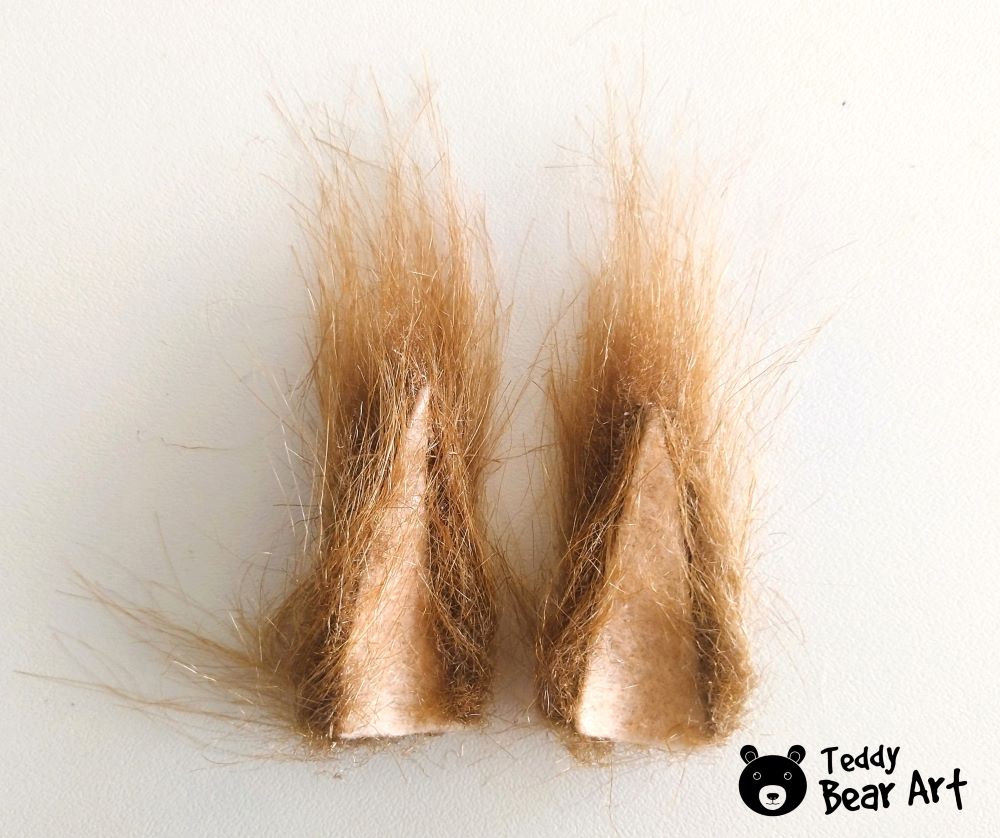
For now, set the ears aside, don’t sew them on!
Body and Arms:
Craft the body and arms using felt or fleece fabric. If you’re working with fleece fabric, ensure that you position the pattern in a way that allows the squirrel’s body to stretch lengthwise rather than widthwise. This way, after stuffing, the squirrel won’t become too thick and will fit into its clothing properly.
Fill the arms with synthetic stuffing, insert beads with cotter pins, and neatly seal the openings.
Designing Trousers:
- Cut the trouser pieces, allowing for a 0.5 cm margin for folding.
- Roll and stitch the trouser legs and waist to create neat hems.
- Seam together the trouser sections, ensuring a snug fit.
- Turn the trousers inside out meticulously for a refined appearance.
Crafting a Blouse:
- Commence by cutting the blouse, leaving a 0.5 cm margin for folding, with particular focus on the sleeves.
- Seam and stitch the sleeves meticulously to achieve tidy hems.
- Following the indicated red dotted line, cut along the neckline of the blouse, then fold and stitch or overlock it for a finished edge.
- Fold the blouse in half and seam it together, aiming for symmetry in the design.
- Carefully reverse the blouse to reveal a polished final result.
Assembly:
Start by attaching the squirrel’s head to the body, and then attach the arms.
Fill the body with synthetic filling, adding weight if necessary for stability, and stitch the hole securely.
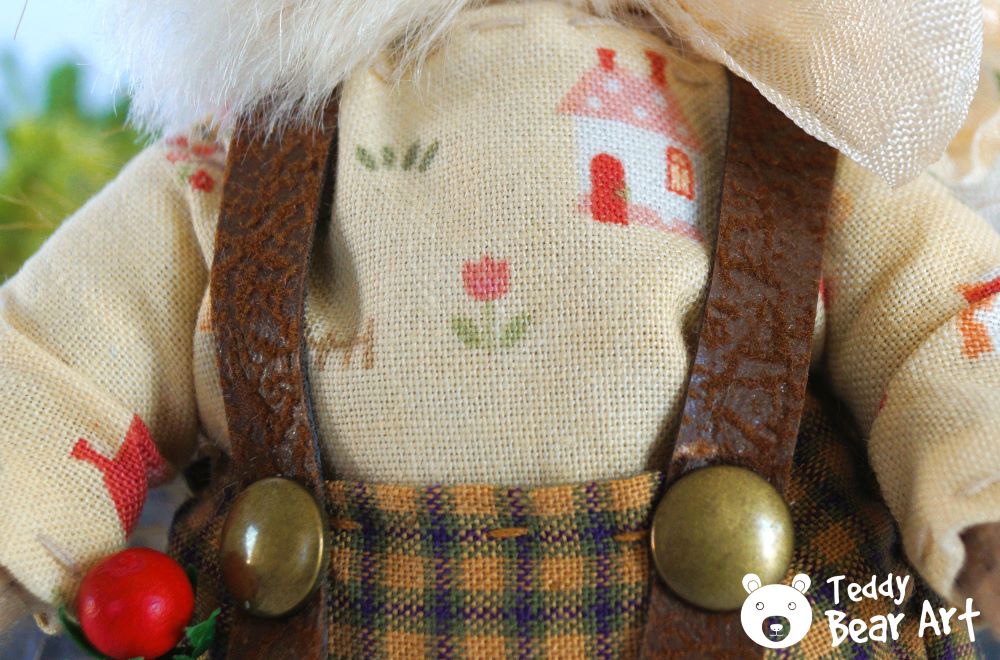
Outfit your squirrel by beginning with the shirt, and securely sewing it at the waistline.
Then, dress the squirrel in the pants, ensuring graceful and symmetrical folds at both the front and sides.
Seam the pants to the squirrel’s body using an invisible stitch along the entire waistline to achieve a seamless and snug fit.
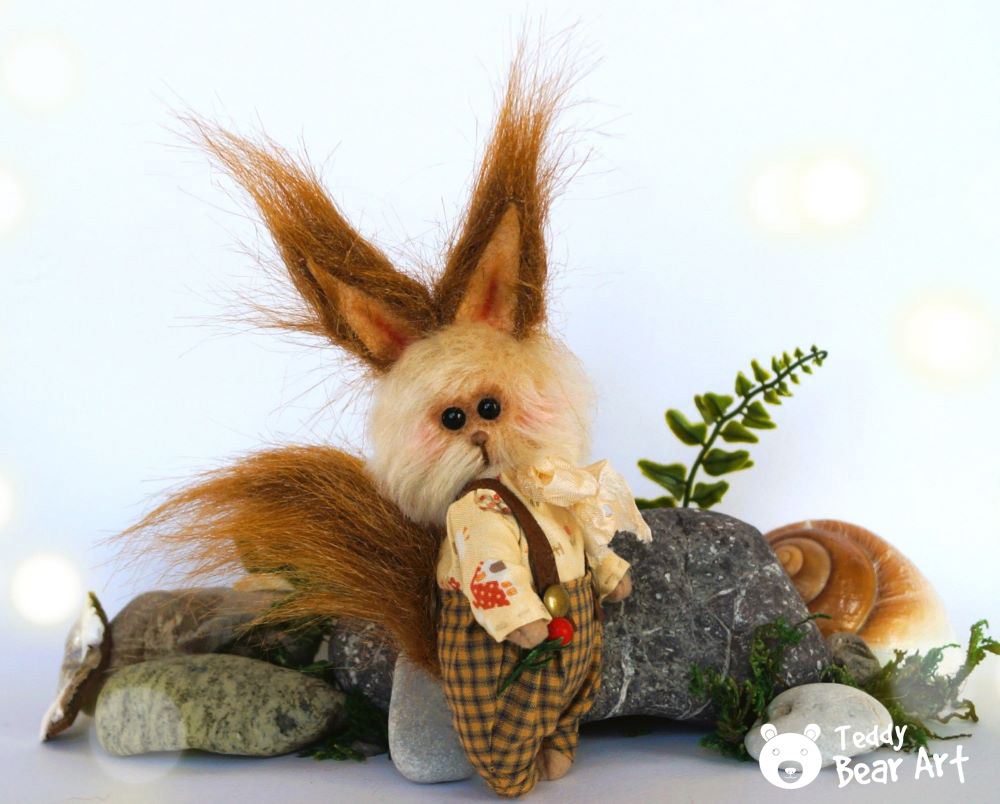
At the end, sew the ears onto the squirrel and attach the tail.
Tip: The tail can be crafted by gluing together neatly from a single piece of faux fur instead of sewing it.
Finishing Touches
As you approach the final stages of completing your stuffed squirrel, it’s time to infuse those finishing touches that will truly animate it. Here’s how to imbue charm and character into your creation.
Accessories:
Inject personality into your squirrel’s ensemble by incorporating suspenders crafted from faux leather. Cut them out, stitch them onto the pants, and adorn them with rivets, buttons, or whimsical additions like acorns, flowers, and more. You can also introduce glasses, ribbons, or a bow tie for an extra dash of style.
Detailing:
Enhance the realism of your squirrel by tinting the inner ears, and eye area and applying a hint of blush for a rosy-cheeked appearance. These subtle touches impart depth and warmth to your creation, breathing life into it in a delightful manner.
Tip: Achieving a harmonious squirrel appearance hinges on the scale of the selected accessories and the fabric patterns for clothing. The smaller and finer they are, the more exquisite the overall presentation will appear.
By attending to these final touches and embellishments, you’ll fashion a stuffed squirrel that’s not only endearing but also brimming with personality and allure. Enjoy infusing your own creative touch to ensure your squirrel stands out as truly one-of-a-kind!
Conclusion
Crafting an adorable squirrel plushie with customizable outfits is a fun and rewarding project that anyone can enjoy. With our free sewing pattern and outfit templates, you can bring your own unique squirrel friend to life with ease.
So gather your materials, download the pattern, and let your creativity soar as you embark on this delightful crafting adventure!
More Goodies
Explore more delightful sewing patterns and guides on teddybearart.com/:
- Easy Stuffed Bunny Sewing Pattern: Complete Guide with Outfit Patterns Included – Dive into the world of bunny crafting with our comprehensive guide, complete with outfit patterns to personalize your creation.
- Quacktastic Creation: Teddy Duck Sewing Pattern and Guide – Discover the charm of creating your own adorable teddy duck with our detailed sewing pattern and guide.
Discover new projects and expand your crafting repertoire with these fantastic resources!
Get Free Patterns & Be the First to Know!
Want free teddy bear patterns, exclusive tutorials, and a chance to win craft supplies?
Sign up for our newsletter using the subscribe form in the middle of this article to receive new patterns, insider tips, and the latest news on teddy bear art. You’ll also automatically be entered into our annual giveaway for a chance to win teddy bear crafting materials.
Bonus entry: Save one of our pins on Pinterest to increase your chances of winning!
Let’s create, inspire, and craft beautiful teddy bears together!
Hey really appreciate your post!
I myself would love to sew a a past time, it is such a creative activity as well as peaceful plus you get to admire the piece you have created or gift it too, makes it extra special.
Your post is awesome especially for beginners, the easy to follow steps along with a template too, you are really helpful! This squirrel pattern along with the outfit is awesome!
I would like to know do you enjoy sewing and why?
Thanks again and have a great day!
Hey there! Thanks a bunch for your lovely comment! Sewing is such a fantastic pastime, isn’t it? It’s like diving into a world of creativity and tranquility all at once. And you’re right – there’s something incredibly rewarding about creating something with your own hands and then being able to admire it or share it with others. It adds that extra special touch to every stitch!
I’m thrilled to hear that you found the post helpful, especially for beginners. Making things easy to follow is key, in my opinion. And oh, I’m glad you liked the squirrel pattern and outfit! They’re just too adorable, aren’t they?
As for me, I enjoy sewing! It’s been and still is a passion of mine for years. There’s just this magical feeling when you’re working with fabrics and bringing your ideas to life. It’s like therapy for the soul!
Thanks again for your kind words! Wishing you a fabulous day filled with creativity and joy!
Your site was so adorable. I loved the very simple design, and the colors were vivid and eye-catching. I must admit that I have never been very crafty and almost failed home ec in high school, as sewing and crafts were not in my DNA. However, your site was so well written, with the designs and information very clear that even someone like me could follow the information and design. The article was very well articulated and easy to follow. Good job, enjoyed your site and the articles.
Thank you so much for your kind words! I’m thrilled to hear that you enjoyed visiting my site and found the design and content appealing. Even if crafting isn’t in your DNA, I’m glad to hear that the information was presented in a way that was easy to follow. If you ever decide to give it a try, feel free to reach out if you have any questions or need guidance. Happy crafting!