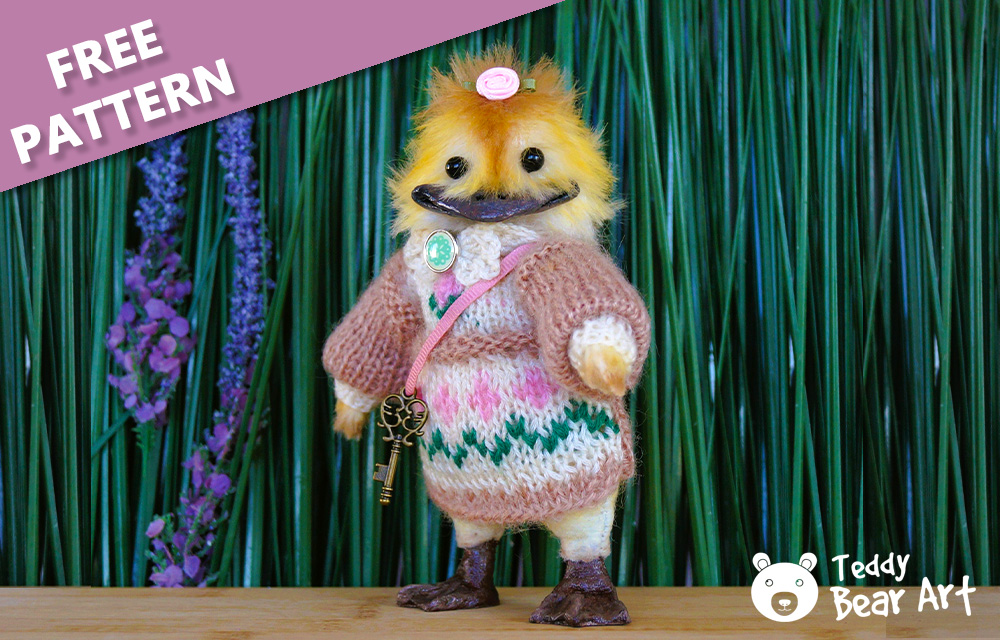
Welcome to the world of duck sewing! Ducks are charming and delightful characters that bring joy to people of all ages. With their cute beaks and fluffy feathers, they’re perfect subjects for crafting your own plushies. In this post, we’ll provide you with a Teddy duck sewing pattern and a comprehensive guide to help you bring your adorable Teddy duck plushie to life.
We’ll be using a mixed technique that combines traditional sewing methods with creative embellishments to give your Teddy duck character its unique charm. This blend of techniques allows for endless possibilities in customizing your duck, from adding whimsical details to creating personalized accessories.
So, get ready to unleash your creativity and let’s dive into the world of Teddy duck sewing!
Download the Pattern
One of the first steps in creating your Teddy duck plushie is to download our exclusive duck sewing pattern. This pattern is specially designed, with easy-to-follow instructions.
Follow the instructions below:
- From a computer (Windows).
Click on the photo of the pattern you see below. In the new tab that will open, you press the right mouse button and select the “Save image as …” option. Then you choose where you want the image to be saved on your computer. - From a phone or a tablet (Android). There should be something similar for mobile devices with Android or iOS.
Click on the image. Save it by holding your finger on the image and selecting the “Save Image” option. Then go to your photo gallery and print it (there is an option).

Materials and Tools
Before you begin sewing your Teddy duck, it’s important to gather all the necessary materials. You’ll need:
- A small piece of white or yellow mohair fabric
- Thin felt fabric (2 mm), similar in color to your mohair or in white color
- Scissors
- Needle and thread
- A pair of black beads or black glass eyes on a metal loop, approx. 6-7 mm in diameter
- Discs 6 mm in diameter – 6 pieces (or same size beads)
- T-shaped cotter pins 1.6×20 – 3 pieces
- Glue UHU
- Molding material
- Stuffing material (polyfill)
- Weighting material
- Oil and acrylic paints, and acrylic varnish
- Pliers
- Awl
Step-by-Step Sewing Guide
Now that you have everything you need, let’s dive into the step-by-step process of sewing your Teddy duck plushie.
The design of the duck has been developed in such a way that it includes clothing with no fasteners and a narrow neckline. Therefore, the sewing and assembly process in this case will be unique, which is very important.
- Head Assembly:
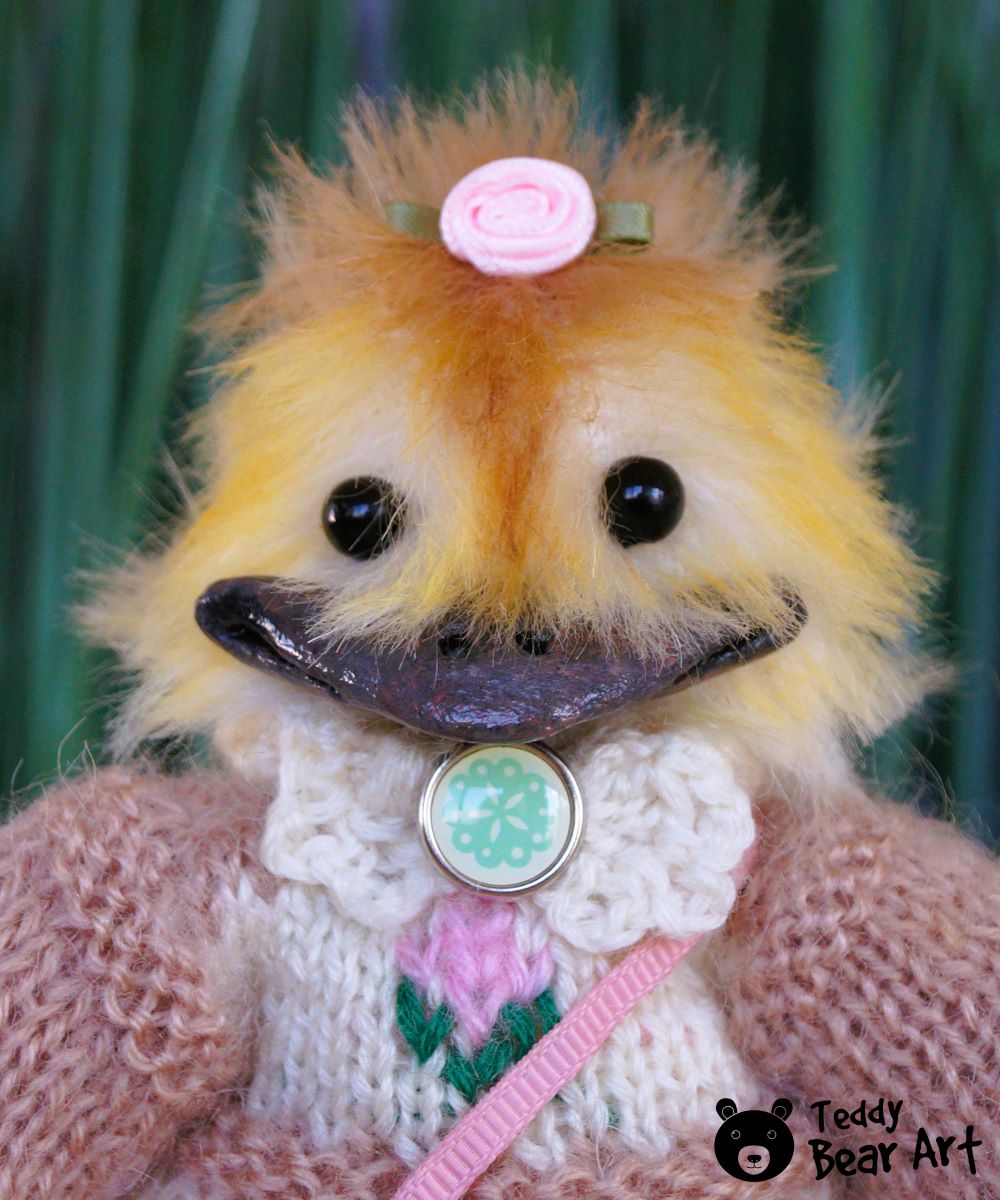
- Cut two pieces of mohair for the head, leaving 5mm seam allowances. Sew them together, leaving an opening for turning them inside out. Turn it right side out, stuff it, insert a disc with a cotter pin, and sew the opening closed.
- Attach bead eyes or insert glass eyes.
- Body and Wings:
- Sew the body and wings from felt fabric. Stuff the wings with synthetic filling, insert discs with cotter pins, and sew the openings closed. Using some glue, attach small pieces of mohair to the wing tips to simulate feathers and trim them to shape.
- Simultaneously sculpt the duck’s beak.
- Assembly:
- First, attach the head and wings to the duck’s body. Then, dress the duck by sliding the head and wings through the clothing.
- Stuff the body with synthetic filling, add weight material if desired, and sew the opening closed.
- Glue the beak in place.
- Now that the duck is nearly complete, determine the appropriate size for its feet. Sculpt the feet and try them on. Add a little more filling to the foot holes, apply glue, and insert the feet.
Personalizing Your Teddy Duck
Now that you’ve completed the basic sewing of your Teddy duck, it’s time to add your own personal touch and bring out its unique character.
Consider shading the face, wings, and body with oil paints or other suitable paints for fabric, allowing you to enhance the duck’s features and add depth to its expression.

Use acrylic paints to paint the beak and legs if they are molded from air-dry material before attaching them.
Additionally, you can accessorize your Teddy duck with cute accessories like bows, hats, scarves, or miniature props like a tiny messenger bag to give it even more personality and charm. Let your creativity soar as you customize your Teddy duck to make it truly one-of-a-kind!
Conclusion
Congratulations on completing your Teddy duck sewing project! Throughout this blog post, we’ve guided you through each step of the process, from downloading the pattern to assembling your adorable duck plushie.
You’ve learned how to sew the head, body, and wings, as well as how to dress your duck and add personal touches like facial features and accessories. By following our step-by-step instructions, you’ve brought your Teddy duck to life with creativity and skill.
We hope this guide has been helpful in your crafting journey and that your Teddy duck brings joy and smiles wherever it goes. Happy sewing, and may your future projects be just as quacktastic!
More Goodies
Looking for more sewing inspiration? Check out our pattern library for a variety of adorable animal patterns and stylish clothes patterns to expand your crafting repertoire:
- Animal Patterns: Explore our collection of charming animal patterns, from cuddly bears to playful kittens and everything in between. Whether you’re a beginner or an experienced crafter, you’ll find the perfect pattern to bring your favorite animals to life.
- Clothes Patterns: Elevate your plushie creations with our selection of clothes patterns, designed to fit a range of plushie sizes and styles. From bucket hats and cozy scarves to elegant dresses, you’ll find patterns to suit any occasion and add a touch of flair to your handmade plushies.
- Tutorials: Dive into our tutorial collection for step-by-step guides on making animals, crafting clothes and accessories, and more. Whether you’re looking to improve your sewing skills or learn new techniques, our tutorials are here to help you create with confidence.
With our pattern library, the possibilities are endless. Happy sewing!
Get Free Patterns & Be the First to Know!
Want free teddy bear patterns, exclusive tutorials, and a chance to win craft supplies?
Sign up for our newsletter using the subscribe form in the middle of this article to receive new patterns, insider tips, and the latest news on teddy bear art. You’ll also automatically be entered into our annual giveaway for a chance to win teddy bear crafting materials.
Bonus entry: Save one of our pins on Pinterest to increase your chances of winning!
Let’s create, inspire, and craft beautiful teddy bears together!
Thank you for sharing this! This post is an engaging and comprehensive guide to creating a charming Teddy Duck plushie through sewing. The detailed instructions, accompanied by a free downloadable pattern, make it accessible for novice and experienced crafters.
I would like to ask how much time it takes for the airdry clay Milliput White to dry. I also use sculpting in my mixed technic creating, but I have never tried this material.
You are welcome! Happy that you like it.
Regarding your question about Milliput White air dry clay, it usually takes about 3-4 hours for a thin layer to dry completely, but drying time may vary depending on factors such as humidity and thickness of application. For me, it took 6 hours. This is a versatile modeling material that is ideal for creating works in mixed media. But you need to work with it quickly enough. Give it a try and let me know how your project turns out!
Hi Hanna,
Thank you so much for sharing this quacktastic guide on creating a Teddy Duck! Your detailed instructions and the addition of a free pattern are incredibly helpful. It’s clear you’ve put a lot of thought into making this accessible for both newbies and seasoned crafters. I’m curious, do you have any tips for beginners worried about making their first cut or stitch? I can’t wait to give this a try and add a personalized touch to my Teddy Duck.
Thank you for your work and sharing your creativity with us!
Warm regards,
Makhsud
Hey Makhsud,
Thanks a bunch for your quacktastic comment! 🦆 I’m thrilled to hear that you found the Teddy Duck guide helpful, and I’m excited for you to give it a try! For beginners worried about that first snip or stitch, I’d say take it slow and steady. Start with simple patterns and gradually work your way up as you gain confidence. Don’t be afraid to make mistakes – they’re all part of the learning process and can even add character to your creation! And always remember, crafting is all about having fun and expressing your creativity. So dive right in and enjoy the journey!
Happy crafting!
Hanna