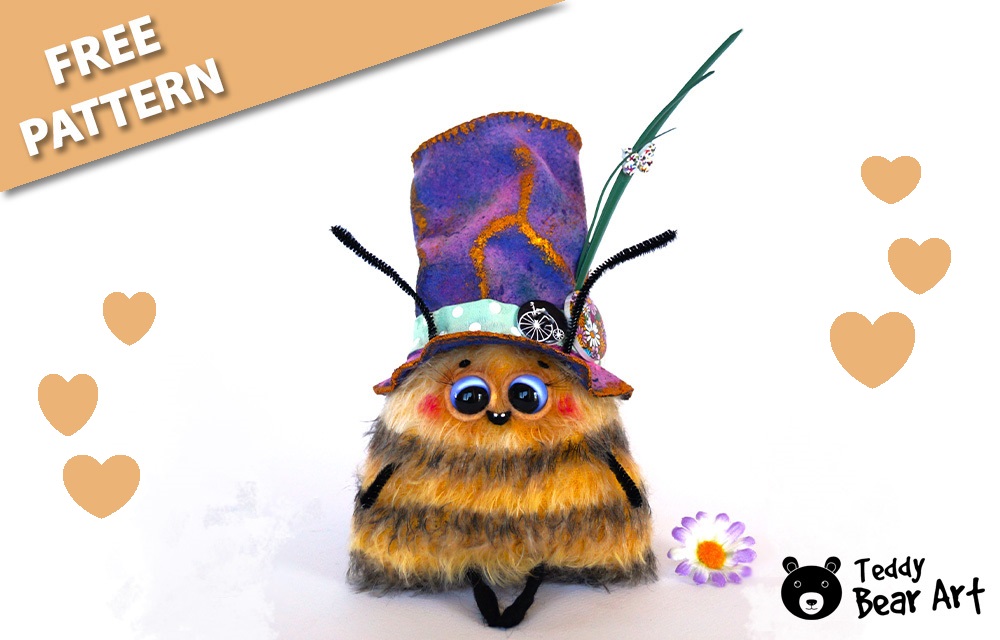
Crafting is a delightful hobby that brings joy and a sense of accomplishment, especially when you create something as charming as a cute bee stuffed animal. Whether you’re a novice or an experienced crafter, this project offers a fun and rewarding experience. Let’s dive into this cute bee stuffed animal pattern and start crafting your adorable plushie today!
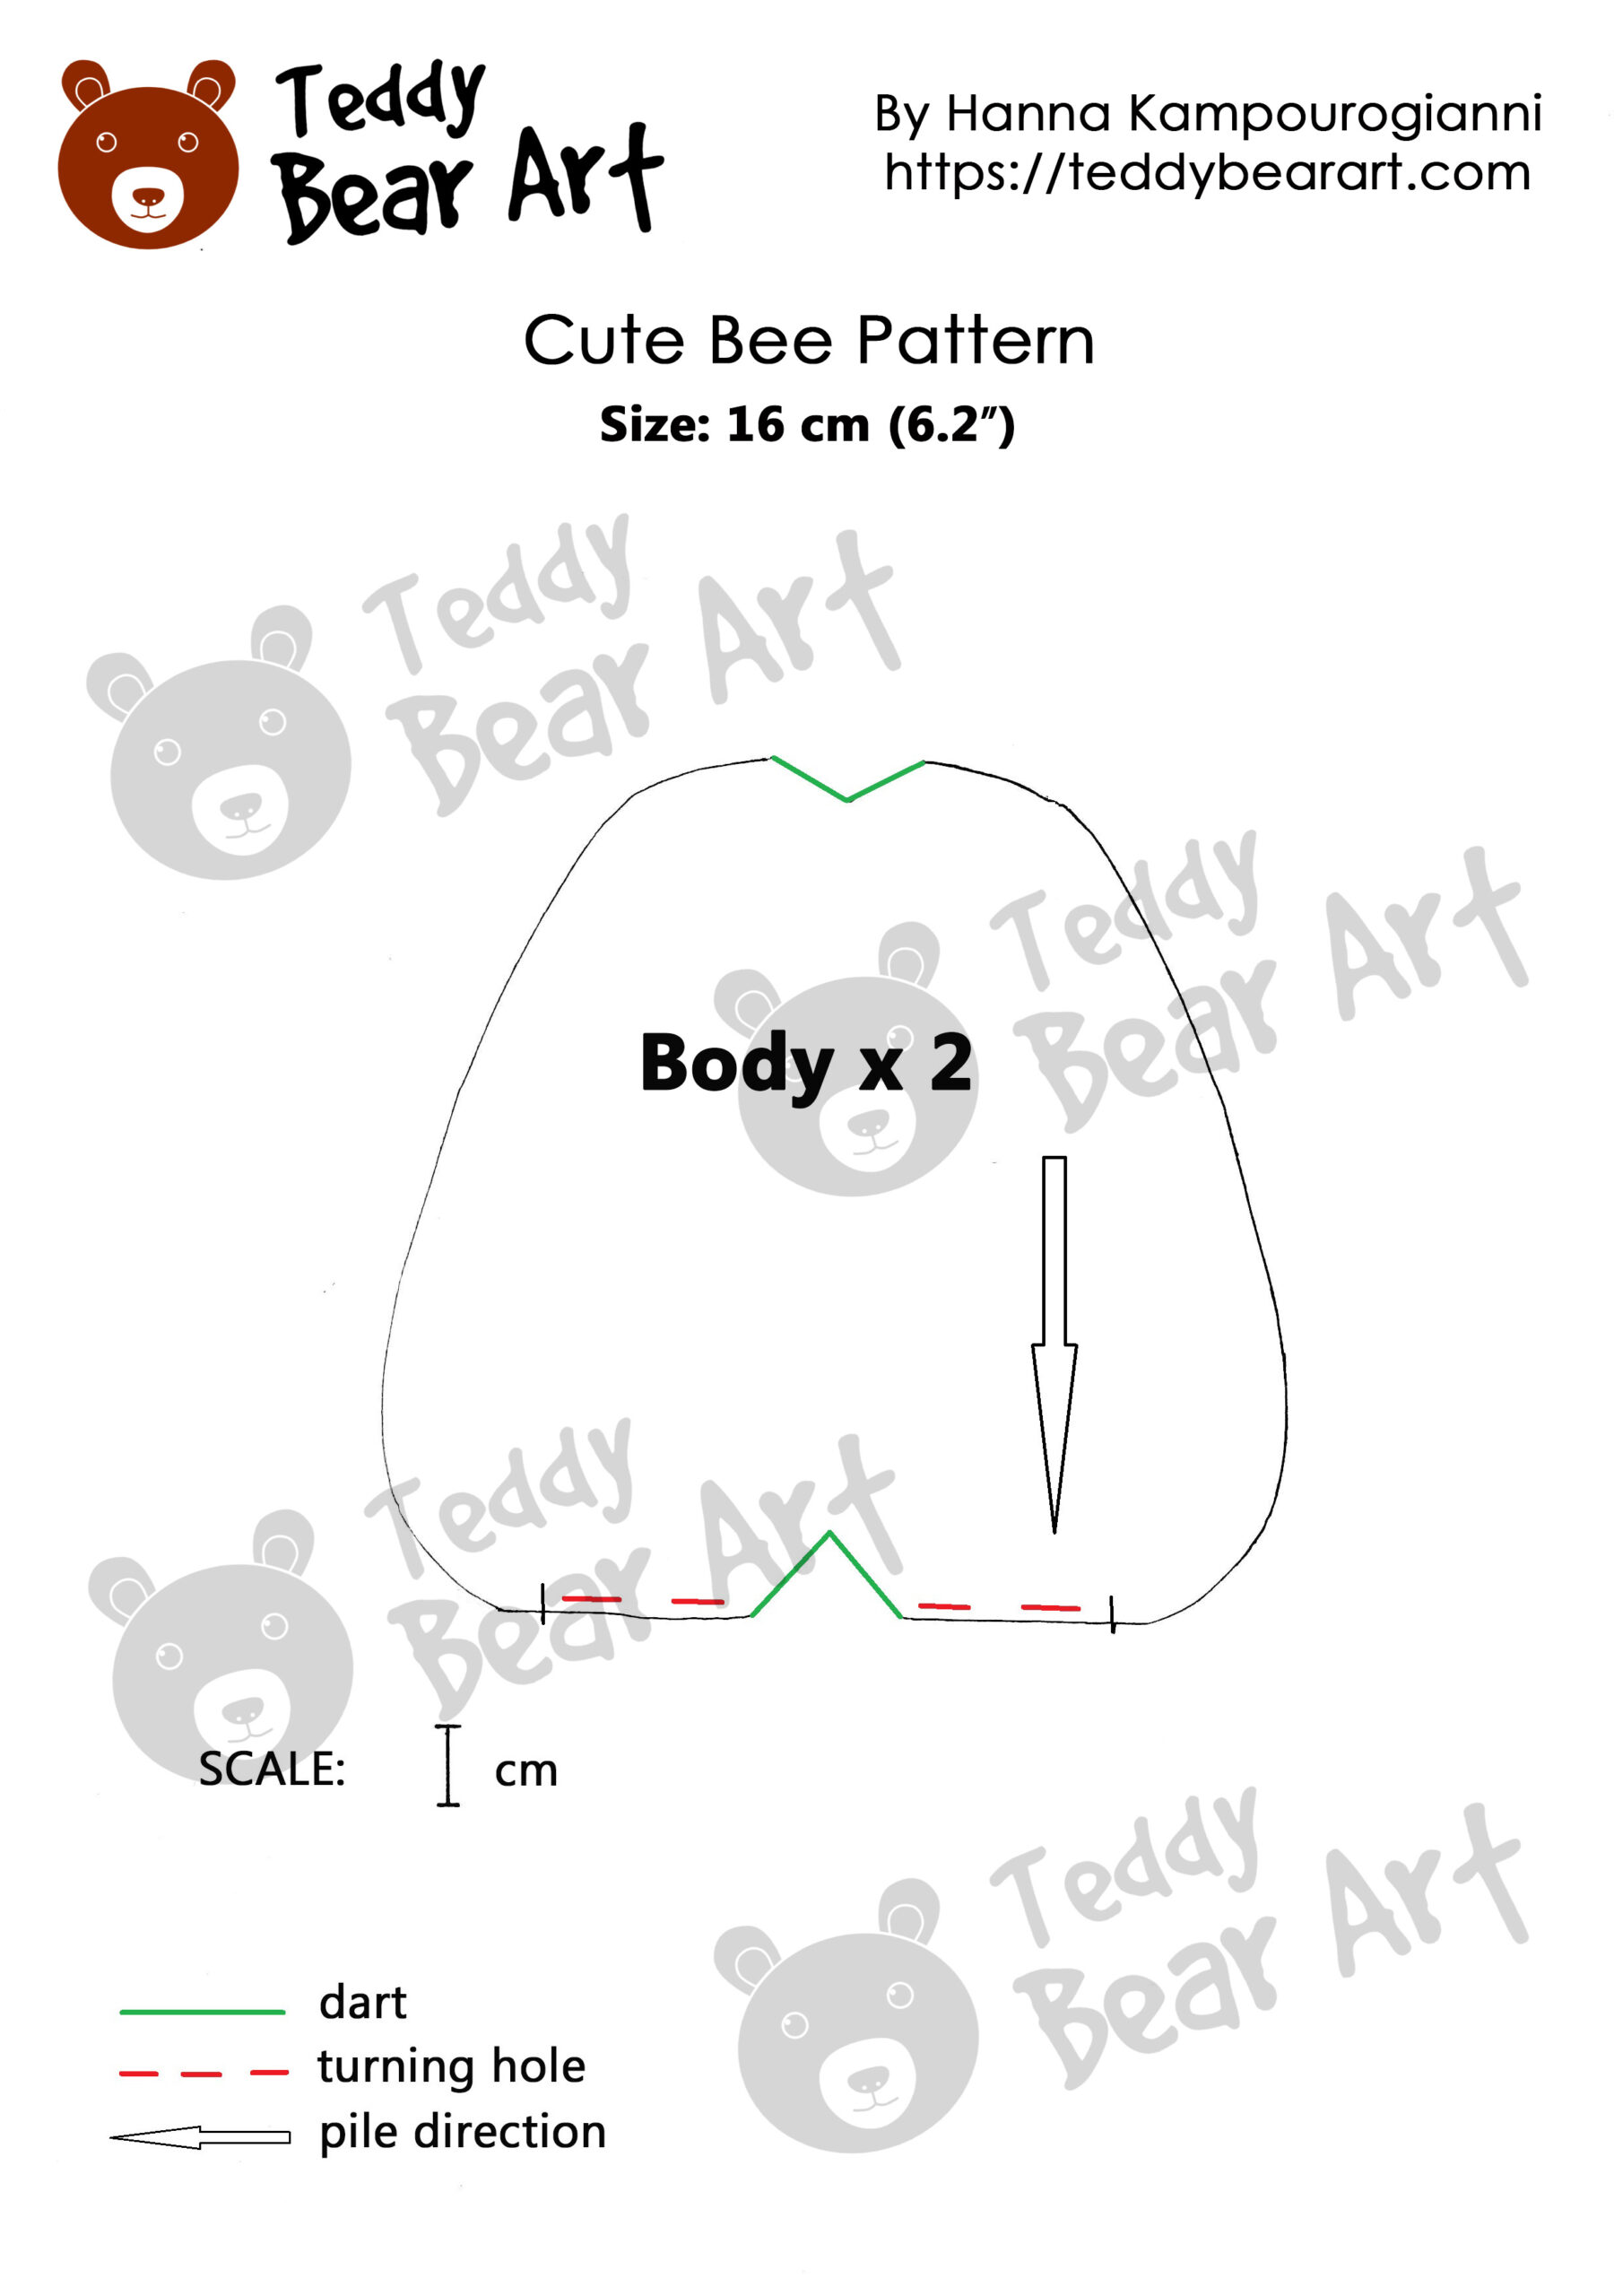
Downloading the Bee Pattern
Make sure to download and print it on standard A4 paper, and double-check your printer settings to ensure it’s the right size.
Download the pattern following the instructions below:
- From a computer (Windows). Click on the photo of the pattern you see below. In the new tab that will open, you press the right mouse button and select the “Save image as …” option. Then you choose where you want the image to be saved on your computer.
- From a phone or a tablet (Android). There should be something similar for mobile devices with Android or iOS.
Click on the image. Save it by holding your finger on the image and selecting the “Save Image” option. Then go to your photo gallery and print it (there is an option).
Materials and Tools Needed
- Yellow mohair fabric with a pile length of 1.5 cm
- A pair of fantasy glass eyes 14 mm in diameter
- Faux eyelashes
- A small piece of black and yellow felt fabric
- Waxed thread
- Needle and thread
- A long needle (10 cm – 15 cm) for setting the eyes
- Scissors
- Awl
- Natural Bamboo Skewers
- Glue UHU
- Oil paints
- White and black acrylic paints
- Varnish for acrylics
- Brushes
- Stuffing material (polyfill)
- Weighting material
- Black Merino wool
- Black chenille wire
- Polyethylene terephthalate for the wings (transparent plastic used for packaging children’s toys)
- CD/DVD/BD Black Marker
Sewing the Cute Bee Stuffed Animal
Once your pattern is printed, you’re ready to cut out your fabric pieces. Spread your fabric flat on a surface and pin the pattern pieces onto the fabric. Use sharp scissors to cut out the fabric leaving approx. 7 mm for the edges.
Start by sewing the body pieces together. With the right sides of the fabric facing each other, stitch along the edges, leaving a small opening for stuffing.
If you’re new to sewing, it’s helpful to sew slowly and use plenty of pins to secure the fabric.
Sew along all the marked tucks (highlighted in green).
Join the two body sides and then turn it right side out.
Fill the body with synthetic stuffing, and add some metal pellets for weight by placing them in a small bag first.
Close the opening by sewing it shut.
Gently use an awl to lift the pile from the seams, then comb it in different directions.
Adding Details and Features
Attach the eyes securely.
Next, attach the eyelashes by using glue and make needle-felted eyelids.
Cut out a mouth from felt fabric, and use acrylic paint to add two teeth. Then, glue the mouth onto the bee.
Similarly, cut out eyebrows from black felt fabric and attach them to the bee.
Start by painting the bee with oil paints or fabric markers, beginning with the black stripes. Let it dry completely.
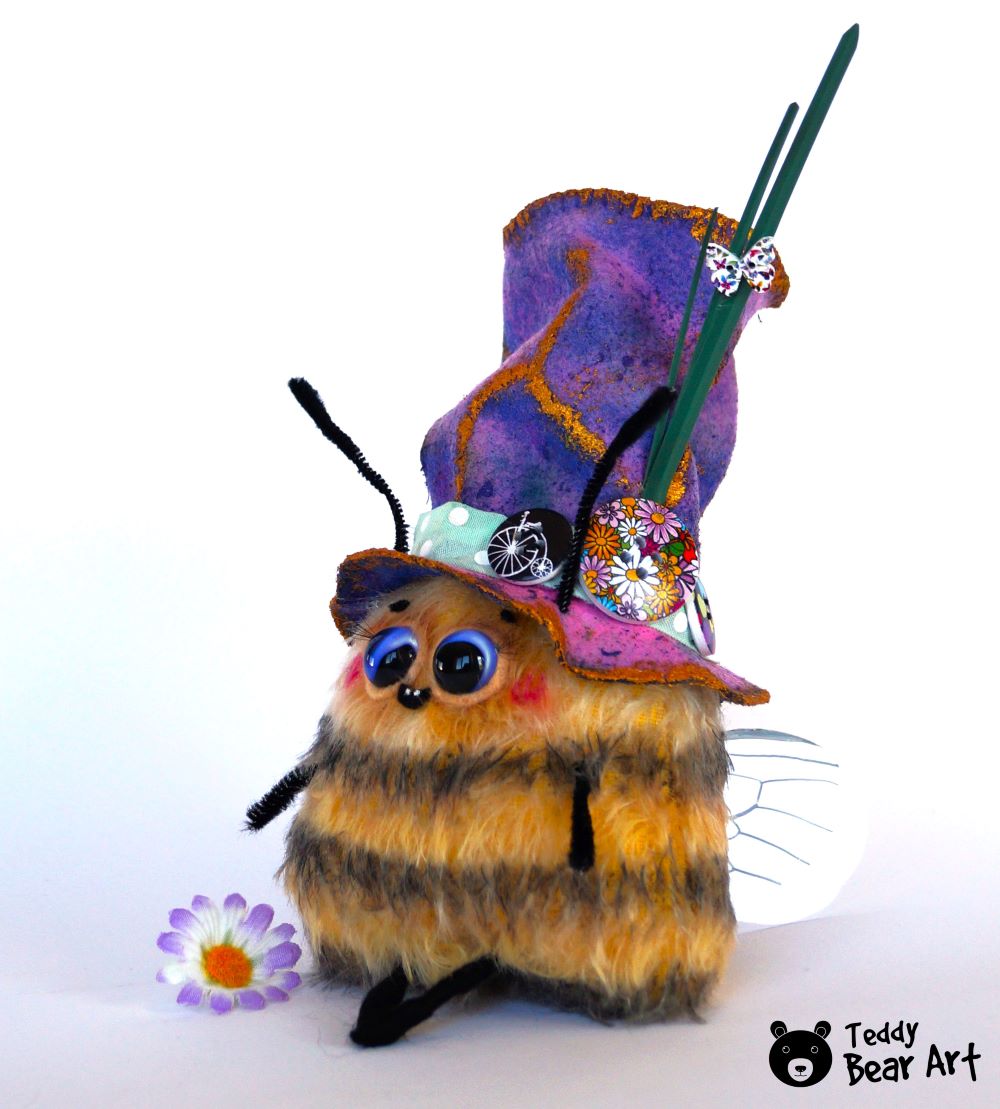
Fold a piece of plastic in half and cut out the wings. Create two small holes in the center for sewing, using a thick needle, awl, or scissors.

Use a black marker for CD/DVD to draw a design on one wing and let it dry. Fold the plastic in half and trace the design onto the second wing to make them identical.
Sew the wings onto the bee.
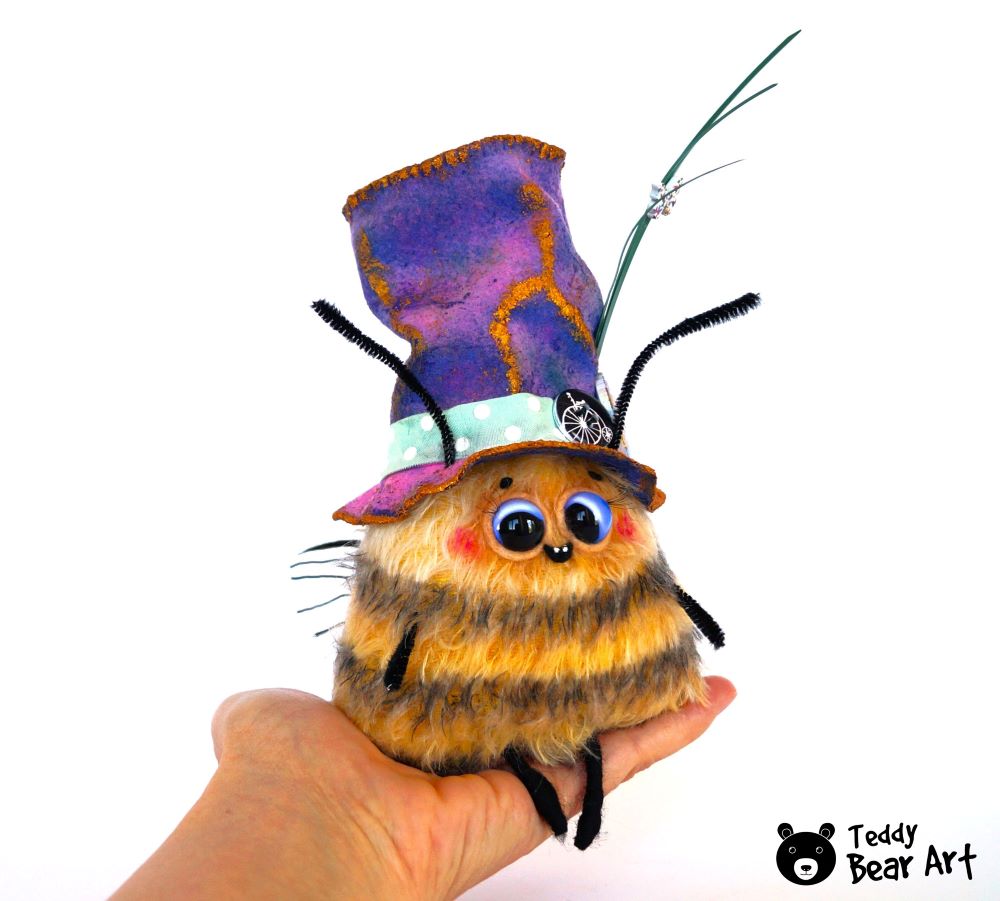
Make the hands and the antennas from chenille wire by trimming it to create a shape. Make the legs using chenille wire and black merino. Twist the wool onto the wire, creating the shape of a bee’s legs, and lightly felt it with a felting needle. Insert the limbs following this guide.
For the bee’s stinger, use a piece of bamboo skewer, paint it with black acrylic paint, and varnish it. Insert the stinger the same way you did with the limbs.
If your bee is without a hat, attach chenille wire antennae using the same method as the stinger and limbs. If it is with a hat, attach the antennae to the hat using glue and then glue the hat to the head.
Finishing Touches
Make sure to fluff and shape your bee to achieve the desired look. Add any final touches, such as blushing the cheeks.
To give your bee extra personality, consider adding cute accessories like tiny flowers, colorful buttons, or small charms. You can also create a tiny hat or scarf from felt fabric to give your bee a unique style. For a whimsical touch, glue a small ribbon or bow on top of the bee’s head.

Conclusion
Crafting a cute bee stuffed animal is a delightful and rewarding project for crafters of all levels. By following this pattern and tutorial, you’ll create an adorable plushie that you can proudly display or gift to someone special.
Download the pattern, gather your materials, and enjoy the process of bringing your cute bee to life. Share your finished projects and join our crafting community for more inspiration and tips. Happy crafting!
By following this detailed guide, you’ll have a wonderful time creating your cute bee stuffed animal. Don’t forget to share your completed projects and connect with other crafters to keep the inspiration flowing. Happy crafting!

More Goodies
- Free Insect Plush Sewing Pattern Tutorial: Explore the world of insects with this free sewing pattern tutorial. Create adorable insect plushies to add to your collection.
- Free Mosquito Plush Sewing Pattern Tutorial: Craft your own cute mosquito plushie with this free sewing pattern tutorial. Perfect for adding a unique touch to your creations.
- Bee Plushie Sewing Pattern: A Fun Project for All Levels of Crafters: Dive into this bee plushie sewing pattern, suitable for crafters of all skill levels. Create a charming bee plushie to enjoy or gift.
Create a cute Frog plush friend for your Bee
Get Free Patterns & Be the First to Know!
Want free teddy bear patterns, exclusive tutorials, and a chance to win craft supplies?
Sign up for our newsletter using the subscribe form in the middle of this article to receive new patterns, insider tips, and the latest news on teddy bear art. You’ll also automatically be entered into our annual giveaway for a chance to win teddy bear crafting materials.
Bonus entry: Save one of our pins on Pinterest to increase your chances of winning!
Let’s create, inspire, and craft beautiful teddy bears together!
Hi Hanna,
I love how detailed your instructions are for making the Cute Bee! The step-by-step explanations are so clear and easy to follow. I also really appreciate the template you’ve provided for us to download and use at home. It’s incredibly helpful!
Thanks so much, Becca
P.S. Do you have any tips for adding personal touches to the Cute Bee? I’d love to make mine unique!
Hi Becca,
Thanks for your feedback! Here are a few ideas for adding personal touches to your fluffy bee:
Bucket Hat: Make a tiny hat from fabric or felt and decorate it with small flowers or beads.
Bow Tie: You can create a miniature bow tie from ribbon or fabric and attach it to the bee’s neck.
Embroidered Mouth: Try embroidering a mouth with colorful threads to give your bee a special expression.
Trimmed Mouth: If you’re confident in your skills, you can carefully trim a smile onto the bee’s face to give it a cute look.
Small Glasses: Make tiny glasses from wire and put them on the bee for a smart appearance.
Mini Bag: Sew a small bag or backpack that the bee can “wear” on its back.
Flower Accessories: Attach small artificial flowers to the bee’s wings or body for extra decoration.
You can find instructions for some of these accessories on this website. I hope these ideas help make your bee even more unique and adorable!
Best wishes,
Hanna
I love, love, love this Cute Bee pattern and can’t wait to make it! I have made a few toys in the past using online patterns and instructions and have sometimes struggled with the instructions. however, your list of materials and tools is very comprehensive and the instructions are clearly set out and easy to understand.
Thank you for this lovely pattern and instructions. I can’t wait to get started!
Thank you so much for your lovely comment! 🥰 I’m thrilled to hear that you love the Cute Bee pattern and found the instructions clear and easy to follow. It means a lot to know that the materials list and step-by-step guide are helpful for you.
If you have any questions or need any help while making your bee, don’t hesitate to reach out. Happy crafting, and I can’t wait to see your finished bee! 🐝✨