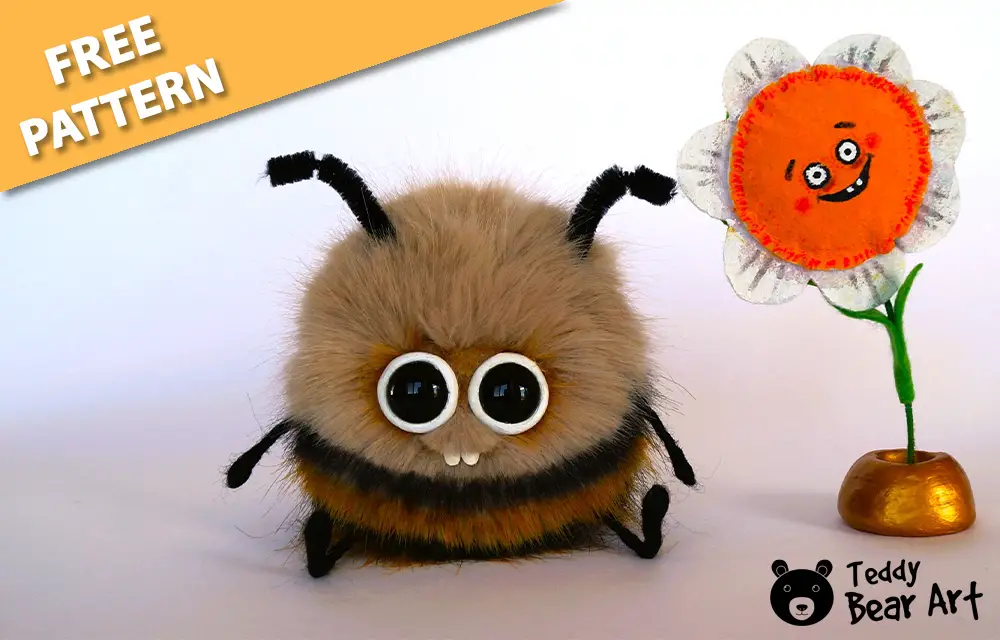
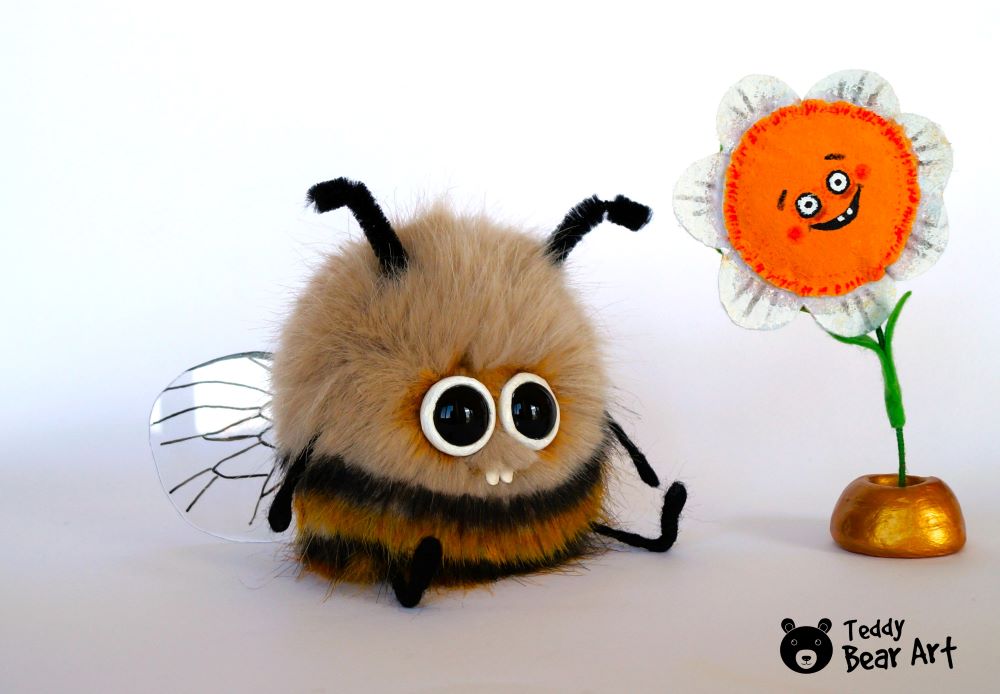
Crafting is a delightful and rewarding hobby that anyone can enjoy, regardless of their skill level. Today, we’re diving into a perfect project for beginners and experienced crafters: a bee plushie sewing pattern.
This fun and accessible project will guide you through creating an adorable bee plushie, making it a fantastic way to spend an afternoon. By following this detailed bee plushie sewing pattern, you’ll ensure a great result that you can be proud of.
Downloading the Bee Plushie Sewing Pattern
First of all, you’ll need to download the free bee plushie sewing pattern. Make sure to print the pattern on standard A4 paper and check that your printer settings are correct to avoid any sizing issues.
Download the pattern following the instructions below:
- From a computer (Windows). Click on the photo of the pattern you see below. In the new tab that will open, you press the right mouse button and select the “Save image as …” option. Then you choose where you want the image to be saved on your computer.
- From a phone or a tablet (Android). There should be something similar for mobile devices with Android or iOS.
Click on the image. Save it by holding your finger on the image and selecting the “Save Image” option. Then go to your photo gallery and print it (there is an option).

Materials and Tools Needed
It’s important to follow this list closely to ensure your bee plushie turns out as expected.
For the Bee:
- Beige faux fur minky fabric with a pile length of 3.5 cm
- A pair of black glass eyes on a metal loop 20 mm in diameter
- Molding material
- Waxed thread
- Needle and thread
- A long needle (10 cm – 15 cm) for setting the eyes
- Scissors
- Awl
- Pliers
- Natural Bamboo Skewers
- Glue UHU
- Oil paints
- White acrylic paint
- Varnish for acrylics
- Brushes
- Stuffing material (polyfill)
- Weighting material
- Wire
- Black floss threads
- Black Merino wool
- Сhenille wire for antennae
- Polyethylene terephthalate for the wings (transparent plastic used for packaging children’s toys)
- CD/DVD/BD Black Marker
For the Flower:
- Felt
- Wire
- Green floss threads
- Acrylic paints
- Stuffing material
- Molding material
- Glue UHU
Sewing the Bee Plushie
Once you have your pattern printed, it’s time to cut out your fabric pieces. Carefully lay out your fabric on a flat surface and pin the pattern pieces to the fabric. Use sharp scissors to cut along the lines, ensuring precision for a perfect fit.
Begin by sewing the body pieces together. Place the fabric pieces with the right sides facing each other and stitch along the edges, leaving a small gap for stuffing.
For beginners, it’s helpful to sew slowly and use plenty of pins to keep the fabric in place.
Stitch along all the marked tucks (indicated in green).
Sew the two body sides together and then turn it inside out.
Stuff the body with synthetic filling, adding some metal pellets for weight by placing them in a small bag first.
Sew the opening to close the body.
Using an awl, gently lift the pile from the seams. Then, comb it in various directions.
Adding Details and Features
Sculpt the eye whites from Milliput White and let them dry completely. Then, paint them with white acrylic paint and allow the paint to dry. Apply a coat of varnish and let it dry thoroughly.
Next, follow this guide to add the bee’s eyes. Before attaching the eyes, trim some of the pile around the area.
Sculpt the teeth and paint them using the same method as the eye whites. Trim the pile to form a smile, but do not attach the teeth yet. This will be done at the very end.
Paint the bee with oil paints or fabric markers, starting with the black stripes. Allow it to dry thoroughly.
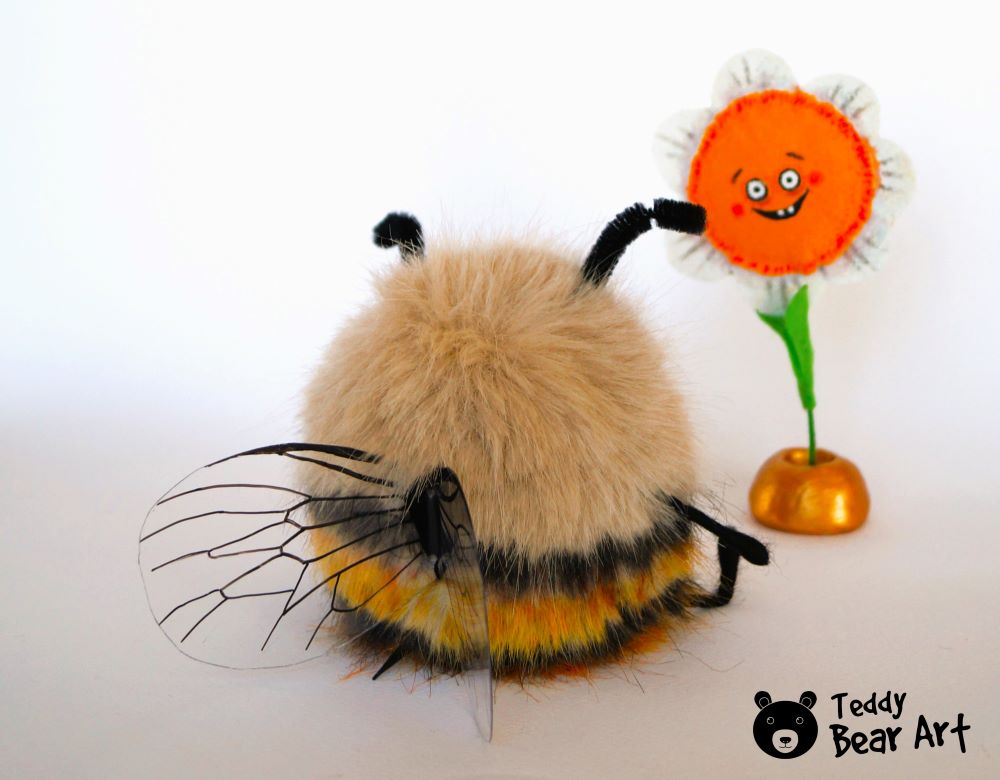
Fold a piece of plastic in half and cut out the wings. Make two small holes in the center for sewing, using a thick needle, awl, or scissors.
Next, use a black marker to draw a design on one wing and let it dry. Then, fold the plastic in half and trace the design onto the second wing to ensure they match perfectly.
Sew the wings onto the bee.
Make the limbs, following this guide, and insert them.
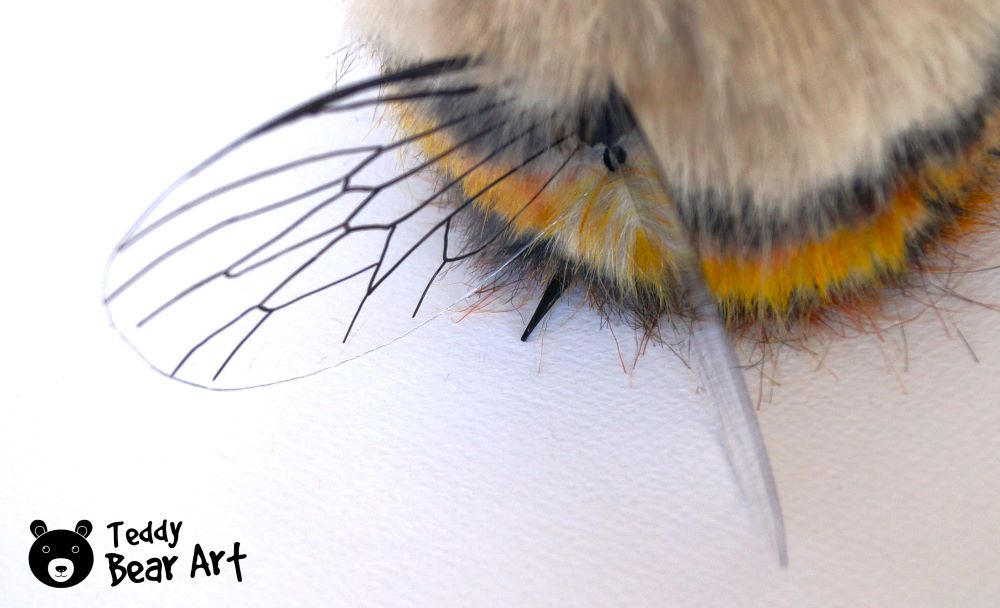
Craft the bee’s stinger from a piece of bamboo skewer, painting it with black acrylic paint and varnish. Insert the stinger using the same method as the limbs.
Attach the antennae made from chenille wire, following the same method as the stinger and limbs.
Finally, glue the teeth in place.
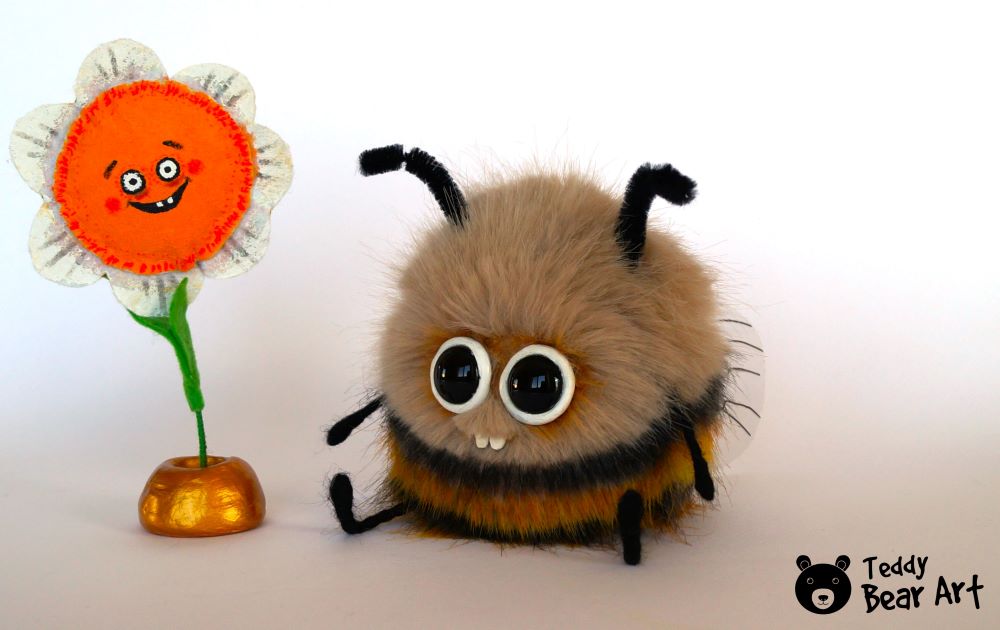
Your bee is now ready!
Crafting the Flower
Cut and sew the flower head from felt, fill it with synthetic stuffing, and paint it. Create the stem using wire wrapped neatly with green embroidery floss. Insert the stem into the head and attach green felt leaves. Finally, sculpt the base (vase) for the flower.
Conclusion
Creating a bee plushie using this sewing pattern is a fun and rewarding project for crafters of all levels. By following the provided steps and tips, you can create a delightful bee plushie that you can proudly showcase.
Download the pattern, gather your materials, and start sewing today! If you have any questions or want to share your finished projects, feel free to leave a comment below or tag us on social media. Happy crafting!
More Goodies
Explore these additional sewing patterns and tutorials for more creative inspiration:
- Free Insect Plush Sewing Pattern Tutorial: Dive into the world of insects with this free sewing pattern tutorial. Create adorable insect plushies to add to your collection.
- Free Mosquito Plush Sewing Pattern Tutorial: Make your own cute mosquito plushie with this free sewing pattern tutorial. Perfect for adding a unique touch to your creations.
- Plush Monster Sewing Pattern and Tutorial: Get creative with this plush monster sewing pattern and tutorial. Design your own unique monster plushie to cuddle or decorate with.
Get Free Patterns & Be the First to Know!
Want free teddy bear patterns, exclusive tutorials, and a chance to win craft supplies?
Sign up for our newsletter using the subscribe form in the middle of this article to receive new patterns, insider tips, and the latest news on teddy bear art. You’ll also automatically be entered into our annual giveaway for a chance to win teddy bear crafting materials.
Bonus entry: Save one of our pins on Pinterest to increase your chances of winning!
Let’s create, inspire, and craft beautiful teddy bears together!
Hello there,
As an avid crafter, I recently tried Hanna Kampourogianni’s Bee Plushie Sewing Pattern, and it was an absolute delight! The pattern is detailed yet simple enough for beginners, while still offering enough complexity to keep experienced crafters engaged. From selecting the perfect minky fabric to meticulously sewing on the wings, every step was a joy. The end result was an adorable bee plushie that I proudly display. This project not only improved my sewing skills but also provided a wonderfully rewarding crafting experience. Highly recommend it for anyone looking to add a charming touch to their handmade collection!
Gemma
Kind regards
Hi Gemma,
Thank you so much for sharing your experience with my Bee Plushie Sewing Pattern! It’s incredibly rewarding to hear that you enjoyed the project. I’m thrilled to know that the pattern was detailed yet simple enough for beginners, and engaging for experienced crafters like yourself.
I’m sure your bee plushie looks absolutely charming on display! It’s wonderful to hear that this project improved your sewing skills and provided a rewarding crafting experience.
Your kind words and recommendation mean a lot to me. I’m glad the pattern brought you joy and added a charming touch to your handmade collection.
Happy crafting!
Kind regards,
Hanna Kampourogianni
Hi there
I like that your article provides a detailed, beginner-friendly guide to creating an adorable bee plushie, complete with a flower accessory. It includes step-by-step instructions, a comprehensive list of materials and tools, and tips for adding intricate details like the eyes and wings.
The guide is well-structured and accessible, making it a perfect project for both novice and experienced crafters. The emphasis on clear photos and social media sharing encourages community engagement.
How did you find the balance between simplicity and complexity in the pattern instructions?
Hi there!
Thank you so much for your kind words! I’m thrilled to hear that you found the bee plushie guide detailed and beginner-friendly.
To strike the balance between simplicity and complexity, I focus on breaking down each step into manageable chunks and always test my patterns myself to ensure they are easy to follow.
Thanks again for your comment and happy crafting!
Warm regards,
Hanna