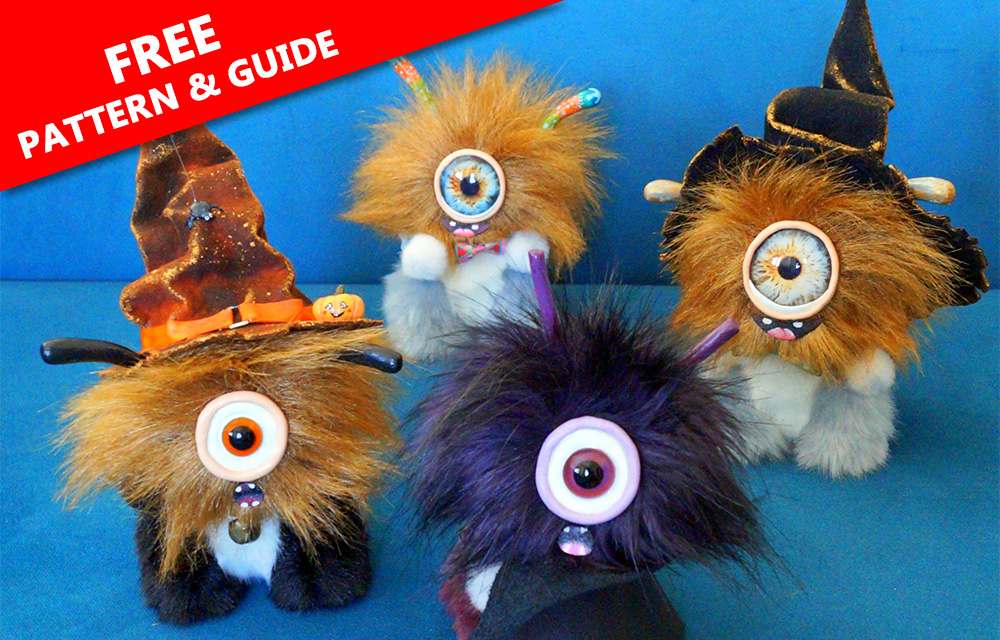
Welcome to the whimsical world of crafting, where we’ll embark on a delightful journey of making a cute monster toy. If you’ve ever wanted to create something adorable with your own hands, you’re in for a treat. In this step-by-step guide, we’ll walk you through the process of crafting a charming teddy monster companion, complete with a free pattern to kickstart your creative adventure.
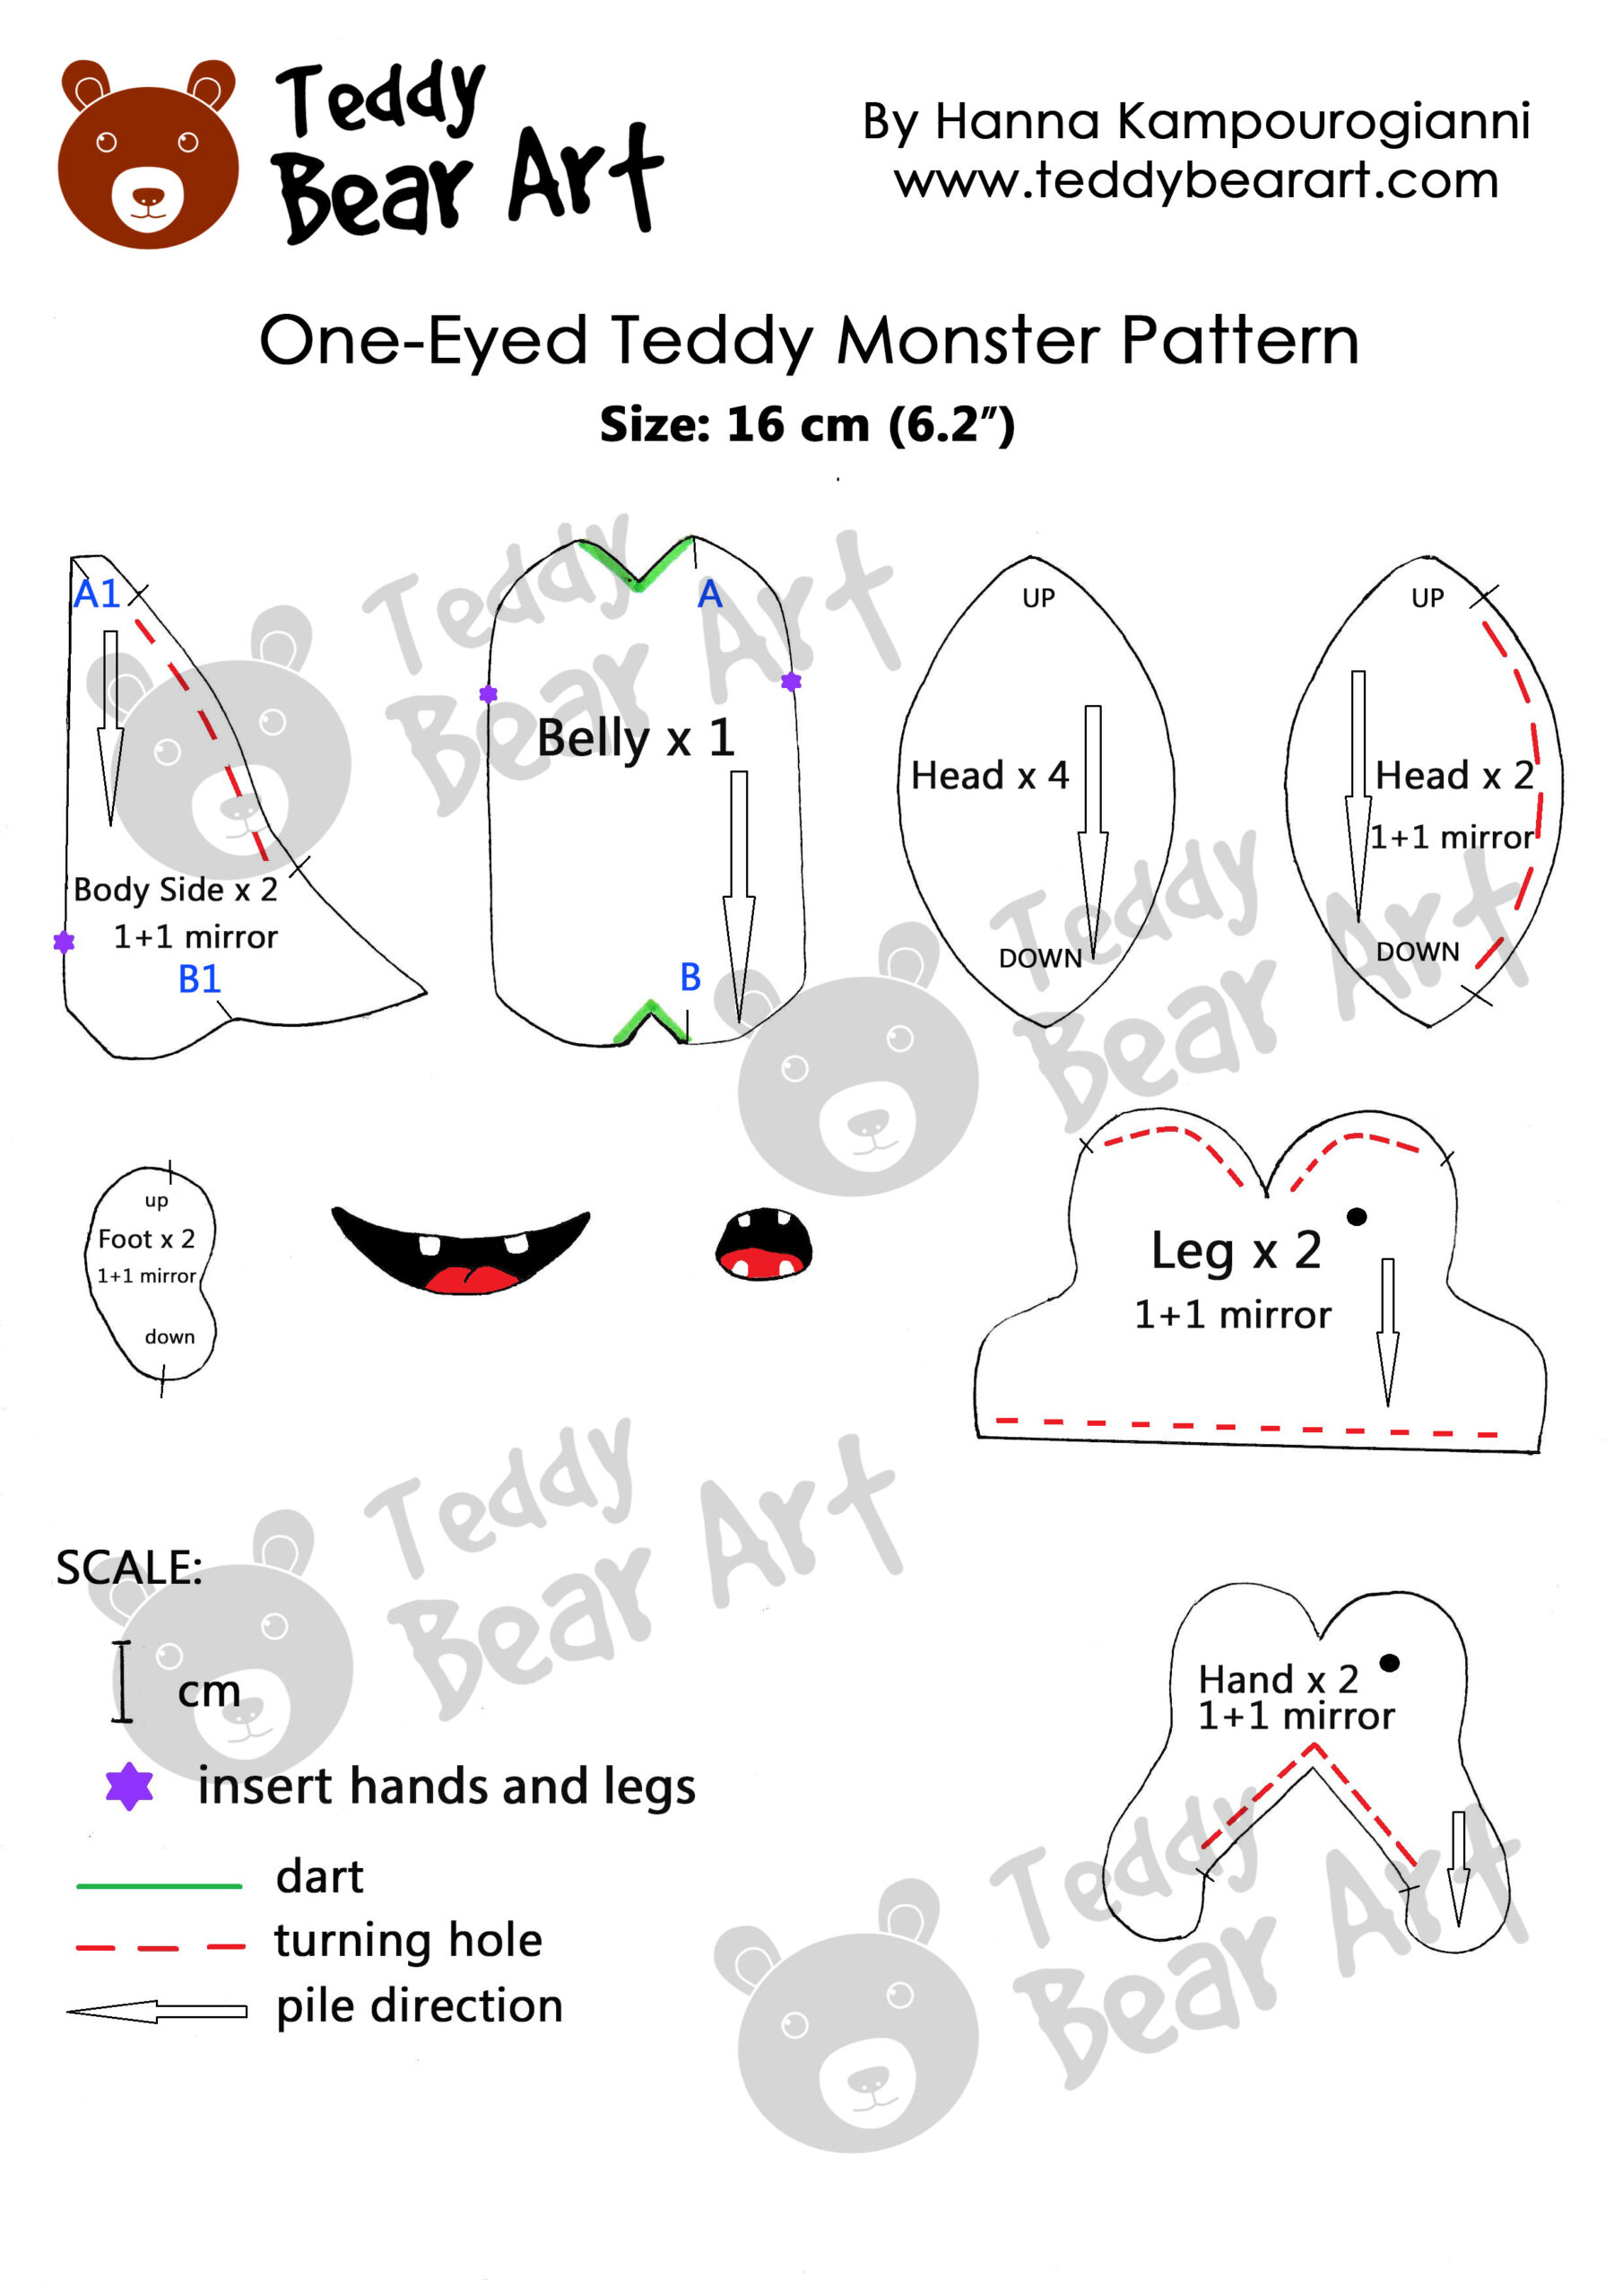
Download the Pattern
- From a computer (Windows).
Click on the photo of the pattern you see below. In the new tab that will open, you press the right mouse button and select the “Save image as …” option. Then you choose where you want the image to be saved on your computer. - From a phone or a tablet (Android). There should be something similar for mobile devices with Android or iOS.
Click on the image. Save it by holding your finger on the image and selecting the “Save Image” option. Then go to your photo gallery and print it (there is an option).
Materials Needed
Gather your materials and set the stage for your crafting masterpiece.
- Faux fur: with a pile length of 7-9 mm for the hands, a pile length of 15-20 mm for the legs, and the body of the vampires. And with a pile length of 1-4 cm for the heads of other monsters.
- Strong threads and a needle for hand sewing.
- A transparent glass eye with a black pupil on a metal loop, 14-16 mm (for vampires). Or a naturalistic eye made of epoxy resin with a diameter of 3 cm (for other monsters).
- Waxed thread.
- Metal pellets or glass pellets for weight.
- Long needle.
- Scissors.
- A piece of fabric of your choice for the feet.
- A piece of white felt fabric for the mouth.
- Discs: 10-12 mm in diameter – 6 pieces for the head and the hands, 15 mm – 4 pieces for the legs.
- Washers: 10 mm in diameter – 10 pieces.
- T-shaped cotter pins 2,0×20 – 5 pieces.
- Synthetic filler.
- Acrylic and paintbrushes.
- Oil paint and paintbrushes.
- Glance varnish for acrylic paint.
- Any materials you use for tinting fabric (oil paints, pastels, textile paints, markers, etc.)
- Milliput White, a two-part, cold-setting, non-shrinking epoxy putty.
- Pliers.
- An awl.
- Strong glue UHU.
Choosing the Perfect Fabric and the Eyes
Selecting the right fabric is a pivotal step in ensuring your cute monster toy turns out just as you envision. Considering the small size of this plush companion, the choice of fabric becomes even more crucial.
Opt for plush fabric with short pile on the limbs and body, avoiding longer piles that can complicate the turning-out process during sewing.
This ensures a smooth crafting experience, allowing you to maintain the distinct outlines of your monster’s body without the hindrance of excessive fluffiness.
For the limbs and body, a short pile is ideal, creating a neat and defined appearance. On the other hand, you might consider using a slightly longer pile for the head, adding a touch of whimsy to your monster’s appearance.
Faux mink fur looks good on such monsters.
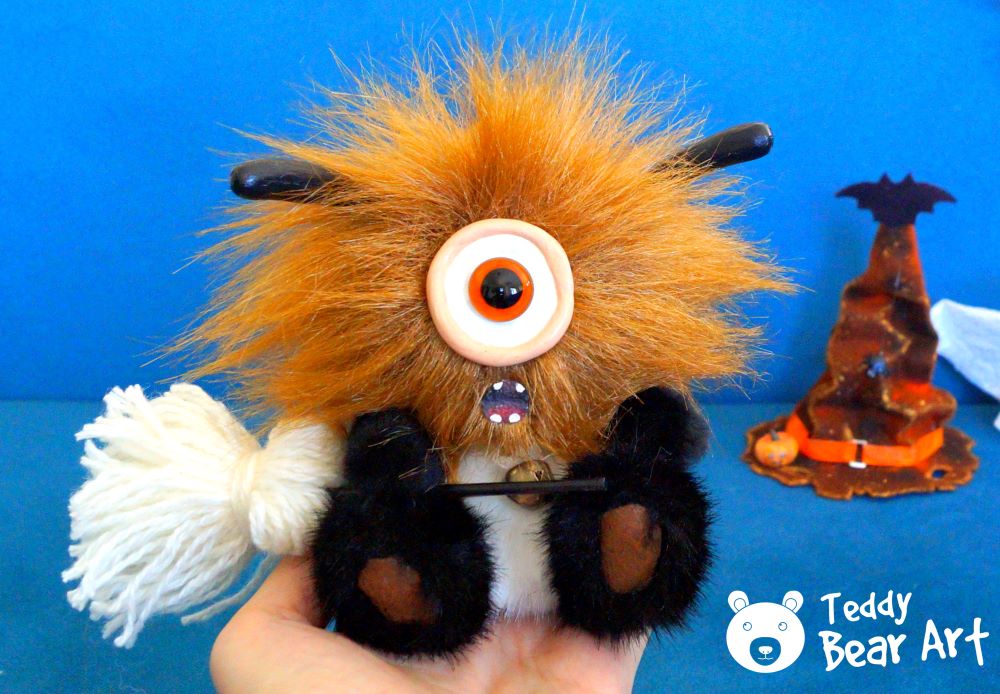
Now, let’s talk eyes – the windows to your monster’s soul. In the realm of cute monsters, big eyes reign supreme. They not only enhance the adorableness but also contribute to the overall charm of your creation.
When selecting eyes for your monster, keep in mind that larger eyes tend to create a more endearing facial expression.
Pupil size is another detail that shouldn’t be overlooked. Aim for larger black pupils, as they amplify the cuteness of your monster, regardless of the mouth expression you choose.
A handy tip for achieving the perfect eyes is to purchase transparent glass eyes. These versatile eyes allow you to color the iris according to your preference, ensuring it harmonizes seamlessly with the fur color.
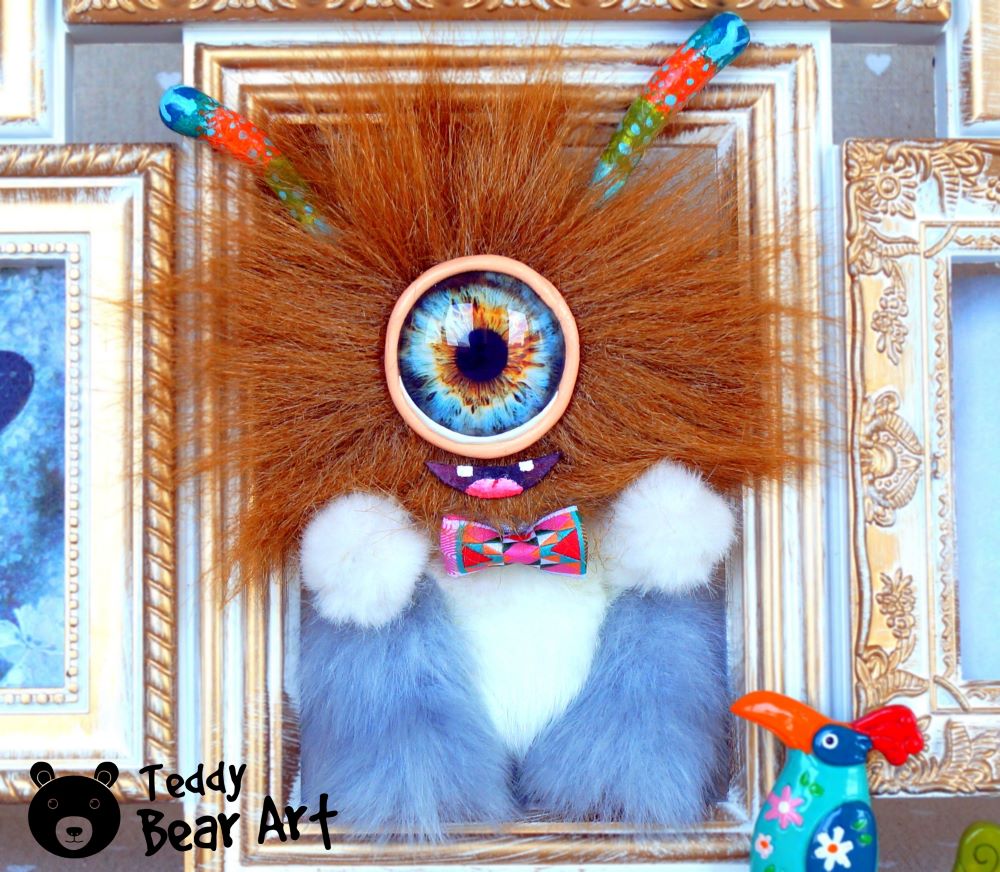
For a truly personalized touch, let your creative instincts guide you as you bring your cute monster’s eyes to life. The eyes play a pivotal role in giving your creation that irresistible charm, making it stand out in the world of cuddly companions.
So, as you embark on the journey of crafting your monster, carefully consider the fabric and eyes, ensuring every detail contributes to the cuteness overload you’re aiming for.
Step-by-Step Crafting Guide
With everything in place, it’s time to dive into the crafting process.
Stitching the Parts
Cut out and place the pattern pieces on the fabric, following the direction of the pile.
Step back 7 mm from the edge and cut out all the pattern pieces. Try not to cut the pile by bringing the scissors as close to the base of the fabric as possible.
- Sew together the 6 head parts, leaving an unsewn area for turning.
- Stitch up the darts on the monster’s belly. Sew the side parts of the body to the belly following the marks from A-A1 to B-B1.
- Finally, sew the sides of the body at the back, leaving space for turning.
- Sew the legs and attach the feet.
- Sew the hands.
- Turn out all the parts.
Stuffing and Inserting the Joints
Read how to insert the joints and fill all the parts tightly, except for the body.
Sew up the openings and use a needle or an awl to free the fur from the seams. Then comb the fur along the seams in different directions to make them less noticeable.
Creating the Eye, Mouth, and Antennae
Creating the Eye:
- Paint a transparent glass eye with acrylic paint and let it dry. Then apply a layer of varnish and let it dry again.
- Take two equal parts of Milliput White, mix them, and knead for 5 minutes. Mold the white part around the eye and let it dry.
- Paint the white part with white acrylic paint and let it dry. Cover it with glossy varnish for a wet effect.
- Take two equal parts of Milliput White, add a bit of acrylic paint, mix, knead, and mold the eyelid around the already dried white part.
Creating the Mouth:
- Choose one of the two mouth patterns and cut it out from white felt.
- Paint the mouth with black acrylic paint first and wait for it to dry completely.
- Draw the tongue and wait for it to dry again.
- Draw teeth or fangs if your monster is a vampire.
- Once the paint is dry, cover the mouth with varnish.
Creating Antennas:
- Mold two antennas from Milliput White and let them dry.
- Paint with acrylic colors and let them dry.
- Cover with varnish.
Assembling Parts of the Monster Toy
- Inserting the Eye: Locate the spot for inserting the eye using a pin. Trim the fur at this spot and create a hole with an awl, delicately straightening the warp threads.
After that, pass the thread through the metal loop and employ a long needle to position the eye. Guide the needle to the underside of the monster’s head and secure the thread by concealing its ends within the head. - Attaching the Mouth: Glue the mouth without trimming the pile.
- Inserting Antennas: Mark with pins the places where you are going to insert them. Straighten the fur, make holes in the fabric with an awl and glue the antennae into these holes.
- Attaching the Head and the Limbs to the Body: Read how to do this if you are a beginner.
- Stuffing the Body: Insert a tiny textile bag with the metal granules for the weight inside of the body and stuff it with synthetic filler. Sew up the hole, take out the pile from the seam, and comb it.
Your cute monster toy is almost ready!
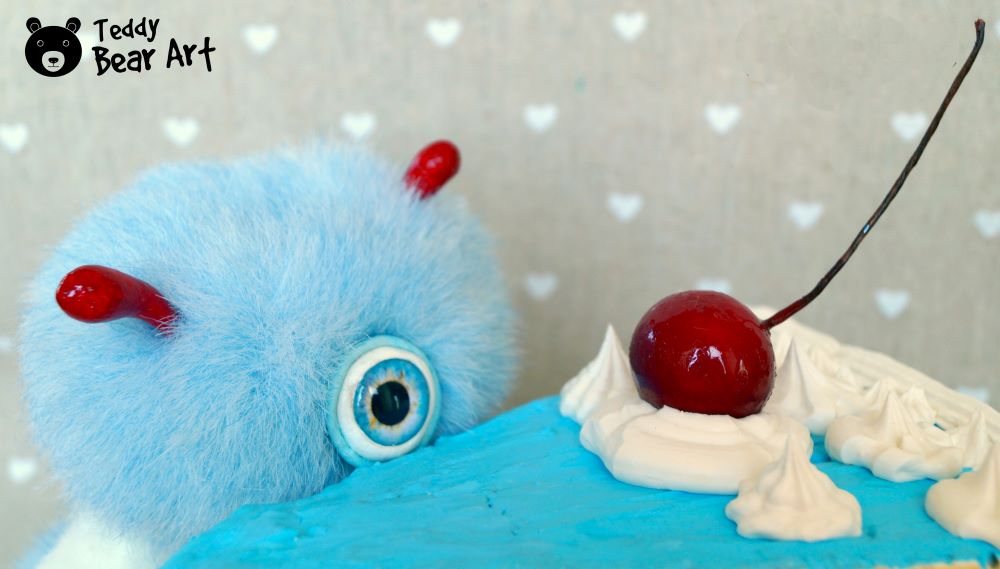
Personalization
Tint the feet of the monster using the paints that you have, except the acrylic ones.
Your delightful monster toy is now complete! Elevate its uniqueness by adding personal details. Consider incorporating a pendant, a stylish bow tie, or perhaps a beautiful ribbon.
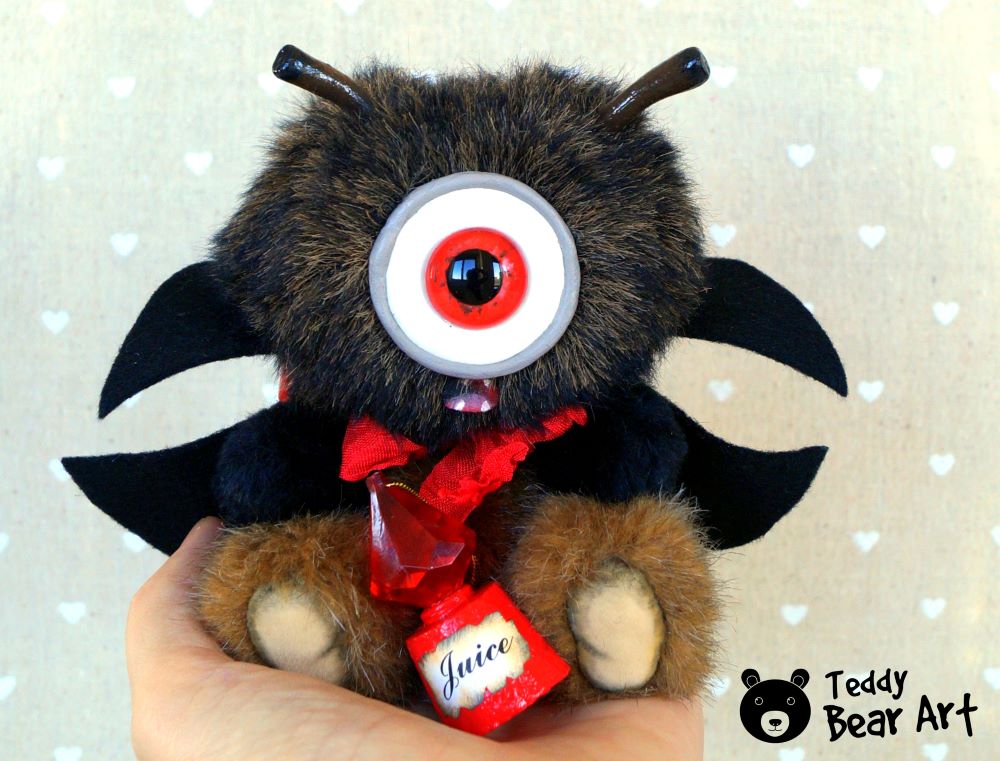
For a vampire-themed monster, introduce accessories like a mini cape and a tiny container of red juice.
If your creation is a Halloween monster, adorn it with a wizard’s hat, a miniature broom, or other thematic items.
Unleash your imagination, and let the creativity flow as you experiment with various accessories to personalize your monster toy and make it truly one-of-a-kind!
Tips for Success
Working with Milliput White:
- When working with Milliput White, remember to measure it into two equal parts and thoroughly mix and knead it. Additionally, you can enhance it by incorporating acrylic paint to create beautiful shades.
If you need to interrupt the sculpting process, tightly wrap it in cling film and refrigerate for no more than 1 hour. Afterward, take it out and resume the process. If left in the freezer for more than 1 hour, it will dry out.
Creating the Eye:
- If your eye lacks a loop, you can create one using an earring base, securely attaching it with Milliput White to the eye’s foundation.
- For large and heavy eyes, the addition of glue may be beneficial.
- Fantasy eyes made of epoxy resin can be found on Etsy
Creating the Mouth:
- When working with mouth painting, prepare several blanks in advance and paint them black. This way, if drawing the tongue and teeth doesn’t succeed on the first attempt, you’ll have spare options, eliminating the need to cut out new pieces and wait for the black paint to dry again.
Before You Go
In conclusion, as you embark on the rewarding journey of crafting your very own cute monster toy, remember that every step is a chance to infuse personality and charm into your creation.
From the initial excitement of downloading the free pattern to carefully selecting the perfect fabric, every decision plays a role in bringing your cuddly companion to life.
As you navigate through the step-by-step crafting guide, take your time with each detail – from stitching and stuffing to adding those personal touches that make your monster uniquely yours.
Consider the valuable tips for success, ensuring sturdy seams, well-thought-out patterns, and just the right amount of stuffing for that irresistibly huggable feel.
In the world of cute monsters, the eyes truly are the windows to their soul. Remember the importance of choosing the right size and pupil size for that perfect expression.
With these steps and tips, you’ll be well-prepared to create happiness—one tiny monster with a big heart at a time.
Happy crafting!
Explore these related posts for more crafting joy:
- Plush Monster Sewing Pattern And Tutorial -001: Easy pattern and guide for beginners.
- Free Insect Plush Sewing Pattern & Tutorial: Easy pattern and guide for beginners.
- Free Mosquito Plush Sewing Pattern & Tutorial: Pattern and guide for advanced teddy bear makers.
Get Free Patterns & Be the First to Know!
Want free teddy bear patterns, exclusive tutorials, and a chance to win craft supplies?
Sign up for our newsletter using the subscribe form in the middle of this article to receive new patterns, insider tips, and the latest news on teddy bear art. You’ll also automatically be entered into our annual giveaway for a chance to win teddy bear crafting materials.
Bonus entry: Save one of our pins on Pinterest to increase your chances of winning!
Let’s create, inspire, and craft beautiful teddy bears together!
Such a helpful article on crafting cute monsters! I love the idea of preparing spare mouth blanks in advance. It’s a game-changer for avoiding frustration in the crafting process.”Enjoyed the part about exploring more creative avenues and seeking inspiration from a community. Do you have any favorite techniques for painting the tongue and teeth?
Hey there! Thanks a bunch for your lovely comment! 🌟 I’m thrilled you found the article on crafting cute monsters helpful. Prepping those spare mouth blanks can indeed save a ton of crafting headaches! 😄
As for painting tongues and teeth, it’s all about adding that extra flair! I personally love using a fine brush for delicate details. For the tongue, I go for a soft pink shade, adding a touch of gloss for a realistic finish. Teeth-wise, a bit of off-white with subtle shading works wonders.
Experiment, get creative, and don’t be afraid to let your unique style shine through! 🎨 If you have any more questions or need tips, feel free to ask. Happy crafting! 🧸✨
Your step-by-step guide to making a cute monster toy is adorable! The free pattern and detailed instructions make it seem approachable even for someone like me who’s not very experienced with crafts.
Creating handmade toys can be such a fulfilling hobby. I remember making stuffed animals for friends’ kids and seeing their faces light up—it’s such a heartwarming experience. Do you have any other toy-making tutorials or craft projects in the pipeline? Your clear instructions and cheerful designs make crafting so enjoyable! Thanks for sharing this delightful guide!
Hey there! 🌟 Thanks a bunch for your sweet comment! I’m thrilled to hear that you found the monster toy guide approachable, even if you’re not a craft pro. Crafting should always be fun and fulfilling, right?
Absolutely, I’ve got more tutorials and craft projects in the works! 🧸✨ How about we dive into making a whimsical teddy bear next? Stay tuned for some fuzzy cuteness and clear, cheerful instructions. Can’t wait to share more crafting joy with you! Happy crafting! 💖