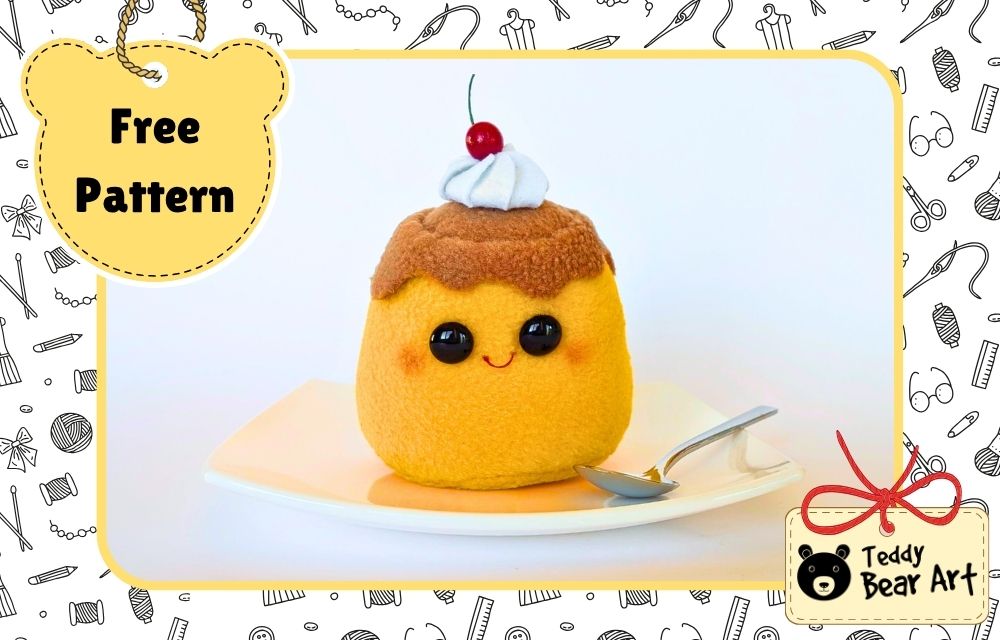
If you love cute fleece toys, kawaii faces, and soft handmade decorations, this little pudding plush is such a fun project to sew. In this step-by-step tutorial, I’ll show you how to sew a pudding plush with a rounded body, chocolate topping, whipped cream, and a tiny cherry on top.
Download the Pattern
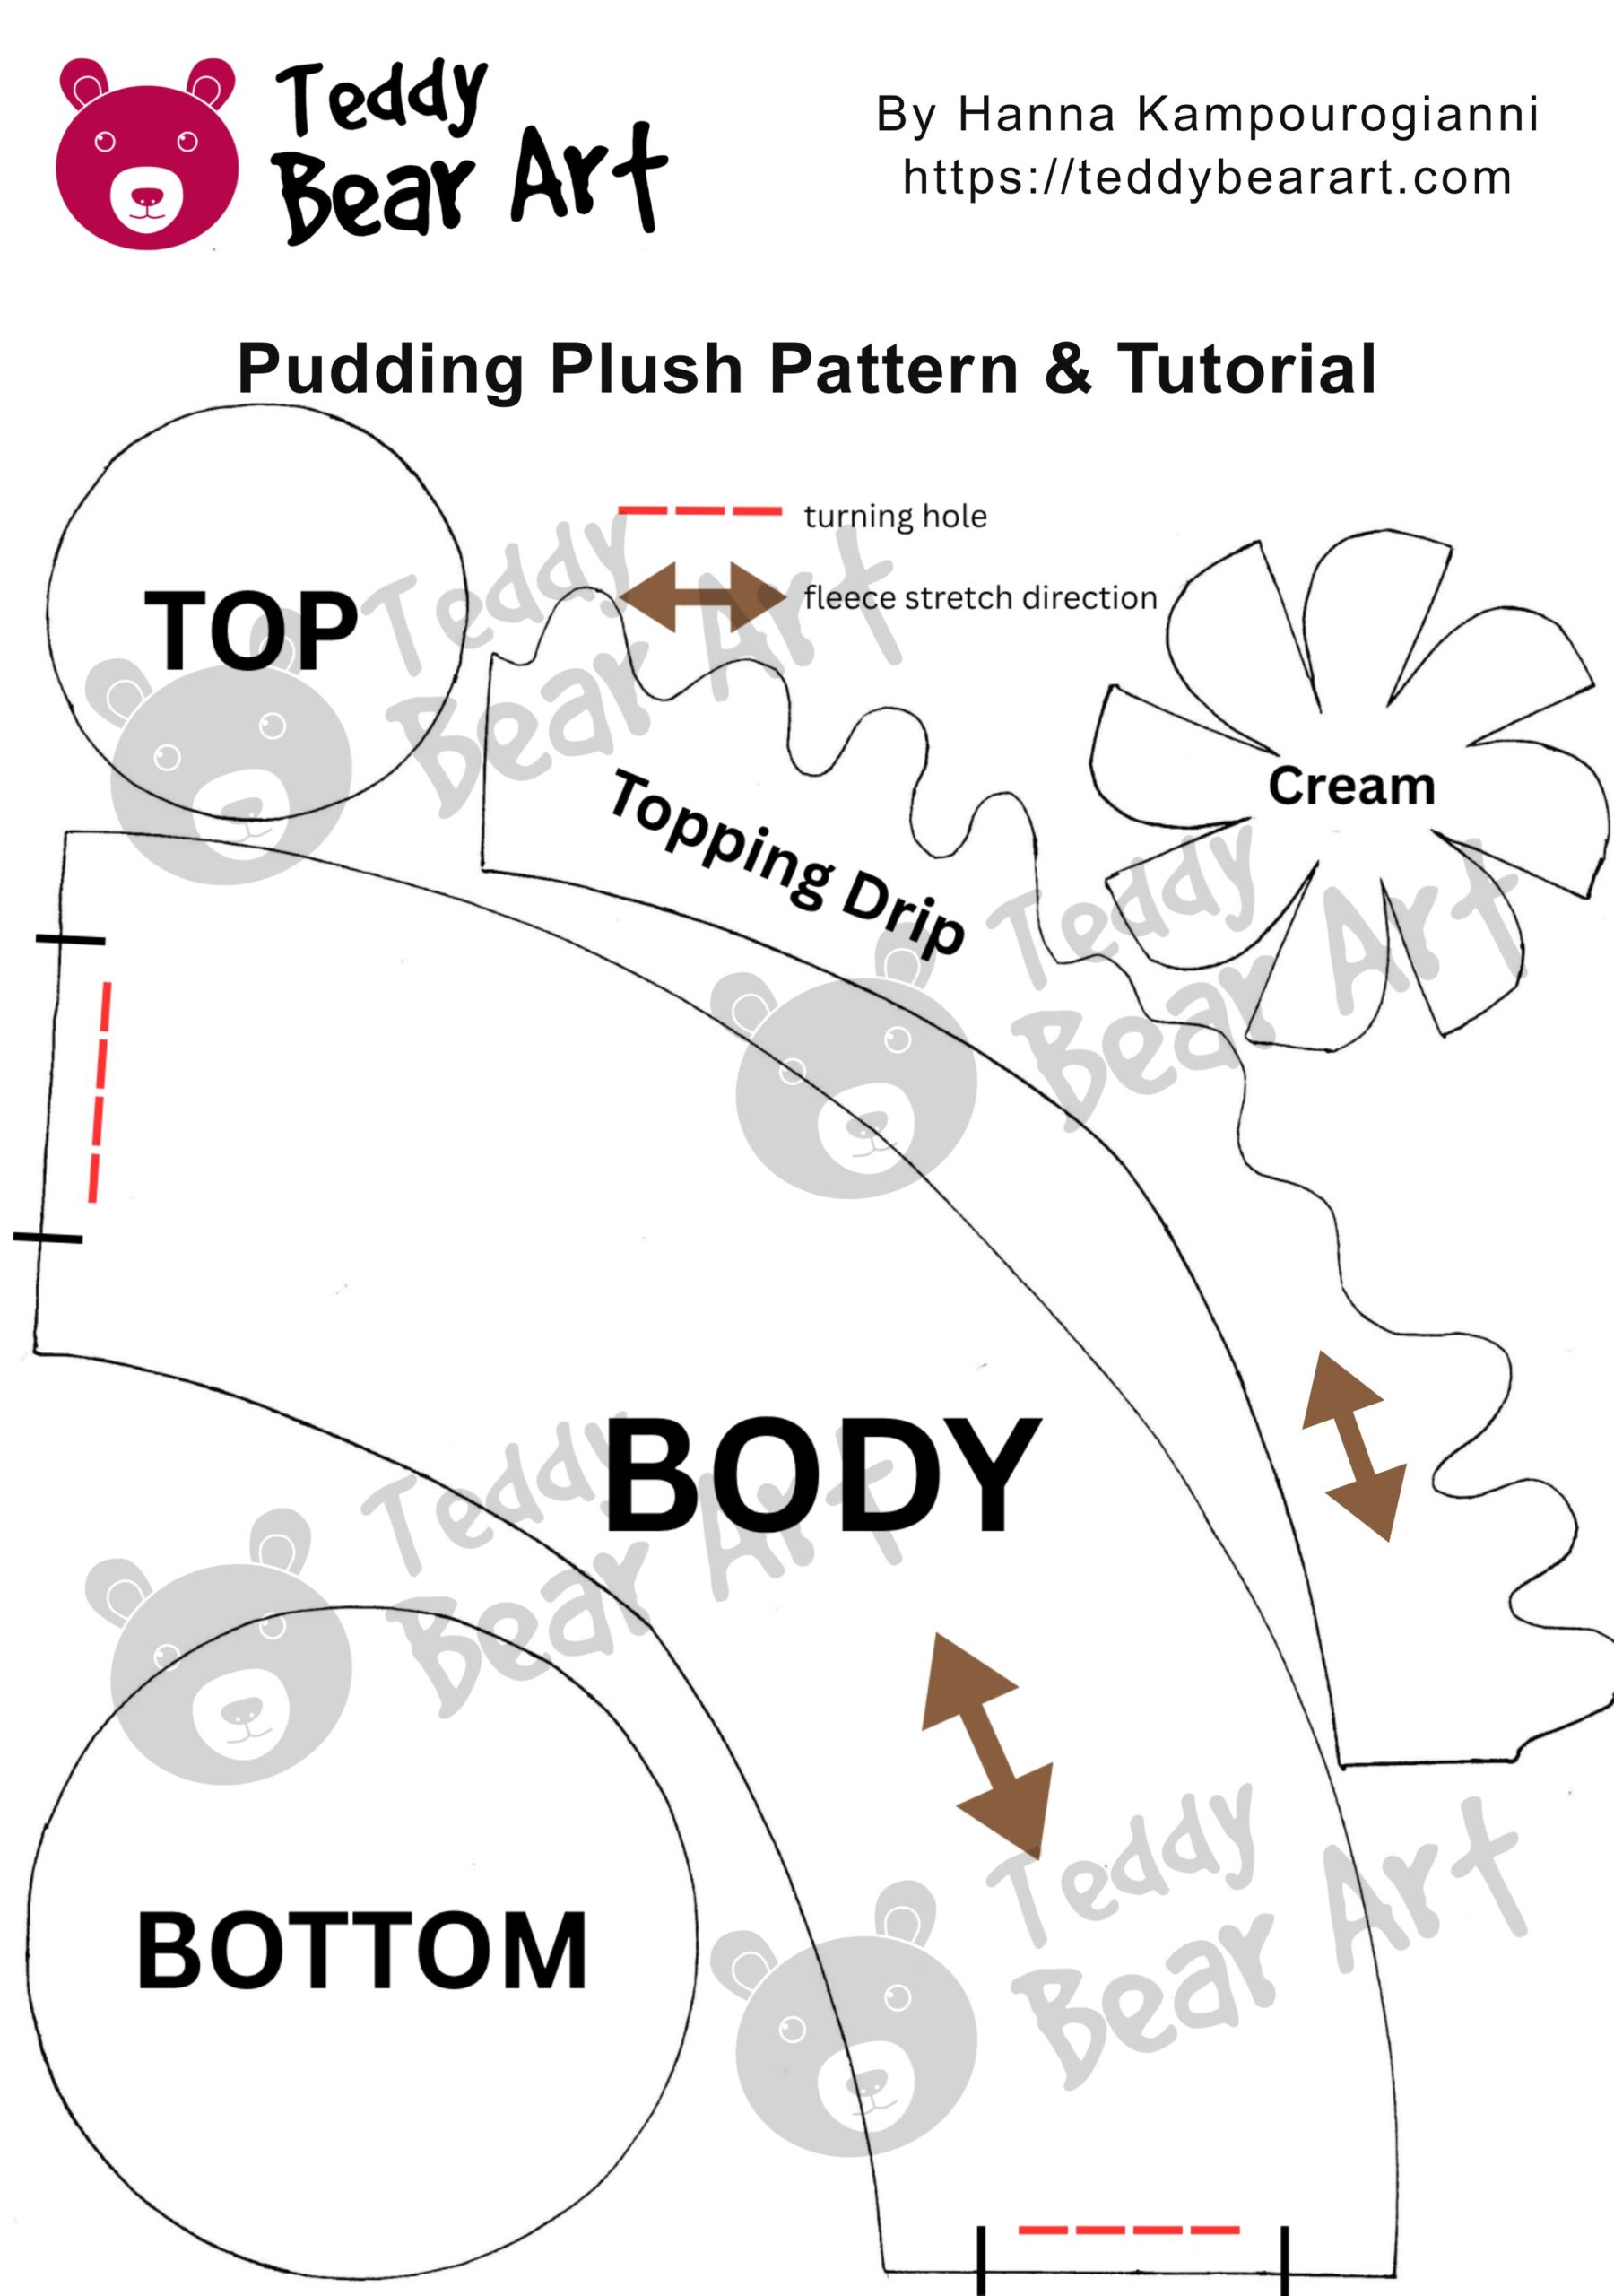
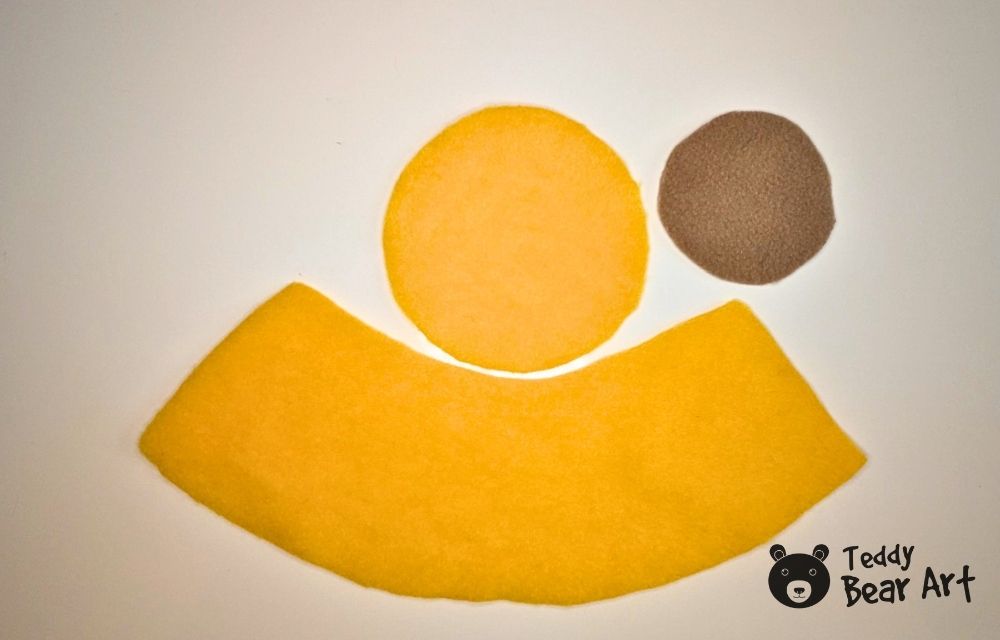
Notice that seam allowances are not included for the pudding body, top and bottom. For this project, it is fine to include 5 mm for seam allowances.
To download the pattern, follow the instructions below:
From a phone or tablet: There should be a similar option for mobile devices with Android or iOS. Click on the image. Save it by holding your finger on the image and selecting the “Save Image” option. Then, go to your photo gallery and print it (an option available).
From a computer: Click on the photo of the pattern you see below. In the new tab that will open, you press the right mouse button and select the “Save image as …” option. Then, you choose where the image will be saved on your computer.
Materials You Will Need
- Yellow or cream fleece for the pudding body
- Brown fleece for the chocolate or caramel topping
- White felt for the whipped cream
- Small red bead, red felt ball, or red fleece circle for the cherry
- Small piece of green embroidery floss, thread, or thin cord for the cherry stem
- Black beads, glass eyes, felt circles, or embroidery thread for the eyes
- Embroidery thread for the mouth
- Pink pastel, fabric blush, or soft pink pencil for the cheeks
- Polyester stuffing
- Matching sewing thread
- Needle
- Scissors
- Pins or sewing clips
- Fabric marker or pencil
- Sewing machine, optional
How to Sew a Pudding Plush Step by Step
Step 1: Sew the Pattern Pieces
Print the pattern and cut out the paper pieces. Place them on your fleece and felt, then trace around them.
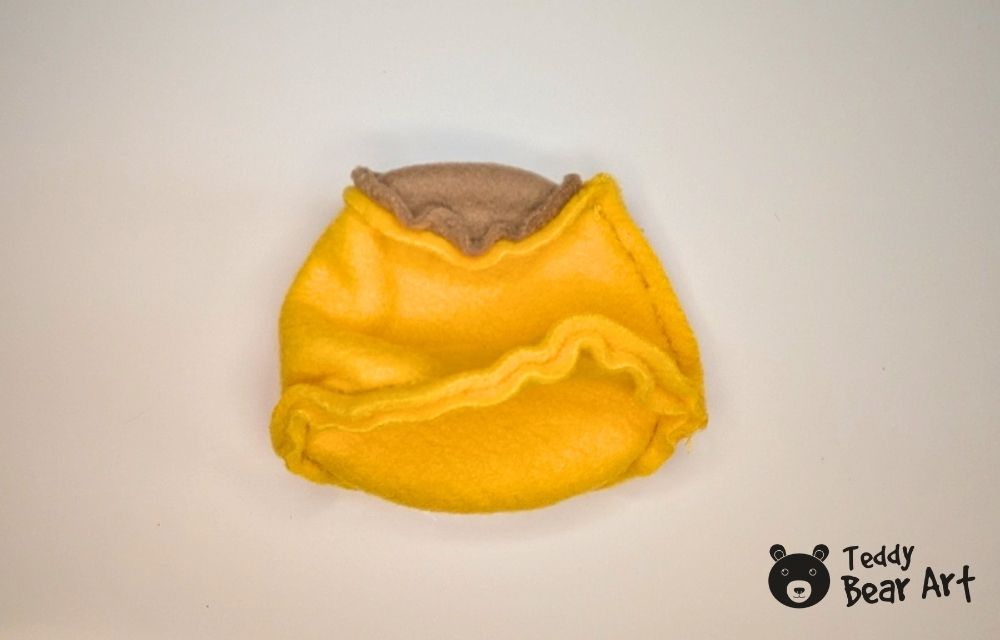
Take the main body piece and fold it with the right sides facing each other. Match the short edges.
Sew along this short side seam, leave an opening. Now you should have a soft fleece tube. This tube is the rounded side wall of your pudding plush.
Don’t stretch the fleece while sewing. Let it sit naturally. If the seam looks a little wavy at this stage, don’t worry too much. Stuffing will help smooth the shape later.
Take the top circle and pin it to the upper edge of the body tube, right sides together.
Use many pins. Really, more than you think you need. Sewing a circle into a tube can feel a little awkward, but good pinning makes everything easier.
Sew slowly around the circle. If you are using a machine, stop often and adjust the fabric. If you are sewing by hand, use small backstitches and keep checking that the edges stay aligned.
Now pin the bottom circle to the lower edge of the pudding body, again with right sides together.
Sew around the circle. Try to keep the seam smooth, but don’t stress over tiny imperfections. This is a soft handmade plush, not a factory toy, and those small details often disappear once the pudding is stuffed.
Step 2: Turn the Pudding Right Side Out and Stuff
Turn the pudding plush right side out through the opening.
Use your fingers to shape the top and bottom edges. A wooden stick or stuffing tool can help push the seams gently, but don’t use anything sharp. Fleece can stretch or tear if you push too hard.
At this point, the pudding may look a little flat or funny. That is completely normal. The magic happens after stuffing.
Start adding polyester stuffing in small pieces. Don’t put one large lump inside because it can make the plush uneven.
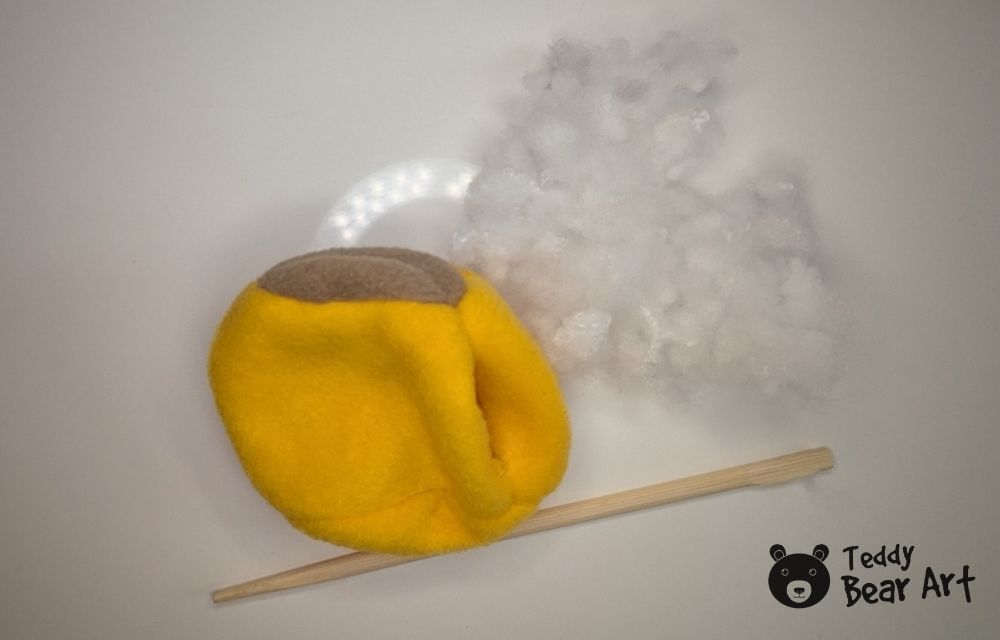
Fill the top edge, the sides, and the bottom slowly. Massage the stuffing with your fingers as you go. The goal is a rounded pudding shape that feels soft and slightly squishy.
Do not overstuff it too much. A pudding plush looks cuter when it has a gentle, soft shape, not a hard ball shape.
When you are happy with the shape, close the opening with a ladder stitch.
Pull the thread gently so the seam closes neatly. Make a few small securing stitches at the end and hide the thread tail inside the plush.
Give the body one more gentle squeeze and shape it with your hands.
Step 3: Add the Eyes
Before attaching the eyes, try different positions. Place them a little higher, then lower, then closer together.
The face changes so much with tiny adjustments. Higher eyes can look sweeter. Lower eyes can look funnier. Eyes placed closer together usually give a more kawaii look.
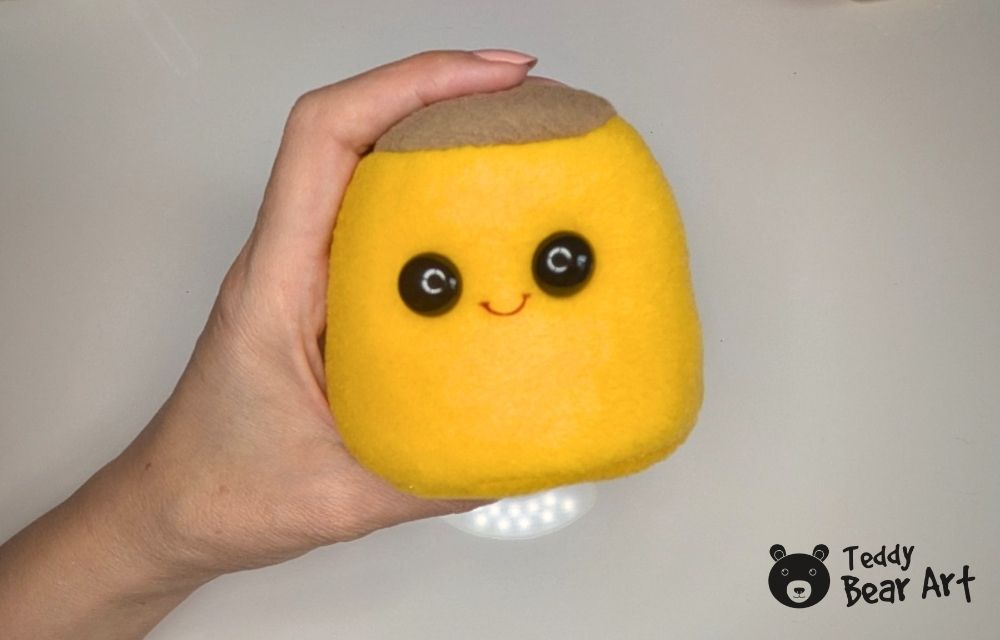
Use black beads, felt circles, glass eyes, or embroidered eyes. If this plush is for a small child, use embroidered or felt eyes instead of hard parts.
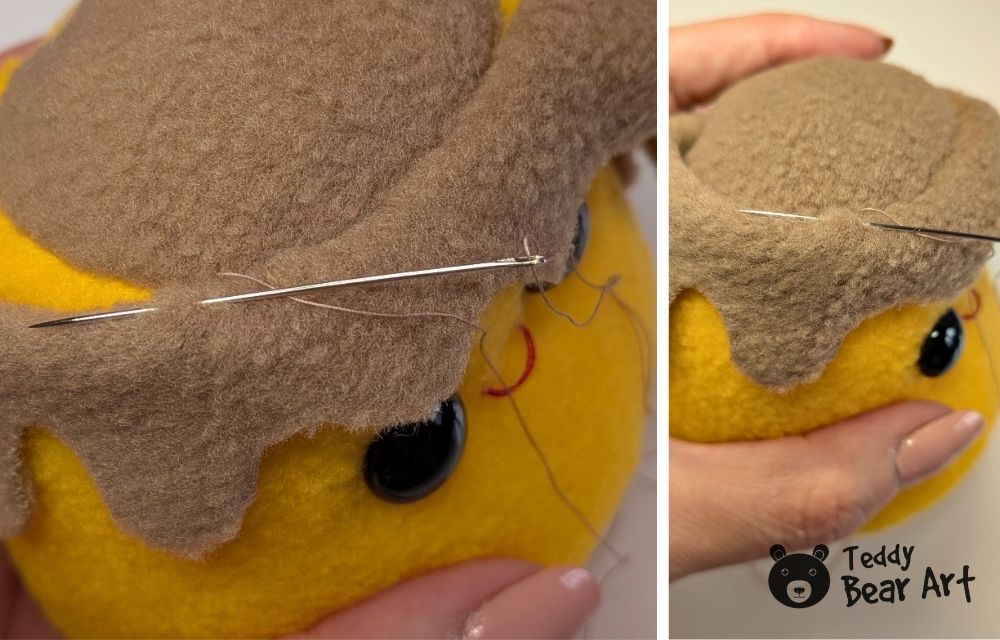
Step 4: Add the Chocolate Topping
Place the brown dripping topping around the upper part of the pudding.
Move it around until the drips look nice from the front. I like having one or two longer drips showing clearly because it makes the pudding look more playful.
Pin the topping in place. Sew it by hand with small neat stitches. You can stitch around the top edge first, then add a few tiny stitches along the drips if they need to sit flatter.
This part gives the plush its dessert personality, so take your time.
Use embroidery thread to make a small smile. Red, brown, or dark pink thread all work nicely.
Keep the mouth simple. A tiny curved smile is enough.
Add soft cheeks with pink pastel, fabric blush, or a very gentle touch of colored pencil. Start lightly. You can always add more color, but it is harder to remove too much blush.
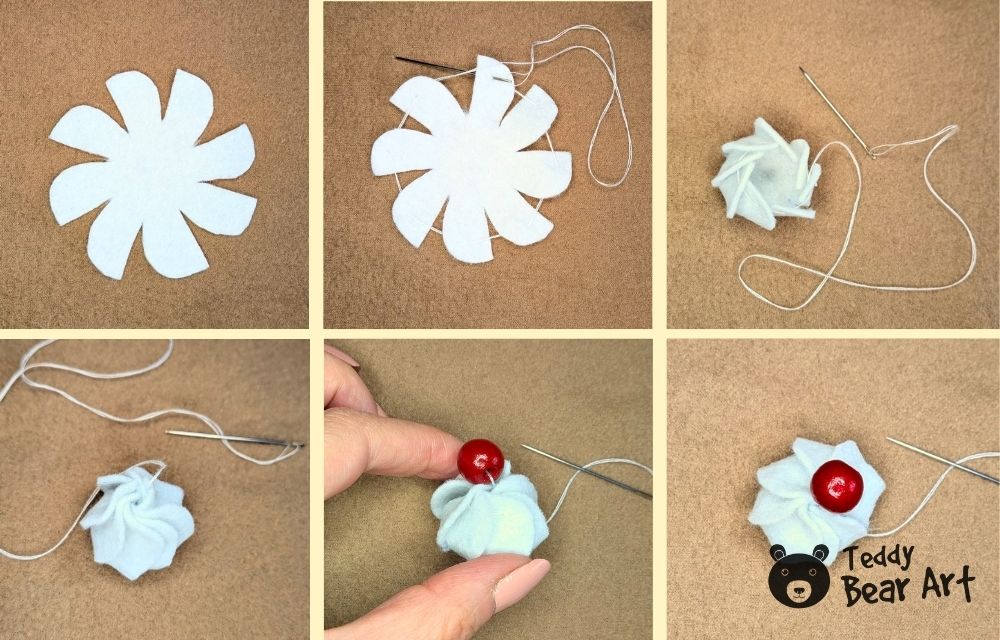
Step 5: Make the Whipped Cream
Take the white whipped cream piece. Sew small gathering stitches around the outer edge.
Pull the thread slowly. The piece will start to gather and curl into a little whipped cream shape. Adjust it with your fingers until you like the look.
Secure the top with a few stitches so the cream keeps its shape.
If you use felt, the whipped cream will look a bit more structured. If you use fleece, it will look softer and more plush.
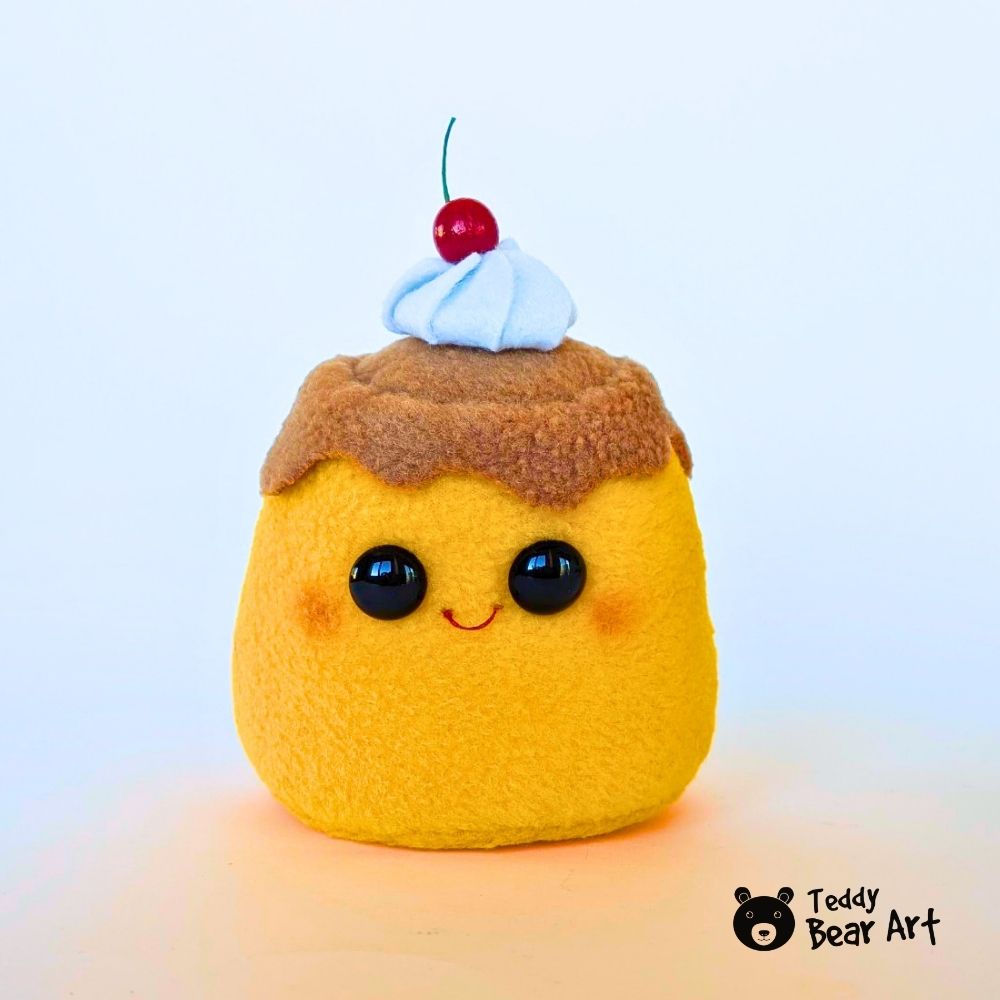
Add a small red bead, felt ball, or tiny stuffed red circle to the top of the whipped cream.
For the stem, use green embroidery floss, thread, or a very thin cord. Sew or glue it securely into place.
This is a tiny detail, but it makes the whole pudding plush look finished. Without the cherry, it is cute. With the cherry, it becomes a little character.
Place the whipped cream on top of the pudding, right in the center or slightly to one side if you want a playful look.
Sew it securely to the brown topping. Make several small stitches around the base so it does not wobble.
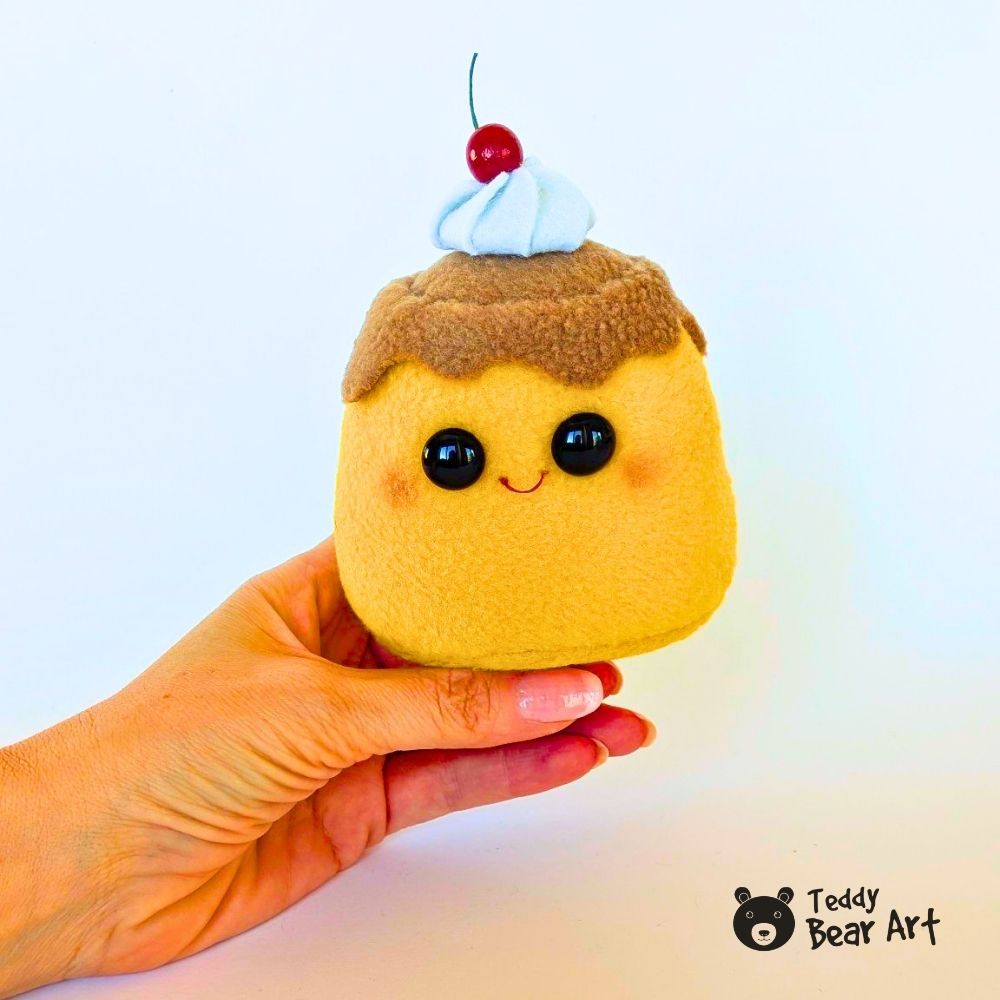
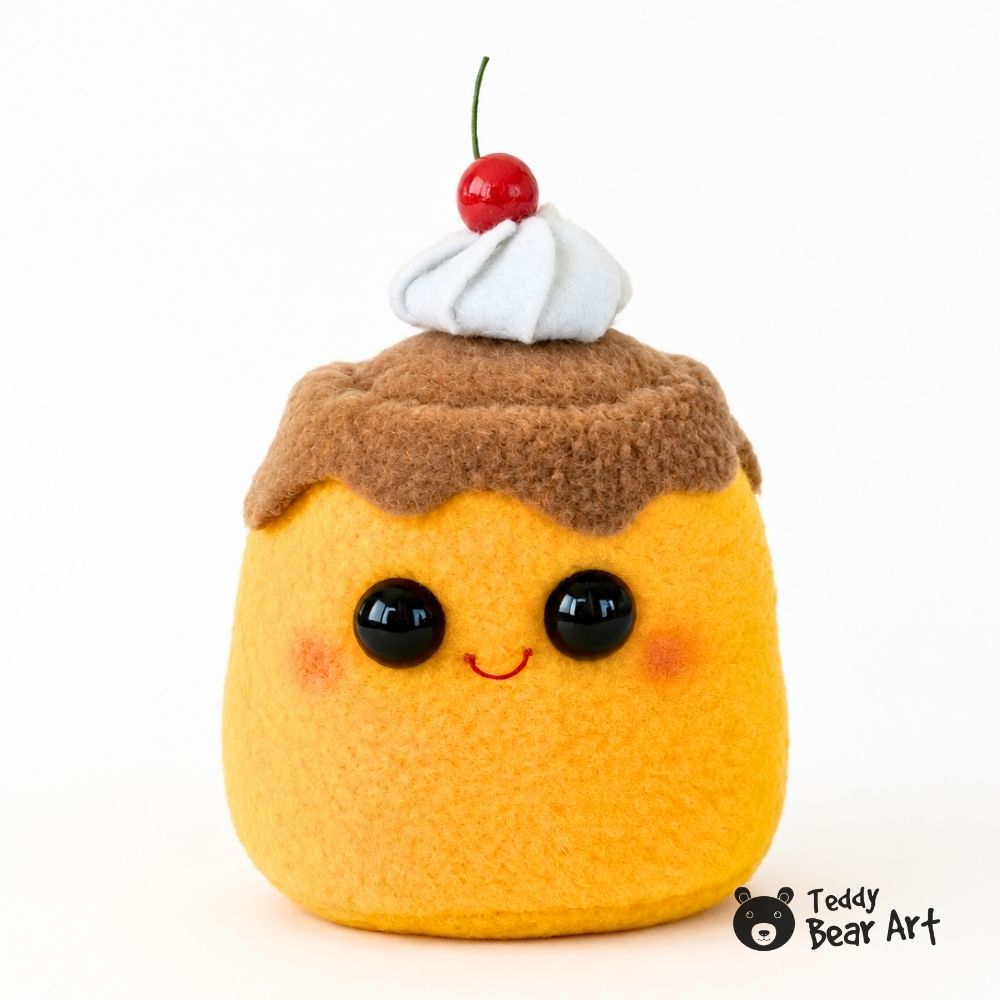
Now your kawaii pudding plush is finished.
Tips for Sewing This Pudding Plush
Use enough pins around the circles. This is the most important tip for a neat pudding body.
Cut the brown topping slowly, especially around the wavy sauce edge. A clean wavy edge makes the whole plush look nicer.
Stuff the pudding in small pieces. This helps avoid lumps and gives a smoother rounded shape.
Keep the face simple. Two small eyes, a tiny smile, and soft pink cheeks are perfect for this style.
Sew the decorative parts by hand. The topping, face, whipped cream, and cherry are easier to control with a needle than with a machine.
If you want a safer plush for children, use embroidered details instead of beads or hard eyes.
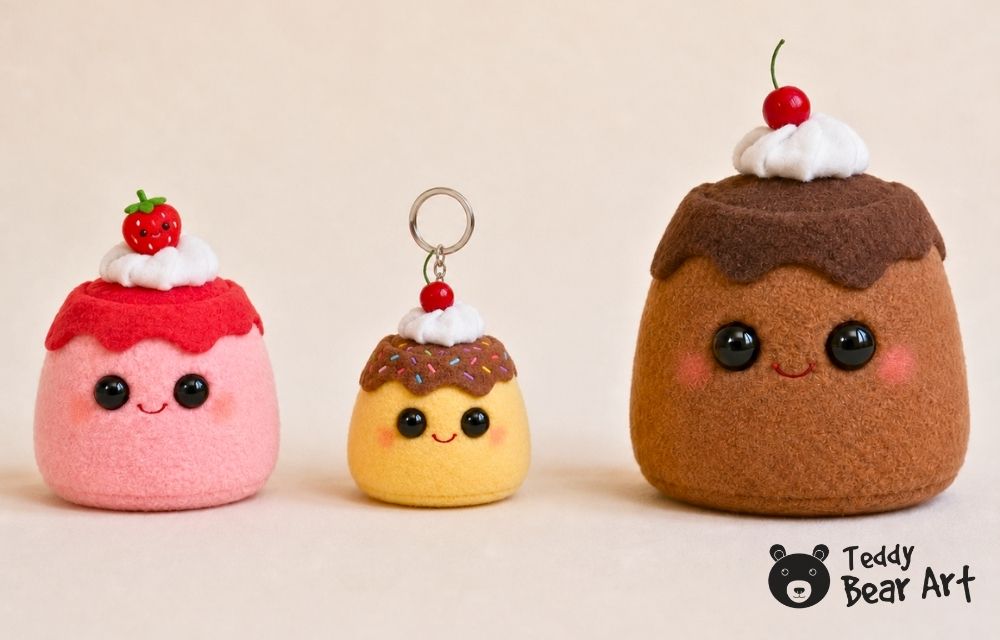
Variations for Your Pudding Plush
You can change this free pudding plush pattern in many cute ways.
Make a caramel flan plush with cream fleece and golden brown topping.
Make a chocolate pudding plush with brown fleece and darker chocolate sauce.
Make a strawberry pudding plush with pink fleece and red topping.
Reduce the pattern and create a tiny pudding keychain.
Add embroidered sprinkles to the topping.
Make sleepy eyes, a surprised mouth, or a tiny shy smile.
You can also make a whole dessert plush collection with different colors. A pudding, a drink plush, and an ice cream plush would look so cute together on a craft table or shelf.
Frequently Asked Questions
Is this pudding plush good for beginners?
Yes, this pudding plush is beginner-friendly, especially if you have already sewn a simple plush toy before. The main shape is not difficult, but the top and bottom circles need careful pinning.
Can I sew this pudding plush by hand?
Yes, you can sew the whole plush by hand. Use small backstitches for the main seams and a ladder stitch for closing the opening.
What fabric is best for this pudding plush pattern?
Fleece is the easiest fabric for the body because it is soft and forgiving. Felt works very well for the whipped cream and small details. Minky can also work, but it is more slippery.
Before You Go
I hope you enjoyed sewing this little pudding plush. It is a small project, but it has so much charm, from the soft rounded body to the tiny cherry on top.
Projects like this are perfect when you want to sew something cute without spending too much time or fabric. You can make one pudding plush as a sweet handmade gift, or create a few in different colors and give each one its own tiny personality.
If you try this free pudding plush pattern, have fun with the details. Change the face, play with the topping color, add sprinkles, or make a tiny version for a keychain. Sometimes the smallest plushies become the most lovable ones.
Get Free Patterns & Be the First to Know!
Want free teddy bear patterns, exclusive tutorials, and a chance to win craft supplies?
Sign up for our newsletter using the subscribe form in the middle of this article to receive new patterns, insider tips, and the latest news on teddy bear art. You’ll also automatically be entered into our annual giveaway for a chance to win teddy bear crafting materials.
Bonus entry: Save one of our pins on Pinterest to increase your chances of winning!
Let’s create, inspire, and craft beautiful teddy bears together!
Hi Hanna,
This pudding plush looks really cute, especially the whipped cream and cherry on top. I think my daughter would love something like this, so I saved the tutorial to try later.
I also liked your tip about not overstuffing dessert plushies, it makes sense because they look softer that way. Do you think fleece is the best fabric for a beginner, or would minky also work if someone is patient with it?
Hi, thank you so much!
I think your daughter would really enjoy this little pudding plush. It is such a sweet and simple project.
For a beginner, I would definitely recommend fleece first. It is easier to control, doesn’t shift as much, and it is much more forgiving when sewing small curved pieces. Minky can work too, but it needs more patience, more pins or clips, and slower sewing because it moves a lot.
So my advice would be: try the first pudding with fleece, and then, when you feel comfortable with the pattern, you can make a softer minky version too.
This is such a cute and creative sewing project! I really like how the tutorial breaks everything down step by step, making it feel doable even for beginners. I think projects like this are a great way to practice basic sewing skills while also ending up with something fun and unique. It is in my list already!
Thank you so much!